Upgrading and Servicing
Page 4
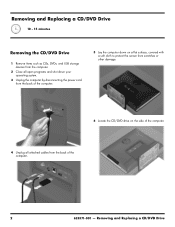
.../DVD Drive Removing and Replacing a CD/DVD Drive 10 - 15 minutes Removing the CD/DVD Drive 1 Remove items such as CDs, DVDs, and USB storage devices from the computer. 2 Close ... by disconnecting the power cord from the back of the computer. 5 Lay the computer down on a flat surface, covered with a soft cloth to protect the screen from scratches or other damage. 6 Locate the CD/DVD drive on the side of the computer. 4 Unplug all attached cables from the back of the...
.../DVD Drive Removing and Replacing a CD/DVD Drive 10 - 15 minutes Removing the CD/DVD Drive 1 Remove items such as CDs, DVDs, and USB storage devices from the computer. 2 Close ... by disconnecting the power cord from the back of the computer. 5 Lay the computer down on a flat surface, covered with a soft cloth to protect the screen from scratches or other damage. 6 Locate the CD/DVD drive on the side of the computer. 4 Unplug all attached cables from the back of the...
Upgrading and Servicing
Page 10
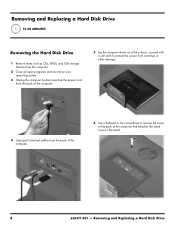
... Disk Drive Removing and Replacing a Hard Disk Drive 15-20 MINUTES Removing the Hard Disk Drive 1 Remove items such as CDs, DVDs, and USB storage devices from the computer. 2 Close ... by disconnecting the power cord from the back of the computer. 5 Lay the computer down on a flat surface, covered with a soft cloth to protect the screen from scratches or other damage. 4 Unplug all attached cables from the back of the computer. 6 Use a flathead or Torx screwdriver to remove the screw at...
... Disk Drive Removing and Replacing a Hard Disk Drive 15-20 MINUTES Removing the Hard Disk Drive 1 Remove items such as CDs, DVDs, and USB storage devices from the computer. 2 Close ... by disconnecting the power cord from the back of the computer. 5 Lay the computer down on a flat surface, covered with a soft cloth to protect the screen from scratches or other damage. 4 Unplug all attached cables from the back of the computer. 6 Use a flathead or Torx screwdriver to remove the screw at...
Upgrading and Servicing
Page 16
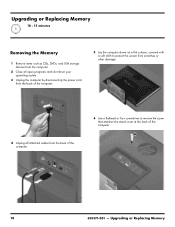
Upgrading or Replacing Memory 10 - 15 minutes Removing the Memory 1 Remove items such as CDs, DVDs, and USB storage devices from the computer. 2 Close all open programs and ... by disconnecting the power cord from the back of the computer. 5 Lay the computer down on a flat surface, covered with a soft cloth to protect the screen from scratches or other damage. 4 Unplug all attached cables from the back of the computer. 6 Use a flathead or Torx screwdriver to remove the screw that...
Upgrading or Replacing Memory 10 - 15 minutes Removing the Memory 1 Remove items such as CDs, DVDs, and USB storage devices from the computer. 2 Close all open programs and ... by disconnecting the power cord from the back of the computer. 5 Lay the computer down on a flat surface, covered with a soft cloth to protect the screen from scratches or other damage. 4 Unplug all attached cables from the back of the computer. 6 Use a flathead or Torx screwdriver to remove the screw that...
Upgrading and Servicing
Page 26
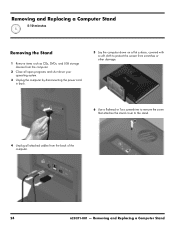
Removing and Replacing a Computer Stand 5-10 minutes 1 Removing the Stand 1 Remove items such as CDs, DVDs, and USB storage devices from the computer. 2 Close all open programs and ... system. 3 Unplug the computer by disconnecting the power cord in back. 5 Lay the computer down on a flat surface, covered with a soft cloth to protect the screen from scratches or other damage. 6 Use a flathead or Torx screwdriver to remove the screw that attaches the stand cover to the stand. 4 Unplug all attached...
Removing and Replacing a Computer Stand 5-10 minutes 1 Removing the Stand 1 Remove items such as CDs, DVDs, and USB storage devices from the computer. 2 Close all open programs and ... system. 3 Unplug the computer by disconnecting the power cord in back. 5 Lay the computer down on a flat surface, covered with a soft cloth to protect the screen from scratches or other damage. 6 Use a flathead or Torx screwdriver to remove the screw that attaches the stand cover to the stand. 4 Unplug all attached...
Getting Started Guide
Page 14
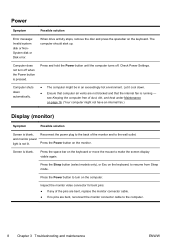
... Computer shuts down . ● Ensure that the internal fan is blank. Screen is running - Computer does not turn on the keyboard, to the wall outlet. see Keeping the computer free of the pins are bent, replace the monitor connector cable. ● If no pins are not blocked and ...that computer air vents are bent, reconnect the monitor connector cable to make the screen display visible again. Check Power Settings. Press the Power button...
... Computer shuts down . ● Ensure that the internal fan is blank. Screen is running - Computer does not turn on the keyboard, to the wall outlet. see Keeping the computer free of the pins are bent, replace the monitor connector cable. ● If no pins are not blocked and ...that computer air vents are bent, reconnect the monitor connector cable to make the screen display visible again. Check Power Settings. Press the Power button...

Getting Started Guide
Page 17
Replace the batteries in the keyboard and mouse. Your computer model might vary. Ensure that follow to repeat the procedure for the keyboard. 4. Click the left ... check for re-synchronization. Push and hold the Connect button (B) on the underside of the keyboard for 5 to 10 seconds until the LED on the screen.
Replace the batteries in the keyboard and mouse. Your computer model might vary. Ensure that follow to repeat the procedure for the keyboard. 4. Click the left ... check for re-synchronization. Push and hold the Connect button (B) on the underside of the keyboard for 5 to 10 seconds until the LED on the screen.

Getting Started Guide
Page 18
...speakers are connected to your ISP, and start automatically. Log in monitor speakers, use an High-Definition Multimedia Interface (HDMI) connector on -screen display (OSD) and ensure that audio is enabled and that they are connected to connect your computer, and then unplug and reconnect the... Symptom Possible solution Volume is very low or unsatisfactory. Ensure that you want to the Audio Out (lime green) connector on . Replace the non-powered speakers with powered speakers. If you connected the speakers to hear sound during the initial setup of the computer. (Additional...
...speakers are connected to your ISP, and start automatically. Log in monitor speakers, use an High-Definition Multimedia Interface (HDMI) connector on -screen display (OSD) and ensure that audio is enabled and that they are connected to connect your computer, and then unplug and reconnect the... Symptom Possible solution Volume is very low or unsatisfactory. Ensure that you want to the Audio Out (lime green) connector on . Replace the non-powered speakers with powered speakers. If you connected the speakers to hear sound during the initial setup of the computer. (Additional...
Getting Started Guide
Page 23
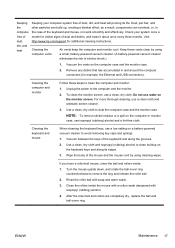
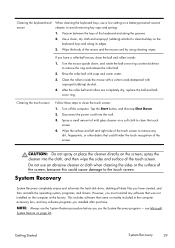
... and other particles can overheat, or, in and around the computer connectors (for example, the Ethernet and USB connectors). Visit http://www.hp.com/support for visible signs of the keyboard and along its life. Cleaning the computer and monitor Follow these vents clean by using a ...and the monitor case. 2. Unplug the power to clean buildup on the monitor screen. as a result, components can build up, creating a blanket effect; After the roller ball and rollers are completely dry, replace the ball and ball-cover ring. Remove any debris that has accumulated in the...
... and other particles can overheat, or, in and around the computer connectors (for example, the Ethernet and USB connectors). Visit http://www.hp.com/support for visible signs of the keyboard and along its life. Cleaning the computer and monitor Follow these vents clean by using a ...and the monitor case. 2. Unplug the power to clean buildup on the monitor screen. as a result, components can build up, creating a blanket effect; After the roller ball and rollers are completely dry, replace the ball and ball-cover ring. Remove any debris that has accumulated in the...
Getting Started Guide
Page 24
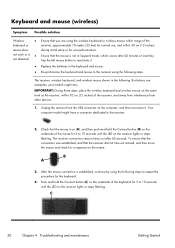
... using the following steps to the receiver. 2. your models might have a connector dedicated to repeat the procedure for a response on the screen. Push and hold the Connect button (B) on the underside of the keyboard for re-synchronization. not work or is ● Ensure that... after 20 minutes of the receiver, and away from interference from the USB connector on the computer, and then reconnect it . ● Replace the batteries in Suspend mode, which occurs after 60 seconds. C 20 Chapter 4 Troubleshooting and maintenance Getting Started IMPORTANT: During these steps,...
... using the following steps to the receiver. 2. your models might have a connector dedicated to repeat the procedure for a response on the screen. Push and hold the Connect button (B) on the underside of the keyboard for re-synchronization. not work or is ● Ensure that... after 20 minutes of the receiver, and away from interference from the USB connector on the computer, and then reconnect it . ● Replace the batteries in Suspend mode, which occurs after 60 seconds. C 20 Chapter 4 Troubleshooting and maintenance Getting Started IMPORTANT: During these steps,...
Getting Started Guide
Page 33
... isopropyl (rubbing) alcohol to avoid removing key caps and springs. 1. Rinse the roller ball with isopropyl (rubbing) alcohol. 4. Cleaning the touch screen Follow these steps to remove the ring and release the roller ball. 2. Clean the rollers inside : 1. Turn off the computer. Vacuum between the...small amount of the touch screen. see Microsoft System Restore on the screen; Wipe the surface and left and right side of the mouse and the mouse cord by using cleaning wipes. After the roller ball and rollers are completely dry, replace the ball and ballcover ring....
... isopropyl (rubbing) alcohol to avoid removing key caps and springs. 1. Rinse the roller ball with isopropyl (rubbing) alcohol. 4. Cleaning the touch screen Follow these steps to remove the ring and release the roller ball. 2. Clean the rollers inside : 1. Turn off the computer. Vacuum between the...small amount of the touch screen. see Microsoft System Restore on the screen; Wipe the surface and left and right side of the mouse and the mouse cord by using cleaning wipes. After the roller ball and rollers are completely dry, replace the ball and ballcover ring....


