
Upgrading and Servicing
Page 1
Removing and Replacing a CD/DVD Drive ........2 Removing the CD/DVD Drive 2 Installing a New CD/DVD Drive 4 Removing and Replacing a Hard Disk Drive .....8 Removing the Hard Disk Drive 8 Installing a New Hard Disk Drive 10 Upgrading or Replacing Memory 14 Removing the Memory 14 Installing a New Memory Card 18 Troubleshooting 22 Removing and Replacing a Computer Stand ..24 Removing the Stand 24 Installing a New Stand 25 UPGRADING AND SERVICING GUIDE HP TouchSmart310 Computer features may vary by model.
Removing and Replacing a CD/DVD Drive ........2 Removing the CD/DVD Drive 2 Installing a New CD/DVD Drive 4 Removing and Replacing a Hard Disk Drive .....8 Removing the Hard Disk Drive 8 Installing a New Hard Disk Drive 10 Upgrading or Replacing Memory 14 Removing the Memory 14 Installing a New Memory Card 18 Troubleshooting 22 Removing and Replacing a Computer Stand ..24 Removing the Stand 24 Installing a New Stand 25 UPGRADING AND SERVICING GUIDE HP TouchSmart310 Computer features may vary by model.
Upgrading and Servicing
Page 15
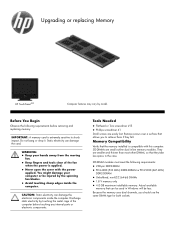
...Needed Flathead or Torx screwdriver #15 Phillips screwdriver #1 Small screws are small outline dual inline memory modules. IMPORTANT: A memory card is compatible with the power applied. SO-DIMM modules must meet the following requirements before touching any internal parts... fan. Keep fingers and tools clear of the computer before removing and replacing memory. Remove screws over a surface that they fall. Upgrading or replacing Memory HP TouchSmart310 Computer features may vary by the spinning fan blades. Avoid touching sharp edges...
...Needed Flathead or Torx screwdriver #15 Phillips screwdriver #1 Small screws are small outline dual inline memory modules. IMPORTANT: A memory card is compatible with the power applied. SO-DIMM modules must meet the following requirements before touching any internal parts... fan. Keep fingers and tools clear of the computer before removing and replacing memory. Remove screws over a surface that they fall. Upgrading or replacing Memory HP TouchSmart310 Computer features may vary by the spinning fan blades. Avoid touching sharp edges...
Upgrading and Servicing
Page 16
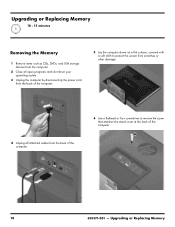
Upgrading or Replacing Memory 10 - 15 minutes Removing the Memory 1 Remove items such as CDs, DVDs, and USB storage devices from the computer. 2 Close all open programs and shut down your operating system. 3 Unplug the ... a flathead or Torx screwdriver to remove the screw that attaches the stand cover at the back of the computer. 14 628371-001 - Upgrading or Replacing Memory
Upgrading or Replacing Memory 10 - 15 minutes Removing the Memory 1 Remove items such as CDs, DVDs, and USB storage devices from the computer. 2 Close all open programs and shut down your operating system. 3 Unplug the ... a flathead or Torx screwdriver to remove the screw that attaches the stand cover at the back of the computer. 14 628371-001 - Upgrading or Replacing Memory

Upgrading and Servicing
Page 17
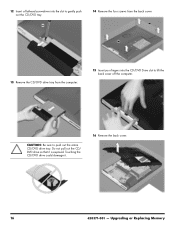
7 Lift the bottom edges of the stand cover to remove it from the stand. 9 Lift the stand to remove it from the computer. 8 Remove the four screws that attach the stand to the back of the computer, using a flathead or Torx screwdriver. 10 Insert a large paper clip into the hole on the CD/DVD drive cover to release the CD/DVD drive tray. 11 Pull the CD/DVD drive tray out slightly and use a #1 Phillips screwdriver to loosen the two captive screws. 628371-001 - Upgrading or Replacing Memory 15
7 Lift the bottom edges of the stand cover to remove it from the stand. 9 Lift the stand to remove it from the computer. 8 Remove the four screws that attach the stand to the back of the computer, using a flathead or Torx screwdriver. 10 Insert a large paper clip into the hole on the CD/DVD drive cover to release the CD/DVD drive tray. 11 Pull the CD/DVD drive tray out slightly and use a #1 Phillips screwdriver to loosen the two captive screws. 628371-001 - Upgrading or Replacing Memory 15
Upgrading and Servicing
Page 18
Touching the CD/DVD drive could damage it is exposed. CAUTION: Be sure to lift the back cover off the computer. 12 Insert a flathead screwdriver into the slot to gently push out the CD/DVD tray. 14 Remove the four screws from the back cover. 13 Remove the CD/DVD drive tray from the computer. 15 Insert your fingers into the CD/DVD Drive slot to push out the entire CD/DVD drive tray. Do not pull out the CD/ DVD drive so that it . 16 Remove the back cover. 16 628371-001 - Upgrading or Replacing Memory
Touching the CD/DVD drive could damage it is exposed. CAUTION: Be sure to lift the back cover off the computer. 12 Insert a flathead screwdriver into the slot to gently push out the CD/DVD tray. 14 Remove the four screws from the back cover. 13 Remove the CD/DVD drive tray from the computer. 15 Insert your fingers into the CD/DVD Drive slot to push out the entire CD/DVD drive tray. Do not pull out the CD/ DVD drive so that it . 16 Remove the back cover. 16 628371-001 - Upgrading or Replacing Memory

Upgrading and Servicing
Page 19
17 Locate the memory cards on the retaining clips at the left and right sides of the computer. 19 Holding the memory card by its edges, remove it . 20 If you need to remove the lower memory card, repeat steps 19 and 20. 628371-001 - IMPORTANT: If you are removing both cards, you must remove the upper one before removing the lower one. 18 Use your fingers to press outwards on the back of the top memory card to release it from the compartment. Upgrading or Replacing Memory 17
17 Locate the memory cards on the retaining clips at the left and right sides of the computer. 19 Holding the memory card by its edges, remove it . 20 If you need to remove the lower memory card, repeat steps 19 and 20. 628371-001 - IMPORTANT: If you are removing both cards, you must remove the upper one before removing the lower one. 18 Use your fingers to press outwards on the back of the top memory card to release it from the compartment. Upgrading or Replacing Memory 17
Upgrading and Servicing
Page 20
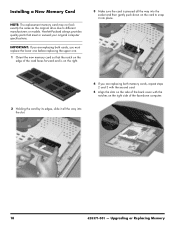
...push down on the right side of the back cover with the notches on the card to different manufacturers or models. Installing a New Memory Card NOTE: The replacement memory card may not look exactly the same as the original drive due to snap it into place. 2 Holding the card by its ... replacing both cards, you must replace the lower one before replacing the upper one. 1 Orient the new memory card so that meet or exceed your original computer specifications. IMPORTANT: If you are replacing both memory cards, repeat steps 2 and 3 with the second card. 5 Align the slots on the side of the...
...push down on the right side of the back cover with the notches on the card to different manufacturers or models. Installing a New Memory Card NOTE: The replacement memory card may not look exactly the same as the original drive due to snap it into place. 2 Holding the card by its ... replacing both cards, you must replace the lower one before replacing the upper one. 1 Orient the new memory card so that meet or exceed your original computer specifications. IMPORTANT: If you are replacing both memory cards, repeat steps 2 and 3 with the second card. 5 Align the slots on the side of the...
Upgrading and Servicing
Page 21
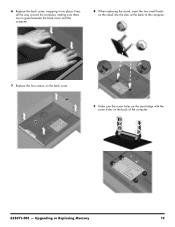
Press all the way around the computer, making sure there are no gaps between the back cover and the computer. 8 When replacing the stand, insert the two small hooks on the back of the computer. 7 Replace the four screws on the back cover. 9 Make sure the screw holes on the stand align with the screw holes on the stand into place. 6 Replace the back cover, snapping it into the slots at the back of the computer. 628371-001 - Upgrading or Replacing Memory 19
Press all the way around the computer, making sure there are no gaps between the back cover and the computer. 8 When replacing the stand, insert the two small hooks on the back of the computer. 7 Replace the four screws on the back cover. 9 Make sure the screw holes on the stand align with the screw holes on the stand into place. 6 Replace the back cover, snapping it into the slots at the back of the computer. 628371-001 - Upgrading or Replacing Memory 19

Upgrading and Servicing
Page 22
Upgrading or Replacing Memory 10 Replace the stand. 13 Tighten the screw that secures the stand cover to the back of the computer. 11 Use a flathead or Torx screwdriver to replace the four screws on the stand. 14 Slide the CD/DVD drive assembly partially into the computer. 12 Replace the stand cover on the stand at the back of the computer. 15 Insert a flathead screwdriver into the slot to push the CD/DVD drive in further. 20 628371-001 -
Upgrading or Replacing Memory 10 Replace the stand. 13 Tighten the screw that secures the stand cover to the back of the computer. 11 Use a flathead or Torx screwdriver to replace the four screws on the stand. 14 Slide the CD/DVD drive assembly partially into the computer. 12 Replace the stand cover on the stand at the back of the computer. 15 Insert a flathead screwdriver into the slot to push the CD/DVD drive in further. 20 628371-001 -
Upgrading and Servicing
Page 23
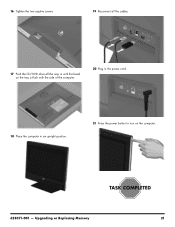
Upgrading or Replacing Memory 21 16 Tighten the two captive screws. 19 Reconnect all the cables. 17 Push the CD/DVD drive all the way in until the bezel on the tray is flush with the side of the computer. 20 Plug in the power cord. 18 Place the computer in an upright position. 21 Press the power button to turn on the computer. 628371-001 -
Upgrading or Replacing Memory 21 16 Tighten the two captive screws. 19 Reconnect all the cables. 17 Push the CD/DVD drive all the way in until the bezel on the tray is flush with the side of the computer. 20 Plug in the power cord. 18 Place the computer in an upright position. 21 Press the power button to turn on the computer. 628371-001 -

Upgrading and Servicing
Page 24
To install it correctly, make sure it into the compartment and then push down on , turn the computer off and unplug the power cord, then open up the memory compartment and make sure the memory card is firmly seated. Upgrading or Replacing Memory Troubleshooting If the computer displays a memory error after you have turned it back on it to snap it inserted all the way into place. 22 628371-001 -
To install it correctly, make sure it into the compartment and then push down on , turn the computer off and unplug the power cord, then open up the memory compartment and make sure the memory card is firmly seated. Upgrading or Replacing Memory Troubleshooting If the computer displays a memory error after you have turned it back on it to snap it inserted all the way into place. 22 628371-001 -
Getting Started Guide
Page 3
...the size advertised. Because of the different measuring systems, you may see a difference between the size reported by manufacturers in terms of memory For computers with the Microsoft® Windows® operating system preinstalled may not be smaller than the size stated in the product specifications,... in the computer window because it shows information about one gigabyte (GB) is equal to HP and Compaq systems. The memory above 3 GB may appear to 1,073,741,824 bytes. Note about systems configured with 4 GB of decimal (base 10) ...
...the size advertised. Because of the different measuring systems, you may see a difference between the size reported by manufacturers in terms of memory For computers with the Microsoft® Windows® operating system preinstalled may not be smaller than the size stated in the product specifications,... in the computer window because it shows information about one gigabyte (GB) is equal to HP and Compaq systems. The memory above 3 GB may appear to 1,073,741,824 bytes. Note about systems configured with 4 GB of decimal (base 10) ...
Getting Started Guide
Page 11
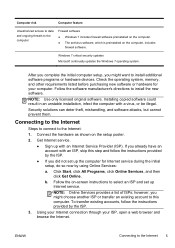
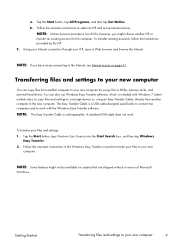
... computer. NOTE: Online Services provides a list of ISPs; b. Using your Internet connection through your computer. NOTE: Use only licensed original software. Check the operating system, memory, and other requirements listed before purchasing new software or hardware for Internet service during the initial setup, do so now by using Online Services: a. Connecting...
... computer. NOTE: Online Services provides a list of ISPs; b. Using your Internet connection through your computer. NOTE: Use only licensed original software. Check the operating system, memory, and other requirements listed before purchasing new software or hardware for Internet service during the initial setup, do so now by using Online Services: a. Connecting...
Getting Started Guide
Page 12
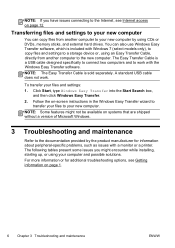
... be available on systems that are shipped without a version of Microsoft Windows. 3 Troubleshooting and maintenance Refer to the documentation provided by using CDs or DVDs, memory sticks, and external hard drives. To transfer your computer and possible solutions. The following tables present some issues you have issues connecting to the Internet...
... be available on systems that are shipped without a version of Microsoft Windows. 3 Troubleshooting and maintenance Refer to the documentation provided by using CDs or DVDs, memory sticks, and external hard drives. To transfer your computer and possible solutions. The following tables present some issues you have issues connecting to the Internet...
Getting Started Guide
Page 3
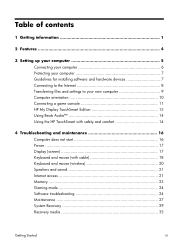
...Internet 8 Transferring files and settings to your new computer 9 Computer orientation 10 Connecting a game console 11 HP My Display TouchSmart Edition 13 Using Beats Audio 14 Using the HP TouchSmart with safety and comfort 14 4 Troubleshooting and maintenance 16 Computer does not start 16 Power 17 Display (...screen 17 Keyboard and mouse (with cable 18 Keyboard and mouse (wireless 20 Speakers and sound 21 Internet access 21 Memory 23 Gaming ...
...Internet 8 Transferring files and settings to your new computer 9 Computer orientation 10 Connecting a game console 11 HP My Display TouchSmart Edition 13 Using Beats Audio 14 Using the HP TouchSmart with safety and comfort 14 4 Troubleshooting and maintenance 16 Computer does not start 16 Power 17 Display (...screen 17 Keyboard and mouse (with cable 18 Keyboard and mouse (wireless 20 Speakers and sound 21 Internet access 21 Memory 23 Gaming ...
Getting Started Guide
Page 11
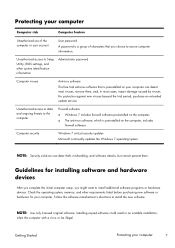
..., which is preinstalled on the computer, includes firewall software. NOTE: Security solutions can detect most cases, repair damage caused by viruses. Check the operating system, memory, and other system identification information Administrator password Computer viruses Antivirus software The free trial antivirus software that you might want to secure computer information. For...
..., which is preinstalled on the computer, includes firewall software. NOTE: Security solutions can detect most cases, repair damage caused by viruses. Check the operating system, memory, and other system identification information Administrator password Computer viruses Antivirus software The free trial antivirus software that you might want to secure computer information. For...
Getting Started Guide
Page 13
... 21. A standard USB cable does not work with Windows 7 (select models only), to copy files and settings to a storage device or, using CDs or DVDs, memory sticks, and external hard drives. NOTE: Some features might choose another ISP or transfer an existing account to the new computer. To transfer existing accounts...
... 21. A standard USB cable does not work with Windows 7 (select models only), to copy files and settings to a storage device or, using CDs or DVDs, memory sticks, and external hard drives. NOTE: Some features might choose another ISP or transfer an existing account to the new computer. To transfer existing accounts...
Getting Started Guide
Page 27
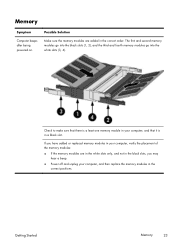
If you have added or replaced memory modules in your computer, verify the placement of the memory modules: ● If the memory modules are added in the correct order. The first and second memory modules go into the black slots (1, 2), and the third and fourth memory modules go into the white slots (3, 4). Possible Solution Make sure...
If you have added or replaced memory modules in your computer, verify the placement of the memory modules: ● If the memory modules are added in the correct order. The first and second memory modules go into the black slots (1, 2), and the third and fourth memory modules go into the white slots (3, 4). Possible Solution Make sure...


