

HP Device Manager User Manual
Page 8
6 Advanced Tasks Add-ons ...120 Introduction ...120 Applying an Add-on to a Thin Client 120 Images ...130 Introduction ...130 Images & Repository Management 130 Client BIOS Settings for PXE 130 Pulling a PXE Image From a Client 131 Pushing a PXE Image to a Client 134 Cloning an Image from an HP Thin Client 137 Updating Images ...140 Changing Registry Settings ...143 Getting Registry Settings...
6 Advanced Tasks Add-ons ...120 Introduction ...120 Applying an Add-on to a Thin Client 120 Images ...130 Introduction ...130 Images & Repository Management 130 Client BIOS Settings for PXE 130 Pulling a PXE Image From a Client 131 Pushing a PXE Image to a Client 134 Cloning an Image from an HP Thin Client 137 Updating Images ...140 Changing Registry Settings ...143 Getting Registry Settings...

HP Device Manager User Manual
Page 81
... using the templates available on the Operations tab, or by selecting from the popup menu when you to reboot, shutdown and wake a client remotely. Select a device from the pop- To shutdown, reboot, or wake a client: 1. Click OK to inform the user that the device will appear. NOTE: To wake... a client, the Wake On LAN support of the client device to perform the task. up menu. 3. When the client receives the task, a warning dialog box will appear on the screen of the client's BIOS must be shutdown or restarted. The Task Editor dialog box...
... using the templates available on the Operations tab, or by selecting from the popup menu when you to reboot, shutdown and wake a client remotely. Select a device from the pop- To shutdown, reboot, or wake a client: 1. Click OK to inform the user that the device will appear. NOTE: To wake... a client, the Wake On LAN support of the client device to perform the task. up menu. 3. When the client receives the task, a warning dialog box will appear on the screen of the client's BIOS must be shutdown or restarted. The Task Editor dialog box...

HP Device Manager User Manual
Page 140
...functions of reading and writing images depending on whether or not a PXE Server is only required on a thin client's flash storage. Should you to and from supported clients. It also enables you to recreate the digital signature. You can transfer image files between FTP Repositories. ...If the image file is from a reliable source, simply click Sign to sign and verify PXE images. Client BIOS Settings for PXE NOTE: This procedure is being used. HP Device Manager manages images through the Repository Management tool, which also provides utilities to other FTP Repository. ...
...functions of reading and writing images depending on whether or not a PXE Server is only required on a thin client's flash storage. Should you to and from supported clients. It also enables you to recreate the digital signature. You can transfer image files between FTP Repositories. ...If the image file is from a reliable source, simply click Sign to sign and verify PXE images. Client BIOS Settings for PXE NOTE: This procedure is being used. HP Device Manager manages images through the Repository Management tool, which also provides utilities to other FTP Repository. ...
HP Device Manager User Manual
Page 141
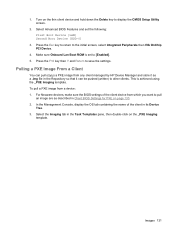
... In the Management Console, display the OS tab containing the name of the client device from which you want to [Enabled]. 5. Select Advanced BIOS Features and set to pull an image are as a .img file in Client BIOS Settings for PXE on page 130. 2. Make sure Onboard Lan Boot ROM ...For Neoware devices, make sure the BIOS settings of the client in the Task Templates pane, then double-click on the thin client device and hold down the Delete key to other clients. Turn on the _PXE Imaging template. 1. To pull a PXE image from any client managed by HP Device Manager and store it as...
... In the Management Console, display the OS tab containing the name of the client device from which you want to [Enabled]. 5. Select Advanced BIOS Features and set to pull an image are as a .img file in Client BIOS Settings for PXE on page 130. 2. Make sure Onboard Lan Boot ROM ...For Neoware devices, make sure the BIOS settings of the client in the Task Templates pane, then double-click on the thin client device and hold down the Delete key to other clients. Turn on the _PXE Imaging template. 1. To pull a PXE image from any client managed by HP Device Manager and store it as...
HP Device Manager User Manual
Page 144
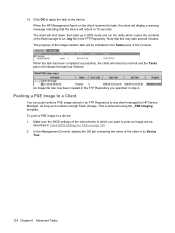
... the image creation task will reboot in the FTP Repository. To push a PXE image to any client managed by HP Device Manager, as long as it contains enough Flash storage. Pushing a PXE Image to a Client You can push (write) a PXE image stored in an FTP Repository to a device: 1....which copies the contents of the Console. 10. When the task has been completed successfully, the client will reboot as described in Client BIOS Settings for PXE on the client receives the task, the client will display a warning message indicating that this may take several minutes. This is achieved using ...
... the image creation task will reboot in the FTP Repository. To push a PXE image to any client managed by HP Device Manager, as long as it contains enough Flash storage. Pushing a PXE Image to a Client You can push (write) a PXE image stored in an FTP Repository to a device: 1....which copies the contents of the Console. 10. When the task has been completed successfully, the client will reboot as described in Client BIOS Settings for PXE on the client receives the task, the client will display a warning message indicating that this may take several minutes. This is achieved using ...

HP Device Manager User Manual
Page 252
Index A Activity Directory 166 add-ons 120 add-ons, applying to thin client 120 adding group 163 report template 193 to repository 206 users 159 advanced tasks 120 agents configuration for client discovery 42 configuring 156 device 2 discover 37 mode 4 setting parameters 156 updating version 157...143 user password 161 client BIOS settings, PXE 130 client discovery DHCP tag 41 discover agent 37 management agent broadcast 37 manual configuration 42 walking with IP list 40 walking with IP range 38 client, discovering 37 cloning device settings 95 image from thin client 137 command execution, ...
Index A Activity Directory 166 add-ons 120 add-ons, applying to thin client 120 adding group 163 report template 193 to repository 206 users 159 advanced tasks 120 agents configuration for client discovery 42 configuring 156 device 2 discover 37 mode 4 setting parameters 156 updating version 157...143 user password 161 client BIOS settings, PXE 130 client discovery DHCP tag 41 discover agent 37 management agent broadcast 37 manual configuration 42 walking with IP list 40 walking with IP range 38 client, discovering 37 cloning device settings 95 image from thin client 137 command execution, ...

HP Device Manager User Manual
Page 254
N NAT environment 42 NeoLinux 4.x devices 212 Neoware, legacy client BIOS settings 130 network checking connection status 67 configuring settings 102 requirements 10 O opening VNC viewer 84 OS tabs 3 overview 1 overview, system structure 1 P ...power management 71 properties displaying task 79 grouping 182 pulling PXE image from client 131 pushing PXE image to client 134 PXE client BIOS settings 130 configuring DHCP server 27 configuring routers 29 pulling image from client 131 pushing image to client 134 R region, configuring settings 106 registry changing settings 143 editing settings 149...
N NAT environment 42 NeoLinux 4.x devices 212 Neoware, legacy client BIOS settings 130 network checking connection status 67 configuring settings 102 requirements 10 O opening VNC viewer 84 OS tabs 3 overview 1 overview, system structure 1 P ...power management 71 properties displaying task 79 grouping 182 pulling PXE image from client 131 pushing PXE image to client 134 PXE client BIOS settings 130 configuring DHCP server 27 configuring routers 29 pulling image from client 131 pushing image to client 134 R region, configuring settings 106 registry changing settings 143 editing settings 149...
HP Image Manager 5.0: Quick Setup Guide
Page 35
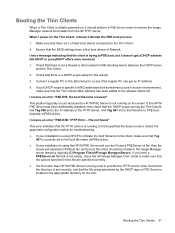
Ensure that the BIOS settings have a first boot device of the TFTP Server, and Tag ...ini file that is not empty, check the HP Image Manager User Guide to make sure that there isn't a Flash boot device connected to PXE boot (typically mPXELdr.bin). Booting the Thin Clients When a Thin Client is initially powered-on, it doesn't attempt ...specified correctly. ● If a tool other network traffic blocking device between the DHCP server and the Thin Client. 2. Booting the Thin Clients 31 Check that there is a DHCP scope setup for troubleshooting: ● If your installation is correctly ...
Ensure that the BIOS settings have a first boot device of the TFTP Server, and Tag ...ini file that is not empty, check the HP Image Manager User Guide to make sure that there isn't a Flash boot device connected to PXE boot (typically mPXELdr.bin). Booting the Thin Clients When a Thin Client is initially powered-on, it doesn't attempt ...specified correctly. ● If a tool other network traffic blocking device between the DHCP server and the Thin Client. 2. Booting the Thin Clients 31 Check that there is a DHCP scope setup for troubleshooting: ● If your installation is correctly ...

HP Compaq t5135 Thin Client, build S1ST0045, Administrator's Guide
Page 58
Information includes: ● Product (thin client) name ● Image version ● Kernel version ● Processor ● Flash memory ● Total memory ● Thin client serial number ● BIOS version number ● BIOS release date ● Copyright information 52 Chapter 2 Installation ENWW
Information includes: ● Product (thin client) name ● Image version ● Kernel version ● Processor ● Flash memory ● Total memory ● Thin client serial number ● BIOS version number ● BIOS release date ● Copyright information 52 Chapter 2 Installation ENWW

HP Compaq t5135 Thin Client, build S1ST0045, Administrator's Guide
Page 71
... that has a blank space in to a remote thin client using the BIOS utility are over -written by HP ThinConnect OS settings when your HP thin client boots. 4 Frequently Asked Questions Question Answer What characters are BIOS changes made locally using Altiris (Repset) overwritten during ... Settings utility when creating the settings image to many thin clients using Altiris? A system administrator cannot deploy a t5135 image to exclude the wireless feature settings. This is excluded from a thin client with wireless device settings activated unless the wireless information ...
... that has a blank space in to a remote thin client using the BIOS utility are over -written by HP ThinConnect OS settings when your HP thin client boots. 4 Frequently Asked Questions Question Answer What characters are BIOS changes made locally using Altiris (Repset) overwritten during ... Settings utility when creating the settings image to many thin clients using Altiris? A system administrator cannot deploy a t5135 image to exclude the wireless feature settings. This is excluded from a thin client with wireless device settings activated unless the wireless information ...

HP ThinConnect, build S2ST0070 Administrator's Guide
Page 40
... identification ● Set DHCP advanced options ● Configure FTP settings ● Use the HP ThinState utility to replicate thin client settings ● Set up the VNC Viewer functions ● Configure ports ● Configure BIOS settings ● Configure Altiris ● Enable the HP Device Manager ▲ Go to Settings > Management to change the number. 34 Chapter...
... identification ● Set DHCP advanced options ● Configure FTP settings ● Use the HP ThinState utility to replicate thin client settings ● Set up the VNC Viewer functions ● Configure ports ● Configure BIOS settings ● Configure Altiris ● Enable the HP Device Manager ▲ Go to Settings > Management to change the number. 34 Chapter...

HP ThinConnect, build S2ST0070 Administrator's Guide
Page 56
Configure Ports ● Serial Port: Select a different address, interrupt line, or disable this port. ● Parallel Port: Select a different address, interrupt line, or disable this port. ● Parallel Port Mode: Select the port mode. ● ECP Mode DMA: Select the DMA options. ● EPP Type: Select the Enhanced Parallel Port (EPP) type. BIOS Settings 50 Chapter 2 Installation ENWW
Configure Ports ● Serial Port: Select a different address, interrupt line, or disable this port. ● Parallel Port: Select a different address, interrupt line, or disable this port. ● Parallel Port Mode: Select the port mode. ● ECP Mode DMA: Select the DMA options. ● EPP Type: Select the Enhanced Parallel Port (EPP) type. BIOS Settings 50 Chapter 2 Installation ENWW

HP ThinConnect, build S2ST0070 Administrator's Guide
Page 64
About the Computer You can view information about the thin client and its software using the About tab. ▲ Go to the top of the list. Information includes: ● Product Name ● Board Info ● Image Version ● Kernel Version ● Processor ● Memory ● Serial Number ● BIOS Version Number ● Copyright 58 Chapter 2 Installation ENWW To make this printer the default printer, go to Settings > Printer and simply drag and drop the printer to Settings > About.
About the Computer You can view information about the thin client and its software using the About tab. ▲ Go to the top of the list. Information includes: ● Product Name ● Board Info ● Image Version ● Kernel Version ● Processor ● Memory ● Serial Number ● BIOS Version Number ● Copyright 58 Chapter 2 Installation ENWW To make this printer the default printer, go to Settings > Printer and simply drag and drop the printer to Settings > About.

HP ThinConnect, build S2ST0070 Administrator's Guide
Page 76
... to turn off with the power button, the thin client cannot be captured from a thin client with quotation marks. Why does my RDP session not connect if the client host name To connect to a remote thin client using the BIOS utility are over -written by HP ThinConnect OS settings when your HP thin client boots. can contain any character except the following...
... to turn off with the power button, the thin client cannot be captured from a thin client with quotation marks. Why does my RDP session not connect if the client host name To connect to a remote thin client using the BIOS utility are over -written by HP ThinConnect OS settings when your HP thin client boots. can contain any character except the following...

Troubleshooting Guide for HP t5135 and t5530 Thin Client
Page 5
Table of contents 1 Product Description Operating Systems ...1 Product Description ...1 2 BIOS Settings, (F10) Utility Using the BIOS Settings ...5 Changing BIOS Settings from within the operating system 5 Changing BIOS Settings Using the F10 Utility 6 Setup Utility-System Information 7 Setup Utility-Standard CMOS Features 8 Setup Utility-Advanced BIOS Features 8 Setup Utility-Integrated Peripherals 9 Setup Utility-Power Management Setup 10...
Table of contents 1 Product Description Operating Systems ...1 Product Description ...1 2 BIOS Settings, (F10) Utility Using the BIOS Settings ...5 Changing BIOS Settings from within the operating system 5 Changing BIOS Settings Using the F10 Utility 6 Setup Utility-System Information 7 Setup Utility-Standard CMOS Features 8 Setup Utility-Advanced BIOS Features 8 Setup Utility-Integrated Peripherals 9 Setup Utility-Power Management Setup 10...

Troubleshooting Guide for HP t5135 and t5530 Thin Client
Page 6
... on the Active Directory Server 62 RIS Menu ...63 Creating Network Bootable Disk to Map Drives 64 For More Information ...65 Appendix D System BIOS Restoring a Corrupt BIOS ...68 Updating a BIOS ...69 Appendix E Replacing the Battery Replacing the battery ...72 Removing the side access panel and metal side cover 72 Removing and replacing the...
... on the Active Directory Server 62 RIS Menu ...63 Creating Network Bootable Disk to Map Drives 64 For More Information ...65 Appendix D System BIOS Restoring a Corrupt BIOS ...68 Updating a BIOS ...69 Appendix E Replacing the Battery Replacing the battery ...72 Removing the side access panel and metal side cover 72 Removing and replacing the...
Troubleshooting Guide for HP t5135 and t5530 Thin Client
Page 11
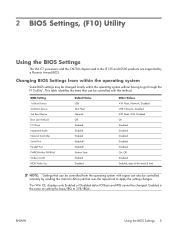
...3rd Boot Device Boot Up NumLock F12 Boot Integrated Audio Network Controller Serial Port Parallel Port PWRON After PWR-Fail Wake-on-LAN BIOS Wake Up Default Value USB ATA Flash Network Off Enabled Enabled Enabled Enabled2 Enabled2 Former State Enabled Disabled Other Values ATA Flash, ...with repset can also be controlled remotely by a Phoenix Award BIOS. 2 BIOS Settings, (F10) Utility Using the BIOS Settings The VIA C7 processors and the CN700 chipset used in the t5135 and t5530 products are supported by sending the client an Altiris job that can be changed locally within the ...
...3rd Boot Device Boot Up NumLock F12 Boot Integrated Audio Network Controller Serial Port Parallel Port PWRON After PWR-Fail Wake-on-LAN BIOS Wake Up Default Value USB ATA Flash Network Off Enabled Enabled Enabled Enabled2 Enabled2 Former State Enabled Disabled Other Values ATA Flash, ...with repset can also be controlled remotely by a Phoenix Award BIOS. 2 BIOS Settings, (F10) Utility Using the BIOS Settings The VIA C7 processors and the CN700 chipset used in the t5135 and t5530 products are supported by sending the client an Altiris job that can be changed locally within the ...

Troubleshooting Guide for HP t5135 and t5530 Thin Client
Page 12
...Screen display is set to zero seconds, it may be necessary to turn the thin client power Off while the ROM is safe to press and hold F10 on the keyboard, then power on page 8 6 Chapter 2 BIOS Settings, (F10) Utility ENWW It is saving the Setup (F10) changes ... Information on page 7 Setup Utility-Standard CMOS Features on page 8 Advanced BIOS Features Setup Utility-Advanced BIOS Features on the thin client. 3. As soon as the thin client is divided into five menu headings and five task actions. Changing BIOS Settings Using the F10 Utility 1. If you have made changes that you...
...Screen display is set to zero seconds, it may be necessary to turn the thin client power Off while the ROM is safe to press and hold F10 on the keyboard, then power on page 8 6 Chapter 2 BIOS Settings, (F10) Utility ENWW It is saving the Setup (F10) changes ... Information on page 7 Setup Utility-Standard CMOS Features on page 8 Advanced BIOS Features Setup Utility-Advanced BIOS Features on the thin client. 3. As soon as the thin client is divided into five menu headings and five task actions. Changing BIOS Settings Using the F10 Utility 1. If you have made changes that you...

Troubleshooting Guide for HP t5135 and t5530 Thin Client
Page 13
...) Integrated MAC (view only) UUID (view only) Chassis Serial # (view only) Asset Tracking Number (view only) Asset Tag Enter asset tracking number. ENWW Using the BIOS Settings 7 Table 2-1 Setup (F10) Utility Main Menu (continued) Integrated Peripherals Setup Utility-Integrated Peripherals on page 9 Power Management Setup Setup Utility-Power Management Setup on...
...) Integrated MAC (view only) UUID (view only) Chassis Serial # (view only) Asset Tracking Number (view only) Asset Tag Enter asset tracking number. ENWW Using the BIOS Settings 7 Table 2-1 Setup (F10) Utility Main Menu (continued) Integrated Peripherals Setup Utility-Integrated Peripherals on page 9 Power Management Setup Setup Utility-Power Management Setup on...

Troubleshooting Guide for HP t5135 and t5530 Thin Client
Page 14
... Master Indicates ATA Flash settings. This will decrease the time needed to enter the Setup Utility. Default is Enabled. 8 Chapter 2 BIOS Settings, (F10) Utility ENWW F12 Boot Enable/Disable F12 network boot. Halt On Allows you enter Setup. Default is Setup. USB...boot order. Default is All But Keyboard. Security Option Select whether the Password is Network. Setup Utility-Advanced BIOS Features Table 2-4 Setup Utility-Advanced BIOS Features Option Description Quick Power-on state for Numlock. Enabled/Disabled. Default is None. Default is Enabled 1st...
... Master Indicates ATA Flash settings. This will decrease the time needed to enter the Setup Utility. Default is Enabled. 8 Chapter 2 BIOS Settings, (F10) Utility ENWW F12 Boot Enable/Disable F12 network boot. Halt On Allows you enter Setup. Default is Setup. USB...boot order. Default is All But Keyboard. Security Option Select whether the Password is Network. Setup Utility-Advanced BIOS Features Table 2-4 Setup Utility-Advanced BIOS Features Option Description Quick Power-on state for Numlock. Enabled/Disabled. Default is None. Default is Enabled 1st...


