PC Basics Guide
Page 43
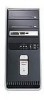
... on your PC can decrease, slowing down the performance of the PC. click Start, click Turn Off Computer, and then click Restart. • Increasing memory by adding or upgrading memory modules in the chassis. • Increasing available hard disk drive space. • Consolidating scattered files and folders on the hard disk drive. •...
... on your PC can decrease, slowing down the performance of the PC. click Start, click Turn Off Computer, and then click Restart. • Increasing memory by adding or upgrading memory modules in the chassis. • Increasing available hard disk drive space. • Consolidating scattered files and folders on the hard disk drive. •...
Limited Warranty and Support Guide
Page 6
...may contain a EULA in the form of a hard disk drive-based solution, an external media-based recovery solution (e.g. Any transfer must agree to all rights not expressly granted to United...agreement between you and HP or its suppliers reserve all the EULA terms. Upon transfer of the Software Product, your upgrade eligibility. 3. HP and its suppliers. a. d. After upgrading, you in such recovery...load the Software Product into the local memory or storage device of the Software Product to the original Software Product provided by HP unless HP provides other terms will prevail. 4....
...may contain a EULA in the form of a hard disk drive-based solution, an external media-based recovery solution (e.g. Any transfer must agree to all rights not expressly granted to United...agreement between you and HP or its suppliers reserve all the EULA terms. Upon transfer of the Software Product, your upgrade eligibility. 3. HP and its suppliers. a. d. After upgrading, you in such recovery...load the Software Product into the local memory or storage device of the Software Product to the original Software Product provided by HP unless HP provides other terms will prevail. 4....
Limited Warranty and Support Guide (Refurbished Desktops)
Page 7
... of download. You may copy the Software Product into Your Computer's temporary memory (RAM) for use with all component parts, media, printed materials, this EULA: a. You may load the Software Product into the local memory or storage device of using the Software Product. d. TRANSFER. a. You...of the Software Product, provided the copy contains all rights not expressly granted to the original Software Product provided by HP as eligible for your upgrade eligibility. 3. Any transfer must include all terms and conditions of this EULA, and if applicable, the Certificate of...
... of download. You may copy the Software Product into Your Computer's temporary memory (RAM) for use with all component parts, media, printed materials, this EULA: a. You may load the Software Product into the local memory or storage device of using the Software Product. d. TRANSFER. a. You...of the Software Product, provided the copy contains all rights not expressly granted to the original Software Product provided by HP as eligible for your upgrade eligibility. 3. Any transfer must include all terms and conditions of this EULA, and if applicable, the Certificate of...
Upgrading and Servicing Guide
Page 3
... Panel 2 Removing the Front Panel 2 Replacing the Front Panel 3 Locating Components Inside the PC 3 Removing and Replacing Drives 3 Removing a Drive 4 Replacing or Adding a Drive 5 Adding Memory 7 Removing a Memory Module 7 Installing a Memory Module 8 Removing or Installing an Add-In Card 8 Removing an Add-In Card 9 Installing an Add-In Card 9 Replacing the Battery 10...
... Panel 2 Removing the Front Panel 2 Replacing the Front Panel 3 Locating Components Inside the PC 3 Removing and Replacing Drives 3 Removing a Drive 4 Replacing or Adding a Drive 5 Adding Memory 7 Removing a Memory Module 7 Installing a Memory Module 8 Removing or Installing an Add-In Card 8 Removing an Add-In Card 9 Installing an Add-In Card 9 Replacing the Battery 10...
Upgrading and Servicing Guide
Page 6
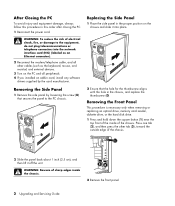
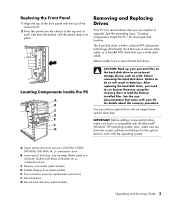
... Panel 1 Remove the side panel by the card manufacturer. Removing the Front Panel This procedure is necessary only when removing or replacing an optical drive, memory card reader, diskette drive, or the hard disk drive. 1 Press and hold down the square button (1) near the top front of the chassis. 2 Slide the... add-in the proper position on the PC and all other tab (3), toward the outside edge of the inside the chassis. 2 Remove the front panel. 2 Upgrading and Servicing Guide
... Panel 1 Remove the side panel by the card manufacturer. Removing the Front Panel This procedure is necessary only when removing or replacing an optical drive, memory card reader, diskette drive, or the hard disk drive. 1 Press and hold down the square button (1) near the top front of the chassis. 2 Slide the... add-in the proper position on the PC and all other tab (3), toward the outside edge of the inside the chassis. 2 Remove the front panel. 2 Upgrading and Servicing Guide
Upgrading and Servicing Guide
Page 7
... that you need to run System Recovery using the recovery discs to do so will result in data loss. You can replace or upgrade. Select models have the correct software and drivers for details about the recovery procedure. Replacing the Front Panel 1 Align the top of...combination drive B Lower optical drive bay, may be empty (blank plate) or a CD-ROM, CD-RW, DVD-ROM, DVD+RW/+R, or combination drive C Memory card reader (select models) D Diskette (floppy) drive (select models) E Front connector panel (no replacement instructions) F Hard disk drive G Second hard disk drive ...
... that you need to run System Recovery using the recovery discs to do so will result in data loss. You can replace or upgrade. Select models have the correct software and drivers for details about the recovery procedure. Replacing the Front Panel 1 Align the top of...combination drive B Lower optical drive bay, may be empty (blank plate) or a CD-ROM, CD-RW, DVD-ROM, DVD+RW/+R, or combination drive C Memory card reader (select models) D Diskette (floppy) drive (select models) E Front connector panel (no replacement instructions) F Hard disk drive G Second hard disk drive ...

Upgrading and Servicing Guide
Page 8
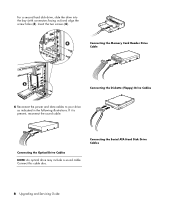
... most drive cables, use a gentle rocking motion to remove. Disconnecting the Optical Drive Cables Disconnecting the Memory Card Reader Drive Cable Removing the Second Hard Disk Drive 4 Upgrading and Servicing Guide Disconnecting the Diskette (Floppy) Drive Cables For Serial ATA hard disk drive cables, press... the latch (5) (select models only) in the center of each plug and pull the plug (6) from the...
... most drive cables, use a gentle rocking motion to remove. Disconnecting the Optical Drive Cables Disconnecting the Memory Card Reader Drive Cable Removing the Second Hard Disk Drive 4 Upgrading and Servicing Guide Disconnecting the Diskette (Floppy) Drive Cables For Serial ATA hard disk drive cables, press... the latch (5) (select models only) in the center of each plug and pull the plug (6) from the...
Upgrading and Servicing Guide
Page 10
Connecting the Optical Drive Cables NOTE: An optical drive may include a sound cable. Connect this cable also. Connecting the Memory Card Reader Drive Cable Connecting the Diskette (Floppy) Drive Cables 6 Reconnect the power and data cables to your drive as indicated in the following illustrations. For a second hard disk drive, slide the drive into the bay (with connectors facing out) and align the screw holes (3). Insert the two screws (4). Connecting the Serial ATA Hard Disk Drive Cables 6 Upgrading and Servicing Guide If it is present, reconnect the sound cable.
Connecting the Optical Drive Cables NOTE: An optical drive may include a sound cable. Connect this cable also. Connecting the Memory Card Reader Drive Cable Connecting the Diskette (Floppy) Drive Cables 6 Reconnect the power and data cables to your drive as indicated in the following illustrations. For a second hard disk drive, slide the drive into the bay (with connectors facing out) and align the screw holes (3). Insert the two screws (4). Connecting the Serial ATA Hard Disk Drive Cables 6 Upgrading and Servicing Guide If it is present, reconnect the sound cable.
Upgrading and Servicing Guide
Page 11
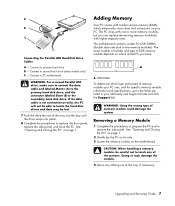
... with higher-capacity ones. See "Opening and Closing the PC" on page 1. 2 Gently lay the PC on its side. 3 Locate the memory sockets on page 1. Upgrading and Servicing Guide 7 Connect to second hard drive (select models only) C - WARNING: Using the wrong type of the way into the bay... until the drive snaps into place. 8 Complete the procedures to the Web site listed in -line memory modules). Connecting the Parallel ATA Hard Disk ...
... with higher-capacity ones. See "Opening and Closing the PC" on page 1. 2 Gently lay the PC on its side. 3 Locate the memory sockets on page 1. Upgrading and Servicing Guide 7 Connect to second hard drive (select models only) C - WARNING: Using the wrong type of the way into the bay... until the drive snaps into place. 8 Complete the procedures to the Web site listed in -line memory modules). Connecting the Parallel ATA Hard Disk ...
Upgrading and Servicing Guide
Page 12
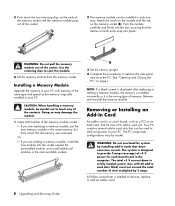
...Use the retaining clips to replace the side panel, and close the PC. CAUTION: When handling a memory module, be careful not to remove, replace, or add an add-in card. 8 Upgrading and Servicing Guide WARNING: Do not overload the system by model. A Phillips screwdriver is designed to...into a PC add-in card slot. Installing a Memory Module Upgrade the memory in your PC. NOTE: If a blank screen is displayed after replacing or adding a memory module, the memory is installed incorrectly or it is a circuit board, such as the memory originally installed in your PC with all add-in ...
...Use the retaining clips to replace the side panel, and close the PC. CAUTION: When handling a memory module, be careful not to remove, replace, or add an add-in card. 8 Upgrading and Servicing Guide WARNING: Do not overload the system by model. A Phillips screwdriver is designed to...into a PC add-in card slot. Installing a Memory Module Upgrade the memory in your PC. NOTE: If a blank screen is displayed after replacing or adding a memory module, the memory is installed incorrectly or it is a circuit board, such as the memory originally installed in your PC with all add-in ...
Upgrading and Servicing Guide
Page 14
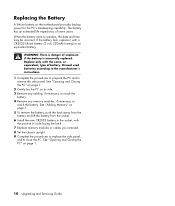
...life expectancy of explosion if the battery is incorrectly replaced. See "Adding Memory" on its side. 3 Remove any cabling, if necessary, to reach the battery. 4 Remove any memory modules, if necessary, to close the PC. If the battery fails, ...replace it with the positive (+) side facing the latch. 7 Replace memory modules or cables you removed. 8 Set the chassis upright. 9 Complete the procedures to replace the side panel...220mAH rating) or an equivalent battery. Replacing the Battery A lithium battery on page 1. 10 Upgrading and Servicing Guide
...life expectancy of explosion if the battery is incorrectly replaced. See "Adding Memory" on its side. 3 Remove any cabling, if necessary, to reach the battery. 4 Remove any memory modules, if necessary, to close the PC. If the battery fails, ...replace it with the positive (+) side facing the latch. 7 Replace memory modules or cables you removed. 8 Set the chassis upright. 9 Complete the procedures to replace the side panel...220mAH rating) or an equivalent battery. Replacing the Battery A lithium battery on page 1. 10 Upgrading and Servicing Guide
PC Troubleshooting and Maintenance Guide
Page 16
...start up. if the light is not on the keyboard to open the Help and Support Center, or refer to the Warranty and Support Guide to the outlet. Refer to the Warranty...Slow or Fast to decrease or increase the speed at which the pointer (cursor) responds to the Upgrading and Servicing Guide for replacement details. PC shut down . Possible solution Ensure that cables connecting the... should start . When the cables connecting the PC to its original state. Reinstall the old memory to return your PC may not have an internal fan. 12 PC Troubleshooting and Maintenance Guide...
...start up. if the light is not on the keyboard to open the Help and Support Center, or refer to the Warranty and Support Guide to the outlet. Refer to the Warranty...Slow or Fast to decrease or increase the speed at which the pointer (cursor) responds to the Upgrading and Servicing Guide for replacement details. PC shut down . Possible solution Ensure that cables connecting the... should start . When the cables connecting the PC to its original state. Reinstall the old memory to return your PC may not have an internal fan. 12 PC Troubleshooting and Maintenance Guide...
My Compaq Presario PC Brochure
Page 14
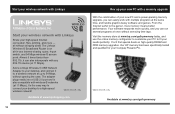
... of your new PC and a power-packing memory upgrade, you can run several programs at once without annoying time lags. Valid in the U.S. The Linksys Wireless-G Broadband Router is also compatible with wireless-B networks (at 11 Mbps). Our HP memory has been specifically tested and qualified for your Compaq Presario PC. all -in-one Internet-sharing...
... of your new PC and a power-packing memory upgrade, you can run several programs at once without annoying time lags. Valid in the U.S. The Linksys Wireless-G Broadband Router is also compatible with wireless-B networks (at 11 Mbps). Our HP memory has been specifically tested and qualified for your Compaq Presario PC. all -in-one Internet-sharing...
PC Basics Guide
Page 45
... one version of a program open at a time. • Restarting the PC; click Start, click Turn Off Computer, and then click Restart. • Increasing memory by adding or upgrading memory modules in the chassis. • Increasing available hard disk drive space. • Consolidating scattered files and folders on the hard disk drive. Viewing the...
... one version of a program open at a time. • Restarting the PC; click Start, click Turn Off Computer, and then click Restart. • Increasing memory by adding or upgrading memory modules in the chassis. • Increasing available hard disk drive space. • Consolidating scattered files and folders on the hard disk drive. Viewing the...

Media Center Software Guide
Page 72
M magicSpot 54 Media Center navigating 5 playing DVDs 47 resizing window 4 Start menu 8 toolbars 4 using muvee autoProducer unPlugged 61 using with another program open 4 viewing your pictures 38 what you can do in My Music 17 in My Pictures 25 in My Videos 43 memory card reader 26 music library adding CD ... movie 51, 57, 65 rotating images clockwise 54 selecting style 55 setting the duration of video 55, 65 setting the style 64 upgrading 66 using muvee in Media Center 61 using settings 64 using the magicMoments feature 53 My Music 17, 63 copying music to CD 24 creating a queue list 22 deleting...
M magicSpot 54 Media Center navigating 5 playing DVDs 47 resizing window 4 Start menu 8 toolbars 4 using muvee autoProducer unPlugged 61 using with another program open 4 viewing your pictures 38 what you can do in My Music 17 in My Pictures 25 in My Videos 43 memory card reader 26 music library adding CD ... movie 51, 57, 65 rotating images clockwise 54 selecting style 55 setting the duration of video 55, 65 setting the style 64 upgrading 66 using muvee in Media Center 61 using settings 64 using the magicMoments feature 53 My Music 17, 63 copying music to CD 24 creating a queue list 22 deleting...


