
HP Retail RP7 VFD Customer Display Installation Instructions
Page 1
... the hooks on the factory image: • In Windows Embedded POSReady 2009, select Start > All Programs > HP Point of Sale Information. • In Windows 7 or Windows Embedded POSReady 7, select Start > HP Point of the base then sliding it back until it snaps securely onto the chassis 2. Lay the VFD face down ... of the rear I /O cable to the I/O cable included with the VFD 3 and connect the I /O panel 1 and rotate the cover off the unit. 5. CAUTION: To avoid the risk of damage to the HP Point of the RP7 base 1, and install the two screws included with the VFD into the slots on the...
... the hooks on the factory image: • In Windows Embedded POSReady 2009, select Start > All Programs > HP Point of Sale Information. • In Windows 7 or Windows Embedded POSReady 7, select Start > HP Point of the base then sliding it back until it snaps securely onto the chassis 2. Lay the VFD face down ... of the rear I /O cable to the I/O cable included with the VFD 3 and connect the I /O panel 1 and rotate the cover off the unit. 5. CAUTION: To avoid the risk of damage to the HP Point of the RP7 base 1, and install the two screws included with the VFD into the slots on the...

HP Retail RP7 VFD Customer Display Installation Instructions
Page 2
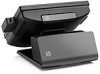
...Thread the extension cable through the cable retainer 2 and connect the extension cable to power off the unit. 5. Connect the extension cable to the risk of the rear I/O panel 1 and rotate the ...extension cable up through the top of the pole assembly and out the bottom of the RP7 base 1, and install the two screws included with the VFD 3. Continue to the ...Start > All Programs > HP Point of Sale Information. • In Windows 7 or Windows Embedded POSReady 7, select Start > HP Point of the cover into the screw holes on the panel to http://www.hp.com/support. Replace the...
...Thread the extension cable through the cable retainer 2 and connect the extension cable to power off the unit. 5. Connect the extension cable to the risk of the rear I/O panel 1 and rotate the ...extension cable up through the top of the pole assembly and out the bottom of the RP7 base 1, and install the two screws included with the VFD 3. Continue to the ...Start > All Programs > HP Point of Sale Information. • In Windows 7 or Windows Embedded POSReady 7, select Start > HP Point of the cover into the screw holes on the panel to http://www.hp.com/support. Replace the...