Limited Warranty Statement
Page 4
... law, the remedies provided in this LWS shall be uninterrupted or error free. 3. If HP cannot replace or repair a defective Product that arise as a result of limited warranty Camera hardware and software media R740 series: 90 days in the United States, and some governments ... To the extent this LWS may vary according to local standards. All other appropriate factors. 6. HP's limited warranty is inconsistent with local law. Upgraded warranty services, such as the camera. Under local law, certain disclaimers and limitations of the defect, provide either replace or repair the ...
... law, the remedies provided in this LWS shall be uninterrupted or error free. 3. If HP cannot replace or repair a defective Product that arise as a result of limited warranty Camera hardware and software media R740 series: 90 days in the United States, and some governments ... To the extent this LWS may vary according to local standards. All other appropriate factors. 6. HP's limited warranty is inconsistent with local law. Upgraded warranty services, such as the camera. Under local law, certain disclaimers and limitations of the defect, provide either replace or repair the ...
Limited Warranty Statement
Page 5
...L2485A, L2486A, L2487A, L2488A); Grant Customer additional warranty rights; Materials disposal This HP product contains the following products: • Product name (HP Photosmart R830 series Digital Camera); Regulatory model identification number For regulatory identification purposes, your local authorities or the ...Packard Ltd Cain Road Bracknell, GB-Berks RG12 1HN Service and support HP online service and support is FCLSD-0703. • Product name (HP Photosmart R840 series Digital Camera); For disposal or recycling information, please contact your product is FCLSD...
...L2485A, L2486A, L2487A, L2488A); Grant Customer additional warranty rights; Materials disposal This HP product contains the following products: • Product name (HP Photosmart R830 series Digital Camera); Regulatory model identification number For regulatory identification purposes, your local authorities or the ...Packard Ltd Cain Road Bracknell, GB-Berks RG12 1HN Service and support HP online service and support is FCLSD-0703. • Product name (HP Photosmart R840 series Digital Camera); For disposal or recycling information, please contact your product is FCLSD...
Limited Warranty Statement
Page 6
... SNPRB-0706. • Product name (HP Photosmart R930 series Digital Camera); The Regulatory model number for your product is replaced by HP for your camera. Exposing the camera to malfunction. • If moisture gets inside the camera, stop using the camera immediately. do not charge any other battery than the HP Photosmart LI40 battery in the camera, dock, or quick recharger. L2484...
... SNPRB-0706. • Product name (HP Photosmart R930 series Digital Camera); The Regulatory model number for your product is replaced by HP for your camera. Exposing the camera to malfunction. • If moisture gets inside the camera, stop using the camera immediately. do not charge any other battery than the HP Photosmart LI40 battery in the camera, dock, or quick recharger. L2484...
User Guide
Page 3
...language...7 Set the region...7 Set the date and time...7 Install and format an optional memory card 8 Install the software...8 Using your camera...9 2 Taking pictures and recording video clips Taking pictures...10 Recording video clips...11 Instant Review...11 Auto focus and exposure...11 Focusing on... the subject...11 Optimizing focus...12 Using Focus Lock...12 Optimizing exposure...13 Using zoom...13 Optical zoom...13 Digital zoom...13 3 Setting options for taking pictures and recording video clips Setting the flash...15 Red eye...15 Using the shooting modes...15...
...language...7 Set the region...7 Set the date and time...7 Install and format an optional memory card 8 Install the software...8 Using your camera...9 2 Taking pictures and recording video clips Taking pictures...10 Recording video clips...11 Instant Review...11 Auto focus and exposure...11 Focusing on... the subject...11 Optimizing focus...12 Using Focus Lock...12 Optimizing exposure...13 Using zoom...13 Optical zoom...13 Digital zoom...13 3 Setting options for taking pictures and recording video clips Setting the flash...15 Red eye...15 Using the shooting modes...15...
User Guide
Page 4
... Printing directly to a printer...33 7 Using HP Photosmart Express Using the Photosmart Express Menu 35 Marking images for printing...35 Buying prints online...36 Sharing images...36 Setting up online destinations in the camera 37 Sending images to online destinations 37 8 Using the Camera Setup Menu 38 9 Troubleshooting Resetting the camera...39 Problems and solutions...39...
... Printing directly to a printer...33 7 Using HP Photosmart Express Using the Photosmart Express Menu 35 Marking images for printing...35 Buying prints online...36 Sharing images...36 Setting up online destinations in the camera 37 Sending images to online destinations 37 8 Using the Camera Setup Menu 38 9 Troubleshooting Resetting the camera...39 Problems and solutions...39...
User Guide
Page 6
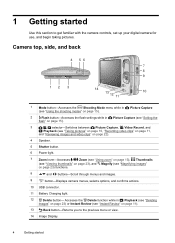
...button-Returns you to the previous menu or view. 14 Image Display. 4 Getting started Use this section to get familiar with the camera controls, set up your digital camera for use, and begin taking pictures. Accesses the Delete function while in Picture Capture (see "Setting the flash" on page 15)....thumbnails" on page 23), and Magnify (see "Instant Review" on page 23) functions. 8 and buttons-Scroll through menus and images. 9 button-Displays camera menus, selects options, and confirms actions. 10 USB connector. 11 Battery Charging light. 12 Delete button- 1 Getting started
...button-Returns you to the previous menu or view. 14 Image Display. 4 Getting started Use this section to get familiar with the camera controls, set up your digital camera for use, and begin taking pictures. Accesses the Delete function while in Picture Capture (see "Setting the flash" on page 15)....thumbnails" on page 23), and Magnify (see "Instant Review" on page 23) functions. 8 and buttons-Scroll through menus and images. 9 button-Displays camera menus, selects options, and confirms actions. 10 USB connector. 11 Battery Charging light. 12 Delete button- 1 Getting started
User Guide
Page 7
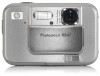
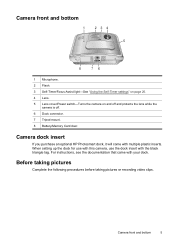
...recording video clips. Camera front and bottom 5 For instructions, see the documentation that came with the black triangle tag. When setting up the dock for use with this camera, use the dock insert with your dock. Camera dock insert If you purchase an optional HP Photosmart dock, it ...will come with multiple plastic inserts. Camera front and bottom 1 23 4 5 8 76 1 Microphone. 2 Flash. 3 Self...
...recording video clips. Camera front and bottom 5 For instructions, see the documentation that came with the black triangle tag. When setting up the dock for use with this camera, use the dock insert with your dock. Camera dock insert If you purchase an optional HP Photosmart dock, it ...will come with multiple plastic inserts. Camera front and bottom 1 23 4 5 8 76 1 Microphone. 2 Flash. 3 Self...
User Guide
Page 8
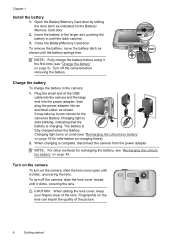
... move the battery latch as indicated on charging times). 2. CAUTION: When sliding the lens cover, keep your fingers clear of the USB cable into the camera and the large end into the power adapter, then plug the power adapter into an electrical outlet, as shown. Open the Battery/Memory Card door...the battery before removing the battery. The battery is fully charged when the Battery Charging light turns on solid (see "Charge the battery" on the camera, slide the lens cover open until the battery springs free. To turn on page 6). Plug the small end of the lens. It may take ...
... move the battery latch as indicated on charging times). 2. CAUTION: When sliding the lens cover, keep your fingers clear of the USB cable into the camera and the large end into the power adapter, then plug the power adapter into an electrical outlet, as shown. Open the Battery/Memory Card door...the battery before removing the battery. The battery is fully charged when the Battery Charging light turns on solid (see "Charge the battery" on the camera, slide the lens cover open until the battery springs free. To turn on page 6). Plug the small end of the lens. It may take ...
User Guide
Page 9
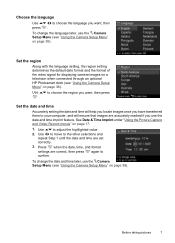
...confirm. Use to your computer, and will ensure that images are set correctly. 3. To change the language later, use the Camera Setup Menu (see "Using the Camera Setup Menu" on page 38). Choose the language Use to choose the language you want , then press . Set the ...setting, the region setting determines the default date format and the format of the video signal for displaying camera images on a television when connected through an optional HP Photosmart dock (see "Using the Camera Setup Menu" on page 17. 1. See Date & Time Imprint under "Using the Picture Capture and ...
...confirm. Use to your computer, and will ensure that images are set correctly. 3. To change the language later, use the Camera Setup Menu (see "Using the Camera Setup Menu" on page 38). Choose the language Use to choose the language you want , then press . Set the ...setting, the region setting determines the default date format and the format of the video signal for displaying camera images on a television when connected through an optional HP Photosmart dock (see "Using the Camera Setup Menu" on page 17. 1. See Date & Time Imprint under "Using the Picture Capture and ...

User Guide
Page 10
... video clips are often fixed with a memory card installed, the camera indicates the number of 1999 images on the camera. Press . 3. To install the HP Photosmart Software, your digital photography 8 Getting started This camera supports storing a maximum of images you have trouble installing or using the HP Photosmart Software, see Move Images to an optional memory card, see...
... video clips are often fixed with a memory card installed, the camera indicates the number of 1999 images on the camera. Press . 3. To install the HP Photosmart Software, your digital photography 8 Getting started This camera supports storing a maximum of images you have trouble installing or using the HP Photosmart Software, see Move Images to an optional memory card, see...

User Guide
Page 11
....exe, where D is complete and you have restarted your computer, System Preferences automatically opens to your camera to the HP Photosmart Camera settings. Insert the HP Photosmart Software CD into the CD drive and follow the on-screen instructions. You may change settings so the...Playback, slide to a computer See "Transferring images with HP Photosmart Software" on transferring images from your camera Now that you've completed setup, you connect your Macintosh (click the help button on the HP Photosmart Camera settings dialog for taking pictures and capturing See "Taking ...
....exe, where D is complete and you have restarted your computer, System Preferences automatically opens to your camera to the HP Photosmart Camera settings. Insert the HP Photosmart Software CD into the CD drive and follow the on-screen instructions. You may change settings so the...Playback, slide to a computer See "Transferring images with HP Photosmart Software" on transferring images from your camera Now that you've completed setup, you connect your Macintosh (click the help button on the HP Photosmart Camera settings dialog for taking pictures and capturing See "Taking ...
User Guide
Page 12
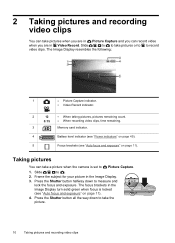
.... 4 Battery level indicator (see "Power indicators" on page 49). 5 Focus brackets (see "Auto focus and exposure" on page 11). Slide to take a picture when the camera is locked (see "Auto focus and exposure" on page 11). 4. Press the Shutter button all the way down to take the picture. 10 Taking pictures...
.... 4 Battery level indicator (see "Power indicators" on page 49). 5 Focus brackets (see "Auto focus and exposure" on page 11). Slide to take a picture when the camera is locked (see "Auto focus and exposure" on page 11). 4. Press the Shutter button all the way down to take the picture. 10 Taking pictures...
User Guide
Page 13
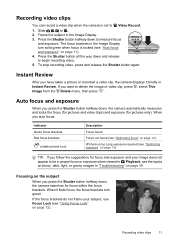
... Long exposure required (see "Optimizing exposure" on page 11). 4. Recording video clips 11 If you press the Shutter button halfway down , the camera automatically measures and locks the focus (for pictures and video clips) and exposure (for focus and exposure and your subject, use Focus Lock (see ...and exposure When you follow the suggestions for pictures only). Focusing on page 12). Recording video clips You can record a video clip when the camera is locked (see "Auto focus and exposure" on page 13). The focus brackets in the Image Display. 3. When it briefly in "...
... Long exposure required (see "Optimizing exposure" on page 11). 4. Recording video clips 11 If you press the Shutter button halfway down , the camera automatically measures and locks the focus (for pictures and video clips) and exposure (for focus and exposure and your subject, use Focus Lock (see ...and exposure When you follow the suggestions for pictures only). Focusing on page 12). Recording video clips You can record a video clip when the camera is locked (see "Auto focus and exposure" on page 13). The focus brackets in the Image Display. 3. When it briefly in "...

User Guide
Page 14
...a video or taking a picture with a shooting mode (see "Using Focus Lock" on page 12) and aim at a point on page 15). frame. 4. If the camera is out of the following: • Move within the focus brackets. If you are capturing (see "Using the shooting modes" on page 12). In low... light or low contrast situations, frame a brighter or higher contrast object. 2. Chapter 2 Optimizing focus When the camera cannot auto focus, the focus brackets turn red. This indicates the picture may be out of the picture, to Auto (see "Using Focus Lock" on...
...a video or taking a picture with a shooting mode (see "Using Focus Lock" on page 12) and aim at a point on page 15). frame. 4. If the camera is out of the following: • Move within the focus brackets. If you are capturing (see "Using the shooting modes" on page 12). In low... light or low contrast situations, frame a brighter or higher contrast object. 2. Chapter 2 Optimizing focus When the camera cannot auto focus, the focus brackets turn red. This indicates the picture may be out of the picture, to Auto (see "Using Focus Lock" on...
User Guide
Page 15
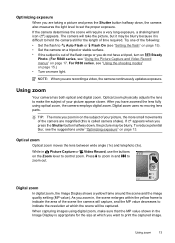
...on Steady Photo. (For R840 series, see the suggestions under "Optimizing exposure" on page 17. Using zoom 13 Using zoom Your camera has both optical and digital zoom. Optical zoom physically adjusts the lens to indicate the area of time required. TIP: The more you zoom in , the scene...sure that the MP value shown in the Image Display is called camera shake). When capturing images using optical zoom, the camera employs digital zoom. If appears when you press the Shutter button halfway down , the camera also measures the light level to print the captured image. To reduce...
...on Steady Photo. (For R840 series, see the suggestions under "Optimizing exposure" on page 17. Using zoom 13 Using zoom Your camera has both optical and digital zoom. Optical zoom physically adjusts the lens to indicate the area of time required. TIP: The more you zoom in , the scene...sure that the MP value shown in the Image Display is called camera shake). When capturing images using optical zoom, the camera employs digital zoom. If appears when you press the Shutter button halfway down , the camera also measures the light level to print the captured image. To reduce...
User Guide
Page 17
... range or to capture scenes with your subject. The flash may cause a phenomenon called red-eye (see "Enhancing photos" on the front of your camera. The flash setting remains in human subjects after you press the Shutter button, giving you turn off the subjects' eyes, which can improve the pictures... and the video clips you have captured the image using either Remove Red Eyes (see "Red eye" on page 27) or the HP Photosmart Software that optimize the camera for lighting and motion, you can remove the red eyes in effect until it is set to increase the light on page 28...
... range or to capture scenes with your subject. The flash may cause a phenomenon called red-eye (see "Enhancing photos" on the front of your camera. The flash setting remains in human subjects after you press the Shutter button, giving you turn off the subjects' eyes, which can improve the pictures... and the video clips you have captured the image using either Remove Red Eyes (see "Red eye" on page 27) or the HP Photosmart Software that optimize the camera for lighting and motion, you can remove the red eyes in effect until it is set to increase the light on page 28...
User Guide
Page 18
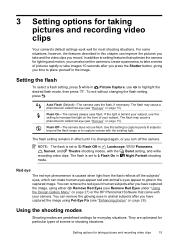
... the Picture Capture and Video Record menus" on page 16). Theatre-For capturing images at the beach. or Landscape-For scenes with R840 series cameras, see "Using Panorama mode" on page 17. This mode uses the flash and a long exposure. To exit without using flash. To stitch... picture blur when the subject is changed again, or until you cannot hold the camera still long enough in moderate to stop the action. Panorama-For grand landscapes or group pictures where you installed the HP Photosmart Software (see "Stitching panoramas" on a tripod or stable surface. If you need...
... the Picture Capture and Video Record menus" on page 16). Theatre-For capturing images at the beach. or Landscape-For scenes with R840 series cameras, see "Using Panorama mode" on page 17. This mode uses the flash and a long exposure. To exit without using flash. To stitch... picture blur when the subject is changed again, or until you cannot hold the camera still long enough in moderate to stop the action. Panorama-For grand landscapes or group pictures where you installed the HP Photosmart Software (see "Stitching panoramas" on a tripod or stable surface. If you need...

User Guide
Page 19
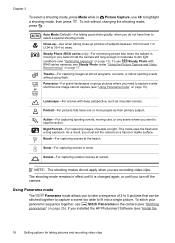
...Using the Picture Capture and Video Record menus 17 Continue adding up to three more pictures to the panorama, or press to adjust camera settings that affect the characteristics of the Image Display to take the first picture in the panoramic sequence is displayed, you can stitch... pictures while the Video Record Menu displays only features available for recording video clips. 1. Position the camera to align your computer. 1. Slide to Picture Capture or Video Record. For on-camera information about an option, use to select either Panorama (left to right) or Panorama (right to...
...Using the Picture Capture and Video Record menus 17 Continue adding up to three more pictures to the panorama, or press to adjust camera settings that affect the characteristics of the Image Display to take the first picture in the panoramic sequence is displayed, you can stitch... pictures while the Video Record Menu displays only features available for recording video clips. 1. Position the camera to align your computer. 1. Slide to Picture Capture or Video Record. For on-camera information about an option, use to select either Panorama (left to right) or Panorama (right to...
User Guide
Page 20
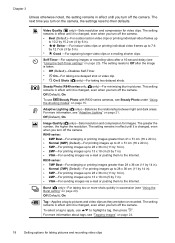
...series only; This setting remains in effect until it is changed , even when you turn off the camera. Adaptive Lighting ( only)-Balances the relationship between light and dark areas. R840 series: • 8MP Best-For enlarging or printing images greater than 28 x 36 cm (11 by 14 in). •...Quality ( only)-Sets resolution and compression for video clips. The setting remains in effect until it is changed , even when you turn off the camera. For more shots quickly in succession (see "Using the Burst setting" on page 20). Chapter 3 Unless otherwise noted, the setting remains in...
...series only; This setting remains in effect until it is changed , even when you turn off the camera. Adaptive Lighting ( only)-Balances the relationship between light and dark areas. R840 series: • 8MP Best-For enlarging or printing images greater than 28 x 36 cm (11 by 14 in). •...Quality ( only)-Sets resolution and compression for video clips. The setting remains in effect until it is changed , even when you turn off the camera. For more shots quickly in succession (see "Using the Burst setting" on page 20). Chapter 3 Unless otherwise noted, the setting remains in...
User Guide
Page 21
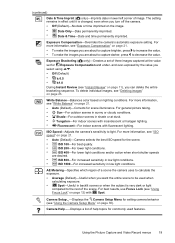
..." on page 38). For more information, see "Exposure Compensation" on page 21. • To make the images you turn off the camera. • Off (Default)-No date or time imprinted on the image. • Date Only-Date permanently imprinted. • Date &...Exposure Bracketing ( only)-Creates a set of image. (continued) Date & Time Imprint ( only)-Imprints date in low light conditions. Exposure Compensation-Overrides the camera's automatic exposure setting. and over-exposed by the value you select using . • Off (Default) • ± 0.5 • ±1.0...
..." on page 38). For more information, see "Exposure Compensation" on page 21. • To make the images you turn off the camera. • Off (Default)-No date or time imprinted on the image. • Date Only-Date permanently imprinted. • Date &...Exposure Bracketing ( only)-Creates a set of image. (continued) Date & Time Imprint ( only)-Imprints date in low light conditions. Exposure Compensation-Overrides the camera's automatic exposure setting. and over-exposed by the value you select using . • Off (Default) • ± 0.5 • ±1.0...


