User Guide
Page 3
... Taking pictures...10 Recording video clips...11 Instant Review...11 Auto focus and exposure...11 Focusing on the subject...11 Optimizing focus...12 Using Focus Lock...12 Optimizing exposure...13 Using zoom...13 Optical zoom...13 Digital zoom...13 3 Setting options for taking pictures and recording video clips Setting the flash...15 Red eye...15 Using the shooting modes...15 Using Panorama mode...16 Using the Picture Capture and Video Record menus 17 Using the Self-Timer settings 20 Using the Burst setting...20 Adaptive Lighting...21 Exposure Compensation...21 White Balance...21 ISO speed...
... Taking pictures...10 Recording video clips...11 Instant Review...11 Auto focus and exposure...11 Focusing on the subject...11 Optimizing focus...12 Using Focus Lock...12 Optimizing exposure...13 Using zoom...13 Optical zoom...13 Digital zoom...13 3 Setting options for taking pictures and recording video clips Setting the flash...15 Red eye...15 Using the shooting modes...15 Using Panorama mode...16 Using the Picture Capture and Video Record menus 17 Using the Self-Timer settings 20 Using the Burst setting...20 Adaptive Lighting...21 Exposure Compensation...21 White Balance...21 ISO speed...
User Guide
Page 4
... images without HP Photosmart Software 32 Connecting to the computer 32 Using a memory card reader 33 Printing directly to a printer...33 7 Using HP Photosmart Express Using the Photosmart Express Menu 35 Marking images for printing...35 Buying prints online...36 Sharing images...36 Setting up online destinations in the camera 37 Sending images to online destinations 37 8 Using the Camera Setup Menu 38 9 Troubleshooting Resetting the camera...39 Problems and solutions...39 Camera error messages...45 10 Product support Helpful websites...46 Getting assistance...46 A Managing batteries...
... images without HP Photosmart Software 32 Connecting to the computer 32 Using a memory card reader 33 Printing directly to a printer...33 7 Using HP Photosmart Express Using the Photosmart Express Menu 35 Marking images for printing...35 Buying prints online...36 Sharing images...36 Setting up online destinations in the camera 37 Sending images to online destinations 37 8 Using the Camera Setup Menu 38 9 Troubleshooting Resetting the camera...39 Problems and solutions...39 Camera error messages...45 10 Product support Helpful websites...46 Getting assistance...46 A Managing batteries...

User Guide
Page 10
... transferring images and video clips to transfer existing images before first use internal memory and view images stored there, remove the memory card. If you have trouble installing or using the HP Photosmart Software, see Move Images to Card under "Specifications" on the camera packaging. Use to select Yes, then press to . 2. Chapter 1 Install and format an optional memory card This camera supports standard, high speed, and high capacity Secure Digital (SD and SDHC) memory cards, 32MB to select Format Card, then press . 4. NOTE: When you turn...
... transferring images and video clips to transfer existing images before first use internal memory and view images stored there, remove the memory card. If you have trouble installing or using the HP Photosmart Software, see Move Images to Card under "Specifications" on the camera packaging. Use to select Yes, then press to . 2. Chapter 1 Install and format an optional memory card This camera supports standard, high speed, and high capacity Secure Digital (SD and SDHC) memory cards, 32MB to select Format Card, then press . 4. NOTE: When you turn...

User Guide
Page 11
... support for taking pictures and capturing See "Taking pictures" on page 10 and video clips "Recording video clips" on -screen instructions. Windows: 1. Using your CD drive, then click OK. 3. Double-click the installer icon, then follow the on enhancing your camera to the HP Photosmart Camera settings. Close all programs and temporarily disable any virus protection software. 2. TIP: To switch between Picture Capture, Video Record, and Playback, slide to a printer" on page 15. For information on taking pictures and video record options recording video...
... support for taking pictures and capturing See "Taking pictures" on page 10 and video clips "Recording video clips" on -screen instructions. Windows: 1. Using your CD drive, then click OK. 3. Double-click the installer icon, then follow the on enhancing your camera to the HP Photosmart Camera settings. Close all programs and temporarily disable any virus protection software. 2. TIP: To switch between Picture Capture, Video Record, and Playback, slide to a printer" on page 15. For information on taking pictures and video record options recording video...

User Guide
Page 14
... within the focus brackets. frame. 4. Using Focus Lock Use Focus Lock to Close-up and cannot focus, the camera will not take the picture. If you are recording a video or taking a picture with a shooting mode (see "Using the shooting modes" on page 15) other than 500 mm or 19.7 in the area where the action will still take the picture. 12 Taking pictures and recording video clips Press the Shutter button halfway down again. Press the Shutter button all the...
... within the focus brackets. frame. 4. Using Focus Lock Use Focus Lock to Close-up and cannot focus, the camera will not take the picture. If you are recording a video or taking a picture with a shooting mode (see "Using the shooting modes" on page 15) other than 500 mm or 19.7 in the area where the action will still take the picture. 12 Taking pictures and recording video clips Press the Shutter button halfway down again. Press the Shutter button all the...
User Guide
Page 15
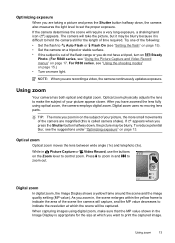
Digital zoom uses no moving lens parts. If appears when you press the Shutter button halfway down , the camera also measures the light level to print the captured image. If the camera determines the scene will capture, and the MP value decreases to Auto Flash or Flash On (see "Using the Picture Capture and Video Record menus" on page 13. The camera will be blurry. Optical zoom Optical zoom moves the lens between wide...
Digital zoom uses no moving lens parts. If appears when you press the Shutter button halfway down , the camera also measures the light level to print the captured image. If the camera determines the scene will capture, and the MP value decreases to Auto Flash or Flash On (see "Using the Picture Capture and Video Record menus" on page 13. The camera will be blurry. Optical zoom Optical zoom moves the lens between wide...
User Guide
Page 18
... changed again, or until you cannot hold the camera still long enough in snow. As a result, you are recording video clips. NOTE: The shooting modes do not have one image cannot capture (see "Stitching panoramas" on page 13). Sunset-For capturing outdoor scenes at the beach. Auto Mode (Default)-For taking pictures and recording video clips Beach-For capturing scenes at sunset. To exit without using flash...
... changed again, or until you cannot hold the camera still long enough in snow. As a result, you are recording video clips. NOTE: The shooting modes do not have one image cannot capture (see "Stitching panoramas" on page 13). Sunset-For capturing outdoor scenes at the beach. Auto Mode (Default)-For taking pictures and recording video clips Beach-For capturing scenes at sunset. To exit without using flash...
User Guide
Page 23
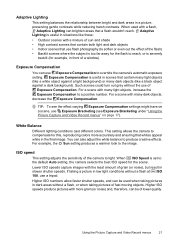
.... White Balance Different lighting conditions cast different colors. For a scene with more accurately and ensuring that use a tripod. For a scene with a flash, Adaptive Lighting can use Exposure Bracketing (see the effect varying Exposure Compensation settings might have on page 17). When used when taking pictures in dark areas without a flash, or when taking a picture in low light conditions without the use of the camera to the default Auto setting, the camera selects the best ISO speed for...
.... White Balance Different lighting conditions cast different colors. For a scene with more accurately and ensuring that use a tripod. For a scene with a flash, Adaptive Lighting can use Exposure Bracketing (see the effect varying Exposure Compensation settings might have on page 17). When used when taking pictures in dark areas without a flash, or when taking a picture in low light conditions without the use of the camera to the default Auto setting, the camera selects the best ISO speed for...

User Guide
Page 33
... using the HP Photosmart Software: 1. To transfer images using an optional HP Photosmart dock (see "Install the software" on the computer, do not disconnect your camera from the memory card will reduce the time it appears that nothing is connected to turn on the computer screen. 6 Transferring and printing images Regularly transferring images to your computer and deleting them . Even if your Image Display turns off the camera. Transferring images with your camera. If you have not stitched on the camera (see "Using Panorama mode...
... using the HP Photosmart Software: 1. To transfer images using an optional HP Photosmart dock (see "Install the software" on the computer, do not disconnect your camera from the memory card will reduce the time it appears that nothing is connected to turn on the computer screen. 6 Transferring and printing images Regularly transferring images to your computer and deleting them . Even if your Image Display turns off the camera. Transferring images with your camera. If you have not stitched on the camera (see "Using Panorama mode...

User Guide
Page 34
... you have transferred the images, you can then use the Share features or Buy Prints Online on the camera's Photosmart Express Menu (see "Using a memory card reader" on the camera. When you encounter problems, set the camera's USB Configuration to Disk Drive (see the Help feature in the HP Photosmart Software. Your computer's provided image transfer software should start. Turn on page 43. Transferring images without HP Photosmart Software If you do not install the HP Photosmart Software: • You cannot use the HP Photosmart Software to transfer your camera directly to...
... you have transferred the images, you can then use the Share features or Buy Prints Online on the camera's Photosmart Express Menu (see "Using a memory card reader" on the camera. When you encounter problems, set the camera's USB Configuration to Disk Drive (see the Help feature in the HP Photosmart Software. Your computer's provided image transfer software should start. Turn on page 43. Transferring images without HP Photosmart Software If you do not install the HP Photosmart Software: • You cannot use the HP Photosmart Software to transfer your camera directly to...
User Guide
Page 40
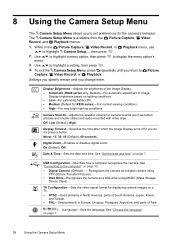
... disables digital zoom. Date & Time-Sets the date and time. On (Default), Off. See "Connecting to highlight Camera Setup..., then press . 2. Use to set preferences for camera sounds (such as a disk drive using PTP (Picture Transfer Protocol). • Disk Drive-Recognizes the camera as button presses and shutter clicks) and audio recorded with video clips. Display Timeout-Specifies the time after which the Image Display turns off if you change them. 8 Using the Camera Setup Menu The Camera Setup Menu allows you to highlight a setting, then press . 4. The Camera Setup Menu...
... disables digital zoom. Date & Time-Sets the date and time. On (Default), Off. See "Connecting to highlight Camera Setup..., then press . 2. Use to set preferences for camera sounds (such as a disk drive using PTP (Picture Transfer Protocol). • Disk Drive-Recognizes the camera as button presses and shutter clicks) and audio recorded with video clips. Display Timeout-Specifies the time after which the Image Display turns off if you change them. 8 Using the Camera Setup Menu The Camera Setup Menu allows you to highlight a setting, then press . 4. The Camera Setup Menu...

User Guide
Page 41
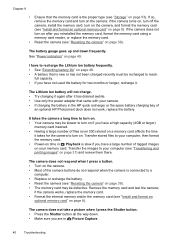
... press buttons, reset the camera. 1. Remove the memory card and battery. 3. NOTE: Known issues are often fixed with new releases of a paper clip into a working electrical outlet, and that power adapter is inserted correctly (see "Set the date and time" on the camera. Problems and solutions Use this section to your digital photography experience, periodically check the Hewlett-Packard Technical Support website (www.hp.com/support) for 3-6 seconds, then release. 4. Use the Buy Prints Online...
... press buttons, reset the camera. 1. Remove the memory card and battery. 3. NOTE: Known issues are often fixed with new releases of a paper clip into a working electrical outlet, and that power adapter is inserted correctly (see "Set the date and time" on the camera. Problems and solutions Use this section to your digital photography experience, periodically check the Hewlett-Packard Technical Support website (www.hp.com/support) for 3-6 seconds, then release. 4. Use the Buy Prints Online...
User Guide
Page 42
... spare battery charging bay of an optional HP Photosmart dock does not work, replace the battery. It takes the camera a long time to a computer. • Replace or recharge the battery. • Reset the camera (see "Install and format an optional memory card" on page 8). The camera does not respond when I have to recharge the Lithium Ion battery frequently. • See "Extending battery life" on page 48. • A battery that is connected to turn on...
... spare battery charging bay of an optional HP Photosmart dock does not work, replace the battery. It takes the camera a long time to a computer. • Replace or recharge the battery. • Reset the camera (see "Install and format an optional memory card" on page 8). The camera does not respond when I have to recharge the Lithium Ion battery frequently. • See "Extending battery life" on page 48. • A battery that is connected to turn on...
User Guide
Page 43
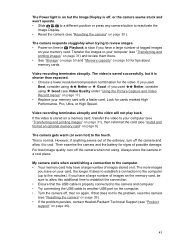
... Specifications. My image is blurry. • Use Focus Lock (see "Using Focus Lock" on page 12). • R830 series: Use Steady Photo shooting mode (see "Setting the flash" on page 17). My image is outside the flash range, turn off (see Steady Photo under "Using the Picture Capture and Video Record menus" on page 39). • Replace or recharge the battery. This causes a longer exposure time, so use a tripod or hold the camera steady, or improve lighting conditions. • Set...
... Specifications. My image is blurry. • Use Focus Lock (see "Using Focus Lock" on page 12). • R830 series: Use Steady Photo shooting mode (see "Setting the flash" on page 17). My image is outside the flash range, turn off (see Steady Photo under "Using the Picture Capture and Video Record menus" on page 39). • Replace or recharge the battery. This causes a longer exposure time, so use a tripod or hold the camera steady, or improve lighting conditions. • Set...
User Guide
Page 45
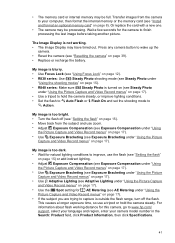
...; Power-on time in a cool place. This is off , or the camera seems stuck and won 't operate. • Slide to a different position or press any camera button to your computer (see "Transferring and printing images" on page 31), then reformat the card (see Video Quality under "Using the Picture Capture and Video Record menus" on page 8). The video is stored on a memory card, transfer the video to reactivate the Image Display. • Reset...
...; Power-on time in a cool place. This is off , or the camera seems stuck and won 't operate. • Slide to a different position or press any camera button to your computer (see "Transferring and printing images" on page 31), then reformat the card (see Video Quality under "Using the Picture Capture and Video Record menus" on page 8). The video is stored on a memory card, transfer the video to reactivate the Image Display. • Reset...

User Guide
Page 48
... (English only) www.hp.com/support www.hp.com/go/windowsvista (English only) Getting assistance To get the best from your camera). 3. 10 Product support Use this section to find support information for your camera's software, drivers, and firmware. HP support by product, country/region, and language. Helpful websites To optimize your digital photography experience, periodically check the websites listed below for updates to your digital camera, including links to the camera's Help screens. 2. Post...
... (English only) www.hp.com/support www.hp.com/go/windowsvista (English only) Getting assistance To get the best from your camera). 3. 10 Product support Use this section to find support information for your camera's software, drivers, and firmware. HP support by product, country/region, and language. Helpful websites To optimize your digital photography experience, periodically check the websites listed below for updates to your digital camera, including links to the camera's Help screens. 2. Post...
User Guide
Page 57
... images 28 D Date & Time 7, 38 Date & Time Imprint 19 deleting images 4, 23 Design Gallery 27 digital zoom 13, 38 dimensions 53 direct print 33 Display Brightness 38 Display Timeout 38 dock insert 5 E e-mail images 36, 37 enhancing photos 28 exposure 13 Exposure Bracketing 19 Exposure Compensation 19, 21 F F-number 52 flash settings 15 working range 52 Flash button 4 focal length 52 focus auto focus 11 brackets 11 focus lock 12 optimizing 12 settings 52 folded lens 5 format memory card 8 G getting assistance 46 H HP Photosmart Express 35 HP Photosmart Software 8 I Image Display 4 Image...
... images 28 D Date & Time 7, 38 Date & Time Imprint 19 deleting images 4, 23 Design Gallery 27 digital zoom 13, 38 dimensions 53 direct print 33 Display Brightness 38 Display Timeout 38 dock insert 5 E e-mail images 36, 37 enhancing photos 28 exposure 13 Exposure Bracketing 19 Exposure Compensation 19, 21 F F-number 52 flash settings 15 working range 52 Flash button 4 focal length 52 focus auto focus 11 brackets 11 focus lock 12 optimizing 12 settings 52 folded lens 5 format memory card 8 G getting assistance 46 H HP Photosmart Express 35 HP Photosmart Software 8 I Image Display 4 Image...
User Guide
Page 58
... 7 remaining pictures count 10 removing red eyes 27 reset camera 39 resolution 52 reviewing images 22 S safety precautions for batteries 48, 50 selecting images for destinations 36, 37 selecting images for printing 35 Self-Timer light 5 setting 18, 20 sending individual images 36, 37 set date and time 7 setting up destinations 36, 37 share pictures 35 shooting mode 15 Shutter button 4, 11 shutter speed 52 slideshow 25 Snow mode 16 software install 8 solving problems 39 sounds of camera 38 space remaining in memory 10 specifications 52...
... 7 remaining pictures count 10 removing red eyes 27 reset camera 39 resolution 52 reviewing images 22 S safety precautions for batteries 48, 50 selecting images for destinations 36, 37 selecting images for printing 35 Self-Timer light 5 setting 18, 20 sending individual images 36, 37 set date and time 7 setting up destinations 36, 37 share pictures 35 shooting mode 15 Shutter button 4, 11 shutter speed 52 slideshow 25 Snow mode 16 software install 8 solving problems 39 sounds of camera 38 space remaining in memory 10 specifications 52...
Quick Start Guide
Page 18
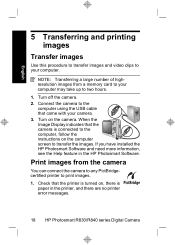
... have installed the HP Photosmart Software and need more information, see the Help feature in the printer, and there are no printer error messages. 18 HP Photosmart R830/R840 series Digital Camera Turn off the camera. 2. English 5 Transferring and printing images Transfer images Use this procedure to transfer images and video clips to your computer may take up to print images. 1. Turn on , there is connected to the computer, follow the instructions on the computer screen to the computer using the USB cable that the camera is...
... have installed the HP Photosmart Software and need more information, see the Help feature in the printer, and there are no printer error messages. 18 HP Photosmart R830/R840 series Digital Camera Turn off the camera. 2. English 5 Transferring and printing images Transfer images Use this procedure to transfer images and video clips to your computer may take up to print images. 1. Turn on , there is connected to the computer, follow the instructions on the computer screen to the computer using the USB cable that the camera is...
Quick Start Guide
Page 20
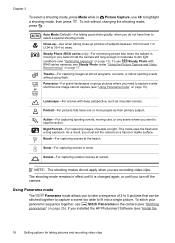
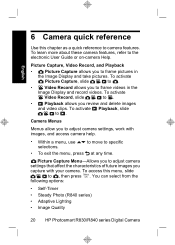
Picture Capture, Video Record, and Playback • Picture Capture allows you to adjust camera settings, work with your camera. To activate Playback, slide to the electronic User Guide or on-camera Help. Camera Menus Menus allow you to frame pictures in the Image Display and record videos. You can select from the following options: • Self-Timer • Steady Photo (R840 series) • Adaptive Lighting • Image Quality 20 HP Photosmart R830/R840 series Digital Camera To activate Video Record, slide to . • Playback allows...
Picture Capture, Video Record, and Playback • Picture Capture allows you to adjust camera settings, work with your camera. To activate Playback, slide to the electronic User Guide or on-camera Help. Camera Menus Menus allow you to frame pictures in the Image Display and record videos. You can select from the following options: • Self-Timer • Steady Photo (R840 series) • Adaptive Lighting • Image Quality 20 HP Photosmart R830/R840 series Digital Camera To activate Video Record, slide to . • Playback allows...


