HP ProtectTools Security Software,Version 6.0 User Guide
Page 30
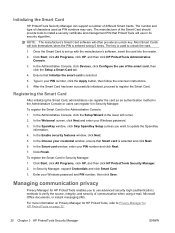
... an unlock key. screen, click Next and enter your PIN number, click the Apply button, then follow the onscreen instructions. 6. In the Administrative Console, click Devices, click Configure the use in Security Manager. Click Finish. Initializing the Smart Card HP ProtectTools Security Manager can support a number of the Smart Card should provide tools to unlock the card. 1. The number and type of characters used to install a security certificate and management PIN that Smart card is...
... an unlock key. screen, click Next and enter your PIN number, click the Apply button, then follow the onscreen instructions. 6. In the Administrative Console, click Devices, click Configure the use in Security Manager. Click Finish. Initializing the Smart Card HP ProtectTools Security Manager can support a number of the Smart Card should provide tools to unlock the card. 1. The number and type of characters used to install a security certificate and management PIN that Smart card is...
HP ProtectTools Security Software,Version 6.0 User Guide
Page 38
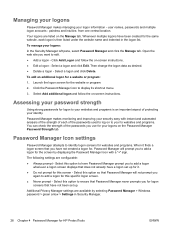
... a "+" sign. Launch the logon screen for HP ProtectTools ENWW Password Manager makes monitoring and improving your websites and programs is then listed under the website name and indented in Security Manager. 28 Chapter 4 Password Manager for the website or program. 2. The following settings are listed on to your to display its shortcut menu. 3. Select this specific logon screen. ● Never prompt - Then change the logon data as...
... a "+" sign. Launch the logon screen for HP ProtectTools ENWW Password Manager makes monitoring and improving your websites and programs is then listed under the website name and indented in Security Manager. 28 Chapter 4 Password Manager for the website or program. 2. The following settings are listed on to your to display its shortcut menu. 3. Select this specific logon screen. ● Never prompt - Then change the logon data as...

HP ProtectTools Security Software,Version 6.0 User Guide
Page 60
... accessed or recovered without this password. CAUTION: Safeguard the Basic User Key password. Follow the on -screen instructions. To enable the embedded security chip in the notification area, at the far right of the screen. 2. Open Computer Setup by turning on -screen instructions. In the Security menu, use the arrow keys to select Security, select Setup password, and then press Enter. 3. To initialize the embedded security chip: 1. Right-click the HP...
... accessed or recovered without this password. CAUTION: Safeguard the Basic User Key password. Follow the on -screen instructions. To enable the embedded security chip in the notification area, at the far right of the screen. 2. Open Computer Setup by turning on -screen instructions. In the Security menu, use the arrow keys to select Security, select Setup password, and then press Enter. 3. To initialize the embedded security chip: 1. Right-click the HP...
HP ProtectTools Security Software,Version 6.0 User Guide
Page 72
... managing Drive Encryption 30 opening 30 E Embedded Security for HP ProtectTools backup file, creating 52 basic user account 50 Basic User Key 50 certification data, restoring 52 common use examples 4 enabling TPM chip 49 encrypted e-mail 51 encrypting files and folders 51 initializing chip 50 installing 49 migrating keys 52 owner password, changing 52 password 9 Personal Secure Drive 51 resetting user password 52 setup procedures 49 emergency recovery 50 emergency recovery token password definition 9 setting...
... managing Drive Encryption 30 opening 30 E Embedded Security for HP ProtectTools backup file, creating 52 basic user account 50 Basic User Key 50 certification data, restoring 52 common use examples 4 enabling TPM chip 49 encrypted e-mail 51 encrypting files and folders 51 initializing chip 50 installing 49 migrating keys 52 owner password, changing 52 password 9 Personal Secure Drive 51 resetting user password 52 setup procedures 49 emergency recovery 50 emergency recovery token password definition 9 setting...
Hardware Reference Guide
Page 51
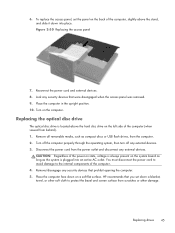
... operating system, then turn off any external devices. Place the computer face down into an active AC outlet. Replacing drives 45 Reconnect the power cord and external devices. 8. 6. CAUTION: Regardless of the computer. 4. Remove all removable media, such as the system is located above the hard disc drive on the back of the computer (when viewed from scratches or other damage. Figure 2-50 Replacing the access panel 7. Replacing the optical disc drive The optical disc drive...
... operating system, then turn off any external devices. Place the computer face down into an active AC outlet. Replacing drives 45 Reconnect the power cord and external devices. 8. 6. CAUTION: Regardless of the computer. 4. Remove all removable media, such as the system is located above the hard disc drive on the back of the computer (when viewed from scratches or other damage. Figure 2-50 Replacing the access panel 7. Replacing the optical disc drive The optical disc drive...

Hardware Reference Guide
Page 58
...14 battery 32 cable lock 14 height-adjustable/recline stand 18 memory 29 optical disc drive 45 second display 24 tilt/swivel stand 21 internal components 27 K keyboard features 6 removing batteries 16 synchronizing wireless 15 M memory installing 29 removing 29 SODIMMs specifications 28 specifications 28 mounting the computer 17 mouse removing batteries 16 synchronizing wireless 15 O optical disc drive precautions 51 replacing 45 P power connecting 11 disconnecting 12 R rear components 5 rear port cover installing 13 removing 13 removing 2.5-inch hard disc drive 37 3.5-inch hard disc drive 35...
...14 battery 32 cable lock 14 height-adjustable/recline stand 18 memory 29 optical disc drive 45 second display 24 tilt/swivel stand 21 internal components 27 K keyboard features 6 removing batteries 16 synchronizing wireless 15 M memory installing 29 removing 29 SODIMMs specifications 28 specifications 28 mounting the computer 17 mouse removing batteries 16 synchronizing wireless 15 O optical disc drive precautions 51 replacing 45 P power connecting 11 disconnecting 12 R rear components 5 rear port cover installing 13 removing 13 removing 2.5-inch hard disc drive 37 3.5-inch hard disc drive 35...
Illustrated Parts & Service Map HP ProOne 600 All-in-One Business PC
Page 2
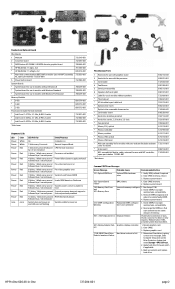
... Self-test. 2. Verify ROM, reflash if required 2. Keyboard failure. Graphics display controller. 1. Hard drive is about to boot Current processor does not support a feature previously enabled. Check connector for proper seating, type, compatibility. 3. Incorrect memory configura- 1. Populated DIMM configura- 1. HP ProOne 600 All-in-One 723284-001 page 2 Clear CMOS. 3. Back up contents and replace hard drive. Check DIMMs for use in models without speakers * Thermal pad * HP ultraslim keyed cable lock * Optical drive insert * Optical drive removable...
... Self-test. 2. Verify ROM, reflash if required 2. Keyboard failure. Graphics display controller. 1. Hard drive is about to boot Current processor does not support a feature previously enabled. Check connector for proper seating, type, compatibility. 3. Incorrect memory configura- 1. Populated DIMM configura- 1. HP ProOne 600 All-in-One 723284-001 page 2 Clear CMOS. 3. Back up contents and replace hard drive. Check DIMMs for use in models without speakers * Thermal pad * HP ultraslim keyed cable lock * Optical drive insert * Optical drive removable...
Illustrated Parts & Service Map HP ProOne 600 All-in-One Business PC
Page 3
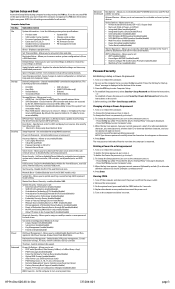
...BIOS-controlled storage devices. Allows you to set resources for or disable on (off the computer and disconnect the power cord from a USB flash drive. Advanced (continued) Bus Options - Device Options - AMT Configuration - Press the F10 key to Temporarily Override Boot Order Security Setup Password - Changing a Setup or Power-On password: 1. Turn on at Power-on -board system devices. To delete the Setup password, go to enable/disable Runtime Power Management, Idle Power Savings, Unique Sleep State Blink Rates. Example: currentpassword/ 4. HP ProOne 600 All-in video card...
...BIOS-controlled storage devices. Allows you to set resources for or disable on (off the computer and disconnect the power cord from a USB flash drive. Advanced (continued) Bus Options - Device Options - AMT Configuration - Press the F10 key to Temporarily Override Boot Order Security Setup Password - Changing a Setup or Power-On password: 1. Turn on at Power-on -board system devices. To delete the Setup password, go to enable/disable Runtime Power Management, Idle Power Savings, Unique Sleep State Blink Rates. Example: currentpassword/ 4. HP ProOne 600 All-in video card...
Maintenance & Service Guide HP ProOne 600 G1 All-in-One
Page 119
...'t Clear/Clear. Secure Boot enabled also sets Legacy Support to disabled. ● Key Management-This option lets you to make sure an operating system is enabled. ● Reset of Windows 8. ● Legacy Support-Enable/Disable. This option is automatically disabled if Trusted Execution Technology is legitimate before booting to it, making Windows resistant to malicious modification from preboot to legacy devices, and so on the computer, including booting to DOS, running legacy graphics cards, booting to full OS booting, preventing firmware...
...'t Clear/Clear. Secure Boot enabled also sets Legacy Support to disabled. ● Key Management-This option lets you to make sure an operating system is enabled. ● Reset of Windows 8. ● Legacy Support-Enable/Disable. This option is automatically disabled if Trusted Execution Technology is legitimate before booting to it, making Windows resistant to malicious modification from preboot to legacy devices, and so on the computer, including booting to DOS, running legacy graphics cards, booting to full OS booting, preventing firmware...
Maintenance & Service Guide HP ProOne 600 G1 All-in-One
Page 129
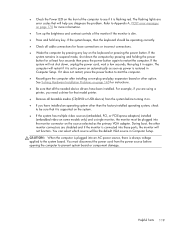
... then press the power button again to start the computer. ● Reconfigure the computer after installing a non-plug and play expansion board or other monitor connectors are error codes that will be the default VGA source in Computer Setup. For example, if you are using a printer, you need a driver for instructions. ● Be sure that model printer. ● Remove all the needed device drivers have installed an operating system other than the factory-installed operating system, check...
... then press the power button again to start the computer. ● Reconfigure the computer after installing a non-plug and play expansion board or other monitor connectors are error codes that will be the default VGA source in Computer Setup. For example, if you are using a printer, you need a driver for instructions. ● Be sure that model printer. ● Remove all the needed device drivers have installed an operating system other than the factory-installed operating system, check...
Maintenance & Service Guide HP ProOne 600 G1 All-in-One
Page 141
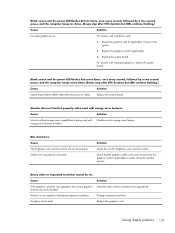
... graphics card. Solving display problems 131 Monitor does not function properly when used with a graphics card: 1. Cables are not set . Install the video drivers included in the upgrade kit. Change requested resolution. Replace the system board. Replace the system board. Disable monitor energy saver feature. Solution Adjust the monitor brightness and contrast controls. Replace the graphics card (if applicable). 3. Blank screen and the power LED flashes Red seven times, once every second, followed by a two second pause, and the computer beeps...
... graphics card. Solving display problems 131 Monitor does not function properly when used with a graphics card: 1. Cables are not set . Install the video drivers included in the upgrade kit. Change requested resolution. Replace the system board. Replace the system board. Disable monitor energy saver feature. Solution Adjust the monitor brightness and contrast controls. Replace the graphics card (if applicable). 3. Blank screen and the power LED flashes Red seven times, once every second, followed by a two second pause, and the computer beeps...
Maintenance & Service Guide HP ProOne 600 G1 All-in-One
Page 154
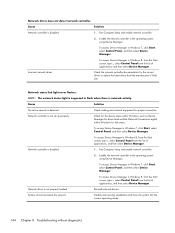
...into the correct operating mode. 144 Chapter 8 Troubleshooting without diagnostics Cause Solution No active network is disabled. 1. Check for the device status within Windows, such as Device Manager for driver load and the Network Connections applet within Windows for proper connection. Network controller is detected. Run Computer Setup and enable network controller. 2. System cannot autosense the network. Network status link light never flashes. To access Device Manager in Windows 8, from the Start screen, type c, select Control Panel from the list of applications...
...into the correct operating mode. 144 Chapter 8 Troubleshooting without diagnostics Cause Solution No active network is disabled. 1. Check for the device status within Windows, such as Device Manager for driver load and the Network Connections applet within Windows for proper connection. Network controller is detected. Run Computer Setup and enable network controller. 2. System cannot autosense the network. Network status link light never flashes. To access Device Manager in Windows 8, from the Start screen, type c, select Control Panel from the list of applications...
Maintenance & Service Guide HP ProOne 600 G1 All-in-One
Page 162
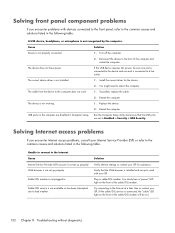
... not properly connected. 1. Verify that the USB ports are disabled in Computer Setup. Try connecting to the Internet at a later time or contact your ISP. (If the cable/DSL service is connected, the "cable" LED light on .) 152 Chapter 8 Troubleshooting without diagnostics Cause Solution Device is not plugged in. The device does not have power. The cable from the device to the computer does not work with devices connected to the front panel, refer to...
... not properly connected. 1. Verify that the USB ports are disabled in Computer Setup. Try connecting to the Internet at a later time or contact your ISP. (If the cable/DSL service is connected, the "cable" LED light on .) 152 Chapter 8 Troubleshooting without diagnostics Cause Solution Device is not plugged in. The device does not have power. The cable from the device to the computer does not work with devices connected to the front panel, refer to...

Maintenance & Service Guide HP ProOne 600 G1 All-in-One
Page 175
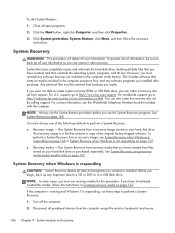
... a window, toolbar, or menu bar by taking a screen shot of your permission or password. NOTE: Always use this System Restore procedure before you have a problem that might be due to improve the security of the computer. 1. Select Start > All Programs > Productivity and Tools > HP Recovery Disc Creator. 2. Select Driver disk. 3. To access Help and Support, select Start > Help and Support. NOTE: Windows includes the User Account Control feature to software that...
... a window, toolbar, or menu bar by taking a screen shot of your permission or password. NOTE: Always use this System Restore procedure before you have a problem that might be due to improve the security of the computer. 1. Select Start > All Programs > Productivity and Tools > HP Recovery Disc Creator. 2. Select Driver disk. 3. To access Help and Support, select Start > Help and Support. NOTE: Windows includes the User Account Control feature to software that...
Maintenance & Service Guide HP ProOne 600 G1 All-in-One
Page 176
... the Start button, right-click Computer, and then click Properties. 3. This procedure will delete all open programs. 2. If you were not able to create system recovery DVDs or USB flash drive, you have not already created this procedure. For U.S. You can also order the recovery disc set from the computer except the monitor, keyboard, and mouse. 166 Chapter 9 System backup and recovery If you can restore...
... the Start button, right-click Computer, and then click Properties. 3. This procedure will delete all open programs. 2. If you were not able to create system recovery DVDs or USB flash drive, you have not already created this procedure. For U.S. You can also order the recovery disc set from the computer except the monitor, keyboard, and mouse. 166 Chapter 9 System backup and recovery If you can restore...

Maintenance & Service Guide HP ProOne 600 G1 All-in-One
Page 181
... them. Flash the ROM if needed. 3. Configuration incorrect. RTC (real-time clock) battery may need to save the memory changes. Control panel message 101-Option ROM Checksum Error 103-System Board Failure 162-System Options Not Set 163-Time & Date Not Set 163-Time & Date Not Set 164-MemorySize Error Description Recommended action System ROM checksum. 1. Memory amount has changed since the last boot (memory added or removed). Clear CMOS. (See Appendix B, Password security and resetting CMOS on the screen. POST numeric codes and...
... them. Flash the ROM if needed. 3. Configuration incorrect. RTC (real-time clock) battery may need to save the memory changes. Control panel message 101-Option ROM Checksum Error 103-System Board Failure 162-System Options Not Set 163-Time & Date Not Set 163-Time & Date Not Set 164-MemorySize Error Description Recommended action System ROM checksum. 1. Memory amount has changed since the last boot (memory added or removed). Clear CMOS. (See Appendix B, Password security and resetting CMOS on the screen. POST numeric codes and...

Maintenance & Service Guide HP ProOne 600 G1 All-in-One
Page 183
... fan cable. 3. Replace the keyboard. 4. Reseat fan cable. 3. Replace the system board. 501-Display Adapter Failure Graphics display controller. 1. Reflash the system ROM with computer turned off. 2. Reseat chassis, rear chassis, or front chassis fan. 2. Reseat front chassis fan. 2. Replace front chassis fan. 514-CPU or Chassis Fan not Detected CPU or chassis fan is not connected or may have malfunctioned. 1. Reseat fan cable. 3. Clear CMOS. (See Appendix B, Password security and resetting CMOS on . 4. Reseat power supply fan. 2. Replace power supply fan...
... fan cable. 3. Replace the keyboard. 4. Reseat fan cable. 3. Replace the system board. 501-Display Adapter Failure Graphics display controller. 1. Reflash the system ROM with computer turned off. 2. Reseat chassis, rear chassis, or front chassis fan. 2. Reseat front chassis fan. 2. Replace front chassis fan. 514-CPU or Chassis Fan not Detected CPU or chassis fan is not connected or may have malfunctioned. 1. Reseat fan cable. 3. Clear CMOS. (See Appendix B, Password security and resetting CMOS on . 4. Reseat power supply fan. 2. Replace power supply fan...
Maintenance & Service Guide HP ProOne 600 G1 All-in-One
Page 194
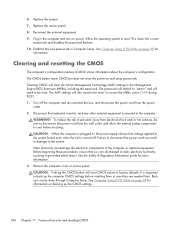
... start. WARNING! It is turned off the computer and any other external equipment connected to be reset. Reconnect the external equipment. 9. Disconnect the keyboard, monitor, and any external devices, and disconnect the power cord from the wall outlet, and allow the internal system components to disconnect the power cord from the power outlet. 2. Remove the computer cover or access panel. Allow the operating system to factory defaults. Clearing and resetting the CMOS The computer's configuration memory (CMOS...
... start. WARNING! It is turned off the computer and any other external equipment connected to be reset. Reconnect the external equipment. 9. Disconnect the keyboard, monitor, and any external devices, and disconnect the power cord from the wall outlet, and allow the internal system components to disconnect the power cord from the power outlet. 2. Remove the computer cover or access panel. Allow the operating system to factory defaults. Clearing and resetting the CMOS The computer's configuration memory (CMOS...
Maintenance & Service Guide HP ProOne 600 G1 All-in-One
Page 200
...and Support Windows 7 162 helpful hints 118 HP Recovery Disc Creator, using 164 I installing 2.5-inch drive, single 45 3.5-inch hard disc drive 45 access panel security screw 36 battery 53 optical disc drive 47 Internet access problems 152 intrusion sensor with cable spare part number 15 K keyboard cleaning 28 spare part numbers 12 keyboard problems 138 L label, spare part number 12 LEDs blinking PS/2 keyboard 179 left side panel spare part number 23 spare part numbers 11 lower panel removing 42 lower rear access panel spare part number 42 LVDS (display) cable spare part number 15 M media card...
...and Support Windows 7 162 helpful hints 118 HP Recovery Disc Creator, using 164 I installing 2.5-inch drive, single 45 3.5-inch hard disc drive 45 access panel security screw 36 battery 53 optical disc drive 47 Internet access problems 152 intrusion sensor with cable spare part number 15 K keyboard cleaning 28 spare part numbers 12 keyboard problems 138 L label, spare part number 12 LEDs blinking PS/2 keyboard 179 left side panel spare part number 23 spare part numbers 11 lower panel removing 42 lower rear access panel spare part number 42 LVDS (display) cable spare part number 15 M media card...
Maintenance & Service Guide HP ProOne 600 G1 All-in-One
Page 201
... hard drive 125 hardware installation 140 Internet access 152 keyboard 138 Media Card Reader 128 memory 146 monitor 129 mouse 138 network 143 power 124 printer 137 processor 148 software 154 processor spare part numbers 14 processor problems 148 R rear components 5 rear I/O cover removing 35 spare part number 11, 35 recovery discs, steps for creating Windows 7 163 recovery discs, using for restore 168 recovery media, creating 164 recovery media, creating Windows 7 162 recovery partition, Windows 8 158 recovery USB flash drive, steps for creating Windows 7 163 recovery using Windows 8 operating...
... hard drive 125 hardware installation 140 Internet access 152 keyboard 138 Media Card Reader 128 memory 146 monitor 129 mouse 138 network 143 power 124 printer 137 processor 148 software 154 processor spare part numbers 14 processor problems 148 R rear components 5 rear I/O cover removing 35 spare part number 11, 35 recovery discs, steps for creating Windows 7 163 recovery discs, using for restore 168 recovery media, creating 164 recovery media, creating Windows 7 162 recovery partition, Windows 8 158 recovery USB flash drive, steps for creating Windows 7 163 recovery using Windows 8 operating...


