Limited Warranty Statement
Page 5
... any implied warranties imposed by this LWS from limiting the statutory rights of your HP product, you with the Product name (HP Photosmart M437/M537 series Digital Cameras) or Product numbers (L2443A, L2449A). For European customers only... The name and address of the HP entity responsible for each applicable country or region. Get award winning assistance, 24x7 at end-of-life: • Lithium-iron disulfide, Alkaline manganese dioxide-zinc AA, or Nickel Metal-Hydride batteries...
... any implied warranties imposed by this LWS from limiting the statutory rights of your HP product, you with the Product name (HP Photosmart M437/M537 series Digital Cameras) or Product numbers (L2443A, L2449A). For European customers only... The name and address of the HP entity responsible for each applicable country or region. Get award winning assistance, 24x7 at end-of-life: • Lithium-iron disulfide, Alkaline manganese dioxide-zinc AA, or Nickel Metal-Hydride batteries...

Limited Warranty Statement
Page 6
... case or attempt to repair the camera yourself. Allow the camera to air dry completely before operating it to the instructions. 4 HP M437/M537 Photosmart Warranty L2442-90009_Warranty.fm Page 4 Tuesday, October 17, 2006 12:06 AM Safety precautions • To avoid the risk of electric... wireless dock base approved by an incorrect type. Caution: Risk of explosion if battery is replaced by HP for your camera. Contact an authorized HP Service Center for your camera's warranty. Use of used batteries according to malfunction. • If moisture gets inside the camera, stop using the...
... case or attempt to repair the camera yourself. Allow the camera to air dry completely before operating it to the instructions. 4 HP M437/M537 Photosmart Warranty L2442-90009_Warranty.fm Page 4 Tuesday, October 17, 2006 12:06 AM Safety precautions • To avoid the risk of electric... wireless dock base approved by an incorrect type. Caution: Risk of explosion if battery is replaced by HP for your camera. Contact an authorized HP Service Center for your camera's warranty. Use of used batteries according to malfunction. • If moisture gets inside the camera, stop using the...
Quick Start Guide
Page 5
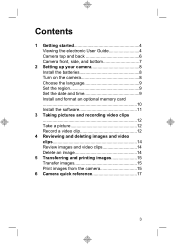
Contents 1 Getting started 4 Viewing the electronic User Guide 4 Camera top and back 6 Camera front, side, and bottom 7 2 Setting up your camera 8 Install the batteries 8 Turn on the camera 8 Choose the language 9 Set the region 9 Set the date and time 9 Install and format an optional memory card 10 Install the ...
Contents 1 Getting started 4 Viewing the electronic User Guide 4 Camera top and back 6 Camera front, side, and bottom 7 2 Setting up your camera 8 Install the batteries 8 Turn on the camera 8 Choose the language 9 Set the region 9 Set the date and time 9 Install and format an optional memory card 10 Install the ...
Quick Start Guide
Page 6
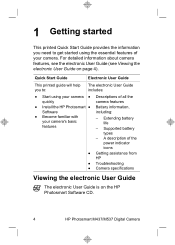
... all the quickly camera features ● Install the HP Photosmart ● Battery information, Software including: ● Become familiar with your camera. Supported battery types - Extending battery life - For detailed information about camera features, see the electronic User Guide (see Viewing the electronic User Guide on the HP Photosmart Software CD. 4 HP Photosmart M437/M537 Digital Camera A description of your camera...
... all the quickly camera features ● Install the HP Photosmart ● Battery information, Software including: ● Become familiar with your camera. Supported battery types - Extending battery life - For detailed information about camera features, see the electronic User Guide (see Viewing the electronic User Guide on the HP Photosmart Software CD. 4 HP Photosmart M437/M537 Digital Camera A description of your camera...
Quick Start Guide
Page 9
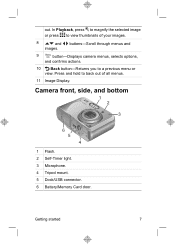
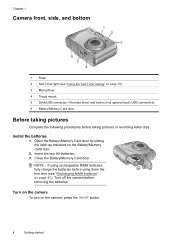
In Playback, press to magnify the selected image or press to a previous menu or view. out. Camera front, side, and bottom 1 2 3 6 5 4 1 Flash. 2 Self-Timer light. 3 Microphone. 4 Tripod mount. 5 Dock/USB connector. 6 Battery/Memory Card door. buttons-Scroll through menus and 9 button-Displays camera menus, selects options, and confirms actions. 10 Back button-Returns you to view thumbnails of all menus. 11 Image Display. Press and hold to back out of your images. 8 and images. Getting started 7
In Playback, press to magnify the selected image or press to a previous menu or view. out. Camera front, side, and bottom 1 2 3 6 5 4 1 Flash. 2 Self-Timer light. 3 Microphone. 4 Tripod mount. 5 Dock/USB connector. 6 Battery/Memory Card door. buttons-Scroll through menus and 9 button-Displays camera menus, selects options, and confirms actions. 10 Back button-Returns you to view thumbnails of all menus. 11 Image Display. Press and hold to back out of your images. 8 and images. Getting started 7
Quick Start Guide
Page 10
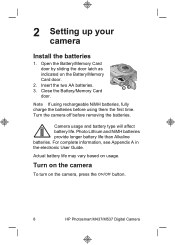
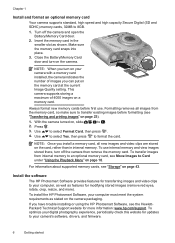
... the camera To turn on the Battery/Memory Card door. 2. Photo Lithium and NiMH batteries provide longer battery life than Alkaline batteries. Insert the two AA batteries. 3. Open the Battery/Memory Card door by sliding the door latch as indicated on the camera, press the button. 8 HP Photosmart M437/M537 Digital Camera Close the Battery/Memory Card door. For complete...
... the camera To turn on the Battery/Memory Card door. 2. Photo Lithium and NiMH batteries provide longer battery life than Alkaline batteries. Insert the two AA batteries. 3. Open the Battery/Memory Card door by sliding the door latch as indicated on the camera, press the button. 8 HP Photosmart M437/M537 Digital Camera Close the Battery/Memory Card door. For complete...
Quick Start Guide
Page 12
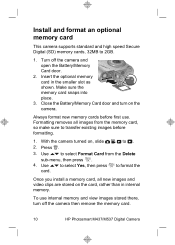
... the Battery/Memory Card door and turn on , slide to transfer existing images before first use internal memory and view images stored there, turn off the camera and open the Battery/Memory Card door. 2. With the camera turned on the camera. Turn off the camera then remove the memory card. 10 HP Photosmart M437/M537...
... the Battery/Memory Card door and turn on , slide to transfer existing images before first use internal memory and view images stored there, turn off the camera and open the Battery/Memory Card door. 2. With the camera turned on the camera. Turn off the camera then remove the memory card. 10 HP Photosmart M437/M537...
Quick Start Guide
Page 21
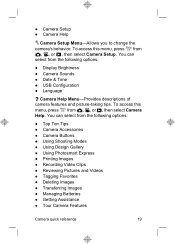
... select from the following options: ● Top Ten Tips ● Camera Accessories ● Camera Buttons ● Using Shooting Modes ● Using Design Gallery ● Using Photosmart Express ● Printing Images ● Recording Video Clips ● Reviewing Pictures and Videos ● Tagging Favorites ● Deleting Images ● Transferring Images ● Managing...
... select from the following options: ● Top Ten Tips ● Camera Accessories ● Camera Buttons ● Using Shooting Modes ● Using Design Gallery ● Using Photosmart Express ● Printing Images ● Recording Video Clips ● Reviewing Pictures and Videos ● Tagging Favorites ● Deleting Images ● Transferring Images ● Managing...
Quick Start Guide
Page 22
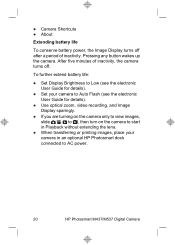
... wakes up the camera. After five minutes of inactivity, the camera turns off after a period of inactivity. To further extend battery life: ● Set Display Brightness to Low (see the electronic User Guide for details). ● Set your camera to Auto... in Playback without extending the lens. ● When transferring or printing images, place your camera in an optional HP Photosmart dock connected to AC power. 20 HP Photosmart M437/M537 Digital Camera ● Camera Shortcuts ● About Extending battery life To conserve battery power, the Image Display turns off .
... wakes up the camera. After five minutes of inactivity, the camera turns off after a period of inactivity. To further extend battery life: ● Set Display Brightness to Low (see the electronic User Guide for details). ● Set your camera to Auto... in Playback without extending the lens. ● When transferring or printing images, place your camera in an optional HP Photosmart dock connected to AC power. 20 HP Photosmart M437/M537 Digital Camera ● Camera Shortcuts ● About Extending battery life To conserve battery power, the Image Display turns off .
User Guide
Page 3
Contents 1 Getting started Camera top and back ...3 Camera front, side, and bottom 4 Before taking pictures...4 Install the batteries...4 Turn on the camera...4 Choose the language...5 Set the region...5 Set the date and time...5 Install and format an optional memory card 6 Install the software...6 ...
Contents 1 Getting started Camera top and back ...3 Camera front, side, and bottom 4 Before taking pictures...4 Install the batteries...4 Turn on the camera...4 Choose the language...5 Set the region...5 Set the date and time...5 Install and format an optional memory card 6 Install the software...6 ...
User Guide
Page 4
...the computer 24 Using a memory card reader 25 Printing images directly to a printer 25 7 Using HP Photosmart Express Using the Photosmart Express Menu 27 Marking images for printing...27 Buying prints online...29 Sharing images...29 Setting up online... Helpful websites...38 Getting assistance...38 A Managing batteries Top points about batteries...39 Extending battery life...39 Safety precautions for using batteries 39 Power indicators...40 Number of shots per battery type 40 Battery performance...41 Recharging NiMH batteries...41 B Specifications Memory capacity...43 Image quality......
...the computer 24 Using a memory card reader 25 Printing images directly to a printer 25 7 Using HP Photosmart Express Using the Photosmart Express Menu 27 Marking images for printing...27 Buying prints online...29 Sharing images...29 Setting up online... Helpful websites...38 Getting assistance...38 A Managing batteries Top points about batteries...39 Extending battery life...39 Safety precautions for using batteries 39 Power indicators...40 Number of shots per battery type 40 Battery performance...41 Recharging NiMH batteries...41 B Specifications Memory capacity...43 Image quality......
User Guide
Page 6
... video clips. Turn on the camera To turn on the Battery/Memory Card door. 2. Chapter 1 Camera front, side, and bottom 1 2 3 6 5 4 1 Flash. 2 Self-Timer light (see "Recharging NiMH batteries" on page 41). Open the Battery/Memory Card door by sliding the latch as indicated on the... camera, press the button. 4 Getting started Install the batteries 1. NOTE: If using rechargeable NiMH batteries, fully charge the batteries before using them the first time (see "Using the Self-Timer setting" on page 15). 3 Microphone. 4 Tripod ...
... video clips. Turn on the camera To turn on the Battery/Memory Card door. 2. Chapter 1 Camera front, side, and bottom 1 2 3 6 5 4 1 Flash. 2 Self-Timer light (see "Recharging NiMH batteries" on page 41). Open the Battery/Memory Card door by sliding the latch as indicated on the... camera, press the button. 4 Getting started Install the batteries 1. NOTE: If using rechargeable NiMH batteries, fully charge the batteries before using them the first time (see "Using the Self-Timer setting" on page 15). 3 Microphone. 4 Tripod ...
User Guide
Page 8
... for transferring images and video clips to your computer, as well as shown. NOTE: Once you have trouble installing or using the HP Photosmart Software, see "Transferring and printing images" on page 23). 1. To use . To transfer images from the memory card, so ...camera indicates the number of 4000 images on the camera packaging. Close the Battery/Memory Card door and turn on your camera's software, drivers, and firmware. 6 Getting started Install the software The HP Photosmart Software provides features for more ). Insert the memory card in internal memory....
... for transferring images and video clips to your computer, as well as shown. NOTE: Once you have trouble installing or using the HP Photosmart Software, see "Transferring and printing images" on page 23). 1. To use . To transfer images from the memory card, so ...camera indicates the number of 4000 images on the camera packaging. Close the Battery/Memory Card door and turn on your camera's software, drivers, and firmware. 6 Getting started Install the software The HP Photosmart Software provides features for more ). Insert the memory card in internal memory....
User Guide
Page 10
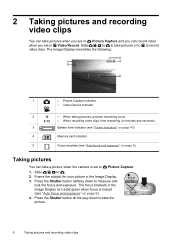
Frame the subject for your picture in minutes and seconds). 3 Battery level indicator (see "Power indicators" on page 40). 4 Memory card indicator. 5 Focus brackets (see "Auto focus and exposure" on page 9). Slide to measure and lock ...
Frame the subject for your picture in minutes and seconds). 3 Battery level indicator (see "Power indicators" on page 40). 4 Memory card indicator. 5 Focus brackets (see "Auto focus and exposure" on page 9). Slide to measure and lock ...
User Guide
Page 19
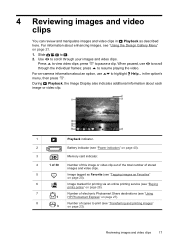
... about enhancing images, see "Transferring and printing images" 3 on -camera information about each image or video clip. 1 Playback indicator. 2 Battery indicator (see "Power indicators" on page 40). 3 Memory card indicator. 4 1 of 30 Number of this image or video clip out...6 Image marked for printing via an online printing service (see "Buying prints online" on page 29). 7 Number of electronic Photosmart Share destinations (see "Using 1 HP Photosmart Express" on page 21. 1. Reviewing images and video clips 17 Slide to print (see "Using the Design Gallery Menu"...
... about enhancing images, see "Transferring and printing images" 3 on -camera information about each image or video clip. 1 Playback indicator. 2 Battery indicator (see "Power indicators" on page 40). 3 Memory card indicator. 4 1 of 30 Number of this image or video clip out...6 Image marked for printing via an online printing service (see "Buying prints online" on page 29). 7 Number of electronic Photosmart Share destinations (see "Using 1 HP Photosmart Express" on page 21. 1. Reviewing images and video clips 17 Slide to print (see "Using the Design Gallery Menu"...
User Guide
Page 25
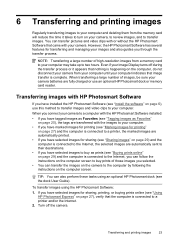
... (see "Install the software" on page 6), use an optional HP Photosmart dock or memory card reader. When transferring a large number of images, be sure your camera batteries are transferred with your computer. • If you have marked images for printing (see "Marking images for printing...is connected to the Internet, you selected. • You can also perform these tasks using the HP Photosmart Software: 1. To transfer images using an optional HP Photosmart dock (see "Using HP Photosmart Express" on page 27), verify that nothing is happening on the computer, do not disconnect your ...
... (see "Install the software" on page 6), use an optional HP Photosmart dock or memory card reader. When transferring a large number of images, be sure your camera batteries are transferred with your computer. • If you have marked images for printing (see "Marking images for printing...is connected to the Internet, you selected. • You can also perform these tasks using the HP Photosmart Software: 1. To transfer images using an optional HP Photosmart dock (see "Using HP Photosmart Express" on page 27), verify that nothing is happening on the computer, do not disconnect your ...
User Guide
Page 33
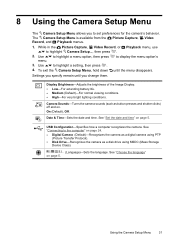
... allows you to highlight Camera Setup..., then press . 2. Settings you change them. Display Brightness-Adjusts the brightness of the Image Display. • Low-For extending battery life. • Medium (Default)-For normal viewing conditions. • High-For very bright lighting conditions. Date & Time-Sets the date and time. See "Choose the...
... allows you to highlight Camera Setup..., then press . 2. Settings you change them. Display Brightness-Adjusts the brightness of the Image Display. • Low-For extending battery life. • Medium (Default)-For normal viewing conditions. • High-For very bright lighting conditions. Date & Time-Sets the date and time. See "Choose the...
User Guide
Page 34
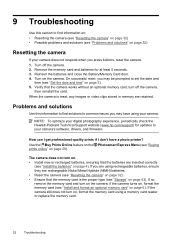
...? NOTE: To optimize your digital photography experience, periodically check the Hewlett-Packard Technical Support website (www.hp.com/support) for at least 5 seconds. 3. Reinsert the batteries and close the Battery/Memory Card door. 4. When the camera is the proper type (see "Storage" on page 43).... How can I get professional-quality prints if I don't have using your camera. Use the Buy Prints Online feature on the Photosmart Express Menu (see...
...? NOTE: To optimize your digital photography experience, periodically check the Hewlett-Packard Technical Support website (www.hp.com/support) for at least 5 seconds. 3. Reinsert the batteries and close the Battery/Memory Card door. 4. When the camera is the proper type (see "Storage" on page 43).... How can I get professional-quality prints if I don't have using your camera. Use the Buy Prints Online feature on the Photosmart Express Menu (see...
User Guide
Page 35
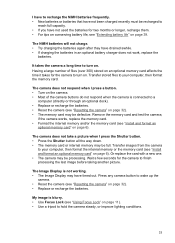
... a long time to wake up the camera. • Reset the camera (see "Resetting the camera" on page 32). • Replace or recharge the batteries. Press any camera button to turn on . I have to turn on . Having a large number of files (over 300) stored on the camera. •... conditions. Or replace the card with a new one. • The camera may be full. I have to recharge the NiMH batteries frequently. • New batteries or batteries that have not been charged recently must be recharged to your computer, then format the internal memory or the memory card (see "Install...
... a long time to wake up the camera. • Reset the camera (see "Resetting the camera" on page 32). • Replace or recharge the batteries. Press any camera button to turn on . I have to turn on . Having a large number of files (over 300) stored on the camera. •... conditions. Or replace the card with a new one. • The camera may be full. I have to recharge the NiMH batteries frequently. • New batteries or batteries that have not been charged recently must be recharged to your computer, then format the internal memory or the memory card (see "Install...
User Guide
Page 37
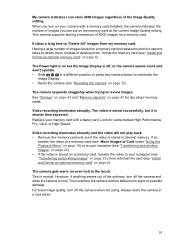
... the camera (see "Install and format an optional memory card" on page 32). This is stored in a cool place. Then examine the camera and the batteries for signs of deleting them . Replace your computer (see "Transferring and printing images" on page 23). • If the video is shorter than expected. Look...
... the camera (see "Install and format an optional memory card" on page 32). This is stored in a cool place. Then examine the camera and the batteries for signs of deleting them . Replace your computer (see "Transferring and printing images" on page 23). • If the video is shorter than expected. Look...


