Limited Warranty Statement
Page 27
... Hanover Street Palo Alto, Ca 94304 (650) 857-1501 HP Photosmart M437/M537 Digital Camera Declaration of Conformity (European Economic Area) According to ISO/IEC 17050-1 and EN 17050-1: Supplier's name: Hewlett-Packard Singapore (Pte) Ltd Imaging and Printing Manufacturing Operation Singapore declares that interference will not occur in a particular installation. L2442-90009_Warranty.fm Page 25 Tuesday, October 17, 2006...
... Hanover Street Palo Alto, Ca 94304 (650) 857-1501 HP Photosmart M437/M537 Digital Camera Declaration of Conformity (European Economic Area) According to ISO/IEC 17050-1 and EN 17050-1: Supplier's name: Hewlett-Packard Singapore (Pte) Ltd Imaging and Printing Manufacturing Operation Singapore declares that interference will not occur in a particular installation. L2442-90009_Warranty.fm Page 25 Tuesday, October 17, 2006...
Quick Start Guide
Page 5
... Getting started 4 Viewing the electronic User Guide 4 Camera top and back 6 Camera front, side, and bottom 7 2 Setting up your camera 8 Install the batteries 8 Turn on the camera 8 Choose the language 9 Set the region 9 Set the date and time 9 Install and format an optional memory card 10 Install the software 11 3 Taking pictures and recording video clips 12 Take a picture 12 Record a video clip 12 4 Reviewing and deleting images and video clips 14 Review images and video clips 14 Delete an image 14 5 Transferring and printing images 15 Transfer images 15 Print images from...
... Getting started 4 Viewing the electronic User Guide 4 Camera top and back 6 Camera front, side, and bottom 7 2 Setting up your camera 8 Install the batteries 8 Turn on the camera 8 Choose the language 9 Set the region 9 Set the date and time 9 Install and format an optional memory card 10 Install the software 11 3 Taking pictures and recording video clips 12 Take a picture 12 Record a video clip 12 4 Reviewing and deleting images and video clips 14 Review images and video clips 14 Delete an image 14 5 Transferring and printing images 15 Transfer images 15 Print images from...
Quick Start Guide
Page 7
... copied to help . To view the User Guide after it has been installed on your computer. 2. On Macintosh: Open the readme file in the docs folder on the main page of your computer: ● On Windows: Open the HP Solution Center and click on Learn About: Digital Photography (English only). ● For product assistance, diagnostics, and driver downloads 24x7, visit www.hp.com/support. ● For help with the HP Photosmart Software, see the software's online help...
... copied to help . To view the User Guide after it has been installed on your computer. 2. On Macintosh: Open the readme file in the docs folder on the main page of your computer: ● On Windows: Open the HP Solution Center and click on Learn About: Digital Photography (English only). ● For product assistance, diagnostics, and driver downloads 24x7, visit www.hp.com/support. ● For help with the HP Photosmart Software, see the software's online help...
Quick Start Guide
Page 12
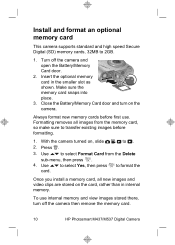
... memory card snaps into place. 3. Once you install a memory card, all images from the Delete sub-menu, then press . 4. Insert the optional memory card in internal memory. Always format new memory cards before formatting. 1. Press . 3. Turn off the camera then remove the memory card. 10 HP Photosmart M437/M537 Digital Camera To use . Install and format an optional memory card This camera supports standard and high speed Secure Digital (SD) memory cards, 32MB to format the card. Close the Battery/Memory Card door and turn off the camera and open the Battery/Memory Card...
... memory card snaps into place. 3. Once you install a memory card, all images from the Delete sub-menu, then press . 4. Insert the optional memory card in internal memory. Always format new memory cards before formatting. 1. Press . 3. Turn off the camera then remove the memory card. 10 HP Photosmart M437/M537 Digital Camera To use . Install and format an optional memory card This camera supports standard and high speed Secure Digital (SD) memory cards, 32MB to format the card. Close the Battery/Memory Card door and turn off the camera and open the Battery/Memory Card...
User Guide
Page 3
... focus...10 Using Focus Lock...11 Optimizing exposure...11 Using zoom...11 Optical zoom...12 Digital zoom...12 3 Setting options for taking pictures and recording video clips Setting the flash...13 Flash Setting-Red-Eye...13 Using the Picture Capture and Video Record menus 14 Using the Self-Timer setting 15 Using the Burst setting...15 4 Reviewing images and video clips Deleting images...18 Viewing thumbnails...18 Magnifying images...18 Using the Playback Menu...18 Removing red eyes...19 Tagging images as Favorites 20 Viewing slideshows...20 5 Using the Design Gallery Menu Modifying colors...
... focus...10 Using Focus Lock...11 Optimizing exposure...11 Using zoom...11 Optical zoom...12 Digital zoom...12 3 Setting options for taking pictures and recording video clips Setting the flash...13 Flash Setting-Red-Eye...13 Using the Picture Capture and Video Record menus 14 Using the Self-Timer setting 15 Using the Burst setting...15 4 Reviewing images and video clips Deleting images...18 Viewing thumbnails...18 Magnifying images...18 Using the Playback Menu...18 Removing red eyes...19 Tagging images as Favorites 20 Viewing slideshows...20 5 Using the Design Gallery Menu Modifying colors...
User Guide
Page 4
...printer 25 7 Using HP Photosmart Express Using the Photosmart Express Menu 27 Marking images for printing...27 Buying prints online...29 Sharing images...29 Setting up online destinations in the camera 29 Sending images to online destinations 30 8 Using the Camera Setup Menu 31 9 Troubleshooting Resetting the camera...32 Problems and solutions...32 Camera error messages...36 10 Product support Helpful websites...38 Getting assistance...38 A Managing batteries Top points about batteries...39 Extending battery life...39 Safety precautions for using batteries 39 Power indicators...40 Number...
...printer 25 7 Using HP Photosmart Express Using the Photosmart Express Menu 27 Marking images for printing...27 Buying prints online...29 Sharing images...29 Setting up online destinations in the camera 29 Sending images to online destinations 30 8 Using the Camera Setup Menu 31 9 Troubleshooting Resetting the camera...32 Problems and solutions...32 Camera error messages...36 10 Product support Helpful websites...38 Getting assistance...38 A Managing batteries Top points about batteries...39 Extending battery life...39 Safety precautions for using batteries 39 Power indicators...40 Number...
User Guide
Page 8
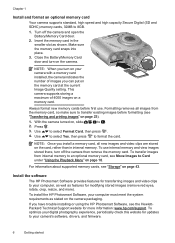
...and open the Battery/Memory Card door. 2. Close the Battery/Memory Card door and turn on a memory card. Chapter 1 Install and format an optional memory card Your camera supports standard, high speed and high capacity Secure Digital (SD and SDHC) memory cards, 32MB to select Format Card, then press . 4. Install the software The HP Photosmart Software provides features for modifying stored images (remove red eyes, rotate, crop, resize, and more information: www.hp.com/support. Turn off the camera then remove the memory card. Use to 8GB. 1. Make sure the memory card...
...and open the Battery/Memory Card door. 2. Close the Battery/Memory Card door and turn on a memory card. Chapter 1 Install and format an optional memory card Your camera supports standard, high speed and high capacity Secure Digital (SD and SDHC) memory cards, 32MB to select Format Card, then press . 4. Install the software The HP Photosmart Software provides features for modifying stored images (remove red eyes, rotate, crop, resize, and more information: www.hp.com/support. Turn off the camera then remove the memory card. Use to 8GB. 1. Make sure the memory card...
User Guide
Page 9
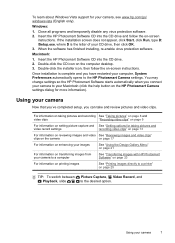
... setup, you have restarted your Macintosh (click the help button on the computer desktop. 3. To learn about Windows Vista support for your camera 7 Insert the HP Photosmart Software CD into the CD drive. 2. Insert the HP Photosmart Software CD into the CD drive and follow the on page 25 TIP: To switch between Picture Capture, Video Record, and Playback, slide to a printer" on -screen instructions. Double-click the CD icon on the HP Photosmart Camera settings...
... setup, you have restarted your Macintosh (click the help button on the computer desktop. 3. To learn about Windows Vista support for your camera 7 Insert the HP Photosmart Software CD into the CD drive. 2. Insert the HP Photosmart Software CD into the CD drive and follow the on page 25 TIP: To switch between Picture Capture, Video Record, and Playback, slide to a printer" on -screen instructions. Double-click the CD icon on the HP Photosmart Camera settings...

User Guide
Page 12
... the camera cannot focus, it finds focus, the focus brackets turn red. If the focus brackets do not frame your subject, use Focus Lock (see Auto under "Using the Picture Capture and Video Record menus" on page 11). 10 Taking pictures and recording video clips This indicates the picture may be out of the focus range or the scene has low contrast. If you are capturing (see Shooting Mode under "Using the Picture Capture and Video Record menus...
... the camera cannot focus, it finds focus, the focus brackets turn red. If the focus brackets do not frame your subject, use Focus Lock (see Auto under "Using the Picture Capture and Video Record menus" on page 11). 10 Taking pictures and recording video clips This indicates the picture may be out of the focus range or the scene has low contrast. If you are capturing (see Shooting Mode under "Using the Picture Capture and Video Record menus...

User Guide
Page 13
..., set the proper exposure. Digital zoom uses no moving lens parts. Using zoom 11 Try one of the following: • Set the flash to Steady Photo (see the suggestions in "Optimizing exposure" on the subject of time required. After you are recording a video, the camera continuously updates exposure. If appears when you are taking a picture and press the Shutter button halfway down, the camera also measures the light level to set the shooting mode to Auto Flash or Flash On (see "Setting the flash...
..., set the proper exposure. Digital zoom uses no moving lens parts. Using zoom 11 Try one of the following: • Set the flash to Steady Photo (see the suggestions in "Optimizing exposure" on the subject of time required. After you are recording a video, the camera continuously updates exposure. If appears when you are taking a picture and press the Shutter button halfway down, the camera also measures the light level to set the shooting mode to Auto Flash or Flash On (see "Setting the flash...
User Guide
Page 16
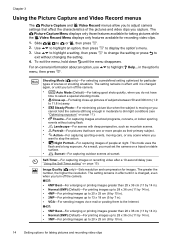
... 15). Use to highlight a setting, then press to change the setting or press to or , then press . 2. The setting remains in ). 14 Setting options for recording video clips. 1. The Picture Capture Menu displays only those features available for taking close-up -For taking pictures while the Video Record Menu displays only features available for taking pictures and recording video clips The greater the number, the higher the resolution. This mode uses the flash and a long exposure. For...
... 15). Use to highlight a setting, then press to change the setting or press to or , then press . 2. The setting remains in ). 14 Setting options for recording video clips. 1. The Picture Capture Menu displays only those features available for taking close-up -For taking pictures while the Video Record Menu displays only features available for taking pictures and recording video clips The greater the number, the higher the resolution. This mode uses the flash and a long exposure. For...
User Guide
Page 25
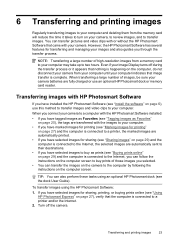
... images" on page 29) and the computer is connected to the Internet, the selected images are fully charged or use this method to transfer images and video clips to your images and also guides you can transfer the images on the camera to the computer by following the instructions on the computer screen. However, the HP Photosmart Software has several features for sharing, printing, or buying prints online (see the dock User Guide...
... images" on page 29) and the computer is connected to the Internet, the selected images are fully charged or use this method to transfer images and video clips to your images and also guides you can transfer the images on the camera to the computer by following the instructions on the computer screen. However, the HP Photosmart Software has several features for sharing, printing, or buying prints online (see the dock User Guide...
User Guide
Page 26
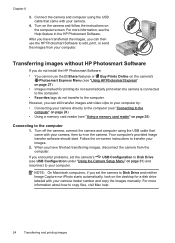
... HP Photosmart Software. For more information, see "Using a memory card reader" on page 31) and reconnect to your camera model number and copy the images manually. Chapter 6 3. However, you encounter problems, set the camera to your computer by: • Connecting your images. 2. If you can then use the Share features or Buy Prints Online on the camera's Photosmart Express Menu (see USB Configuration under "Using the Camera Setup Menu" on page 25) Connecting to copy files, visit Mac help. 24 Transferring and printing images Transferring images without HP Photosmart Software...
... HP Photosmart Software. For more information, see "Using a memory card reader" on page 31) and reconnect to your camera model number and copy the images manually. Chapter 6 3. However, you encounter problems, set the camera to your computer by: • Connecting your images. 2. If you can then use the Share features or Buy Prints Online on the camera's Photosmart Express Menu (see USB Configuration under "Using the Camera Setup Menu" on page 25) Connecting to copy files, visit Mac help. 24 Transferring and printing images Transferring images without HP Photosmart Software...
User Guide
Page 34
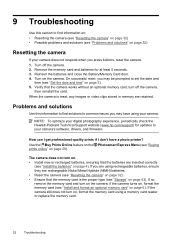
... you press buttons, reset the camera. 1. if the camera turns on, format the memory card (see "Install the batteries" on page 5). 5. NOTE: To optimize your digital photography experience, periodically check the Hewlett-Packard Technical Support website (www.hp.com/support) for at least 5 seconds. 3. If you may have a photo printer? Reinsert the batteries and close the Battery/Memory Card door. 4. Use the Buy Prints Online feature on the Photosmart Express Menu (see "Set the date and time" on...
... you press buttons, reset the camera. 1. if the camera turns on, format the memory card (see "Install the batteries" on page 5). 5. NOTE: To optimize your digital photography experience, periodically check the Hewlett-Packard Technical Support website (www.hp.com/support) for at least 5 seconds. 3. If you may have a photo printer? Reinsert the batteries and close the Battery/Memory Card door. 4. Use the Buy Prints Online feature on the Photosmart Express Menu (see "Set the date and time" on...

User Guide
Page 36
Remove the memory card and see if the images are stored in this camera, which supports High Capacity Secure Digital cards. • Your memory card may be defective. Chapter 9 • Use Steady Photo shooting mode (see Steady Photo under "Using the Picture Capture and Video Record menus" on page 14). • Set the flash to Auto Flash or Flash On and set the shooting mode to Card under "Specifications" on page 42), turn off (see "Setting the flash" on page 13). • Move...
Remove the memory card and see if the images are stored in this camera, which supports High Capacity Secure Digital cards. • Your memory card may be defective. Chapter 9 • Use Steady Photo shooting mode (see Steady Photo under "Using the Picture Capture and Video Record menus" on page 14). • Set the flash to Auto Flash or Flash On and set the shooting mode to Card under "Specifications" on page 42), turn off (see "Setting the flash" on page 13). • Move...
User Guide
Page 38
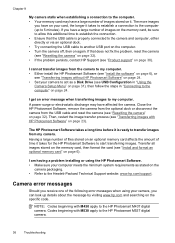
... having a problem installing or using your card, the longer it takes for the HP Photosmart Software to 5 minutes). The HP Photosmart Software takes a long time before it is properly connected to the camera and computer, either directly or via an optional dock. • Try connecting the USB cable to another USB port on the computer. • Turn the camera off, then on the specific code. Having a large number of files stored on an optional memory card affects the...
... having a problem installing or using your card, the longer it takes for the HP Photosmart Software to 5 minutes). The HP Photosmart Software takes a long time before it is properly connected to the camera and computer, either directly or via an optional dock. • Try connecting the USB cable to another USB port on the computer. • Turn the camera off, then on the specific code. Having a large number of files stored on an optional memory card affects the...
User Guide
Page 40
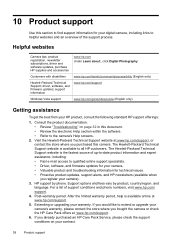
... Product support support information www.hp.com/support Windows Vista support www.hp.com/go/windowsvista (English only) Getting assistance To get the best from your HP product, consult the following standard HP support offerings: 1. The Hewlett-Packard Technical Support website is available to qualified online support specialists. • Driver, software, and firmware updates for your camera. • Valuable product and troubleshooting information for your digital camera, including links to extend or upgrade your camera...
... Product support support information www.hp.com/support Windows Vista support www.hp.com/go/windowsvista (English only) Getting assistance To get the best from your HP product, consult the following standard HP support offerings: 1. The Hewlett-Packard Technical Support website is available to qualified online support specialists. • Driver, software, and firmware updates for your camera. • Valuable product and troubleshooting information for your digital camera, including links to extend or upgrade your camera...
User Guide
Page 42
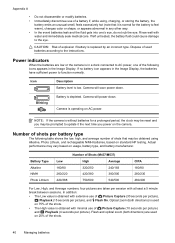
... is without batteries for the battery to function normally. Power indicators When the batteries are used batteries according to the eye. Camera will soon power down . NOTE: If the camera is obtained with at least a 5 minute break between sessions. Optical zoom (both directions) are low or the camera is in the Image Display. Rinse well with minimal use of Picture Capture (10 seconds per picture) and Playback (4 seconds per picture), and Flash On...
... is without batteries for the battery to function normally. Power indicators When the batteries are used batteries according to the eye. Camera will soon power down . NOTE: If the camera is obtained with at least a 5 minute break between sessions. Optical zoom (both directions) are low or the camera is in the Image Display. Rinse well with minimal use of Picture Capture (10 seconds per picture) and Playback (4 seconds per picture), and Flash On...
User Guide
Page 47
... 43 parts 3, 4 specifications 42 turn on/off 4 weight 43 Camera Setup Menu 31 Camera Sounds 31 Close-up mode 14 color depth 42 colors 21 compression format 43 computer, connect to 23, 24 D Date & Time 5, 31 Date & Time Imprint 15 Delete button 3 digital zoom 12 dimensions 43 direct print 25 Display Brightness 31 E e-mail images 29 exposure 11 F F-number 42 Favorites 20 flash red-eye reduction 13 working range 42 Flash button 3 focal length 42 focus auto focus 9 brackets 9 focus lock 11 optimizing 10 format memory card 6 G getting assistance 38 H HP Photosmart Express 27 HP Photosmart Software...
... 43 parts 3, 4 specifications 42 turn on/off 4 weight 43 Camera Setup Menu 31 Camera Sounds 31 Close-up mode 14 color depth 42 colors 21 compression format 43 computer, connect to 23, 24 D Date & Time 5, 31 Date & Time Imprint 15 Delete button 3 digital zoom 12 dimensions 43 direct print 25 Display Brightness 31 E e-mail images 29 exposure 11 F F-number 42 Favorites 20 flash red-eye reduction 13 working range 42 Flash button 3 focal length 42 focus auto focus 9 brackets 9 focus lock 11 optimizing 10 format memory card 6 G getting assistance 38 H HP Photosmart Express 27 HP Photosmart Software...
User Guide
Page 48
... images for printing 27 Self-Timer light 4 Self-Timer setting 14, 15 sending individual images 29, 30 set date and time 5 setting up destinations 29 share pictures 27 Shutter button 3, 9 shutter speed 42 slideshow 20 software install 6 solving problems 32 sounds of camera 31 space remaining in memory 8 specifications 42 State Selector 3 Steady Photo mode 14 storage 43 Sunset mode 14 support process 38 T Theatre mode 14 Thumbnails 18 Thumbnails control 3 Time & Date 5, 31 transfer images 23, 24 troubleshooting 32 turn on/off power 4 U USB configuration 24, 31 V video clips 9 Video Record Menu...
... images for printing 27 Self-Timer light 4 Self-Timer setting 14, 15 sending individual images 29, 30 set date and time 5 setting up destinations 29 share pictures 27 Shutter button 3, 9 shutter speed 42 slideshow 20 software install 6 solving problems 32 sounds of camera 31 space remaining in memory 8 specifications 42 State Selector 3 Steady Photo mode 14 storage 43 Sunset mode 14 support process 38 T Theatre mode 14 Thumbnails 18 Thumbnails control 3 Time & Date 5, 31 transfer images 23, 24 troubleshooting 32 turn on/off power 4 U USB configuration 24, 31 V video clips 9 Video Record Menu...


