HP Notebook Reference Guide - Windows 7
Page 7
...card ...31 Using a USB device ...31 Connecting a USB device 31 Removing a USB device ...32 Using 1394 devices (select models only 32 Connecting a 1394 device 32 Removing a 1394 device 33 Using an eSATA device (select models only 33 Connecting an eSATA device 33 Removing an eSATA device 34 Using optional external devices ...34 Using optional external drives 34 Using the expansion port (select models only 34 6 Drives ...36 Handling drives ...36 Using hard drives ...37 Improving hard drive performance 37 Using Disk Defragmenter 37 Using Disk Cleanup 37 Using HP ProtectSmart Hard Drive...
...card ...31 Using a USB device ...31 Connecting a USB device 31 Removing a USB device ...32 Using 1394 devices (select models only 32 Connecting a 1394 device 32 Removing a 1394 device 33 Using an eSATA device (select models only 33 Connecting an eSATA device 33 Removing an eSATA device 34 Using optional external devices ...34 Using optional external drives 34 Using the expansion port (select models only 34 6 Drives ...36 Handling drives ...36 Using hard drives ...37 Improving hard drive performance 37 Using Disk Defragmenter 37 Using Disk Cleanup 37 Using HP ProtectSmart Hard Drive...
HP Notebook Reference Guide - Windows 7
Page 28
... . If the computer is unresponsive and you are connecting an external hardware device that does not connect to a USB or video port ● When the computer will be unused and disconnected from external power for at least 5 seconds. ● Disconnect the computer from external power and remove the battery. 18 Chapter 4 Power management 4 Power management NOTE: A computer may have been registered to a network domain, the button you click is possible. 1.
... . If the computer is unresponsive and you are connecting an external hardware device that does not connect to a USB or video port ● When the computer will be unused and disconnected from external power for at least 5 seconds. ● Disconnect the computer from external power and remove the battery. 18 Chapter 4 Power management 4 Power management NOTE: A computer may have been registered to a network domain, the button you click is possible. 1.
HP Notebook Reference Guide - Windows 7
Page 29
... a disc or an external media card. NOTE: If you can be changed using Power Options in Hibernation. When Sleep is set at the factory to initiate Sleep after a period of inactivity when running on battery power or on wakeup, you must enter your Windows password before your work returns to the screen where you exit Sleep faster than exiting Hibernation. With the computer on the hard drive and the computer turns off. Setting power options Using power-saving...
... a disc or an external media card. NOTE: If you can be changed using Power Options in Hibernation. When Sleep is set at the factory to initiate Sleep after a period of inactivity when running on battery power or on wakeup, you must enter your Windows password before your work returns to the screen where you exit Sleep faster than exiting Hibernation. With the computer on the hard drive and the computer turns off. Setting power options Using power-saving...
HP Notebook Reference Guide - Windows 7
Page 44
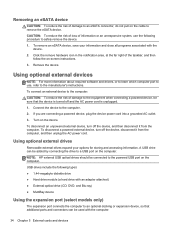
... port to use the following types: ● 1.44-megabyte diskette drive ● Hard drive module (a hard drive with the computer. 34 Chapter 5 External cards and devices Connect the device to the powered USB port on the computer. Turn on -screen instructions. 3. Click the remove hardware icon in the notification area, at the far right of the taskbar, and then follow the on the device. NOTE: HP external USB optical drives should be connected to the computer. 2. To disconnect a powered external device, turn...
... port to use the following types: ● 1.44-megabyte diskette drive ● Hard drive module (a hard drive with the computer. 34 Chapter 5 External cards and devices Connect the device to the powered USB port on the computer. Turn on -screen instructions. 3. Click the remove hardware icon in the notification area, at the far right of the taskbar, and then follow the on the device. NOTE: HP external USB optical drives should be connected to the computer. 2. To disconnect a powered external device, turn...
HP Notebook Reference Guide - Windows 7
Page 47
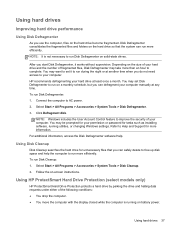
... when you start Disk Defragmenter, it to Help and Support for tasks such as installing software, running on the hard drive become fragmented. Using HP ProtectSmart Hard Drive Protection (select models only) HP ProtectSmart Hard Drive Protection protects a hard drive by parking the drive and halting data requests under either of your computer manually at least once a month. To run Disk Cleanup: 1. To run Disk Defragmenter: 1. NOTE: Windows includes the User Account Control feature...
... when you start Disk Defragmenter, it to Help and Support for tasks such as installing software, running on the hard drive become fragmented. Using HP ProtectSmart Hard Drive Protection (select models only) HP ProtectSmart Hard Drive Protection protects a hard drive by parking the drive and halting data requests under either of your computer manually at least once a month. To run Disk Cleanup: 1. To run Disk Defragmenter: 1. NOTE: Windows includes the User Account Control feature...
HP Notebook Reference Guide - Windows 7
Page 55
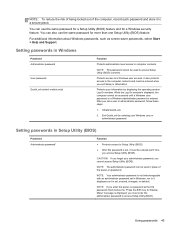
... set , entered, changed, or deleted. NOTE: If you enter the power-on password. Protects access to computer contents. Using passwords 45 Exit QuickLock by entering your information by displaying the operating system Log On window. NOTE: To reduce the risk of being locked out of the power-on password at the first password check before the "Press the ESC key for Startup Menu" message is displayed, you cannot access Setup Utility (BIOS). You can also use...
... set , entered, changed, or deleted. NOTE: If you enter the power-on password. Protects access to computer contents. Using passwords 45 Exit QuickLock by entering your information by displaying the operating system Log On window. NOTE: To reduce the risk of being locked out of the power-on password at the first password check before the "Press the ESC key for Startup Menu" message is displayed, you cannot access Setup Utility (BIOS). You can also use...
HP Notebook Reference Guide - Windows 7
Page 63
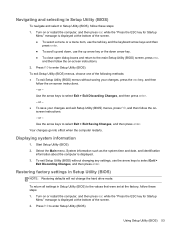
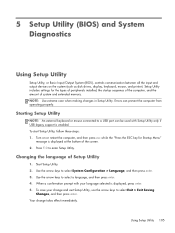
or - or - Restoring factory settings in Setup Utility (BIOS) NOTE: Restoring defaults will not change the hard drive mode. To return all settings in Setup Utility (BIOS) to the values that were set at the bottom of the screen. 2. Use the arrow keys to enter Setup Utility (BIOS). Your changes go into effect when the computer restarts. To exit Setup Utility (BIOS) without saving your changes and exit Setup Utility (BIOS) menus, press f10, and then follow the on -screen instructions. - or - ● To save...
or - or - Restoring factory settings in Setup Utility (BIOS) NOTE: Restoring defaults will not change the hard drive mode. To return all settings in Setup Utility (BIOS) to the values that were set at the bottom of the screen. 2. Use the arrow keys to enter Setup Utility (BIOS). Your changes go into effect when the computer restarts. To exit Setup Utility (BIOS) without saving your changes and exit Setup Utility (BIOS) menus, press f10, and then follow the on -screen instructions. - or - ● To save...
HP Notebook Reference Guide - Windows 7
Page 65
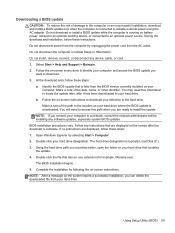
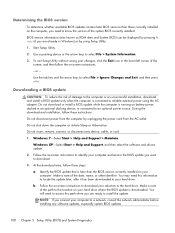
.... Open Windows Explorer by unplugging the power cord from your computer. The hard drive designation is downloaded. Do not shut down the computer or initiate Sleep or Hibernation. Identify the BIOS update that are displayed on -screen instructions. BIOS installation procedures vary. Double-click the file that contains the update. 4. The BIOS installation begins. 5. Using Setup Utility (BIOS) 55 Do not insert, remove, connect, or disconnect any software updates, especially system BIOS updates. Follow the on your hard drive. Make...
.... Open Windows Explorer by unplugging the power cord from your computer. The hard drive designation is downloaded. Do not shut down the computer or initiate Sleep or Hibernation. Identify the BIOS update that are displayed on -screen instructions. BIOS installation procedures vary. Double-click the file that contains the update. 4. The BIOS installation begins. 5. Using Setup Utility (BIOS) 55 Do not insert, remove, connect, or disconnect any software updates, especially system BIOS updates. Follow the on your hard drive. Make...
HP Notebook Reference Guide - Windows 7
Page 71
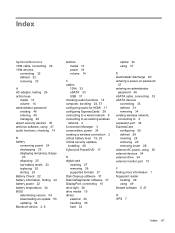
...displaying remaining charge 23 disposing 25 low battery levels 23 replacing 25 storing 24 Battery Check 22 battery information, finding 22 battery power 22 battery temperature 24 BIOS determining version 54 downloading an update 55 updating 54 Bluetooth device 2, 8 buttons media 13 power 18 volume 14 C cables 1394 32 eSATA 33 USB 31 checking audio functions 14 computer, traveling 24, 57 configuring audio for HDMI 17 configuring ExpressCards 28 connecting to a wired network 8 connecting to an existing wireless network 4 Connection Manager 3 conservation, power 24 creating a wireless connection...
...displaying remaining charge 23 disposing 25 low battery levels 23 replacing 25 storing 24 Battery Check 22 battery information, finding 22 battery power 22 battery temperature 24 BIOS determining version 54 downloading an update 55 updating 54 Bluetooth device 2, 8 buttons media 13 power 18 volume 14 C cables 1394 32 eSATA 33 USB 31 checking audio functions 14 computer, traveling 24, 57 configuring audio for HDMI 17 configuring ExpressCards 28 connecting to a wired network 8 connecting to an existing wireless network 4 Connection Manager 3 conservation, power 24 creating a wireless connection...
HP Notebook Reference Guide - Windows 7
Page 72
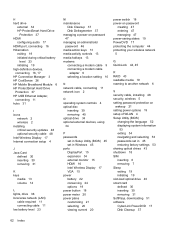
...9 connecting a modem cable adapter 9 selecting a location setting 10 N network cable, connecting 11 network icon 2 O operating system controls 4 optical disc inserting 39 removing 40 optical drive 34 optional external devices, using 34 P passwords set in Setup Utility (BIOS) 45 set in Windows 45 ports DisplayPort 15 expansion 34 external monitor 15 HDMI 16 Intel Wireless Display 17 VGA 15 power battery 22 conserving 24 options 19 power button 18 power meter 20 power plans customizing 21 selecting 20 viewing current 20 power switch 18 power-on password creating 47 entering 47 managing 47 power...
...9 connecting a modem cable adapter 9 selecting a location setting 10 N network cable, connecting 11 network icon 2 O operating system controls 4 optical disc inserting 39 removing 40 optical drive 34 optional external devices, using 34 P passwords set in Setup Utility (BIOS) 45 set in Windows 45 ports DisplayPort 15 expansion 34 external monitor 15 HDMI 16 Intel Wireless Display 17 VGA 15 power battery 22 conserving 24 options 19 power button 18 power meter 20 power plans customizing 21 selecting 20 viewing current 20 power switch 18 power-on password creating 47 entering 47 managing 47 power...

HP Limited Warranty and Techincal Support - 3-year - North America
Page 10
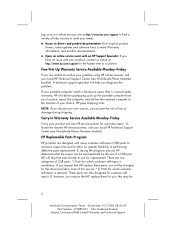
... parts: 1) Parts for greater flexibility in performing defective parts replacement. If your portable computer needs a hardware repair that is mandatory. Free Pick-Up Warranty Service Available Monday-Friday If you , this service.* 2) Parts for which customer self-repair is covered under warranty, HP will ship that HP replace these parts, you will help sources to meet your needs: „ Access to drivers and product documentation: Find original product drivers, latest updates and software fixes...
... parts: 1) Parts for greater flexibility in performing defective parts replacement. If your portable computer needs a hardware repair that is mandatory. Free Pick-Up Warranty Service Available Monday-Friday If you , this service.* 2) Parts for which customer self-repair is covered under warranty, HP will ship that HP replace these parts, you will help sources to meet your needs: „ Access to drivers and product documentation: Find original product drivers, latest updates and software fixes...

HP Limited Warranty and Technical Support - 90 day - North America
Page 10
... support specialist will deliver packaging, pick up the portable computer from your location, repair the computer, and deliver the repaired computer to the location of a CSR part, HP will ship that is covered under warranty, HP will help sources to meet your needs: „ Access to allow for greater flexibility in performing defective parts replacement. HP Replaceable Parts Program HP products are unable to resolve your problem using HP online services...
... support specialist will deliver packaging, pick up the portable computer from your location, repair the computer, and deliver the repaired computer to the location of a CSR part, HP will ship that is covered under warranty, HP will help sources to meet your needs: „ Access to allow for greater flexibility in performing defective parts replacement. HP Replaceable Parts Program HP products are unable to resolve your problem using HP online services...
HP Limited Warranty and Technical Support 1-yr - North America
Page 10
... problem using HP online services, call your local HP Technical Support Center (see Worldwide Phone Numbers booklet). Log on to our online services site at http://www.hp.com/support to find a variety of help you , this service.* 2) Parts for which customer self-repair is covered under warranty, HP will help sources to meet your needs: „ Access to drivers and product documentation: Find original product drivers, latest updates and software fixes...
... problem using HP online services, call your local HP Technical Support Center (see Worldwide Phone Numbers booklet). Log on to our online services site at http://www.hp.com/support to find a variety of help you , this service.* 2) Parts for which customer self-repair is covered under warranty, HP will help sources to meet your needs: „ Access to drivers and product documentation: Find original product drivers, latest updates and software fixes...
HP Limited Worldwide Warranty and Technical Support 3-yr - North America
Page 14
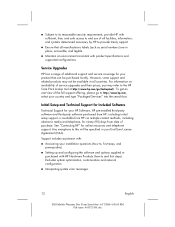
... from HP, including initial setup support, is available from date of purchase. Support includes assistance with: „ Answering your installation questions (how to, first steps, and prerequisites). „ Setting up and configuring the software and options supplied or purchased with product specifications and supported configurations Service Upgrades HP has a range of service upgrades and their prices, you may not be specified in all manufacturers labels (such as serial numbers...
... from HP, including initial setup support, is available from date of purchase. Support includes assistance with: „ Answering your installation questions (how to, first steps, and prerequisites). „ Setting up and configuring the software and options supplied or purchased with product specifications and supported configurations Service Upgrades HP has a range of service upgrades and their prices, you may not be specified in all manufacturers labels (such as serial numbers...
Getting Started HP Notebook - Windows 7
Page 25
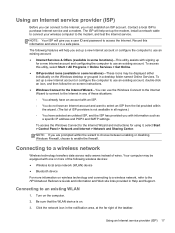
...; Internet Services & Offers (available in some locations)-These icons may be displayed either individually on -screen instructions. ● Windows Connect to the Internet Wizard-You can connect to enable the firewall. Connecting to an existing WLAN 1. Connecting to a wireless network Wireless technology transfers data across radio waves instead of wires. The ISP will help set up the modem, install a network cable to connect your wireless computer to the Internet Wizard and instructions for a new Internet account...
...; Internet Services & Offers (available in some locations)-These icons may be displayed either individually on -screen instructions. ● Windows Connect to the Internet Wizard-You can connect to enable the firewall. Connecting to an existing WLAN 1. Connecting to a wireless network Wireless technology transfers data across radio waves instead of wires. The ISP will help set up the modem, install a network cable to connect your wireless computer to the Internet Wizard and instructions for a new Internet account...
Getting Started HP Notebook - Windows 7
Page 66
...WLAN 53 latch, battery release 15 lights AC adapter 11 caps lock 7 hard drive 11 mute 7 power 7, 11 TouchPad 6, 7 TouchPad accent 6, 7 wireless 7 M memory module inserting 42 removing 41 replacing 41 memory module compartment cover, removing 41 memory module compartment, identifying 15 microphone (audio-in) jack, identifying 12 Microsoft Certificate of Authenticity label 53 mouse, external setting preferences 25 mute light, identifying 7 N network jack, identifying 12 num lk key, identifying 24 num lock key, identifying 9 num lock, external keypad 24 O operating environment 56 operating system...
...WLAN 53 latch, battery release 15 lights AC adapter 11 caps lock 7 hard drive 11 mute 7 power 7, 11 TouchPad 6, 7 TouchPad accent 6, 7 wireless 7 M memory module inserting 42 removing 41 replacing 41 memory module compartment cover, removing 41 memory module compartment, identifying 15 microphone (audio-in) jack, identifying 12 Microsoft Certificate of Authenticity label 53 mouse, external setting preferences 25 mute light, identifying 7 N network jack, identifying 12 num lk key, identifying 24 num lock key, identifying 9 num lock, external keypad 24 O operating environment 56 operating system...
HP Pavilion dv7 Notebook PC Maintenance and Service Guide
Page 65
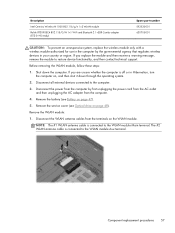
..., replace the wireless module only with a wireless module authorized for use in the computer by first unplugging the power cord from the AC outlet and then unplugging the AC adapter from the computer. 4. If you are unsure whether the computer is connected to the WLAN module Main terminal. Component replacement procedures 57 Remove the battery (see Optical drive on the WLAN module. Disconnect all external devices connected to restore device functionality...
..., replace the wireless module only with a wireless module authorized for use in the computer by first unplugging the power cord from the AC outlet and then unplugging the AC adapter from the computer. 4. If you are unsure whether the computer is connected to the WLAN module Main terminal. Component replacement procedures 57 Remove the battery (see Optical drive on the WLAN module. Disconnect all external devices connected to restore device functionality...
HP Pavilion dv7 Notebook PC Maintenance and Service Guide
Page 113
... the ESC key for the types of peripherals installed, the startup sequence of the computer, and the amount of system and extended memory. To start Setup Utility, follow these steps: 1. Use the arrow keys to select Exit > Exit Saving Changes, and then press enter. Setup Utility includes settings for Startup Menu" message is displayed at the bottom of Setup Utility 1. Starting Setup Utility NOTE: An external keyboard or mouse connected to a USB port can prevent the computer from operating properly...
... the ESC key for the types of peripherals installed, the startup sequence of the computer, and the amount of system and extended memory. To start Setup Utility, follow these steps: 1. Use the arrow keys to select Exit > Exit Saving Changes, and then press enter. Setup Utility includes settings for Startup Menu" message is displayed at the bottom of Setup Utility 1. Starting Setup Utility NOTE: An external keyboard or mouse connected to a USB port can prevent the computer from operating properly...
HP Pavilion dv7 Notebook PC Maintenance and Service Guide
Page 116
... on-screen instructions to identify your computer and access the BIOS update you want to the hard drive. Start Setup Utility. 2. During the download and installation, follow these steps: a. Follow the on-screen instructions to download your hard drive where the BIOS update is later than those currently installed on the computer, you need to install the update. Use a pointing device or the arrow keys to the location on your selection to download. 3. To exit Setup Utility without saving your hard drive. Make...
... on-screen instructions to identify your computer and access the BIOS update you want to the hard drive. Start Setup Utility. 2. During the download and installation, follow these steps: a. Follow the on-screen instructions to download your hard drive where the BIOS update is later than those currently installed on the computer, you need to install the update. Use a pointing device or the arrow keys to the location on your selection to download. 3. To exit Setup Utility without saving your hard drive. Make...
HP Pavilion dv7 Notebook PC Maintenance and Service Guide
Page 134
... cards 7 graphics 3 hard drives 5 keyboard 8 memory module 4 microphone 6 operating system 9 optical drive 5 pointing device 8 ports 8 power requirements 8 processors 1 product name 1 security 9 serviceability 9 video 6 wireless 6 product name 1 R rear speakers removal 94 spare part number 94 remote control, spare part number 32, 33 removal/replacement preliminaries 41 procedures 46 right-side components 19 RJ-45 jack 18 RTC battery removal 54 spare part number 28, 37, 54 S Screw Kit, spare part number 33, 37 SD Card reader board removal 72 spare part number 25, 37, 72 security cable slot...
... cards 7 graphics 3 hard drives 5 keyboard 8 memory module 4 microphone 6 operating system 9 optical drive 5 pointing device 8 ports 8 power requirements 8 processors 1 product name 1 security 9 serviceability 9 video 6 wireless 6 product name 1 R rear speakers removal 94 spare part number 94 remote control, spare part number 32, 33 removal/replacement preliminaries 41 procedures 46 right-side components 19 RJ-45 jack 18 RTC battery removal 54 spare part number 28, 37, 54 S Screw Kit, spare part number 33, 37 SD Card reader board removal 72 spare part number 25, 37, 72 security cable slot...


