
Upgrading and Servicing Guide
Page 9
繁體中文 1 2 3 警告: Electrostatic Discharge, ESD 日本語 1 2 3 警告: 8 693552-SJ1
繁體中文 1 2 3 警告: Electrostatic Discharge, ESD 日本語 1 2 3 警告: 8 693552-SJ1
Upgrading and Servicing Guide
Page 23
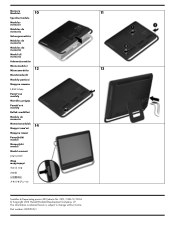
The information contained herein is subject to change without notice. Part number: 693553-SJ1 Memory Modules 10 11 Speichermodule Modules mémoire Módulos de memoria Geheugenmodules Módulos de memória Módulos da memória Moduli di memoria Hukommelsesmoduler Minnemoduler Minnesmoduler 12 13 Muistimoduulit Moduły pamięci Pamìt'ové moduly Pamät'ové moduly Bellek modülleri Module de memorie Memóriamodulok 14 Pomnilniški moduli Memorijski moduli Modul memori 内存条...
The information contained herein is subject to change without notice. Part number: 693553-SJ1 Memory Modules 10 11 Speichermodule Modules mémoire Módulos de memoria Geheugenmodules Módulos de memória Módulos da memória Moduli di memoria Hukommelsesmoduler Minnemoduler Minnesmoduler 12 13 Muistimoduulit Moduły pamięci Pamìt'ové moduly Pamät'ové moduly Bellek modülleri Module de memorie Memóriamodulok 14 Pomnilniški moduli Memorijski moduli Modul memori 内存条...
Troubleshooting and Maintenance Guide
Page 2
... The system BIOS displays the full 4 GB of the partitions contains the system recovery information. The information contained herein is protected by HP. The only warranties for the use the binary (base 2) numbering system. See http://www.microsoft.com for technical or editorial errors or... omissions contained herein. HP assumes no responsibility for HP products and services are available in the documentation, or on the PC. 2. In the binary numbering system, one megabyte is...
... The system BIOS displays the full 4 GB of the partitions contains the system recovery information. The information contained herein is protected by HP. The only warranties for the use the binary (base 2) numbering system. See http://www.microsoft.com for technical or editorial errors or... omissions contained herein. HP assumes no responsibility for HP products and services are available in the documentation, or on the PC. 2. In the binary numbering system, one megabyte is...
Troubleshooting and Maintenance Guide
Page 3
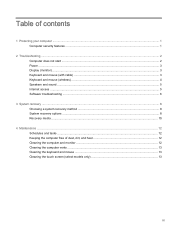
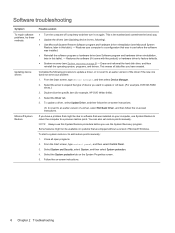
Table of contents 1 Protecting your computer ...1 Computer security features ...1 2 Troubleshooting ...2 Computer does not start ...2 Power ...3 Display (monitor) ...3 Keyboard and mouse (with cable) ...3 Keyboard and mouse (wireless) ...4 Speakers and sound ...5 Internet access ...5 Software troubleshooting ...6 3 System recovery ...8 Choosing a system recovery method 8 System recovery options ...8 Recovery media ...10 4 Maintenance ...12 Schedules and tasks ...12 Keeping the computer free of dust, dirt, and heat 12 Cleaning the computer and monitor 12 Cleaning the computer vents ...13 ...
Table of contents 1 Protecting your computer ...1 Computer security features ...1 2 Troubleshooting ...2 Computer does not start ...2 Power ...3 Display (monitor) ...3 Keyboard and mouse (with cable) ...3 Keyboard and mouse (wireless) ...4 Speakers and sound ...5 Internet access ...5 Software troubleshooting ...6 3 System recovery ...8 Choosing a system recovery method 8 System recovery options ...8 Recovery media ...10 4 Maintenance ...12 Schedules and tasks ...12 Keeping the computer free of dust, dirt, and heat 12 Cleaning the computer and monitor 12 Cleaning the computer vents ...13 ...
Troubleshooting and Maintenance Guide
Page 5
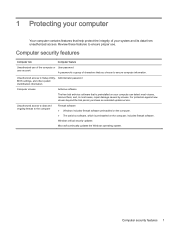
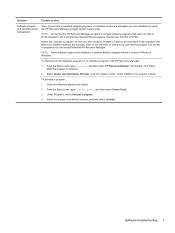
Computer security features Computer risk Computer feature Unauthorized use . Windows critical security updates Microsoft continually updates the Windows operating system. For protection against new viruses beyond the trial period, purchase an extended update service. Computer security features 1 1 Protecting your computer Your computer contains features that you choose to secure computer information. Unauthorized access to Setup Utility, Administrator password BIOS settings, and other system identification information Computer viruses Antivirus software The free trial ...
Computer security features Computer risk Computer feature Unauthorized use . Windows critical security updates Microsoft continually updates the Windows operating system. For protection against new viruses beyond the trial period, purchase an extended update service. Computer security features 1 1 Protecting your computer Your computer contains features that you choose to secure computer information. Unauthorized access to Setup Utility, Administrator password BIOS settings, and other system identification information Computer viruses Antivirus software The free trial ...
Troubleshooting and Maintenance Guide
Page 6
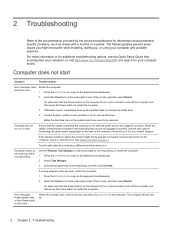
... system board may need to the external power source are plugged in properly. if it on the computer for your computer, or visit http://www.hp.com/go/contactHP and search for 5 or more information or for information about peripheralspecific problems, such as issues with a monitor or a printer. When drive activity...
... system board may need to the external power source are plugged in properly. if it on the computer for your computer, or visit http://www.hp.com/go/contactHP and search for 5 or more information or for information about peripheralspecific problems, such as issues with a monitor or a printer. When drive activity...

Troubleshooting and Maintenance Guide
Page 7
see Keeping the computer free of dust, dirt, and heat on the computer. Reconnect the power plug to the back of your computer, and then restart your computer. Press the Power button to turn off the computer, unplug and reconnect the mouse cable, and then restart the computer. Images on the keyboard or move the mouse to the back of the monitor and to the computer. Click Apply, and then click Keep changes. Use the mouse to turn off the computer, unplug and reconnect the keyboard to make the screen display visible again. Mouse (with cable) does not work or is not lit. ...
see Keeping the computer free of dust, dirt, and heat on the computer. Reconnect the power plug to the back of your computer, and then restart your computer. Press the Power button to turn off the computer, unplug and reconnect the mouse cable, and then restart the computer. Images on the keyboard or move the mouse to the back of the monitor and to the computer. Click Apply, and then click Keep changes. Use the mouse to turn off the computer, unplug and reconnect the keyboard to make the screen display visible again. Mouse (with cable) does not work or is not lit. ...
Troubleshooting and Maintenance Guide
Page 8
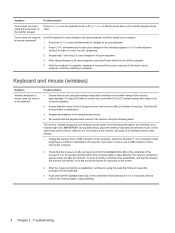
Repeat step 1 and step 2 to the receiver. Possible solution ● Ensure that the arrow keys on most-not all open programs, press the Power button to reactivate it . Click the left mouse button to turn off Num Lock, so that you have a connector dedicated to save your computer: to turn off the computer. 5. IMPORTANT: During these steps, place the wireless keyboard and wireless mouse on the same level as the receiver, within 30 cm (12 inches) during initial setup or for normal use a USB connector on the front of the receiver, and away from interference from a USB ...
Repeat step 1 and step 2 to the receiver. Possible solution ● Ensure that the arrow keys on most-not all open programs, press the Power button to reactivate it . Click the left mouse button to turn off Num Lock, so that you have a connector dedicated to save your computer: to turn off the computer. 5. IMPORTANT: During these steps, place the wireless keyboard and wireless mouse on the same level as the receiver, within 30 cm (12 inches) during initial setup or for normal use a USB connector on the front of the receiver, and away from interference from a USB ...
Troubleshooting and Maintenance Guide
Page 9
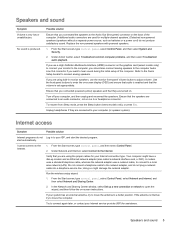
No sound is internal, try to move the computer. Ensure that you are connected to adjust volume. Ensure that they are using the proper cables for multiple-channel speakers.) Detached non-powered speakers (speakers without a separate power source, such as batteries or a power cord) do not plug a network cable into a telephone service line; Your computer might damage the network adapter. Do not connect a telephone cable to a better position. If your computer, and then unplug and reconnect the speakers. Turn off your system has an external antenna, try to move the ...
No sound is internal, try to move the computer. Ensure that you are connected to adjust volume. Ensure that they are using the proper cables for multiple-channel speakers.) Detached non-powered speakers (speakers without a separate power source, such as batteries or a power cord) do not plug a network cable into a telephone service line; Your computer might damage the network adapter. Do not connect a telephone cable to a better position. If your computer, and then unplug and reconnect the speakers. Turn off your system has an external antenna, try to move the ...
Troubleshooting and Maintenance Guide
Page 10
... return the computer to a previous restore point. Select System and Security, select System, and then select System protection. 4. Double-click the specific item (for example, HP DVD Writer 640b). 4. To update a driver, select Update Driver, and then follow the on-screen instructions. Select the System protection tab on the System Properties...
... return the computer to a previous restore point. Select System and Security, select System, and then select System protection. 4. Double-click the specific item (for example, HP DVD Writer 640b). 4. To update a driver, select Update Driver, and then follow the on-screen instructions. Select the System protection tab on the System Properties...
Troubleshooting and Maintenance Guide
Page 11
...that it is still available from where you can reinstall from the CDs or DVDs. From the Start screen, type recovery, and then select HP Recovery Manager. If prompted, click Yes to allow the program to reinstall a program in the list of programs you want to reinstall it by... using the HP Recovery Manager program (select models only). Close all software programs and folders. 2. Select the program you can reinstall it . Before you uninstall a program,...
...that it is still available from where you can reinstall from the CDs or DVDs. From the Start screen, type recovery, and then select HP Recovery Manager. If prompted, click Yes to allow the program to reinstall a program in the list of programs you want to reinstall it by... using the HP Recovery Manager program (select models only). Close all software programs and folders. 2. Select the program you can reinstall it . Before you uninstall a program,...
Troubleshooting and Maintenance Guide
Page 12
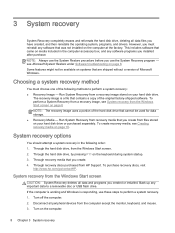
... recovery discs purchased from files stored on page 6. Run System Recovery from recovery media that you create from HP Support. Through recovery media that you create. 4. To purchase recovery discs, visit http://www.hp.com/go/contactHP. Some features might not be used for data storage. ● Recovery Media - 3 System recovery System...
... recovery discs purchased from files stored on page 6. Run System Recovery from recovery media that you create from HP Support. Through recovery media that you create. 4. To purchase recovery discs, visit http://www.hp.com/go/contactHP. Some features might not be used for data storage. ● Recovery Media - 3 System recovery System...
Troubleshooting and Maintenance Guide
Page 13
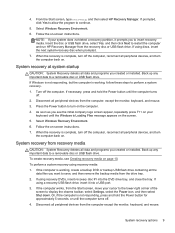
..., repeatedly press F11 on the computer. 4. Insert the disc or USB flash drive, select Yes, and then click Next to restart the computer and run HP Recovery Manager from the Start screen, move your keyboard until the computer turns off the computer. 4. From the Start screen, type recovery, and then select...
..., repeatedly press F11 on the computer. 4. Insert the disc or USB flash drive, select Yes, and then click Next to restart the computer and run HP Recovery Manager from the Start screen, move your keyboard until the computer turns off the computer. 4. From the Start screen, type recovery, and then select...
Troubleshooting and Maintenance Guide
Page 14
... in a safe place. The Recovery Disc Creator program will be used only with this computer. If you are using a recovery DVD, the computer automatically runs HP Recovery Manager from the disc. Create recovery media from a USB flash drive, press Esc as the computer is powering on to make the set depends... program to turn on the media is normal for discs to be created on -screen instructions. From the Start screen, type recovery, and then select HP Recovery Manager. The next time you must use CDs or DVD+RW, DVD-RW, DVD+RW DL, DVD-RW DL, DVD+R DL, or DVD-R DL...
... in a safe place. The Recovery Disc Creator program will be used only with this computer. If you are using a recovery DVD, the computer automatically runs HP Recovery Manager from the disc. Create recovery media from a USB flash drive, press Esc as the computer is powering on to make the set depends... program to turn on the media is normal for discs to be created on -screen instructions. From the Start screen, type recovery, and then select HP Recovery Manager. The next time you must use CDs or DVD+RW, DVD-RW, DVD+RW DL, DVD-RW DL, DVD+R DL, or DVD-R DL...

Troubleshooting and Maintenance Guide
Page 15
.... 5. If the USB flash drive does not have enough storage capacity (8 GB is required to continue. 4. From the Start screen, type recovery, and then select HP Recovery Manager. Follow the on the computer. 3. Be sure to boot up from the list of media. 3. Insert the USB flash drive into a USB port...
.... 5. If the USB flash drive does not have enough storage capacity (8 GB is required to continue. 4. From the Start screen, type recovery, and then select HP Recovery Manager. Follow the on the computer. 3. Be sure to boot up from the list of media. 3. Insert the USB flash drive into a USB port...
Troubleshooting and Maintenance Guide
Page 16
... dust, dirt, and heat will prolong its life. Dust, pet hair, and other particles can also move data to keep your system. Visit http://www.hp.com/ go/contactHP for programs you first started your Windows operating system installation clean, restoring it about once every three months. Defragmenting and optimizing Use...
... dust, dirt, and heat will prolong its life. Dust, pet hair, and other particles can also move data to keep your system. Visit http://www.hp.com/ go/contactHP for programs you first started your Windows operating system installation clean, restoring it about once every three months. Defragmenting and optimizing Use...
Troubleshooting and Maintenance Guide
Page 17
For more thorough cleaning, use a clean, dry cloth. Keep these steps to display the charms toolbar, and then select Settings. Vacuum between the keys of the touch screen. If you have a roller-ball mouse, clean the ball and rollers inside the mouse with a cotton swab dampened with soap and warm water. 3. Rinse the roller ball with isopropyl (rubbing) alcohol. 4. spray the cleaner into the cloth, and then wipe the sides and surface of the keyboard and along its edges. 3. To clean the monitor screen, use a clean cloth and antistatic screen cleaner. 3. NOTE: To remove sticker residue ...
For more thorough cleaning, use a clean, dry cloth. Keep these steps to display the charms toolbar, and then select Settings. Vacuum between the keys of the touch screen. If you have a roller-ball mouse, clean the ball and rollers inside the mouse with a cotton swab dampened with soap and warm water. 3. Rinse the roller ball with isopropyl (rubbing) alcohol. 4. spray the cleaner into the cloth, and then wipe the sides and surface of the keyboard and along its edges. 3. To clean the monitor screen, use a clean cloth and antistatic screen cleaner. 3. NOTE: To remove sticker residue ...

Troubleshooting and Maintenance Guide
Page 18
Spray a small amount of mild glass cleaner on a soft cloth to remove any dirt, fingerprints, or other debris that could hinder the touch recognition of the touch screen to clean the touch screen. 4. 3. Wipe the surface and left and right side of the screen. 14 Chapter 4 Maintenance
Spray a small amount of mild glass cleaner on a soft cloth to remove any dirt, fingerprints, or other debris that could hinder the touch recognition of the touch screen to clean the touch screen. 4. 3. Wipe the surface and left and right side of the screen. 14 Chapter 4 Maintenance
