Wall Mounting Guide
Page 3
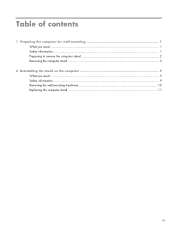
Table of contents 1 Preparing the computer for wall-mounting 1 What you need ...1 Safety information ...1 Preparing to remove the computer stand 2 Removing the computer stand ...2 2 Reinstalling the stand on the computer 9 What you need ...9 Safety information ...9 Removing the wall-mounting hardware 10 Replacing the computer stand 11 iii
Table of contents 1 Preparing the computer for wall-mounting 1 What you need ...1 Safety information ...1 Preparing to remove the computer stand 2 Removing the computer stand ...2 2 Reinstalling the stand on the computer 9 What you need ...9 Safety information ...9 Removing the wall-mounting hardware 10 Replacing the computer stand 11 iii
Wall Mounting Guide
Page 5
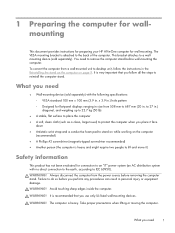
...is very important that you need to a wallmounting device (sold separately) with no direct connection to the earth, according to reinstall the computer stand. to 27 in.) diagonal, and weighing up to 22.7 kg (50 lb) ● A stable, flat surface to place the computer ● A soft, clean... in personal injury or equipment damage. WARNING! 1 Preparing the computer for wallmounting This document provides instructions for preparing your HP All-in-One computer for flat-panel displays ranging in size from 508 mm to do so before you need ● Wall-mounting device (sold separately).
...is very important that you need to a wallmounting device (sold separately) with no direct connection to the earth, according to reinstall the computer stand. to 27 in.) diagonal, and weighing up to 22.7 kg (50 lb) ● A stable, flat surface to place the computer ● A soft, clean... in personal injury or equipment damage. WARNING! 1 Preparing the computer for wallmounting This document provides instructions for preparing your HP All-in-One computer for flat-panel displays ranging in size from 508 mm to do so before you need ● Wall-mounting device (sold separately).
Wall Mounting Guide
Page 6
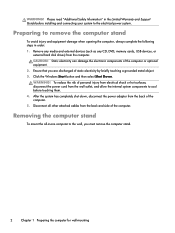
...order: 1. Ensure that you must remove the computer stand. 2 Chapter 1 Preparing the computer for wall-mounting After the system has completely shut down, disconnect the power adapter from the wall outlet, and allow the internal system components to cool before installing and connecting your system to the ... cards, USB devices, or external hard disk drives) from the back and side of the computer. 5. Removing the computer stand To mount the all other attached cables from the computer. WARNING! Click the Windows Start button and then select Shut Down. CAUTION: Static electricity ...
...order: 1. Ensure that you must remove the computer stand. 2 Chapter 1 Preparing the computer for wall-mounting After the system has completely shut down, disconnect the power adapter from the wall outlet, and allow the internal system components to cool before installing and connecting your system to the ... cards, USB devices, or external hard disk drives) from the back and side of the computer. 5. Removing the computer stand To mount the all other attached cables from the computer. WARNING! Click the Windows Start button and then select Shut Down. CAUTION: Static electricity ...
Wall Mounting Guide
Page 8
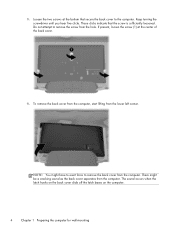
... loosened. The sound occurs when the latch hooks on the back cover slide off the latch bases on the computer. 4 Chapter 1 Preparing the computer for wall-mounting NOTE: You might be a cracking sound as the back cover separates from the computer. 3. To remove the back cover from the computer, start lifting from...
... loosened. The sound occurs when the latch hooks on the back cover slide off the latch bases on the computer. 4 Chapter 1 Preparing the computer for wall-mounting NOTE: You might be a cracking sound as the back cover separates from the computer. 3. To remove the back cover from the computer, start lifting from...
Wall Mounting Guide
Page 10
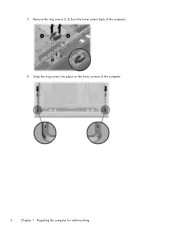
7. Remove the ring covers (1,2) from the lower center back of the computer. 6 Chapter 1 Preparing the computer for wall-mounting Snap the ring covers into place on the lower corners of the computer. 8.
7. Remove the ring covers (1,2) from the lower center back of the computer. 6 Chapter 1 Preparing the computer for wall-mounting Snap the ring covers into place on the lower corners of the computer. 8.
Wall Mounting Guide
Page 12
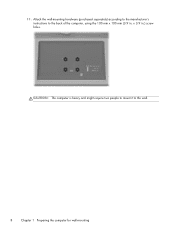
Attach the wall-mounting hardware (purchased separately) according to the manufacturer's instructions to the wall. 8 Chapter 1 Preparing the computer for wall-mounting x 3.9 in . CAUTION: The computer is heavy and might require two people to mount it to the back of the computer, using the 100 mm x 100 mm (3.9 in .) screw holes. 11.
Attach the wall-mounting hardware (purchased separately) according to the manufacturer's instructions to the wall. 8 Chapter 1 Preparing the computer for wall-mounting x 3.9 in . CAUTION: The computer is heavy and might require two people to mount it to the back of the computer, using the 100 mm x 100 mm (3.9 in .) screw holes. 11.
Wall Mounting Guide
Page 13
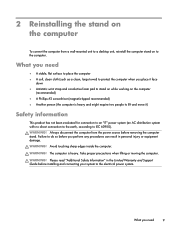
Always disconnect the computer from a wall-mounted unit to a desktop unit, reinstall the computer stand on the computer (recommended) ● A Phillips #2 screwdriver (magnetic-tipped recommended) ● Another person (the computer is heavy. ...
Always disconnect the computer from a wall-mounted unit to a desktop unit, reinstall the computer stand on the computer (recommended) ● A Phillips #2 screwdriver (magnetic-tipped recommended) ● Another person (the computer is heavy. ...
Wall Mounting Guide
Page 14
... cord from the back and side of the computer. 5. Carefully remove the computer from the wall and place facedown on the computer Following the manufacturer's instructions, remove the wall-mounting hardware from the back of the computer. 10 Chapter 2 Reinstalling the stand on a stable,... surface covered with a clean soft cloth. Removing the wall-mounting hardware To prepare to cool before touching them. 3. Disconnect all other attached cables from the wall outlet, and allow the internal system components to remove the wall-mounting device, follow these steps in order: 1. CAUTION: Static...
... cord from the back and side of the computer. 5. Carefully remove the computer from the wall and place facedown on the computer Following the manufacturer's instructions, remove the wall-mounting hardware from the back of the computer. 10 Chapter 2 Reinstalling the stand on a stable,... surface covered with a clean soft cloth. Removing the wall-mounting hardware To prepare to cool before touching them. 3. Disconnect all other attached cables from the wall outlet, and allow the internal system components to remove the wall-mounting device, follow these steps in order: 1. CAUTION: Static...


