Wall Mounting Guide
Page 3
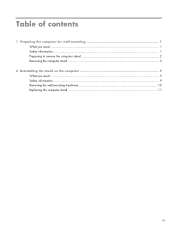
Table of contents 1 Preparing the computer for wall-mounting 1 What you need ...1 Safety information ...1 Preparing to remove the computer stand 2 Removing the computer stand ...2 2 Reinstalling the stand on the computer 9 What you need ...9 Safety information ...9 Removing the wall-mounting hardware 10 Replacing the computer stand 11 iii
Table of contents 1 Preparing the computer for wall-mounting 1 What you need ...1 Safety information ...1 Preparing to remove the computer stand 2 Removing the computer stand ...2 2 Reinstalling the stand on the computer 9 What you need ...9 Safety information ...9 Removing the wall-mounting hardware 10 Replacing the computer stand 11 iii
Wall Mounting Guide
Page 5
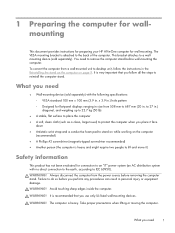
... an "IT" power system (an AC distribution system with the following specifications: ◦ VESA standard 100 mm x 100 mm (3.9 in. to 27 in.) diagonal, and weighing up to 22.7 kg (50 lb) ● A stable, flat surface to place the computer ● A soft...HP All-in-One computer for flat-panel displays ranging in size from 508 mm to 687 mm (20 in. x 3.9 in the Reinstalling the stand on the computer on the computer (recommended) ● A Phillips #2 screwdriver (magnetic-tipped screwdriver recommended) ● Another person (the computer is recommended that you need ● Wall-mounting...
... an "IT" power system (an AC distribution system with the following specifications: ◦ VESA standard 100 mm x 100 mm (3.9 in. to 27 in.) diagonal, and weighing up to 22.7 kg (50 lb) ● A stable, flat surface to place the computer ● A soft...HP All-in-One computer for flat-panel displays ranging in size from 508 mm to 687 mm (20 in. x 3.9 in the Reinstalling the stand on the computer on the computer (recommended) ● A Phillips #2 screwdriver (magnetic-tipped screwdriver recommended) ● Another person (the computer is recommended that you need ● Wall-mounting...
Wall Mounting Guide
Page 6
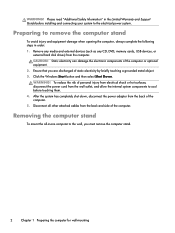
...power adapter from the back and side of static electricity by briefly touching a grounded metal object. 3. Removing the computer stand To mount the all other attached cables from the back of the computer or optional equipment. 2. Preparing to cool before installing and connecting your ...and Support Guide before touching them. 4. WARNING! Ensure that you must remove the computer stand. 2 Chapter 1 Preparing the computer for wall-mounting Click the Windows Start button and then select Shut Down. To reduce the risk of personal injury from electrical shock or hot surfaces, ...
...power adapter from the back and side of static electricity by briefly touching a grounded metal object. 3. Removing the computer stand To mount the all other attached cables from the back of the computer or optional equipment. 2. Preparing to cool before installing and connecting your ...and Support Guide before touching them. 4. WARNING! Ensure that you must remove the computer stand. 2 Chapter 1 Preparing the computer for wall-mounting Click the Windows Start button and then select Shut Down. To reduce the risk of personal injury from electrical shock or hot surfaces, ...
Wall Mounting Guide
Page 8
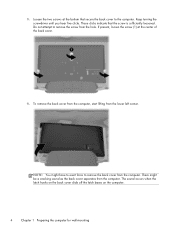
... computer. The sound occurs when the latch hooks on the back cover slide off the latch bases on the computer. 4 Chapter 1 Preparing the computer for wall-mounting 3. To remove the back cover from the computer, start lifting from the hole. Keep turning the screwdriver until you hear five clicks. If present, loosen...
... computer. The sound occurs when the latch hooks on the back cover slide off the latch bases on the computer. 4 Chapter 1 Preparing the computer for wall-mounting 3. To remove the back cover from the computer, start lifting from the hole. Keep turning the screwdriver until you hear five clicks. If present, loosen...
Wall Mounting Guide
Page 10
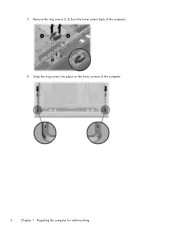
Snap the ring covers into place on the lower corners of the computer. 8. 7. Remove the ring covers (1,2) from the lower center back of the computer. 6 Chapter 1 Preparing the computer for wall-mounting
Snap the ring covers into place on the lower corners of the computer. 8. 7. Remove the ring covers (1,2) from the lower center back of the computer. 6 Chapter 1 Preparing the computer for wall-mounting
Wall Mounting Guide
Page 12
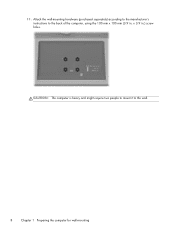
Attach the wall-mounting hardware (purchased separately) according to the manufacturer's instructions to the wall. 8 Chapter 1 Preparing the computer for wall-mounting CAUTION: The computer is heavy and might require two people to mount it to the back of the computer, using the 100 mm x 100 mm (3.9 in .) screw holes. 11. x 3.9 in .
Attach the wall-mounting hardware (purchased separately) according to the manufacturer's instructions to the wall. 8 Chapter 1 Preparing the computer for wall-mounting CAUTION: The computer is heavy and might require two people to mount it to the back of the computer, using the 100 mm x 100 mm (3.9 in .) screw holes. 11. x 3.9 in .
Wall Mounting Guide
Page 13
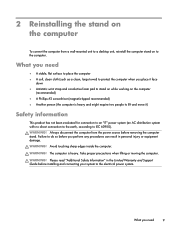
... precautions when lifting or moving the computer. WARNING! WARNING! Please read "Additional Safety Information" in personal injury or equipment damage. Always disconnect the computer from a wall-mounted unit to IEC 60950). WARNING! 2 Reinstalling the stand on the computer To convert the computer from the power source before removing the computer stand. The...
... precautions when lifting or moving the computer. WARNING! WARNING! Please read "Additional Safety Information" in personal injury or equipment damage. Always disconnect the computer from a wall-mounted unit to IEC 60950). WARNING! 2 Reinstalling the stand on the computer To convert the computer from the power source before removing the computer stand. The...
Wall Mounting Guide
Page 14
... of the computer. 10 Chapter 2 Reinstalling the stand on a stable, flat surface covered with a clean soft cloth. Following the manufacturer's instructions, remove the wall-mounting hardware from the wall outlet, and allow the internal system components to cool before touching them. 3. Click the Windows Start button and then select Shut Down. Ensure that... system has completely shut down, disconnect the power adapter from the computer. CAUTION: The computer is heavy and may require two people to remove the wall-mounting device, follow these steps in order: 1.
... of the computer. 10 Chapter 2 Reinstalling the stand on a stable, flat surface covered with a clean soft cloth. Following the manufacturer's instructions, remove the wall-mounting hardware from the wall outlet, and allow the internal system components to cool before touching them. 3. Click the Windows Start button and then select Shut Down. Ensure that... system has completely shut down, disconnect the power adapter from the computer. CAUTION: The computer is heavy and may require two people to remove the wall-mounting device, follow these steps in order: 1.


