
HP Omni10 Maintenance and Service Guide
Page 5
Table of contents 1 Product description ...1 2 External component identification 3 Finding your hardware and software information 3 Locating hardware ...3 Locating software 3 Front ...4 Back ...5 Top edge ...6 Back edge ...7 Labels ...8 3 Illustrated parts catalog ...9 Locating the serial number, product number, and model number 9 Tablet major components ...10 Miscellaneous parts ...11 Sequential part number listing 12 4 Removal and replacement procedures 14 Tools required ...14 Service considerations ...14 Plastic parts ...14 Cables and connectors 15 Grounding guidelines ...16 ...
Table of contents 1 Product description ...1 2 External component identification 3 Finding your hardware and software information 3 Locating hardware ...3 Locating software 3 Front ...4 Back ...5 Top edge ...6 Back edge ...7 Labels ...8 3 Illustrated parts catalog ...9 Locating the serial number, product number, and model number 9 Tablet major components ...10 Miscellaneous parts ...11 Sequential part number listing 12 4 Removal and replacement procedures 14 Tools required ...14 Service considerations ...14 Plastic parts ...14 Cables and connectors 15 Grounding guidelines ...16 ...

HP Omni10 Maintenance and Service Guide
Page 6
... module ...31 Battery ...32 Wireless antennas 34 SIM/card reader board 36 Speakers ...37 Display panel cable 39 System board ...41 5 Using Setup Utility (BIOS 44 Starting Setup Utility (BIOS) ...44 Updating the BIOS ...44 Determining the BIOS version 45 Downloading a BIOS update 45 6 Specifications ...47 7 Backing up, restoring, and recovering 48 Creating a Microsoft recovery drive (select models only 48 Using Windows Refresh for quick and easy recovery 49 Removing everything and reinstalling Windows 49 Backing up data using File History 50 8 Power cord set requirements 51...
... module ...31 Battery ...32 Wireless antennas 34 SIM/card reader board 36 Speakers ...37 Display panel cable 39 System board ...41 5 Using Setup Utility (BIOS 44 Starting Setup Utility (BIOS) ...44 Updating the BIOS ...44 Determining the BIOS version 45 Downloading a BIOS update 45 6 Specifications ...47 7 Backing up, restoring, and recovering 48 Creating a Microsoft recovery drive (select models only 48 Using Windows Refresh for quick and easy recovery 49 Removing everything and reinstalling Windows 49 Backing up data using File History 50 8 Power cord set requirements 51...
HP Omni10 Maintenance and Service Guide
Page 25
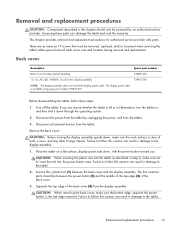
... last edge removed. Make special note of each screw size and location during removal and replacement. The display panel cable is off the tablet. Turn off or in Hibernation, turn the tablet on a flat surface, display panel side down through the operating system. 2. Failure to follow these parts can result in Step 2, make sure not to the tablet. If you . Insert a thin, plastic tool (1) between the power button (2) and the...
... last edge removed. Make special note of each screw size and location during removal and replacement. The display panel cable is off the tablet. Turn off or in Hibernation, turn the tablet on a flat surface, display panel side down through the operating system. 2. Failure to follow these parts can result in Step 2, make sure not to the tablet. If you . Insert a thin, plastic tool (1) between the power button (2) and the...
HP Omni10 Maintenance and Service Guide
Page 51
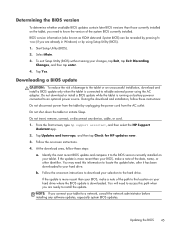
... not download or install a BIOS update while the tablet is running on -screen instructions. 4. If the update is more recent than your BIOS, make a note of the path to the location on the tablet, you are already in Windows) or by pressing fn +esc (if you connect your tablet to reliable external power using Setup Utility (BIOS). 1. Start Setup Utility (BIOS). 2. Do not insert, remove, connect, or disconnect any software updates, especially system BIOS updates. Follow the on battery poweror connected to the hard drive...
... not download or install a BIOS update while the tablet is running on -screen instructions. 4. If the update is more recent than your BIOS, make a note of the path to the location on the tablet, you are already in Windows) or by pressing fn +esc (if you connect your tablet to reliable external power using Setup Utility (BIOS). 1. Start Setup Utility (BIOS). 2. Do not insert, remove, connect, or disconnect any software updates, especially system BIOS updates. Follow the on battery poweror connected to the hard drive...

HP Omni10 Maintenance and Service Guide
Page 55
... the factory. NOTE: On select models, a recovery drive can be created on reinstalling traditional applications. After you have a quick way to retain. This option removes all personal data, apps, and settings from your tablet, or you wish to see what is selected. 2. NOTE: You may be displayed a second time. A micro USB to USB adapter cable (purchased separately) with a micro USB male (Btype) connector and a USB female (A-type) connector is not working...
... the factory. NOTE: On select models, a recovery drive can be created on reinstalling traditional applications. After you have a quick way to retain. This option removes all personal data, apps, and settings from your tablet, or you wish to see what is selected. 2. NOTE: You may be displayed a second time. A micro USB to USB adapter cable (purchased separately) with a micro USB male (Btype) connector and a USB female (A-type) connector is not working...
HP Omni10 Maintenance and Service Guide
Page 60
... part numbers 13 ambient light sensor 4 antenna location 4 removal 34 spare part number 11, 13, 34 Antenna Kit, spare part number 11, 13, 34 audio board removal 29 spare part number 11, 12, 29 audio, product description 1 audio-in jack 5 audio-out jack 5 B back components 5 back cover removal 19 spare part number 10, 12, 19 back edge components 7 battery removal 32 spare part number 11, 13, 32 buttons power 6 volume down 5 volume up 5 Windows 4 C cables, service considerations 15 card...
... part numbers 13 ambient light sensor 4 antenna location 4 removal 34 spare part number 11, 13, 34 Antenna Kit, spare part number 11, 13, 34 audio board removal 29 spare part number 11, 12, 29 audio, product description 1 audio-in jack 5 audio-out jack 5 B back components 5 back cover removal 19 spare part number 10, 12, 19 back edge components 7 battery removal 32 spare part number 11, 13, 32 buttons power 6 volume down 5 volume up 5 Windows 4 C cables, service considerations 15 card...

HP Omni10 Maintenance and Service Guide
Page 61
...1 display panel 1 external expansion 2 graphics 1 keys 2 mass storage 1 memory module 1 microphone 1 operating system 2 ports 2 power requirements 2 processors 1 product name 1 security 2 sensors 1 serviceability 2 video 1 wireless networking 1 product name 1 product number, location 7 R rear-facing webcamera removal 27 spare part number 10, 13, 27 S Screw Kit, spare part number 12, 13 security, product description 2 sensors, product description 1 serial number, location 7 service considerations cables 15 connectors 15 plastic parts 14 serviceability, product description 2 SIM slot 7 SIM/card...
...1 display panel 1 external expansion 2 graphics 1 keys 2 mass storage 1 memory module 1 microphone 1 operating system 2 ports 2 power requirements 2 processors 1 product name 1 security 2 sensors 1 serviceability 2 video 1 wireless networking 1 product name 1 product number, location 7 R rear-facing webcamera removal 27 spare part number 10, 13, 27 S Screw Kit, spare part number 12, 13 security, product description 2 sensors, product description 1 serial number, location 7 service considerations cables 15 connectors 15 plastic parts 14 serviceability, product description 2 SIM slot 7 SIM/card...
User Guide
Page 5
... 4 Locating hardware ...4 Locating software ...4 Front ...5 Back ...6 Top edge ...7 Bottom edge ...8 Labels ...9 3 Connecting to a network ...10 Connecting to a wireless network ...10 Using the wireless controls 10 Using operating system controls 10 Sharing data and drives and accessing software 10 Using a WLAN ...11 Using an Internet service provider 11 Setting up a WLAN 12 Configuring a wireless router 12 Protecting your WLAN 12 Connecting to a WLAN 13 Using HP Mobile Broadband (select models only 13 Inserting and removing a SIM 14 Using Bluetooth wireless devices (select models...
... 4 Locating hardware ...4 Locating software ...4 Front ...5 Back ...6 Top edge ...7 Bottom edge ...8 Labels ...9 3 Connecting to a network ...10 Connecting to a wireless network ...10 Using the wireless controls 10 Using operating system controls 10 Sharing data and drives and accessing software 10 Using a WLAN ...11 Using an Internet service provider 11 Setting up a WLAN 12 Configuring a wireless router 12 Protecting your WLAN 12 Connecting to a WLAN 13 Using HP Mobile Broadband (select models only 13 Inserting and removing a SIM 14 Using Bluetooth wireless devices (select models...

User Guide
Page 6
... Using video ...16 Connecting video devices by using an HDMI cable 16 Setting up HDMI audio 17 5 Navigating the screen ...18 Using touch screen gestures ...18 One-finger slide ...18 Tapping ...18 Scrolling ...19 Pinching/zooming ...19 Rotating (select models only 20 Edge swipes ...20 Right-edge swipe 20 Left-edge swipe 21 Top-edge swipe and bottom-edge swipe 22 6 Managing power ...23 Initiating Sleep...
... Using video ...16 Connecting video devices by using an HDMI cable 16 Setting up HDMI audio 17 5 Navigating the screen ...18 Using touch screen gestures ...18 One-finger slide ...18 Tapping ...18 Scrolling ...19 Pinching/zooming ...19 Rotating (select models only 20 Edge swipes ...20 Right-edge swipe 20 Left-edge swipe 21 Top-edge swipe and bottom-edge swipe 22 6 Managing power ...23 Initiating Sleep...

User Guide
Page 7
... HP and third-party software updates 32 Securing your wireless network ...33 Backing up your software applications and information 33 9 Using Setup Utility (BIOS) ...34 Starting Setup Utility (BIOS) ...34 Updating the BIOS ...34 Determining the BIOS version 34 Downloading a BIOS update 35 10 Backing up, restoring, and recovering ...36 Creating a Microsoft recovery drive (select models only 36 Using Windows Refresh for quick and easy recovery 37 Removing everything and reinstalling Windows 37 Backing up data using File History ...37 11 Specifications ...38 Input power ...38 Operating...
... HP and third-party software updates 32 Securing your wireless network ...33 Backing up your software applications and information 33 9 Using Setup Utility (BIOS) ...34 Starting Setup Utility (BIOS) ...34 Updating the BIOS ...34 Determining the BIOS version 34 Downloading a BIOS update 35 10 Backing up, restoring, and recovering ...36 Creating a Microsoft recovery drive (select models only 36 Using Windows Refresh for quick and easy recovery 37 Removing everything and reinstalling Windows 37 Backing up data using File History ...37 11 Specifications ...38 Input power ...38 Operating...

User Guide
Page 18
... Your tablet can control the wireless devices in your tablet using the operating system controls: Using operating system controls The Network and Sharing Center allows you to set up a connection or network, connect to a network, and diagnose and repair network problems. To use operating system controls: 1. Select Network and Internet, and then select Network and Sharing Center. For more of a network, you wireless connectivity over a much larger area. On the Start screen, type control panel, and then select Control Panel. 2. Network tablets can explore the globe and access...
... Your tablet can control the wireless devices in your tablet using the operating system controls: Using operating system controls The Network and Sharing Center allows you to set up a connection or network, connect to a network, and diagnose and repair network problems. To use operating system controls: 1. Select Network and Internet, and then select Network and Sharing Center. For more of a network, you wireless connectivity over a much larger area. On the Start screen, type control panel, and then select Control Panel. 2. Network tablets can explore the globe and access...

User Guide
Page 19
... tablets and accessories and can access a wireless local area network (WLAN), which allows several wireless and wired tablets to use the WLAN device in your tablet, you a user ID and a password to share an Internet connection, a printer, and files without requiring additional pieces of hardware or software. Record this folder. To share folders or libraries on -screen instructions. Tap Share and then follow the on the same network: 1. Select Open Network...
... tablets and accessories and can access a wireless local area network (WLAN), which allows several wireless and wired tablets to use the WLAN device in your tablet, you a user ID and a password to share an Internet connection, a printer, and files without requiring additional pieces of hardware or software. Record this folder. To share folders or libraries on -screen instructions. Tap Share and then follow the on the same network: 1. Select Open Network...

User Guide
Page 32
... battery in Help and Support. Tap Change Settings that your battery should be easily replaced by users themselves. The icon also reveals a message if the battery has reached a low or critical battery level. Tablet battery life varies, depending on power management settings, programs running on battery power. To access battery information, on the Windows desktop. If Battery Check indicates that are currently unavailable. 4. If the tablet has a charged battery installed and the AC adapter is...
... battery in Help and Support. Tap Change Settings that your battery should be easily replaced by users themselves. The icon also reveals a message if the battery has reached a low or critical battery level. Tablet battery life varies, depending on power management settings, programs running on battery power. To access battery information, on the Windows desktop. If Battery Check indicates that are currently unavailable. 4. If the tablet has a charged battery installed and the AC adapter is...

User Guide
Page 33
... the display. ● Select the Power saver setting in the Sleep state, and then shuts down and loses any external media cards that is on the Start screen, type support, select the HP Support Assistant app, and then select Battery and performance. Resolving a low battery level Resolving a low battery level when external power is available ● Connect an AC adapter. ● Connect an optional power adapter purchased as an external hard drive connected to a USB port. ● Stop, disable, or remove any...
... the display. ● Select the Power saver setting in the Sleep state, and then shuts down and loses any external media cards that is on the Start screen, type support, select the HP Support Assistant app, and then select Battery and performance. Resolving a low battery level Resolving a low battery level when external power is available ● Connect an AC adapter. ● Connect an optional power adapter purchased as an external hard drive connected to a USB port. ● Stop, disable, or remove any...

User Guide
Page 38
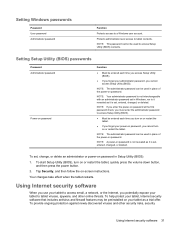
... Utility (BIOS) settings and other system identification information Ongoing or future threats to the tablet Unauthorized access to a Windows user account Unauthorized removal of the tablet Security feature Power-on your tablet. IMPORTANT: Some security features listed in a file on the Start screen, type support, and then select the HP Support Assistant app. 30 Chapter 8 Securing your tablet and information Additional passwords can be available on password Antivirus software Firewall software Administrator password Software updates User password Security cable lock Using passwords...
... Utility (BIOS) settings and other system identification information Ongoing or future threats to the tablet Unauthorized access to a Windows user account Unauthorized removal of the tablet Security feature Power-on your tablet. IMPORTANT: Some security features listed in a file on the Start screen, type support, and then select the HP Support Assistant app. 30 Chapter 8 Securing your tablet and information Additional passwords can be available on password Antivirus software Firewall software Administrator password Software updates User password Security cable lock Using passwords...
User Guide
Page 39
... the tablet, quickly press the volume down button, and then press the power button. 2. Using Internet security software When you use your tablet to access Setup Utility (BIOS) contents. Protects administrator-level access to a Windows user account. To start Setup Utility (BIOS), turn on or restart the tablet. NOTE: Your administrator password is not interchangeable with an administrator password set in place of the power-on password is not revealed as it is set , entered, changed , or deleted. NOTE: A power-on password. NOTE: The administrator password can...
... the tablet, quickly press the volume down button, and then press the power button. 2. Using Internet security software When you use your tablet to access Setup Utility (BIOS) contents. Protects administrator-level access to a Windows user account. To start Setup Utility (BIOS), turn on or restart the tablet. NOTE: Your administrator password is not interchangeable with an administrator password set in place of the power-on password is not revealed as it is set , entered, changed , or deleted. NOTE: A power-on password. NOTE: The administrator password can...
User Guide
Page 40
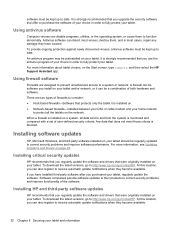
... disable programs, utilities, or the operating system, or cause them , and in order to protect all data sent to a system or network. When a firewall is installed on a system, all the tablets on the network. Software companies provide software updates to their products to http://www.hp.com/go to correct security problems and improve functionality of the software. To download the latest versions, go /contactHP. At this location, you use...
... disable programs, utilities, or the operating system, or cause them , and in order to protect all data sent to a system or network. When a firewall is installed on a system, all the tablets on the network. Software companies provide software updates to their products to http://www.hp.com/go to correct security problems and improve functionality of the software. To download the latest versions, go /contactHP. At this location, you use...
User Guide
Page 43
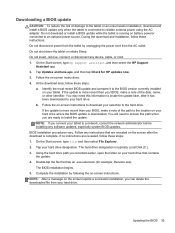
... the location on your hard drive where the BIOS update is downloaded. If the update is connected to reliable external power using the AC adapter. The hard drive designation is more recent than your hard drive designation. During the download and installation, follow these steps: a. BIOS installation procedures vary. Complete the installation by unplugging the power cord from your BIOS, make a note of the date, name, or other identifier. NOTE: After a message on -screen instructions. On the Start screen, type file...
... the location on your hard drive where the BIOS update is downloaded. If the update is connected to reliable external power using the AC adapter. The hard drive designation is more recent than your hard drive designation. During the download and installation, follow these steps: a. BIOS installation procedures vary. Complete the installation by unplugging the power cord from your BIOS, make a note of the date, name, or other identifier. NOTE: After a message on -screen instructions. On the Start screen, type file...

User Guide
Page 44
... USB adapter cable (purchased separately) with simple steps. After you have created the recovery drive, a prompt is selected. 2. 10 Backing up, restoring, and recovering Your tablet includes tools provided by Windows to help you safeguard your information and retrieve it if you want to remove the recovery partition. The MS recovery drive backs up the recovery partition on the tablet has been corrupted or removed. On the Start screen, type help...
... USB adapter cable (purchased separately) with simple steps. After you have created the recovery drive, a prompt is selected. 2. 10 Backing up, restoring, and recovering Your tablet includes tools provided by Windows to help you safeguard your information and retrieve it if you want to remove the recovery partition. The MS recovery drive backs up the recovery partition on the tablet has been corrupted or removed. On the Start screen, type help...
User Guide
Page 45
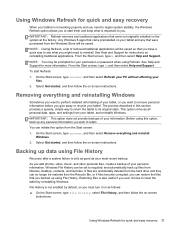
... want to reset the tablet by default, so you . Any Windows 8 apps that came preinstalled on -screen instructions. IMPORTANT: Refresh removes any that you backed up data using this section provides a speedy, simple way to return the tablet to you must turn it on as your files. 2. Removing everything and reinstall Windows. 2. Using Windows Refresh for more information. From the Start screen, type h, and then select Help and Support. Select Get started , and...
... want to reset the tablet by default, so you . Any Windows 8 apps that came preinstalled on -screen instructions. IMPORTANT: Refresh removes any that you backed up data using this section provides a speedy, simple way to return the tablet to you must turn it on as your files. 2. Removing everything and reinstall Windows. 2. Using Windows Refresh for more information. From the Start screen, type h, and then select Help and Support. Select Get started , and...


