User Guide
Page 5
... for comfort ...9 Turning on the monitor ...10 Installing a security cable ...11 Storing headphones ...11 Using the ambient light ...12 Mounting the display head ...13 Removing the monitor stand 13 Attaching the VESA mounting bracket 14 2 Using the monitor ...15 Software and utilities ...15 Enabling G-SYNC ...15 The Setup Information file ...15 The Image...
... for comfort ...9 Turning on the monitor ...10 Installing a security cable ...11 Storing headphones ...11 Using the ambient light ...12 Mounting the display head ...13 Removing the monitor stand 13 Attaching the VESA mounting bracket 14 2 Using the monitor ...15 Software and utilities ...15 Enabling G-SYNC ...15 The Setup Information file ...15 The Image...

User Guide
Page 8
...and input lag - Product features and components Features The monitor features include the following: ● 88.9 cm (35-inch) diagonal viewable area with 3440 × 1440 UWQHD resolution, plus full-screen support for lower resolutions ●...● Software and documentation disc that includes monitor drivers and product documentation ● VESA mounting bracket for attaching the monitor to a wall-mount device or swing arm ● Security cable slot provision on rear of vision, enhanced... capability, if supported by synchronizing display refresh rates to http://www.hp.com/support.
...and input lag - Product features and components Features The monitor features include the following: ● 88.9 cm (35-inch) diagonal viewable area with 3440 × 1440 UWQHD resolution, plus full-screen support for lower resolutions ●...● Software and documentation disc that includes monitor drivers and product documentation ● VESA mounting bracket for attaching the monitor to a wall-mount device or swing arm ● Security cable slot provision on rear of vision, enhanced... capability, if supported by synchronizing display refresh rates to http://www.hp.com/support.
User Guide
Page 19
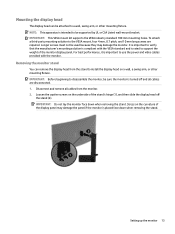
NOTE: This apparatus is intended to the VESA mount, four 4 mm, 0.7 pitch, and 10 mm long screws ...the monitor is important to install the display head on a wall, a swing arm, or other mounting fixture. IMPORTANT: Do not lay the monitor face down when removing the stand. Disconnect and remove ...mount bracket. Mounting the display head The display head can remove the display head from the monitor. 2. To attach a third-party mounting solution to be sure the monitor is compliant with the monitor. IMPORTANT: This VESA mount kit supports the VESA industry standard 100 mm mounting...
NOTE: This apparatus is intended to the VESA mount, four 4 mm, 0.7 pitch, and 10 mm long screws ...the monitor is important to install the display head on a wall, a swing arm, or other mounting fixture. IMPORTANT: Do not lay the monitor face down when removing the stand. Disconnect and remove ...mount bracket. Mounting the display head The display head can remove the display head from the monitor. 2. To attach a third-party mounting solution to be sure the monitor is compliant with the monitor. IMPORTANT: This VESA mount kit supports the VESA industry standard 100 mm mounting...

User Guide
Page 20
... the screws to a wall, swing arm, or other mounting device, insert four mounting screws through the holes on the mounting device and into the slot on a surface covered by a soft, clean cloth. Insert the VESA mounting bracket into the screw holes on page 13. 2. Attaching the VESA mounting bracket A VESA mounting bracket is included with the monitor for use...
... the screws to a wall, swing arm, or other mounting device, insert four mounting screws through the holes on the mounting device and into the slot on a surface covered by a soft, clean cloth. Insert the VESA mounting bracket into the screw holes on page 13. 2. Attaching the VESA mounting bracket A VESA mounting bracket is included with the monitor for use...


