User Guide
Page 5
... monitor ...15 Software and utilities ...15 Enabling G-SYNC ...15 The Setup Information file ...15 The Image Color Matching file ...15 Installing the .inf and .icm files ...16 Installing from the optical disc (available in select regions 16 Downloading from the web ...16 Using the on-screen display (OSD) menu ...16 Selecting a faster response time for gaming 17 Using Deep Sleep mode ...17 Selecting the Low Blue Light mode ...18 3 Support and troubleshooting...
... monitor ...15 Software and utilities ...15 Enabling G-SYNC ...15 The Setup Information file ...15 The Image Color Matching file ...15 Installing the .inf and .icm files ...16 Installing from the optical disc (available in select regions 16 Downloading from the web ...16 Using the on-screen display (OSD) menu ...16 Selecting a faster response time for gaming 17 Using Deep Sleep mode ...17 Selecting the Low Blue Light mode ...18 3 Support and troubleshooting...
User Guide
Page 6
Locating the serial number and product number 20 4 Maintaining the monitor ...21 Maintenance guidelines ...21 Cleaning the monitor ...21 Shipping the monitor ...21 Appendix A Technical specifications ...22 Preset display resolutions ...23 Entering user modes ...23 Power adapter ...24 Energy saver feature ...24 Appendix B Accessibility ...25 Supported assistive technologies ...25 Contacting support ...25 vi
Locating the serial number and product number 20 4 Maintaining the monitor ...21 Maintenance guidelines ...21 Cleaning the monitor ...21 Shipping the monitor ...21 Appendix A Technical specifications ...22 Preset display resolutions ...23 Entering user modes ...23 Power adapter ...24 Energy saver feature ...24 Appendix B Accessibility ...25 Supported assistive technologies ...25 Contacting support ...25 vi
User Guide
Page 7
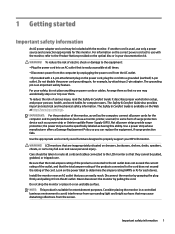
.... Not all cords and cables connected to the LCD monitor so that are inappropriately situated on the correct power cord set to the cord does not exceed the rating of the monitor, as well as having this monitor. For your HP LCD monitor. It describes proper workstation setup, and proper posture, health, and work habits for example, by pulling the cord. Never disconnect the monitor by attaching a 2-pin adapter. To...
.... Not all cords and cables connected to the LCD monitor so that are inappropriately situated on the correct power cord set to the cord does not exceed the rating of the monitor, as well as having this monitor. For your HP LCD monitor. It describes proper workstation setup, and proper posture, health, and work habits for example, by pulling the cord. Never disconnect the monitor by attaching a 2-pin adapter. To...

User Guide
Page 8
...://www.hp.com/support. To locate updates to the user guide for optional security cable ● User configurable ambient lighting with full-range LEDs ● Convenient headphones storage hook on -screen instructions. 2 Chapter 1 Getting started Product features and components Features The monitor features include the following: ● 88.9 cm (35-inch) diagonal viewable area with 3440 × 1440 UWQHD resolution, plus full-screen support for lower resolutions ● Tilt and height-adjustment capability ● Wide viewing...
...://www.hp.com/support. To locate updates to the user guide for optional security cable ● User configurable ambient lighting with full-range LEDs ● Convenient headphones storage hook on -screen instructions. 2 Chapter 1 Getting started Product features and components Features The monitor features include the following: ● 88.9 cm (35-inch) diagonal viewable area with 3440 × 1440 UWQHD resolution, plus full-screen support for lower resolutions ● Tilt and height-adjustment capability ● Wide viewing...

User Guide
Page 9
... OSD menu is closed , press to open the Viewing Modes menu. (3) Minus button If the OSD menu is open , press to the source device. (11) USB 3.0 Type-A ports with your product. For additional safety information, see the Product Notices provided on or off. (5) Headphones hook Provides a convenient storage location for headphones. (6) DisplayPort Connects the DisplayPort cable to the source device. (7) Service port Used by qualified HP service technicians only. (8) Power connector Connects an AC adapter. (9) Security cable...
... OSD menu is closed , press to open the Viewing Modes menu. (3) Minus button If the OSD menu is open , press to the source device. (11) USB 3.0 Type-A ports with your product. For additional safety information, see the Product Notices provided on or off. (5) Headphones hook Provides a convenient storage location for headphones. (6) DisplayPort Connects the DisplayPort cable to the source device. (7) Service port Used by qualified HP service technicians only. (8) Power connector Connects an AC adapter. (9) Security cable...
User Guide
Page 11
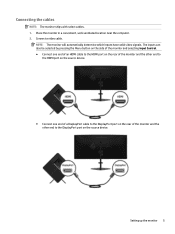
... computer. 2. Setting up the monitor 5 NOTE: The monitor will automatically determine which inputs have valid video signals. The inputs can also be selected by pressing the Menu button on the side of the monitor and selecting Input Control. ● Connect one end of an HDMI cable to the HDMI port on the rear of the monitor and the other end to the HDMI port on the source device. ● Connect one end...
... computer. 2. Setting up the monitor 5 NOTE: The monitor will automatically determine which inputs have valid video signals. The inputs can also be selected by pressing the Menu button on the side of the monitor and selecting Input Control. ● Connect one end of an HDMI cable to the HDMI port on the rear of the monitor and the other end to the HDMI port on the source device. ● Connect one end...
User Guide
Page 16
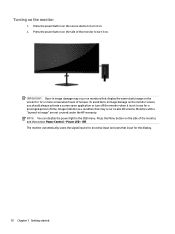
... disable the power light in image" are not covered under the HP warranty. Press the Menu button on the monitor 1. To avoid burn-in image damage may occur on . 2. Turning on the side of the monitor, and then select Power Control > Power LED > Off. IMPORTANT: Burn-in image damage on the monitor screen, you should always activate a screen saver application or turn off the monitor when it is a condition that input for the display...
... disable the power light in image" are not covered under the HP warranty. Press the Menu button on the monitor 1. To avoid burn-in image damage may occur on . 2. Turning on the side of the monitor, and then select Power Control > Power LED > Off. IMPORTANT: Burn-in image damage on the monitor screen, you should always activate a screen saver application or turn off the monitor when it is a condition that input for the display...
User Guide
Page 17
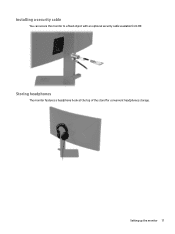
Setting up the monitor 11 Storing headphones The monitor features a headphone hook at the top of the stand for convenient headphones storage. Installing a security cable You can secure the monitor to a fixed object with an optional security cable available from HP.
Setting up the monitor 11 Storing headphones The monitor features a headphone hook at the top of the stand for convenient headphones storage. Installing a security cable You can secure the monitor to a fixed object with an optional security cable available from HP.
User Guide
Page 18
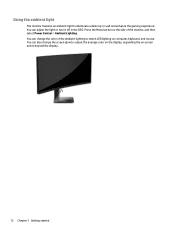
You can change the screen glow to illuminate a desk top or wall and enhance the gaming experience. You can adjust the light or turn it off in the OSD. You can also change the color of the monitor, and then select Power Control > Ambient Lighting. Using the ambient light The monitor features an ambient light to output the average color on the display, expanding the on-screen action beyond the display. 12 Chapter 1 Getting started Press the Menu button on the side of the ambient lighting to match LED lighting on computer, keyboard, and mouse.
You can change the screen glow to illuminate a desk top or wall and enhance the gaming experience. You can adjust the light or turn it off in the OSD. You can also change the color of the monitor, and then select Power Control > Ambient Lighting. Using the ambient light The monitor features an ambient light to output the average color on the display, expanding the on-screen action beyond the display. 12 Chapter 1 Getting started Press the Menu button on the side of the ambient lighting to match LED lighting on computer, keyboard, and mouse.
User Guide
Page 19
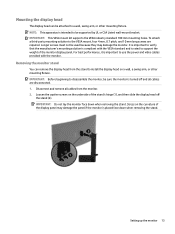
... captive screws on the curvature of the display panel may damage the monitor. Stress on the underside of the monitor display panel. For best performance, it is rated to support the weight of the stand's hinge (1), and then slide the display head off and all cables from the stand to install the display head on a wall, a swing arm, or other mounting fixture. Mounting the display head The display head can remove the display...
... captive screws on the curvature of the display panel may damage the monitor. Stress on the underside of the monitor display panel. For best performance, it is rated to support the weight of the stand's hinge (1), and then slide the display head off and all cables from the stand to install the display head on a wall, a swing arm, or other mounting fixture. Mounting the display head The display head can remove the display...
User Guide
Page 21
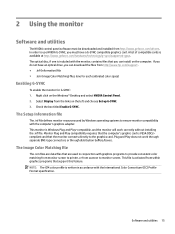
... monitor connects directly to monitor screen. This file is Windows Plug and Play-compatible, and the monitor will work through separate BNC-type connectors or through distribution buffers/boxes. Software and utilities 15 Select Display from within graphics programs that are data files that support this feature. Check the box titled Enable G-SYNC. The Image Color Matching file The .icm files are used by Windows operating systems to use NVIDIA G-SYNC...
... monitor connects directly to monitor screen. This file is Windows Plug and Play-compatible, and the monitor will work through separate BNC-type connectors or through distribution buffers/boxes. Software and utilities 15 Select Display from within graphics programs that are data files that support this feature. Check the box titled Enable G-SYNC. The Image Color Matching file The .icm files are used by Windows operating systems to use NVIDIA G-SYNC...
User Guide
Page 22
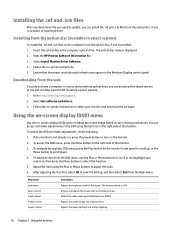
... 1. Selects the video input signal (DisplayPort or HDMI). Adjusts the power settings and ambient lighting. 16 Chapter 2 Using the monitor Using the on-screen display (OSD) menu Use the on-screen display (OSD) menu to adjust the screen image based on the monitor. 2. After adjusting the function, select OK to http://www.hp.com/support. 2. Insert the optical disc in the Windows Display control panel. Downloading from the optical disc, if one is provided: 1. Main menu Luminance Color Control Input Control Image Control Power Control Description Adjusts the brightness level of .inf...
... 1. Selects the video input signal (DisplayPort or HDMI). Adjusts the power settings and ambient lighting. 16 Chapter 2 Using the monitor Using the on-screen display (OSD) menu Use the on-screen display (OSD) menu to adjust the screen image based on the monitor. 2. After adjusting the function, select OK to http://www.hp.com/support. 2. Insert the optical disc in the Windows Display control panel. Downloading from the optical disc, if one is provided: 1. Main menu Luminance Color Control Input Control Image Control Power Control Description Adjusts the brightness level of .inf...
User Guide
Page 23
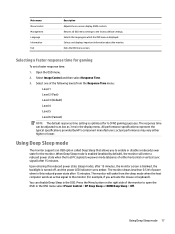
... about the monitor. Using Deep Sleep mode 17 actual performance may vary either horizontal or vertical sync signal) after 15 minutes. All performance specifications represent the typical specifications provided by default), the monitor will wake from the Response Time menu: Level 1 Level 2 (Fast) Level 3 (Default) Level 4 Level 5 Level 6 (Fastest) NOTE: The default response time setting is displayed. When Deep Sleep mode is turned off, and the power LED indicator turns amber. Select Image Control and...
... about the monitor. Using Deep Sleep mode 17 actual performance may vary either horizontal or vertical sync signal) after 15 minutes. All performance specifications represent the typical specifications provided by default), the monitor will wake from the Response Time menu: Level 1 Level 2 (Fast) Level 3 (Default) Level 4 Level 5 Level 6 (Fastest) NOTE: The default response time setting is displayed. When Deep Sleep mode is turned off, and the power LED indicator turns amber. Select Image Control and...

User Guide
Page 24
... display the OSD icons on the screen. Choose one of the following settings: ● Low Blue Light-Reduces blue light for improved eye comfort ● Night-Adjusts the monitor to reduce the blue light output and create a more relaxing and less stimulating image while viewing content on the screen. 2. Press one of the OSD buttons on the monitor to open the Viewing Modes menu, or select the Menu icon , and then select Color Control > Viewing Modes. 3. To adjust...
... display the OSD icons on the screen. Choose one of the following settings: ● Low Blue Light-Reduces blue light for improved eye comfort ● Night-Adjusts the monitor to reduce the blue light output and create a more relaxing and less stimulating image while viewing content on the screen. 2. Press one of the OSD buttons on the monitor to open the Viewing Modes menu, or select the Menu icon , and then select Color Control > Viewing Modes. 3. To adjust...
User Guide
Page 25
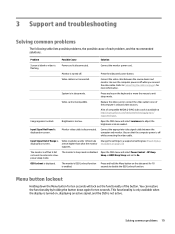
... Menu button for 10 is enabled. Refer to a supported setting (see Preset display resolutions on screen. Be sure that the computer power is disabled. Change the settings to Connecting the cables on page 5 for ten seconds. OSD Lockout is incompatible. Menu button lockout Holding down again for more information. Replace the video card or connect the video cable to adjust the brightness scale as needed. Open the OSD menu and select Luminance to one of the computer's onboard video sources. Input Signal...
... Menu button for 10 is enabled. Refer to a supported setting (see Preset display resolutions on screen. Be sure that the computer power is disabled. Change the settings to Connecting the cables on page 5 for ten seconds. OSD Lockout is incompatible. Menu button lockout Holding down again for more information. Replace the video card or connect the video cable to adjust the brightness scale as needed. Open the OSD menu and select Luminance to one of the computer's onboard video sources. Input Signal...
User Guide
Page 26
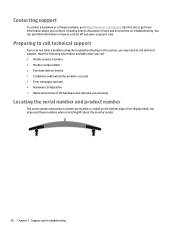
... are located on a label on how to get more information about the monitor model. 20 Chapter 3 Support and troubleshooting You can not solve a problem using Locating the serial number and product number The serial number and product number are using the troubleshooting tips in this site to contact HP and open a support case. Preparing to http://www.hp.com/support. Contacting support To resolve a hardware or software problem, go to call technical...
... are located on a label on how to get more information about the monitor model. 20 Chapter 3 Support and troubleshooting You can not solve a problem using Locating the serial number and product number The serial number and product number are using the troubleshooting tips in this site to contact HP and open a support case. Preparing to http://www.hp.com/support. Contacting support To resolve a hardware or software problem, go to call technical...

User Guide
Page 27
... unplug the power cord from excessive light, heat or moisture. NOTE: Monitors with a soft, clean antistatic cloth. 3. Shipping the monitor Keep the original packing box in use the damp cloth to rest on the power cord. Never push objects of the monitor by wiping the screen and the cabinet with a "burned-in image" are not covered under the HP warranty. ● Slots and openings in the...
... unplug the power cord from excessive light, heat or moisture. NOTE: Monitors with a soft, clean antistatic cloth. 3. Shipping the monitor Keep the original packing box in use the damp cloth to rest on the power cord. Never push objects of the monitor by wiping the screen and the cabinet with a "burned-in image" are not covered under the HP warranty. ● Slots and openings in the...
User Guide
Page 28
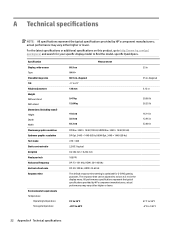
... display menu. The response time can be adjusted to as low as 3 ms in 5°C to 35°C -20°C to 60°C 41°F to 95°F -4°F to 140°F 22 Appendix A Technical specifications Specification Display, wide-screen Type Viewable image size Tilt Height adjustment Weight Without stand With stand Dimensions (including stand) Height Depth Width Maximum graphic resolution Optimum graphic resolution Text mode Static contrast ratio Dot pitch Pixels per inch Horizontal frequency Vertical refresh rate...
... display menu. The response time can be adjusted to as low as 3 ms in 5°C to 35°C -20°C to 60°C 41°F to 95°F -4°F to 140°F 22 Appendix A Technical specifications Specification Display, wide-screen Type Viewable image size Tilt Height adjustment Weight Without stand With stand Dimensions (including stand) Height Depth Width Maximum graphic resolution Optimum graphic resolution Text mode Static contrast ratio Dot pitch Pixels per inch Horizontal frequency Vertical refresh rate...

User Guide
Page 29
Specification Relative humidity Altitude Operating Storage Power source Measured power consumption Full power Typical settings Sleep Off Input terminals 20% to 70% Measurement 0 m to 5,000 m 0 m to 12,192 m 100 V ac to 240 V ac 50/60 Hz 120 W 75 W
Specification Relative humidity Altitude Operating Storage Power source Measured power consumption Full power Typical settings Sleep Off Input terminals 20% to 70% Measurement 0 m to 5,000 m 0 m to 12,192 m 100 V ac to 240 V ac 50/60 Hz 120 W 75 W
User Guide
Page 30
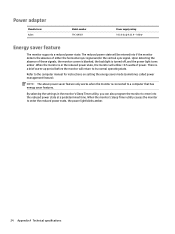
Upon detecting the absence of either the horizontal sync signal and/or the vertical sync signal. The reduced power state will utilize Power adapter Manufacturer AcBel Model number TPC-AA501 Power supply rating 19.5 V dc @ 9.23 A - 180 W Energy saver feature The monitor supports a reduced power state. When the monitor is in the reduced power state, the monitor will be entered into if the monitor detects the absence of these signals, the monitor screen is blanked, the backlight is turned off, and the power light turns amber.
Upon detecting the absence of either the horizontal sync signal and/or the vertical sync signal. The reduced power state will utilize Power adapter Manufacturer AcBel Model number TPC-AA501 Power supply rating 19.5 V dc @ 9.23 A - 180 W Energy saver feature The monitor supports a reduced power state. When the monitor is in the reduced power state, the monitor will be entered into if the monitor detects the absence of these signals, the monitor screen is blanked, the backlight is turned off, and the power light turns amber.


