
Bluetooth Wireless Technology Basics
Page 7
... displayed, select Next. 3. For specific instructions about discovering and connecting to other BWT-enabled devices, refer to restart the computer. Enable BWT functionality. 3. These steps are explained below. When the Software Setup Welcome window is disabled (red logo), enable it on by hp to your BWT-enabled notebook PC: 1. The following 3 steps activate your notebook user documentation if you need help locating the wireless button and light. however, you turn it by right-clicking the Bluetooth...
... displayed, select Next. 3. For specific instructions about discovering and connecting to other BWT-enabled devices, refer to restart the computer. Enable BWT functionality. 3. These steps are explained below. When the Software Setup Welcome window is disabled (red logo), enable it on by hp to your BWT-enabled notebook PC: 1. The following 3 steps activate your notebook user documentation if you need help locating the wireless button and light. however, you turn it by right-clicking the Bluetooth...

Bluetooth Wireless Technology Basics
Page 8
... http://www.hp.com/products/wireless/ for the two devices match, they report a list of available profiles. Table 2. Table 2 describes some models of your notebook, select Start > My Programs > My Bluetooth Places to another BWT-enabled device. Bluetooth wireless technology profiles supported by selecting the Start menu, and then selecting Bluetooth Manager. You can change the BWT settings. If any of the Today screen to activate BWT functionality, to create BWT connections, or to...
... http://www.hp.com/products/wireless/ for the two devices match, they report a list of available profiles. Table 2. Table 2 describes some models of your notebook, select Start > My Programs > My Bluetooth Places to another BWT-enabled device. Bluetooth wireless technology profiles supported by selecting the Start menu, and then selecting Bluetooth Manager. You can change the BWT settings. If any of the Today screen to activate BWT functionality, to create BWT connections, or to...

Limited Warranty and Technical Support
Page 5
... computer needs a hardware repair that is covered under warranty, then HP will help sources to meet your needs: „ Access to drivers and product documentation: Find original product drivers, latest updates and software fixes, Limited Warranty information, and product documentation. „ Open an online service event with an HP Support Specialist: If you call your questions and resolve problems-24 hours a day, 7 days a week. Applicable error messages - Product number, serial number, model...
... computer needs a hardware repair that is covered under warranty, then HP will help sources to meet your needs: „ Access to drivers and product documentation: Find original product drivers, latest updates and software fixes, Limited Warranty information, and product documentation. „ Open an online service event with an HP Support Specialist: If you call your questions and resolve problems-24 hours a day, 7 days a week. Applicable error messages - Product number, serial number, model...
HP ProtectTools Security Manager
Page 2
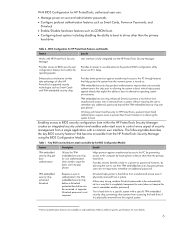
... be difficult to bring many client devices include security features that exist within the device BIOS. New features can be added by using it, and this problem. Client device security options feature a number of capabilities based on a variety of technologies: • Notebook and desktop computers can easily be configured with Smart Card readers • The Trusted Platform Module , or TPM embedded security chip designed...
... be difficult to bring many client devices include security features that exist within the device BIOS. New features can be added by using it, and this problem. Client device security options feature a number of capabilities based on a variety of technologies: • Notebook and desktop computers can easily be configured with Smart Card readers • The Trusted Platform Module , or TPM embedded security chip designed...
HP ProtectTools Security Manager
Page 6
... protect a hard drive from unauthorized access even if physically removed from a device other than the primary hard drive. TPM embedded security chip pre-boot authentication requires that users securely authenticate to the chip prior to allowing the system to platform specific specifications for more details. 6 Working with HP ProtectTools Security Manager User interface is not required. Key BIOS security features made accessible by allowing the user to use alternative to...
... protect a hard drive from unauthorized access even if physically removed from a device other than the primary hard drive. TPM embedded security chip pre-boot authentication requires that users securely authenticate to the chip prior to allowing the system to platform specific specifications for more details. 6 Working with HP ProtectTools Security Manager User interface is not required. Key BIOS security features made accessible by allowing the user to use alternative to...
Wireless Security
Page 8
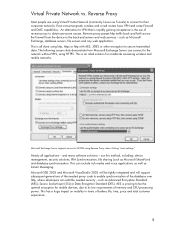
... "more settings." use of memory and CPU processing power. such as Advanced Encryption Standard (AES), Secure Socket layer (SSL) or Data Encryption Standard (DES). Microsoft SQL 2005 and Microsoft VisualStudio 2005 will support subsequent generations of the needed security - Virtual Private Network vs. An alternative to enable synchronization of battery life, time, price and total customer experience. 8 The following screen shots...
... "more settings." use of memory and CPU processing power. such as Advanced Encryption Standard (AES), Secure Socket layer (SSL) or Data Encryption Standard (DES). Microsoft SQL 2005 and Microsoft VisualStudio 2005 will support subsequent generations of the needed security - Virtual Private Network vs. An alternative to enable synchronization of battery life, time, price and total customer experience. 8 The following screen shots...
Hard Drive White Paper
Page 5
...;314058&Product=winxp - HP Recommendations for Notebook Users • Install HP Notebook LidSwitch Policy, or as an alternative, place the notebook into Standby mode before transporting it from one location to another. • Upgrade to the latest system BIOS, as given in the "F10 Setup Hard Drive Self-Test" section. • Whenever possible, adjust power management settings (power schemes) in Control Panel to permit the hard drive to be turned off when it will...
...;314058&Product=winxp - HP Recommendations for Notebook Users • Install HP Notebook LidSwitch Policy, or as an alternative, place the notebook into Standby mode before transporting it from one location to another. • Upgrade to the latest system BIOS, as given in the "F10 Setup Hard Drive Self-Test" section. • Whenever possible, adjust power management settings (power schemes) in Control Panel to permit the hard drive to be turned off when it will...
Hardware Guide
Page 32
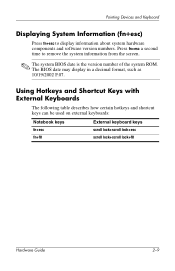
... system hardware components and software version numbers. Using Hotkeys and Shortcut Keys with External Keyboards The following table describes how certain hotkeys and shortcut keys can be used on external keyboards: Notebook keys External keyboard keys fn+esc fn+f8 scroll lock+scroll lock+esc scroll lock+scroll lock+f8 Hardware Guide 2-9 Pointing Devices and Keyboard Displaying System Information (fn+esc) Press fn+esc to remove the system information from the screen. ✎ The system BIOS date is the version number of the system ROM. The BIOS...
... system hardware components and software version numbers. Using Hotkeys and Shortcut Keys with External Keyboards The following table describes how certain hotkeys and shortcut keys can be used on external keyboards: Notebook keys External keyboard keys fn+esc fn+f8 scroll lock+scroll lock+esc scroll lock+scroll lock+f8 Hardware Guide 2-9 Pointing Devices and Keyboard Displaying System Information (fn+esc) Press fn+esc to remove the system information from the screen. ✎ The system BIOS date is the version number of the system ROM. The BIOS...

Hardware Guide
Page 52
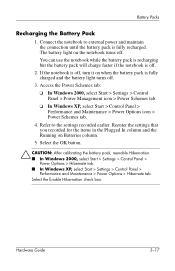
... . Charging the Battery Pack Battery packs can charge whether or not the notebook is off . 3-14 Hardware Guide When to calibrate a battery pack. How to an AC outlet or an optional Automobile Power Adapter/Charger. Insert the battery pack into the notebook. 2. Connect the notebook to Calibrate To calibrate a battery pack, you observe a significant change in use . The battery light on . 3. To charge the battery pack: 1. The battery light on the notebook turns on the notebook turns off...
... . Charging the Battery Pack Battery packs can charge whether or not the notebook is off . 3-14 Hardware Guide When to calibrate a battery pack. How to an AC outlet or an optional Automobile Power Adapter/Charger. Insert the battery pack into the notebook. 2. Connect the notebook to Calibrate To calibrate a battery pack, you observe a significant change in use . The battery light on . 3. To charge the battery pack: 1. The battery light on the notebook turns on the notebook turns off...
Hardware Guide
Page 55
... external power and maintain the connection until the battery pack is fully charged and the battery light turns off . 2. If the notebook is off, turn it on when the battery pack is fully recharged. Hardware Guide 3-17 Battery Packs Recharging the Battery Pack 1. Connect the notebook to the settings recorded earlier. Access the Power Schemes tab: ❏ In Windows 2000, select Start > Settings > Control Panel > Power Management icon > Power Schemes tab. ❏ In Windows XP, select Start > Control Panel > Performance and Maintenance > Power Options icon > Power...
... external power and maintain the connection until the battery pack is fully charged and the battery light turns off . 2. If the notebook is off, turn it on when the battery pack is fully recharged. Hardware Guide 3-17 Battery Packs Recharging the Battery Pack 1. Connect the notebook to the settings recorded earlier. Access the Power Schemes tab: ❏ In Windows 2000, select Start > Settings > Control Panel > Power Management icon > Power Schemes tab. ❏ In Windows XP, select Start > Control Panel > Performance and Maintenance > Power Options icon > Power...

Hardware Guide
Page 56
...; Stop or remove a PC Card you are not using. ■ Remove a CD or DVD you are not using. ■ Use the fn+f9 and fn+f10 hotkeys to adjust screen brightness. ■ Use optional powered speakers instead of the internal speakers, or use the volume buttons to raise and lower system volume. ■ Turn off a device connected to the S-Video-out jack. ■ Run the notebook on external power while formatting a diskette. ■ If you leave your work, initiate...
...; Stop or remove a PC Card you are not using. ■ Remove a CD or DVD you are not using. ■ Use the fn+f9 and fn+f10 hotkeys to adjust screen brightness. ■ Use optional powered speakers instead of the internal speakers, or use the volume buttons to raise and lower system volume. ■ Turn off a device connected to the S-Video-out jack. ■ Run the notebook on external power while formatting a diskette. ■ If you leave your work, initiate...
Hardware Guide
Page 92
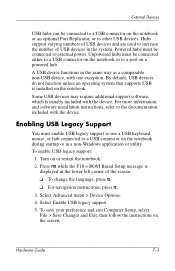
... additional support software, which is installed on the notebook. Hardware Guide 7-3 Turn on the screen. Press f10 while the F10 = ROM Based Setup message is displayed in the lower left corner of USB devices and are used to the documentation included with one exception. Select Advanced menu > Device Options. 4. Enabling USB Legacy Support You must enable USB legacy support to use a USB keyboard, mouse, or hub connected to other USB devices. External Devices USB hubs can be connected to a USB connector on the notebook or an optional Port...
... additional support software, which is installed on the notebook. Hardware Guide 7-3 Turn on the screen. Press f10 while the F10 = ROM Based Setup message is displayed in the lower left corner of USB devices and are used to the documentation included with one exception. Select Advanced menu > Device Options. 4. Enabling USB Legacy Support You must enable USB legacy support to use a USB keyboard, mouse, or hub connected to other USB devices. External Devices USB hubs can be connected to a USB connector on the notebook or an optional Port...

Hardware Guide
Page 111
...Mode 2-11 Quick Launch 1-2, 2-10 Quick Lock 2-10 TouchPad 1-1, 2-1 volume 1-11, 5-3 Wireless On/Off 2-11 C cable lock, connecting 7-5 cable(s) modem 6-1, 6-2 network 6-4 security 7-5 calibration, battery 3-14 camcorder 5-4 cap, replacing pointing stick 2-3 caps lock light 1-5 CD displaying contents of 4-12 inserting 4-9 removing 4-10, 4-11 CD drive inserting CD into 4-9 inserting into MultiBay 4-17 locations supported 4-3 removing CD 4-10, 4-11 See also drives charge sequence 3-8 compartments, primary memory 1-4 Computer Setup enabling num lock mode at startup 2-14 enabling USB legacy support...
...Mode 2-11 Quick Launch 1-2, 2-10 Quick Lock 2-10 TouchPad 1-1, 2-1 volume 1-11, 5-3 Wireless On/Off 2-11 C cable lock, connecting 7-5 cable(s) modem 6-1, 6-2 network 6-4 security 7-5 calibration, battery 3-14 camcorder 5-4 cap, replacing pointing stick 2-3 caps lock light 1-5 CD displaying contents of 4-12 inserting 4-9 removing 4-10, 4-11 CD drive inserting CD into 4-9 inserting into MultiBay 4-17 locations supported 4-3 removing CD 4-10, 4-11 See also drives charge sequence 3-8 compartments, primary memory 1-4 Computer Setup enabling num lock mode at startup 2-14 enabling USB legacy support...
Software Guide
Page 41
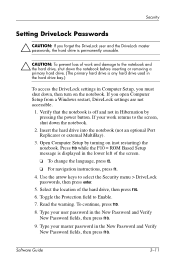
.... Software Guide 3-11 Select the location of the hard drive, then press f10. 6. Type your master password in the New Password and Verify New Password fields, then press f10. Insert the hard drive into the notebook (not an optional Port Replicator or external MultiBay). 3. Open Computer Setup by pressing the power button. Toggle the Protection field to select the Security menu > DriveLock passwords, then press enter. 5. Verify that the notebook is displayed in Hibernation by turning on...
.... Software Guide 3-11 Select the location of the hard drive, then press f10. 6. Type your master password in the New Password and Verify New Password fields, then press f10. Insert the hard drive into the notebook (not an optional Port Replicator or external MultiBay). 3. Open Computer Setup by pressing the power button. Toggle the Protection field to select the Security menu > DriveLock passwords, then press enter. 5. Verify that the notebook is displayed in Hibernation by turning on...
Software Guide
Page 70
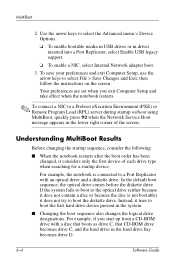
... diskette drive. Use the arrow keys to boot the first hard drive device present in the hard drive bay becomes drive D. 6-4 Software Guide MultiBoot 2. For example, if you exit Computer Setup and take effect when the notebook restarts. ✎ To connect a NIC to a Port Replicator with a disc that boots as drive C, that CD-ROM drive becomes drive C, and the hard drive in the system. ■ Changing the boot sequence also changes the logical drive designations. Your preferences are set...
... diskette drive. Use the arrow keys to boot the first hard drive device present in the hard drive bay becomes drive D. 6-4 Software Guide MultiBoot 2. For example, if you exit Computer Setup and take effect when the notebook restarts. ✎ To connect a NIC to a Port Replicator with a disc that boots as drive C, that CD-ROM drive becomes drive C, and the hard drive in the system. ■ Changing the boot sequence also changes the logical drive designations. Your preferences are set...
Startup Guide
Page 9
... device drivers install, follow these guidelines during software setup: ■ Do not unplug the notebook from the system and cannot be restored once the setup process has begun. ■ If you are prompted to select a language, choose carefully. Startup Guide 1-5 Setting Up the Software A prompt to set up your software displays on the screen. Hardware and Software Setup After the notebook powers on: ■ The power/standby light turns on. (See "Lights" later in this guide...
... device drivers install, follow these guidelines during software setup: ■ Do not unplug the notebook from the system and cannot be restored once the setup process has begun. ■ If you are prompted to select a language, choose carefully. Startup Guide 1-5 Setting Up the Software A prompt to set up your software displays on the screen. Hardware and Software Setup After the notebook powers on: ■ The power/standby light turns on. (See "Lights" later in this guide...
Startup Guide
Page 12
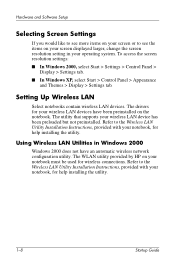
... operating system. The WLAN utility provided by HP on the notebook. Hardware and Software Setup Selecting Screen Settings If you would like to see more items on your screen or to see the items on your screen displayed larger, change the screen resolution setting in Windows 2000 Windows 2000 does not have been preinstalled on your notebook must be used for help installing the utility. 1-8 Startup Guide Setting Up Wireless LAN Select notebooks contain wireless LAN devices. Refer to the Wireless LAN Utility Installation Instructions...
... operating system. The WLAN utility provided by HP on the notebook. Hardware and Software Setup Selecting Screen Settings If you would like to see more items on your screen or to see the items on your screen displayed larger, change the screen resolution setting in Windows 2000 Windows 2000 does not have been preinstalled on your notebook must be used for help installing the utility. 1-8 Startup Guide Setting Up Wireless LAN Select notebooks contain wireless LAN devices. Refer to the Wireless LAN Utility Installation Instructions...
Startup Guide
Page 14
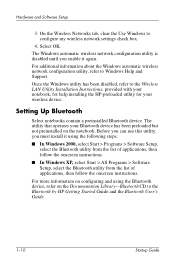
The Windows automatic wireless network configuration utility is disabled until you must install it again. The utility that operates your wireless device. Setting Up Bluetooth Select notebooks contain a preinstalled Bluetooth device. Hardware and Software Setup 3. Before you can use this utility, you enable it using the Bluetooth device, refer on the Documentation Library-Bluetooth CD to the Wireless LAN Utility Installation Instructions, provided with your notebook, for help installing the HP-preloaded utility for your Bluetooth device has been preloaded but not ...
The Windows automatic wireless network configuration utility is disabled until you must install it again. The utility that operates your wireless device. Setting Up Bluetooth Select notebooks contain a preinstalled Bluetooth device. Hardware and Software Setup 3. Before you can use this utility, you enable it using the Bluetooth device, refer on the Documentation Library-Bluetooth CD to the Wireless LAN Utility Installation Instructions, provided with your notebook, for help installing the HP-preloaded utility for your Bluetooth device has been preloaded but not ...
HP Compaq nc8000 Business PC, HP Compaq nw8000 Mobile Workstation - Maintenance and Service Guide
Page 55
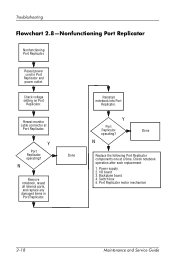
... notebook into Port Replicator. Port Replicator motor mechanism 2-18 Maintenance and Service Guide Check voltage setting on Port Replicator. Y Port Replicator operating? N Remove notebook, reseat all internal parts, and replace any damaged items in Port Replicator and power outlet. Check notebook operation after each replacement. 1. I/O board 3. Switch box 5. Backplane board 4. Reseat monitor cable connector at a time. Y Port Replicator operating? Power supply 2. N Done Replace the following Port Replicator components one at Port Replicator. Troubleshooting...
... notebook into Port Replicator. Port Replicator motor mechanism 2-18 Maintenance and Service Guide Check voltage setting on Port Replicator. Y Port Replicator operating? N Remove notebook, reseat all internal parts, and replace any damaged items in Port Replicator and power outlet. Check notebook operation after each replacement. 1. I/O board 3. Switch box 5. Backplane board 4. Reseat monitor cable connector at a time. Y Port Replicator operating? Power supply 2. N Done Replace the following Port Replicator components one at Port Replicator. Troubleshooting...
Maintenance and Service Guide: HP Compaq Notebook nc8000 and nw8000 Series
Page 164
...monitor connector A-3 microphone jack A-4 modem jack A-2 monitor connector A-3 network jack A-1 parallel connector A-5 RJ-11 telephone jack A-2 RJ-45 network jack A-1 serial connector A-6 S-Video connector A-3 Universal Serial Bus (USB) connector A-2 connectors, service considerations 4-2 cursor control keys 1-17 D design overview 1-24 diagnostics configuration information 2-7 test information 2-8 Diagnostics for Windows 2-1, 2-7 disassembly sequence chart 5-2 diskette drive illustrated 3-6 OS loading problems 2-23 spare part number 3-7 display assembly illustrated 3-2 removal 5-31 spare part...
...monitor connector A-3 microphone jack A-4 modem jack A-2 monitor connector A-3 network jack A-1 parallel connector A-5 RJ-11 telephone jack A-2 RJ-45 network jack A-1 serial connector A-6 S-Video connector A-3 Universal Serial Bus (USB) connector A-2 connectors, service considerations 4-2 cursor control keys 1-17 D design overview 1-24 diagnostics configuration information 2-7 test information 2-8 Diagnostics for Windows 2-1, 2-7 disassembly sequence chart 5-2 diskette drive illustrated 3-6 OS loading problems 2-23 spare part number 3-7 display assembly illustrated 3-2 removal 5-31 spare part...


