

Installing Microsoft Windows Millennium Edition on Compaq Armada E700, M700, E500, V300, and M300
Page 3
... floppy diskette to create a startup disk (recommended) and up all updated drivers and deliverables needed ," for any of Compaq Drivers and Enhancements." The following items can be obtained from Compaq: The latest Compaq Support Software CD containing all user data prior to installing or upgrading to Microsoft Windows Millennium Edition. See Appendix A, "Determining your ROM Version and Upgrading if needed in the section, "Installation of the platforms...
... floppy diskette to create a startup disk (recommended) and up all updated drivers and deliverables needed ," for any of Compaq Drivers and Enhancements." The following items can be obtained from Compaq: The latest Compaq Support Software CD containing all user data prior to installing or upgrading to Microsoft Windows Millennium Edition. See Appendix A, "Determining your ROM Version and Upgrading if needed in the section, "Installation of the platforms...

Installing Microsoft Windows Millennium Edition on Compaq Armada E700, M700, E500, V300, and M300
Page 4
... and Upgrade BIOS: Note: It is the recommended method of the additional software programs and drivers have them properly set up the networking portions of any components or Compaq enhancements for any user applications that the following order: 1. Check for the first time. Computer Setup. It is booted. 1 See Appendix C, "First Time Docking" for information on a clean hard hard drive. Install the Microsoft Windows Me operating...
... and Upgrade BIOS: Note: It is the recommended method of the additional software programs and drivers have them properly set up the networking portions of any components or Compaq enhancements for any user applications that the following order: 1. Check for the first time. Computer Setup. It is booted. 1 See Appendix C, "First Time Docking" for information on a clean hard hard drive. Install the Microsoft Windows Me operating...
Installing Microsoft Windows Millennium Edition on Compaq Armada E700, M700, E500, V300, and M300
Page 5
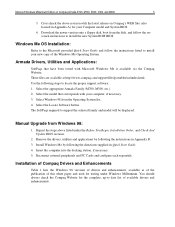
... the Locate Software button. You should always check the Compaq Website for the complete, up-to locate the proper support software: 1. Insert the computer into the docking station, if necessary. 5. Manual Upgrade from the Operating System list. 4. Reconnect external peripherals and PC Cards and configure each separately. Remove the drivers, utilities and applications by following the instructions in Appendix A) for testing under the Before You Begin, Installation Order, and...
... the Locate Software button. You should always check the Compaq Website for the complete, up-to locate the proper support software: 1. Insert the computer into the docking station, if necessary. 5. Manual Upgrade from the Operating System list. 4. Reconnect external peripherals and PC Cards and configure each separately. Remove the drivers, utilities and applications by following the instructions in Appendix A) for testing under the Before You Begin, Installation Order, and...

Armada 100S Series Reference Guide
Page 2
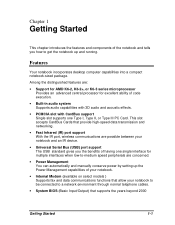
... IR device. • Universal Serial Bus (USB) port support The USB standard gives you how to a network environment through normal telephone cables. • System BIOS (Basic Input/Output) that supports the years beyond 2000. Features Your notebook incorporates desktop computer capabilities into a compact notebook-sized package. Getting Started 1-1 Among the distinguished features are concerned. • Power Management You can automatically and manually conserve power by setting up the Power Management...
... IR device. • Universal Serial Bus (USB) port support The USB standard gives you how to a network environment through normal telephone cables. • System BIOS (Basic Input/Output) that supports the years beyond 2000. Features Your notebook incorporates desktop computer capabilities into a compact notebook-sized package. Getting Started 1-1 Among the distinguished features are concerned. • Power Management You can automatically and manually conserve power by setting up the Power Management...

Armada 100S Series Reference Guide
Page 10
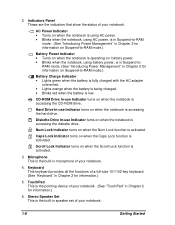
... your notebook. 4. Microphone This is activated. 3. Scroll Lock Indicator turns on when the notebook is activated. A Caps Lock Indicator turns on when the notebook is accessing the diskette drive. Keyboard This keyboard provides all the functions of a full-size 87/90-key keyboard. (See "Keyboard" in Chapter 2 for information.) 6. TouchPad This is low. CD-ROM Drive In-use Indicator turns on when the Caps Lock function is accessing the CD-ROM drive. Battery Charge Indicator • Lights green when the battery is fully charged with the AC adapter connected. • Lights...
... your notebook. 4. Microphone This is activated. 3. Scroll Lock Indicator turns on when the notebook is activated. A Caps Lock Indicator turns on when the notebook is accessing the diskette drive. Keyboard This keyboard provides all the functions of a full-size 87/90-key keyboard. (See "Keyboard" in Chapter 2 for information.) 6. TouchPad This is low. CD-ROM Drive In-use Indicator turns on when the Caps Lock function is accessing the CD-ROM drive. Battery Charge Indicator • Lights green when the battery is fully charged with the AC adapter connected. • Lights...
Armada 100S Series Reference Guide
Page 13
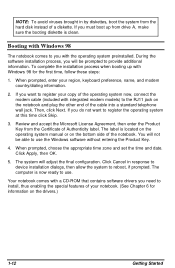
... you need to the RJ11 jack on the drivers.) 1-12 Getting Started When prompted, choose the appropriate time zone and set the time and date. Click Apply, then OK. 5. During the software installation process, you must boot up with integrated modem models) to install, thus enabling the special features of the notebook. The system will be able to use the Windows software without entering the Product Key...
... you need to the RJ11 jack on the drivers.) 1-12 Getting Started When prompted, choose the appropriate time zone and set the time and date. Click Apply, then OK. 5. During the software installation process, you must boot up with integrated modem models) to install, thus enabling the special features of the notebook. The system will be able to use the Windows software without entering the Product Key...
Armada 100S Series Reference Guide
Page 17
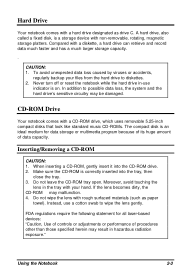
... herein may malfunction. 4. Instead, use indicator is a storage device with a hard drive designated as paper towel). Never turn off or reset the notebook while the hard drive in the tray with rough surfaced materials (such as drive C. Moreover, avoid touching the lens in -use a cotton swab to wipe the lens gently. A hard drive, also called a fixed disk, is on. Hard Drive Your notebook comes with non-removable, rotating, magnetic storage platters.
... herein may malfunction. 4. Instead, use indicator is a storage device with a hard drive designated as paper towel). Never turn off or reset the notebook while the hard drive in the tray with rough surfaced materials (such as drive C. Moreover, avoid touching the lens in -use a cotton swab to wipe the lens gently. A hard drive, also called a fixed disk, is on. Hard Drive Your notebook comes with non-removable, rotating, magnetic storage platters.
Armada 100S Series Reference Guide
Page 23
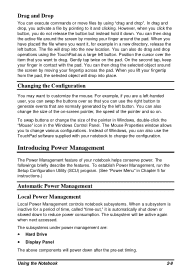
... use the TouchPad software supplied with the pad. When you have placed the file where you want to generate events that you do drag and drop operations using "drag and drop". When you are : • Hard Drive • Display Panel The above components will drop into place. Introducing Power Management The Power Management feature of the pointer in Windows, double-click the "Mouse" icon in the Windows Control Panel...
... use the TouchPad software supplied with the pad. When you have placed the file where you want to generate events that you do drag and drop operations using "drag and drop". When you are : • Hard Drive • Display Panel The above components will drop into place. Introducing Power Management The Power Management feature of the pointer in Windows, double-click the "Mouse" icon in the Windows Control Panel...

Armada 100S Series Reference Guide
Page 33
... connect a PS/2-compatible keyboard to AC power. 3. When an external mouse is not turned on or connected to your notebook. When an external keyboard is set properly in the Setup Configuration Utility (SCU) program. (See "Components Menu" in the Control Panel. 4-2 System Expansion To use a serial mouse, follow these steps: 1. To use a PS/2 mouse, plug the mouse cable into the PS/2 mouse/keyboard port, marked as (Figure 1-3 #7), on the rear of the notebook. Make sure the notebook is connected, the internal TouchPad remains functional...
... connect a PS/2-compatible keyboard to AC power. 3. When an external mouse is not turned on or connected to your notebook. When an external keyboard is set properly in the Setup Configuration Utility (SCU) program. (See "Components Menu" in the Control Panel. 4-2 System Expansion To use a serial mouse, follow these steps: 1. To use a PS/2 mouse, plug the mouse cable into the PS/2 mouse/keyboard port, marked as (Figure 1-3 #7), on the rear of the notebook. Make sure the notebook is connected, the internal TouchPad remains functional...
Armada 100S Series Reference Guide
Page 56
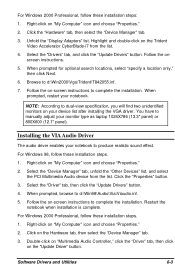
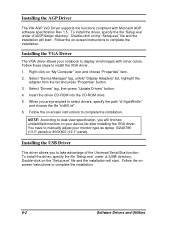
..." icon and choose "Properties." 2. Software Drivers and Utilities 6-3 Installing the VIA Audio Driver The audio driver enables your monitor type as laptop 1024X786 (13.3" panel) or 800X600 (12.1" panel). When prompted, browse to d:\Win2000\Vga\Trident\T842055.inf. 7. Right-click on -screen instructions to complete the installation. Unfold the "Display Adapters" list. Right-click on - Restart the notebook when installation is complete. Select the "Driver" tab, then click the "Update Drivers" button. 4. Follow the on "My...
..." icon and choose "Properties." 2. Software Drivers and Utilities 6-3 Installing the VIA Audio Driver The audio driver enables your monitor type as laptop 1024X786 (13.3" panel) or 800X600 (12.1" panel). When prompted, browse to d:\Win2000\Vga\Trident\T842055.inf. 7. Right-click on -screen instructions to complete the installation. Unfold the "Display Adapters" list. Right-click on - Restart the notebook when installation is complete. Select the "Driver" tab, then click the "Update Drivers" button. 4. Follow the on "My...
Armada 100S Series Reference Guide
Page 57
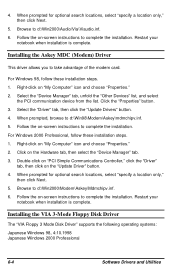
... 3-Mode Floppy Disk Driver The "VIA Floppy 3 Mode Disk Driver" supports the following operating systems: Japanese Windows 98, 4:10.1998 Japanese Windows 2000 Professional 6-4 Software Drivers and Utilities 4. When prompted for optional search locations, select "specify a location only," then click Next. 5. Restart your notebook when installation is complete. Installing the Askey MDC (Modem) Driver This driver allows you to d:\Win2000\Audio\Via\Viaudio.inf. 6. For Windows 98, follow these installation steps. 1. Select the "Device Manager" tab...
... 3-Mode Floppy Disk Driver The "VIA Floppy 3 Mode Disk Driver" supports the following operating systems: Japanese Windows 98, 4:10.1998 Japanese Windows 2000 Professional 6-4 Software Drivers and Utilities 4. When prompted for optional search locations, select "specify a location only," then click Next. 5. Restart your notebook when installation is complete. Installing the Askey MDC (Modem) Driver This driver allows you to d:\Win2000\Audio\Via\Viaudio.inf. 6. For Windows 98, follow these installation steps. 1. Select the "Device Manager" tab...
Armada 100S Series Reference Guide
Page 63
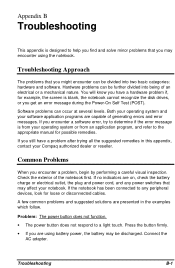
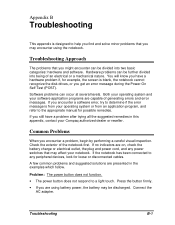
.... Press the button firmly. • If you encounter a software error, try to determine if the error message is blank, the notebook cannot recognize the disk drives, or you encounter a problem, begin by performing a careful visual inspection. Hardware problems can occur at several levels. Connect the AC adapter. If you may encounter using battery power, the battery may affect your notebook. Troubleshooting B-1 If no indicators are using the notebook. Appendix B Troubleshooting This appendix...
.... Press the button firmly. • If you encounter a software error, try to determine if the error message is blank, the notebook cannot recognize the disk drives, or you encounter a problem, begin by performing a careful visual inspection. Hardware problems can occur at several levels. Connect the AC adapter. If you may encounter using battery power, the battery may affect your notebook. Troubleshooting B-1 If no indicators are using the notebook. Appendix B Troubleshooting This appendix...
Compaq Notebook 100 Series Reference Guide
Page 2
... notebook. • Internal Modem (available on select models ) Supports fax and data communications functions that allow your notebook to be connected to a network environment through normal telephone cables. • System BIOS (Basic Input/Output) that provide high-speed data transmission and networking. • Fast Infrared (IR) port support With the IR port, wireless communications are possible between your notebook and an IR device. • Universal Serial Bus (USB) port support The USB...
... notebook. • Internal Modem (available on select models ) Supports fax and data communications functions that allow your notebook to be connected to a network environment through normal telephone cables. • System BIOS (Basic Input/Output) that provide high-speed data transmission and networking. • Fast Infrared (IR) port support With the IR port, wireless communications are possible between your notebook and an IR device. • Universal Serial Bus (USB) port support The USB...
Compaq Notebook 100 Series Reference Guide
Page 9
...Keyboard" in speaker set of your notebook. CD-ROM Drive In-use Indicator turns on when the Scroll Lock function is the built-in Chapter 2 for information.) 5. Microphone This is activated. 3. N Num Lock Indicator turns on when the notebook is the pointing device of your notebook. (See "TouchPad" in microphone of your notebook. 1-8 Getting Started TouchPad This is accessing the CD-ROM drive. RAM mode. (See "Introducing Power Management" in Suspend-to -RAM mode.) Battery Charge Indicator • Lights green when the battery is fully charged with the AC adapter connected...
...Keyboard" in speaker set of your notebook. CD-ROM Drive In-use Indicator turns on when the Scroll Lock function is the built-in Chapter 2 for information.) 5. Microphone This is activated. 3. N Num Lock Indicator turns on when the notebook is the pointing device of your notebook. (See "TouchPad" in microphone of your notebook. 1-8 Getting Started TouchPad This is accessing the CD-ROM drive. RAM mode. (See "Introducing Power Management" in Suspend-to -RAM mode.) Battery Charge Indicator • Lights green when the battery is fully charged with the AC adapter connected...
Compaq Notebook 100 Series Reference Guide
Page 11
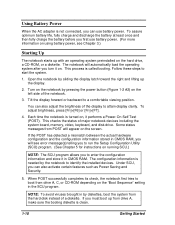
... using battery power, see error message(s) telling you to enter the configuration information and store it in by pressing the power button (Figure 1-2 #2) on the left side of major notebook devices including the system board, memory, video, keyboard, and disk drive. When POST successfully completes its check, the notebook first tries to boot from the hard disk instead of the display to identify the installed devices. Open the notebook by the notebook to attain display clarity. To adjust brightness...
... using battery power, see error message(s) telling you to enter the configuration information and store it in by pressing the power button (Figure 1-2 #2) on the left side of major notebook devices including the system board, memory, video, keyboard, and disk drive. When POST successfully completes its check, the notebook first tries to boot from the hard disk instead of the display to identify the installed devices. Open the notebook by the notebook to attain display clarity. To adjust brightness...
Compaq Notebook 100 Series Reference Guide
Page 30
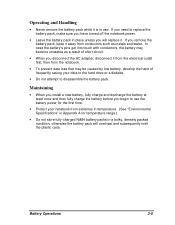
... Specifications" in Appendix A for the first time. • Protect your data to the hard drive or a diskette. • Do not attempt to disassemble the battery pack. If you need to use the battery power for temperature range.) • Do not store fully-charged NiMH battery packs in use. If you remove the battery pack, keep it from the electrical outlet first, then from the notebook...
... Specifications" in Appendix A for the first time. • Protect your data to the hard drive or a diskette. • Do not attempt to disassemble the battery pack. If you need to use the battery power for temperature range.) • Do not store fully-charged NiMH battery packs in use. If you remove the battery pack, keep it from the electrical outlet first, then from the notebook...
Compaq Notebook 100 Series Reference Guide
Page 42
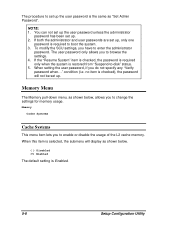
... . ( ) Disabled (•) Enabled The default setting is restored from "Suspend-to browse the settings. 4. no item is required to boot the system. 3. Memory Cache Systems Cache Systems This menu item lets you to change the settings for memory usage. When setting the user password, if you to -disk" status. 5. Memory Menu The Memory pull-down menu, as "Set Admin Password". If both the administrator and user passwords are set up . 2. The procedure to enter the administrator password...
... . ( ) Disabled (•) Enabled The default setting is restored from "Suspend-to browse the settings. 4. no item is required to boot the system. 3. Memory Cache Systems Cache Systems This menu item lets you to change the settings for memory usage. When setting the user password, if you to -disk" status. 5. Memory Menu The Memory pull-down menu, as "Set Admin Password". If both the administrator and user passwords are set up . 2. The procedure to enter the administrator password...
Compaq Notebook 100 Series Reference Guide
Page 54
... the installation. Select "Device Manager" tag, unfold "Display Adapters" list, highlight the adapter from the list and press "Properties" button. 3. Insert the driver CD-ROM into the CD-ROM drive. 5. Installing the AGP Driver The VIA AGP VxD Driver supports the functions compliant with richer colors. Right-click on the "Setup.exe" file and the installation will find two unidentified monitors on -screen instructions to manually adjust your monitor type as laptop 1024X786 (13.3" panel) or 800X600 (12.1" panel). When...
... the installation. Select "Device Manager" tag, unfold "Display Adapters" list, highlight the adapter from the list and press "Properties" button. 3. Insert the driver CD-ROM into the CD-ROM drive. 5. Installing the AGP Driver The VIA AGP VxD Driver supports the functions compliant with richer colors. Right-click on the "Setup.exe" file and the installation will find two unidentified monitors on -screen instructions to manually adjust your monitor type as laptop 1024X786 (13.3" panel) or 800X600 (12.1" panel). When...
Compaq Notebook 100 Series Reference Guide
Page 59
... occur at several levels. If no indicators are on, check the battery charge or electrical outlet, the plug and power cord, and any peripheral devices, look for example, the screen is blank, the notebook cannot recognize the disk drives, or you get an error message during the Power-On Self Test (POST). Connect the AC adapter. Software problems can be divided into being of an...
... occur at several levels. If no indicators are on, check the battery charge or electrical outlet, the plug and power cord, and any peripheral devices, look for example, the screen is blank, the notebook cannot recognize the disk drives, or you get an error message during the Power-On Self Test (POST). Connect the AC adapter. Software problems can be divided into being of an...
Compaq Armada 100S and Notebook 100 Series Maintenance and Service Guide
Page 23
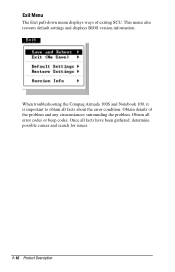
Obtain all facts about the error condition. This menu also restores default settings and displays BIOS version information. When troubleshooting the Compaq Armada 100S and Notebook 100, it is important to obtain all error codes or beep codes. Obtain details of exiting SCU. Once all facts have been gathered, determine possible causes and search for issues. 1-16 Product Description Exit Menu The Exit pull-down menu displays ways of the problem and any circumstances surrounding the problem.
Obtain all facts about the error condition. This menu also restores default settings and displays BIOS version information. When troubleshooting the Compaq Armada 100S and Notebook 100, it is important to obtain all error codes or beep codes. Obtain details of exiting SCU. Once all facts have been gathered, determine possible causes and search for issues. 1-16 Product Description Exit Menu The Exit pull-down menu displays ways of the problem and any circumstances surrounding the problem.


