
HP Mini 2102, HP Mini 210, and Compaq Mini 210 - Maintenance and Service Guide
Page 75
Open Setup Utility by turning on or restarting the computer, and then pressing f10 while the "F10 = BIOS Setup Options" message is not already running , begin at step 2. 1. The utility reports information about the computer and provides settings for startup, ... immediately. To start Setup Utility: ▲ Open Setup Utility by turning on or restarting the computer, and then pressing f10 while the "F10 = BIOS Setup Options" message is already running , begin at step 1. Starting Setup Utility 67 Your change goes into effect immediately. 5 Setup Utility Starting Setup ...
Open Setup Utility by turning on or restarting the computer, and then pressing f10 while the "F10 = BIOS Setup Options" message is not already running , begin at step 2. 1. The utility reports information about the computer and provides settings for startup, ... immediately. To start Setup Utility: ▲ Open Setup Utility by turning on or restarting the computer, and then pressing f10 while the "F10 = BIOS Setup Options" message is already running , begin at step 1. Starting Setup Utility 67 Your change goes into effect immediately. 5 Setup Utility Starting Setup ...
HP Mini 2102, HP Mini 210, and Compaq Mini 210 - Maintenance and Service Guide
Page 76
... running , begin at step 2. 1. Open Setup Utility by turning on or restarting the computer, and then pressing f10 while the "F10 = BIOS Setup Options" message is displayed in the lower-left corner of the screen. 2. System information such as the system time and date, and identification...is already running , begin at step 1. Open Setup Utility by turning on or restarting the computer, and then pressing f10 while the "F10 = BIOS Setup Options" message is displayed in the lower-left corner of the screen. 2. If Setup Utility is displayed. 3. Select the Main menu. ...
... running , begin at step 2. 1. Open Setup Utility by turning on or restarting the computer, and then pressing f10 while the "F10 = BIOS Setup Options" message is displayed in the lower-left corner of the screen. 2. System information such as the system time and date, and identification...is already running , begin at step 1. Open Setup Utility by turning on or restarting the computer, and then pressing f10 while the "F10 = BIOS Setup Options" message is displayed in the lower-left corner of the screen. 2. If Setup Utility is displayed. 3. Select the Main menu. ...
HP Mini 2102, HP Mini 210, and Compaq Mini 210 - Maintenance and Service Guide
Page 77
... Enter, change the system time and date. ● View identification information about the computer. ● View specification information about the processor, memory size, and system BIOS. Enter, change, or delete a power-on password.
... Enter, change the system time and date. ● View identification information about the computer. ● View specification information about the processor, memory size, and system BIOS. Enter, change, or delete a power-on password.
Mini User Guide - Windows 7
Page 8
12 Updating software Updating the BIOS ...69 Determining the BIOS version 69 Downloading a BIOS update 69 Updating programs and drivers ...71 13 Setup Utility Starting Setup Utility ...72 Using Setup Utility ...72 Changing the language of Setup Utility 72 Navigating and selecting in Setup Utility 72 Displaying system information 73 Restoring default settings in Setup Utility 73 Exiting Setup Utility ...73 Setup Utility menus ...74 Main menu ...74 Security menu ...74 System Configuration menu 74 Diagnostics menu ...75 Index ...76 viii
12 Updating software Updating the BIOS ...69 Determining the BIOS version 69 Downloading a BIOS update 69 Updating programs and drivers ...71 13 Setup Utility Starting Setup Utility ...72 Using Setup Utility ...72 Changing the language of Setup Utility 72 Navigating and selecting in Setup Utility 72 Displaying system information 73 Restoring default settings in Setup Utility 73 Exiting Setup Utility ...73 Setup Utility menus ...74 Main menu ...74 Security menu ...74 System Configuration menu 74 Diagnostics menu ...75 Index ...76 viii
Mini User Guide - Windows 7
Page 53
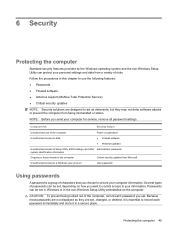
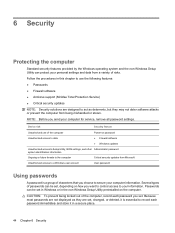
... set, changed, or deleted, it in the non-Windows Setup Utility preinstalled on password ● Firewall software ● Windows updates Unauthorized access to Setup Utility, BIOS settings, and other Administrator password system identification information Ongoing or future threats to secure your computer information. 6 Security Protecting the computer Standard security features provided...
... set, changed, or deleted, it in the non-Windows Setup Utility preinstalled on password ● Firewall software ● Windows updates Unauthorized access to Setup Utility, BIOS settings, and other Administrator password system identification information Ongoing or future threats to secure your computer information. 6 Security Protecting the computer Standard security features provided...

Mini User Guide - Windows 7
Page 55
... it must restart the computer and try again. Power-on password Your power-on or restarting the computer, and then pressing f10 while the "F10 = BIOS Setup Options" message is set , change an administrator password, type your current password in the Enter Current Password field, type a new password in the Enter...
... it must restart the computer and try again. Power-on password Your power-on or restarting the computer, and then pressing f10 while the "F10 = BIOS Setup Options" message is set , change an administrator password, type your current password in the Enter Current Password field, type a new password in the Enter...

Mini User Guide - Windows 7
Page 56
... changes go into effect when the computer restarts. Open Setup Utility by turning on or restarting the computer, and then pressing f10 while the "F10 = BIOS Setup Options" message is displayed in the Enter Current Password field, and then press enter 4 times. 3. Use the arrow keys to select Security > Set Power...
... changes go into effect when the computer restarts. Open Setup Utility by turning on or restarting the computer, and then pressing f10 while the "F10 = BIOS Setup Options" message is displayed in the Enter Current Password field, and then press enter 4 times. 3. Use the arrow keys to select Security > Set Power...

Mini User Guide - Windows 7
Page 68
Function Display system information. Hotkey fn+esc Description Displays information about system hardware components and the system BIOS version number. To use a hotkey command on the computer keyboard, follow either of these steps: ● Briefly press the fn key, and then briefly press the second key of the hotkey command, and then release both keys at the same time. 60 Chapter 9 Pointing devices and keyboard or - ● Press and hold down the fn key, briefly press the second key of the hotkey command. -
Function Display system information. Hotkey fn+esc Description Displays information about system hardware components and the system BIOS version number. To use a hotkey command on the computer keyboard, follow either of these steps: ● Briefly press the fn key, and then briefly press the second key of the hotkey command, and then release both keys at the same time. 60 Chapter 9 Pointing devices and keyboard or - ● Press and hold down the fn key, briefly press the second key of the hotkey command. -

Mini User Guide - Windows 7
Page 76
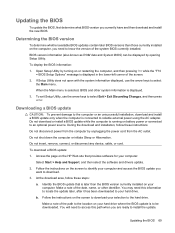
...the hardware devices, and provides for a system BIOS update by identifying the BIOS version currently installed on the HP Web site at http://www.hp.com. 3. Identify your computer may be available on the system ROM. The BIOS initializes the operating system, determines how the ... Chapter 12 Updating software If your computer is stored on the HP Web site. NOTE: The computer system BIOS is connected to a network, consult the network administrator before installing any software updates, especially system BIOS updates. Prepare for data transfer among hardware devices, including the ...
...the hardware devices, and provides for a system BIOS update by identifying the BIOS version currently installed on the HP Web site at http://www.hp.com. 3. Identify your computer may be available on the system ROM. The BIOS initializes the operating system, determines how the ... Chapter 12 Updating software If your computer is stored on the HP Web site. NOTE: The computer system BIOS is connected to a network, consult the network administrator before installing any software updates, especially system BIOS updates. Prepare for data transfer among hardware devices, including the ...
Mini User Guide - Windows 7
Page 77
... location on or restarting the computer, and then pressing f10 while the "F10 = BIOS Setup Options" message is displayed. 3. Determining the BIOS version To determine whether available BIOS updates contain later BIOS versions than the BIOS version currently installed on the HP Web site that is running on the screen to identify your hard drive. Follow...
... location on or restarting the computer, and then pressing f10 while the "F10 = BIOS Setup Options" message is displayed. 3. Determining the BIOS version To determine whether available BIOS updates contain later BIOS versions than the BIOS version currently installed on the HP Web site that is running on the screen to identify your hard drive. Follow...

Mini User Guide - Windows 7
Page 78
... the file that are displayed, follow these steps: 1. NOTE: After a message on the screen. The hard drive designation is complete. The BIOS installation begins. 5. Using the hard drive path you recorded earlier, open the folder on the screen after the download is typically Local Disk .... If no instructions are displayed on your hard drive. 70 Chapter 12 Updating software Follow any software updates, especially system BIOS updates. Double-click your computer to a network, consult the network administrator before installing any instructions that has an .exe extension ...
... the file that are displayed, follow these steps: 1. NOTE: After a message on the screen. The hard drive designation is complete. The BIOS installation begins. 5. Using the hard drive path you recorded earlier, open the folder on the screen after the download is typically Local Disk .... If no instructions are displayed on your hard drive. 70 Chapter 12 Updating software Follow any software updates, especially system BIOS updates. Double-click your computer to a network, consult the network administrator before installing any instructions that has an .exe extension ...
Mini User Guide - Windows 7
Page 79
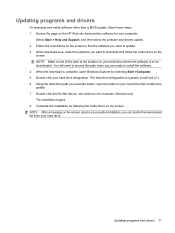
... download is complete, open the folder on the HP Web site that has an .exe extension (for your hard drive where the software is typically Local Disk (C:). 6. Updating programs and drivers 71 Updating programs and drivers To download and install software other than a BIOS update, follow the instructions on the screen. Access...
... download is complete, open the folder on the HP Web site that has an .exe extension (for your hard drive where the software is typically Local Disk (C:). 6. Updating programs and drivers 71 Updating programs and drivers To download and install software other than a BIOS update, follow the instructions on the screen. Access...

Mini User Guide - Windows 7
Page 80
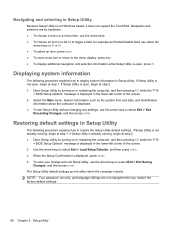
...To start Setup Utility: ▲ Open Setup Utility by turning on or restarting the computer, and then pressing f10 while the "F10 = BIOS Setup Options" message is displayed in the lower-left corner of Setup Utility The following procedure explains how to toggle a field, for startup,...f6. 72 Chapter 13 Setup Utility Navigation and selection are by turning on or restarting the computer, and then pressing f10 while the "F10 = BIOS Setup Options" message is already running , begin at step 1. The utility reports information about the computer and provides settings for example an Enable/...
...To start Setup Utility: ▲ Open Setup Utility by turning on or restarting the computer, and then pressing f10 while the "F10 = BIOS Setup Options" message is displayed in the lower-left corner of Setup Utility The following procedure explains how to toggle a field, for startup,...f6. 72 Chapter 13 Setup Utility Navigation and selection are by turning on or restarting the computer, and then pressing f10 while the "F10 = BIOS Setup Options" message is already running , begin at step 1. The utility reports information about the computer and provides settings for example an Enable/...

Mini User Guide - Windows 7
Page 81
...Utility default settings. Using Setup Utility 73 Open Setup Utility by turning on or restarting the computer, and then pressing f10 while the "F10 = BIOS Setup Options" message is open , begin at step 1. Open Setup Utility by turning on or restarting the computer, and then pressing f10 while ...the "F10 = BIOS Setup Options" message is not already running , begin at step 2. 1. Then use the arrow keys to select Exit > Exit Saving Changes, and then ...
...Utility default settings. Using Setup Utility 73 Open Setup Utility by turning on or restarting the computer, and then pressing f10 while the "F10 = BIOS Setup Options" message is open , begin at step 1. Open Setup Utility by turning on or restarting the computer, and then pressing f10 while ...the "F10 = BIOS Setup Options" message is not already running , begin at step 2. 1. Then use the arrow keys to select Exit > Exit Saving Changes, and then ...

Mini User Guide - Windows 7
Page 82
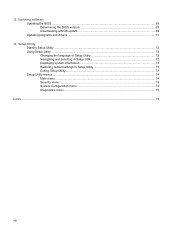
... C4 sleep state. Setup Utility menus The menu tables in this section provide an overview of 5 seconds each (0, 5, 10, 15, 20). ● HP Instant Web―Enable/disable the HP Instant Web menu in this chapter may not be supported by your computer. System Configuration menu Select Language Support Processor C4 State... and change the system time and date. ● View identification information about the computer. ● View specification information about the processor, memory size, and system BIOS.
... C4 sleep state. Setup Utility menus The menu tables in this section provide an overview of 5 seconds each (0, 5, 10, 15, 20). ● HP Instant Web―Enable/disable the HP Instant Web menu in this chapter may not be supported by your computer. System Configuration menu Select Language Support Processor C4 State... and change the system time and date. ● View identification information about the computer. ● View specification information about the processor, memory size, and system BIOS.
Mini User Guide - Windows 7
Page 84
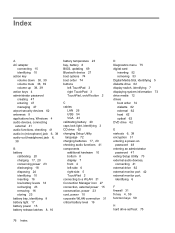
... 18 recharging 23 removing 16 storing 23 battery bay, identifying 8 battery light 17 battery power 15 battery release latches 8, 16 battery temperature 23 bay, battery 8 BIOS, updating 69 Bluetooth device 27 boot options 74 boot order 74 buttons left TouchPad 3 right TouchPad 3 TouchPad, on/off button 2 C cables LAN 26 USB 54...
... 18 recharging 23 removing 16 storing 23 battery bay, identifying 8 battery light 17 battery power 15 battery release latches 8, 16 battery temperature 23 bay, battery 8 BIOS, updating 69 Bluetooth device 27 boot options 74 boot order 74 buttons left TouchPad 3 right TouchPad 3 TouchPad, on/off button 2 C cables LAN 26 USB 54...
Mini User Guide - Windows XP
Page 8
Updating the BIOS ...68 Determining the BIOS version 68 Downloading a BIOS update 68 Updating programs and drivers ...70 13 Setup Utility Starting Setup Utility ...71 Using Setup Utility ...71 Changing the language of Setup Utility 71 Navigating and selecting in Setup Utility 71 Displaying system information 72 Restoring default settings in Setup Utility 72 Exiting Setup Utility ...72 Setup Utility menus ...73 Main menu ...73 Security menu ...73 System Configuration menu 73 Diagnostics menu ...74 Index ...75 viii
Updating the BIOS ...68 Determining the BIOS version 68 Downloading a BIOS update 68 Updating programs and drivers ...70 13 Setup Utility Starting Setup Utility ...71 Using Setup Utility ...71 Changing the language of Setup Utility 71 Navigating and selecting in Setup Utility 71 Displaying system information 72 Restoring default settings in Setup Utility 72 Exiting Setup Utility ...72 Setup Utility menus ...73 Main menu ...73 Security menu ...73 System Configuration menu 73 Diagnostics menu ...74 Index ...75 viii
Mini User Guide - Windows XP
Page 52
... this chapter to use of the computer Unauthorized access to data Power-on password ● Firewall software ● Windows updates Unauthorized access to Setup Utility, BIOS settings, and other Administrator password system identification information Ongoing or future threats to the computer Critical security updates from a variety of risks. 6 Security Protecting the...
... this chapter to use of the computer Unauthorized access to data Power-on password ● Firewall software ● Windows updates Unauthorized access to Setup Utility, BIOS settings, and other Administrator password system identification information Ongoing or future threats to the computer Critical security updates from a variety of risks. 6 Security Protecting the...

Mini User Guide - Windows XP
Page 54
... delete this password is set, you must be entered each time you turn on or restarting the computer, and then pressing f10 while the "F10 = BIOS Setup Options" message is displayed in Windows, nor is set an administrator password, type your administrator password, and then press enter. To save your password...
... delete this password is set, you must be entered each time you turn on or restarting the computer, and then pressing f10 while the "F10 = BIOS Setup Options" message is displayed in Windows, nor is set an administrator password, type your administrator password, and then press enter. To save your password...

Mini User Guide - Windows XP
Page 55
... changes go into effect when the computer restarts. Open Setup Utility by turning on or restarting the computer, and then pressing f10 while the "F10 = BIOS Setup Options" message is displayed in the lower-left corner of the screen. 2. Use the arrow keys to select Security > Set Power-On Password, and...
... changes go into effect when the computer restarts. Open Setup Utility by turning on or restarting the computer, and then pressing f10 while the "F10 = BIOS Setup Options" message is displayed in the lower-left corner of the screen. 2. Use the arrow keys to select Security > Set Power-On Password, and...


