HP Mini 1000 and Compaq Mini 700 - Maintenance and Service Guide
Page 43
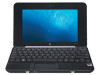
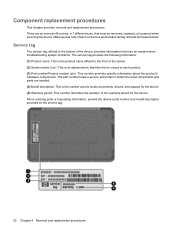
... affixed to locate documents, drivers, and support for the device. (5) Warranty period: This number describes the duration of the warranty period for the device. Component replacement procedures This chapter provides removal and replacement procedures. There are needed when troubleshooting system problems. The service tag provides the following information: (1) Product name: This is the number used to the front of each product. (3) Part number/Product number (p/n): This number provides specific information...
... affixed to locate documents, drivers, and support for the device. (5) Warranty period: This number describes the duration of the warranty period for the device. Component replacement procedures This chapter provides removal and replacement procedures. There are needed when troubleshooting system problems. The service tag provides the following information: (1) Product name: This is the number used to the front of each product. (3) Part number/Product number (p/n): This number provides specific information...
HP Mini 1000 and Compaq Mini 700 - Maintenance and Service Guide
Page 117
... battery light 8 Bluetooth module removal 53 spare part number 15, 26, 53 boot options 73 boot order 73 bottom components 11 Bracket Kit, spare part number 22, 26 buttons, TouchPad 7 C Cable Kit contents 19 spare part number 14, 19 Cable Kit, spare part number 26 cables, service considerations 29 chipset, product description 1 CMOS clearing 34 components bottom 11 front 8 keys 6 left-side 10 pointing device 7 right-side 9 top 4 TouchPad 7 wireless antennae 5 connectors power 10 service considerations 29 D device feet locations 36 spare part number 36 device specifications...
... battery light 8 Bluetooth module removal 53 spare part number 15, 26, 53 boot options 73 boot order 73 bottom components 11 Bracket Kit, spare part number 22, 26 buttons, TouchPad 7 C Cable Kit contents 19 spare part number 14, 19 Cable Kit, spare part number 26 cables, service considerations 29 chipset, product description 1 CMOS clearing 34 components bottom 11 front 8 keys 6 left-side 10 pointing device 7 right-side 9 top 4 TouchPad 7 wireless antennae 5 connectors power 10 service considerations 29 D device feet locations 36 spare part number 36 device specifications...

HP Mini 1000 and Compaq Mini 700 - Maintenance and Service Guide
Page 118
... 57 HP Mini Mobile Drive Bay, location 9 HP Mini Mobile Drive, spare part number 22 I I/O address specifications 81 in Setup Utility 70 internal display switch 4 internal media cards, product description 2 interrupt specifications 80 J jacks audio-in 10 audio-out 10 headphone 10 microphone 10 network 10 RJ-45 10 K keyboard product description 3 L left-side components 10 lights battery 8 drive 8 power 8 power connector 10 TouchPad on/off 7 wireless 8 M mass storage device product description 2 removal 42 spare part number 14, 42 mass storage devices illustrated 20 spare part numbers 20 memory...
... 57 HP Mini Mobile Drive Bay, location 9 HP Mini Mobile Drive, spare part number 22 I I/O address specifications 81 in Setup Utility 70 internal display switch 4 internal media cards, product description 2 interrupt specifications 80 J jacks audio-in 10 audio-out 10 headphone 10 microphone 10 network 10 RJ-45 10 K keyboard product description 3 L left-side components 10 lights battery 8 drive 8 power 8 power connector 10 TouchPad on/off 7 wireless 8 M mass storage device product description 2 removal 42 spare part number 14, 42 mass storage devices illustrated 20 spare part numbers 20 memory...
HP Mini 1000 and Compaq Mini 700 - Maintenance and Service Guide
Page 119
...drive 2 internal media cards 2 keyboard 3 mass storage device 2 memory module 1 modem 2 operating system 3 optical drive 2 panels 1 pointing device 3 ports 2 power requirements 3 processors 1 product name 1 security 3 serviceability 3 solid-state drive 2 webcam 2 wireless 2 product name 1 R removal/replacement preliminaries 29 procedures 35 right-side components 9 RJ-45 jack location 10 pin assignments 100 RTC battery removal 52 spare part number 15, 26, 52 Rubber Kit, spare part number 22, 25 S Screw Kit contents 84 spare part number screw listing 84 23, 25 SD Card Reader 9 security cable...
...drive 2 internal media cards 2 keyboard 3 mass storage device 2 memory module 1 modem 2 operating system 3 optical drive 2 panels 1 pointing device 3 ports 2 power requirements 3 processors 1 product name 1 security 3 serviceability 3 solid-state drive 2 webcam 2 wireless 2 product name 1 R removal/replacement preliminaries 29 procedures 35 right-side components 9 RJ-45 jack location 10 pin assignments 100 RTC battery removal 52 spare part number 15, 26, 52 Rubber Kit, spare part number 22, 25 S Screw Kit contents 84 spare part number screw listing 84 23, 25 SD Card Reader 9 security cable...
HP Mini 1000 Netbook - Maintenance and Service Guide
Page 38
... locate documents, drivers, and support for the device. Make special note of the warranty period for the device. (5) Warranty period: This number describes the duration of each product. (3) Part number/Product number (p/n): This number provides specific information about the product's hardware components. Component replacement procedures This chapter provides removal and replacement procedures. When ordering parts or requesting information, provide the device serial number and model description provided on the service tag. 30 Chapter 4 Removal...
... locate documents, drivers, and support for the device. Make special note of the warranty period for the device. (5) Warranty period: This number describes the duration of each product. (3) Part number/Product number (p/n): This number provides specific information about the product's hardware components. Component replacement procedures This chapter provides removal and replacement procedures. When ordering parts or requesting information, provide the device serial number and model description provided on the service tag. 30 Chapter 4 Removal...

HP Mini 1000 Netbook - Maintenance and Service Guide
Page 118
... battery light 8 Bluetooth module removal 46 spare part number 15, 23, 46 boot options 68 boot order 68 bottom components 11 Bracket Kit, spare part number 19, 23 buttons, TouchPad 7 C Cable Kit, spare part number 19, 23 cables, service considerations 25 chipset, product description 1 components bottom 11 front 8 keys 6 left-side 10 pointing device 7 right-side 9 top 4 TouchPad 7 wireless antennae 5 connectors power 10 service considerations 25 D device feet locations 31 spare part number 31 device specifications 69 diskette drive precautions 26 product description 1 display...
... battery light 8 Bluetooth module removal 46 spare part number 15, 23, 46 boot options 68 boot order 68 bottom components 11 Bracket Kit, spare part number 19, 23 buttons, TouchPad 7 C Cable Kit, spare part number 19, 23 cables, service considerations 25 chipset, product description 1 components bottom 11 front 8 keys 6 left-side 10 pointing device 7 right-side 9 top 4 TouchPad 7 wireless antennae 5 connectors power 10 service considerations 25 D device feet locations 31 spare part number 31 device specifications 69 diskette drive precautions 26 product description 1 display...
HP Mini 1000 Netbook - Maintenance and Service Guide
Page 119
...removal 51 spare part number 51 HP Mini Mobile Drive, spare part number 19 HP Mobile Drive, location 9 I I/O address specifications 76 in Setup Utility 65 internal display switch 4 internal media cards, product description 2 interrupt specifications 75 J jacks audio-in 10 audio-out 10 headphone 10 microphone 10 network 10 RJ-45 10 K keyboard product description 2 removal 35 spare part number 14, 22, 35 keys esc 6 fn 6 function 6 Windows applications 6 Windows logo 6 L left-side components 10 lights battery 8 drive 8 power 8 power connector 10 TouchPad on/off 7 wireless 8 M mass storage device...
...removal 51 spare part number 51 HP Mini Mobile Drive, spare part number 19 HP Mobile Drive, location 9 I I/O address specifications 76 in Setup Utility 65 internal display switch 4 internal media cards, product description 2 interrupt specifications 75 J jacks audio-in 10 audio-out 10 headphone 10 microphone 10 network 10 RJ-45 10 K keyboard product description 2 removal 35 spare part number 14, 22, 35 keys esc 6 fn 6 function 6 Windows applications 6 Windows logo 6 L left-side components 10 lights battery 8 drive 8 power 8 power connector 10 TouchPad on/off 7 wireless 8 M mass storage device...

HP Mini 1000 Netbook - Maintenance and Service Guide
Page 120
... drive 1 internal media cards 2 keyboard 2 mass storage device 1 memory module 1 modem 2 operating system 3 optical drive 1 panels 1 pointing device 2 ports 2 power requirements 2 processors 1 product name 1 security 3 serviceability 3 solid-state drive 1 webcam 2 wireless 2 product name 1 R removal/replacement preliminaries 25 procedures 30 right-side components 9 RJ-45 jack location 10 pin assignments 101 RTC battery removal 45 spare part number 14, 23, 45 Rubber Kit, spare part number 19, 22 S Screw Kit contents 79 spare part number 20, 22 screw listing 79 SD Card Reader 9 security cable...
... drive 1 internal media cards 2 keyboard 2 mass storage device 1 memory module 1 modem 2 operating system 3 optical drive 1 panels 1 pointing device 2 ports 2 power requirements 2 processors 1 product name 1 security 3 serviceability 3 solid-state drive 1 webcam 2 wireless 2 product name 1 R removal/replacement preliminaries 25 procedures 30 right-side components 9 RJ-45 jack location 10 pin assignments 101 RTC battery removal 45 spare part number 14, 23, 45 Rubber Kit, spare part number 19, 22 S Screw Kit contents 79 spare part number 20, 22 screw listing 79 SD Card Reader 9 security cable...

HP MINI User Guide - Windows XP
Page 13
..., and rewind your files. Click the Files button to open the Wireless Network and create, manage, and use wireless connections. Use the mini player to display the system Help and learn about the device. Click the Wireless Network icon to view and customize basic and advanced system settings. Indicates that one or more of your WLAN devices are not connected to access the power management features such as Suspend, restart, Hibernate, log...
..., and rewind your files. Click the Files button to open the Wireless Network and create, manage, and use wireless connections. Use the mini player to display the system Help and learn about the device. Click the Wireless Network icon to view and customize basic and advanced system settings. Indicates that one or more of your WLAN devices are not connected to access the power management features such as Suspend, restart, Hibernate, log...

HP MINI User Guide - Windows XP
Page 74
... in the top-right corner of functions you can connect an external USB mouse to the scroll zone. Using the keyboard Using keyboard shortcuts A shortcut key is a combination of the USB ports on an external mouse. 12 Pointing devices and keyboard Using pointing devices Setting pointing device preferences Use Mouse Preferences to the scroll zone will not activate the scrolling function. Use the TouchPad buttons like the corresponding buttons on the device. Click Keyboard Shortcuts. Using the TouchPad To move the pointer, you want the...
... in the top-right corner of functions you can connect an external USB mouse to the scroll zone. Using the keyboard Using keyboard shortcuts A shortcut key is a combination of the USB ports on an external mouse. 12 Pointing devices and keyboard Using pointing devices Setting pointing device preferences Use Mouse Preferences to the scroll zone will not activate the scrolling function. Use the TouchPad buttons like the corresponding buttons on the device. Click Keyboard Shortcuts. Using the TouchPad To move the pointer, you want the...

HP MINI User Guide - Windows XP
Page 90
...-left corner of the screen. Follow the on or restarting the device, and then pressing f9 while the "F9 = Change Boot Device Order" message is complete, remove the USB flash drive. 7. Change the boot order by turning on -screen instructions to restore your HP MINI. 8. Click the Browse button and select the HP Mini MIE recovery image. - Follow the specific operating system instructions in this section to restore the system. or - Insert the USB flash drive into a USB port on your system.
...-left corner of the screen. Follow the on or restarting the device, and then pressing f9 while the "F9 = Change Boot Device Order" message is complete, remove the USB flash drive. 7. Change the boot order by turning on -screen instructions to restore your HP MINI. 8. Click the Browse button and select the HP Mini MIE recovery image. - Follow the specific operating system instructions in this section to restore the system. or - Insert the USB flash drive into a USB port on your system.
HP MINI User Guide - Windows XP
Page 96
... display switch, identifying 9 internal microphone, identifying 9, 44 Internet browsing 28 connecting 19 searching 28 Internet connection setup 21 Internet programs 15 J jacks audio-in (microphone) 8, 44 audio-out (headphone) 8, 44 RJ-45 (network) 8 K keyboard hotkeys, identifying 65 keyboard shortcuts 64 keyboard, cleaning 83 keys fn 6 function 6 Home 6 Program Switcher 6 L labels Bluetooth 12 regulatory 12 service tag 12 wireless certification 12 WLAN 12 latches, battery release 10 left TouchPad button, identifying 4 lights battery 7 caps lock 5 drive 6 power 6 TouchPad on/of 4 webcam...
... display switch, identifying 9 internal microphone, identifying 9, 44 Internet browsing 28 connecting 19 searching 28 Internet connection setup 21 Internet programs 15 J jacks audio-in (microphone) 8, 44 audio-out (headphone) 8, 44 RJ-45 (network) 8 K keyboard hotkeys, identifying 65 keyboard shortcuts 64 keyboard, cleaning 83 keys fn 6 function 6 Home 6 Program Switcher 6 L labels Bluetooth 12 regulatory 12 service tag 12 wireless certification 12 WLAN 12 latches, battery release 10 left TouchPad button, identifying 4 lights battery 7 caps lock 5 drive 6 power 6 TouchPad on/of 4 webcam...
HP MINI User Guide - Windows XP
Page 97
... hotkey 67 R readable media 32 regulatory information regulatory label 12 wireless certification labels 12 release latches battery 10, 37 memory module compartment cover 70 restoring HP MIE Restore Image Creator 80 System Restore 79 right TouchPad button, identifying 4 RJ-45 (network) jack, identifying 8 routine care 82 S screen brightness hotkeys 67 screen image, switching 66 screen savers, photos 52 SD Card Reader, identifying 7 security lanyard connector, identifying 8 security, wireless 21 serial number, device 12 service tag 12 settings, customizing 74 setup...
... hotkey 67 R readable media 32 regulatory information regulatory label 12 wireless certification labels 12 release latches battery 10, 37 memory module compartment cover 70 restoring HP MIE Restore Image Creator 80 System Restore 79 right TouchPad button, identifying 4 RJ-45 (network) jack, identifying 8 routine care 82 S screen brightness hotkeys 67 screen image, switching 66 screen savers, photos 52 SD Card Reader, identifying 7 security lanyard connector, identifying 8 security, wireless 21 serial number, device 12 service tag 12 settings, customizing 74 setup...
MINI User Guide - Windows XP
Page 7
...43 Using firewall software ...44 Installing critical updates ...45 6 Digital cards Inserting a digital card ...46 Stopping and removing a digital card 47 7 USB devices Using a USB device ...48 Connecting a USB device 48 Stopping and removing a USB device 49 Using the HP Mobile Drive (select models only 50 Inserting the HP Mini Mobile Drive 50 Stopping and removing the HP Mini Mobile Drive 50 8 Pointing devices and keyboard Setting pointing device preferences 52 Using pointing devices ...52 Using the TouchPad ...52 Connecting an external mouse 52 Using the keyboard ...52 Using hotkeys...
...43 Using firewall software ...44 Installing critical updates ...45 6 Digital cards Inserting a digital card ...46 Stopping and removing a digital card 47 7 USB devices Using a USB device ...48 Connecting a USB device 48 Stopping and removing a USB device 49 Using the HP Mobile Drive (select models only 50 Inserting the HP Mini Mobile Drive 50 Stopping and removing the HP Mini Mobile Drive 50 8 Pointing devices and keyboard Setting pointing device preferences 52 Using pointing devices ...52 Using the TouchPad ...52 Connecting an external mouse 52 Using the keyboard ...52 Using hotkeys...
MINI User Guide - Windows XP
Page 16
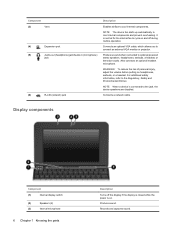
... (1) Internal display switch (2) Speakers (2) (3) Internal microphone 6 Chapter 1 Knowing the parts Description Turns off during routine operation. It is connected to the Regulatory, Safety and Environmental Notices. Also connects an optional headset microphone. To reduce the risk of personal injury, adjust the volume before putting on . NOTE: The device fan starts up automatically to cool internal components. Produce sound. Component (3) Vent (4) Expansion port (5) Audio-out (headphone) jack/Audio-in (microphone) jack (6) RJ-45 (network) jack Description Enables...
... (1) Internal display switch (2) Speakers (2) (3) Internal microphone 6 Chapter 1 Knowing the parts Description Turns off during routine operation. It is connected to the Regulatory, Safety and Environmental Notices. Also connects an optional headset microphone. To reduce the risk of personal injury, adjust the volume before putting on . NOTE: The device fan starts up automatically to cool internal components. Produce sound. Component (3) Vent (4) Expansion port (5) Audio-out (headphone) jack/Audio-in (microphone) jack (6) RJ-45 (network) jack Description Enables...

MINI User Guide - Windows XP
Page 31
You can use settings through Power Options in a cool, dry place. Select Start > Control Panel > Performance and Maintenance > Power Options. 2. Click OK. or dispose of a stored battery, place it on the device turns off . Step 4: Fully recharge the battery To recharge the battery: 1. Storing a battery CAUTION: To prevent damage to a battery, do not disassemble, crush, or puncture a battery; If a device will charge faster if the device is off wireless and local area network (LAN) connections and exit...
You can use settings through Power Options in a cool, dry place. Select Start > Control Panel > Performance and Maintenance > Power Options. 2. Click OK. or dispose of a stored battery, place it on the device turns off . Step 4: Fully recharge the battery To recharge the battery: 1. Storing a battery CAUTION: To prevent damage to a battery, do not disassemble, crush, or puncture a battery; If a device will charge faster if the device is off wireless and local area network (LAN) connections and exit...
MINI User Guide - Windows XP
Page 49
... in the non-Windows Setup Utility preinstalled on the device. Protecting the device 39 NOTE: Before you set. Because most passwords are not displayed as they are designed to act as deterrents, but they may not deter software attacks or prevent the device from Microsoft Unauthorized access to a Windows user account User password Using passwords A password is essential to record each password you send your device for service, remove all password settings. CAUTION: To...
... in the non-Windows Setup Utility preinstalled on the device. Protecting the device 39 NOTE: Before you set. Because most passwords are not displayed as they are designed to act as deterrents, but they may not deter software attacks or prevent the device from Microsoft Unauthorized access to a Windows user account User password Using passwords A password is essential to record each password you send your device for service, remove all password settings. CAUTION: To...

MINI User Guide - Windows XP
Page 64
... displayed, the device cannot be changed . Most external monitors receive video information from device display to monitor display to the hard drive. NOTE: Before you must be changed in memory is Hibernate, but this setting can also alternate images among display devices connected to the fn+f1 hotkey. Then follow the instructions on before initiating Standby. To exit Standby, briefly slide the power switch. Increasing screen brightness (fn+f4) Press fn+f4 to enter your Windows user password...
... displayed, the device cannot be changed . Most external monitors receive video information from device display to monitor display to the hard drive. NOTE: Before you must be changed in memory is Hibernate, but this setting can also alternate images among display devices connected to the fn+f1 hotkey. Then follow the instructions on before initiating Standby. To exit Standby, briefly slide the power switch. Increasing screen brightness (fn+f4) Press fn+f4 to enter your Windows user password...

MINI User Guide - Windows XP
Page 83
... caps lock light, identifying 2 CD drive 57 changing the Setup Utility language 69 charging batteries 16, 19 checking audio functions 36 compartments, memory module 7 components additional hardware 9 bottom 7 display 6 front 3 left-side 5 right-side 5 TouchPad 1 connecting to a WLAN 29 connection, external power 14 connector, security cable 5 conservation, power 21 cord, power 9 corporate WLAN connection 29 critical battery level 18 D Diagnostics menu 72 digital card inserting 46 removing 47 stopping 47 diskette drive 57 display image, switching 54 screen brightness hotkeys 54 display switch...
... caps lock light, identifying 2 CD drive 57 changing the Setup Utility language 69 charging batteries 16, 19 checking audio functions 36 compartments, memory module 7 components additional hardware 9 bottom 7 display 6 front 3 left-side 5 right-side 5 TouchPad 1 connecting to a WLAN 29 connection, external power 14 connector, security cable 5 conservation, power 21 cord, power 9 corporate WLAN connection 29 critical battery level 18 D Diagnostics menu 72 digital card inserting 46 removing 47 stopping 47 diskette drive 57 display image, switching 54 screen brightness hotkeys 54 display switch...
MINI User Guide - Windows XP
Page 84
... wireless 25 internal display switch, identifying 6 internal microphone, identifying 6, 33 Internet connection setup 27 J jacks audio-in (microphone) 6, 33 audio-out (headphone) 6, 33 RJ-45 (network) 6 K keyboard hotkeys, identifying 52 keys fn 3 function 3 Windows applications 3 Windows logo 3 L labels Bluetooth 10 HP Mobile Broadband Module 10 regulatory 10 service tag 9 wireless certification 10 WLAN 10 language support 71 latches, battery release 7 left TouchPad button, identifying 1 lights battery 4 caps lock 2 drive 4 power 4 TouchPad on/of 2 webcam 7 wireless 4 local area network (LAN...
... wireless 25 internal display switch, identifying 6 internal microphone, identifying 6, 33 Internet connection setup 27 J jacks audio-in (microphone) 6, 33 audio-out (headphone) 6, 33 RJ-45 (network) 6 K keyboard hotkeys, identifying 52 keys fn 3 function 3 Windows applications 3 Windows logo 3 L labels Bluetooth 10 HP Mobile Broadband Module 10 regulatory 10 service tag 9 wireless certification 10 WLAN 10 language support 71 latches, battery release 7 left TouchPad button, identifying 1 lights battery 4 caps lock 2 drive 4 power 4 TouchPad on/of 2 webcam 7 wireless 4 local area network (LAN...


