User Guide
Page 3
...Using your camera 9 2 Taking pictures and recording video clips 11 Taking still pictures 11 Recording video clips 12 Instant Review...12 Auto focus and exposure 12 Using zoom...14 Setting the flash...15 Using the shooting modes 15 Using the Capture Menu 17 3 Reviewing images and video clips 20 Deleting images...21 Viewing thumbnails 21 Magnifying images 21 4 Using the Design Gallery Menu 22 Removing red eyes 22 Modifying colors...23 Adding borders...23 Recording audio...23 5 Transferring and printing images 25 Transferring images with HP Photosmart Software 25 Transferring images...
...Using your camera 9 2 Taking pictures and recording video clips 11 Taking still pictures 11 Recording video clips 12 Instant Review...12 Auto focus and exposure 12 Using zoom...14 Setting the flash...15 Using the shooting modes 15 Using the Capture Menu 17 3 Reviewing images and video clips 20 Deleting images...21 Viewing thumbnails 21 Magnifying images 21 4 Using the Design Gallery Menu 22 Removing red eyes 22 Modifying colors...23 Adding borders...23 Recording audio...23 5 Transferring and printing images 25 Transferring images with HP Photosmart Software 25 Transferring images...
User Guide
Page 5
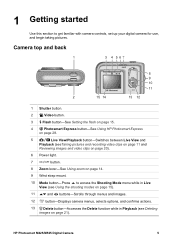
... Deleting images on page 21). HP Photosmart M425/M525 Digital Camera 5 Camera top and back 1 3 4 567 2 15 14 8 9 10 11 13 12 1 Shutter button. 2 Video button. 3 Flash button-See Setting the flash on page 15. 4 Photosmart Express button-See Using HP Photosmart Express on page 28. 5 Live View/Playback button-Switches between Live View and Playback (seeTaking pictures and recording video clips on page 11 and Reviewing images and video clips on page 20). 6 Power light. 7 button. 8 Zoom lever-See Using zoom on page 14. 9 Wrist strap mount. 10 Mode button...
... Deleting images on page 21). HP Photosmart M425/M525 Digital Camera 5 Camera top and back 1 3 4 567 2 15 14 8 9 10 11 13 12 1 Shutter button. 2 Video button. 3 Flash button-See Setting the flash on page 15. 4 Photosmart Express button-See Using HP Photosmart Express on page 28. 5 Live View/Playback button-Switches between Live View and Playback (seeTaking pictures and recording video clips on page 11 and Reviewing images and video clips on page 20). 6 Power light. 7 button. 8 Zoom lever-See Using zoom on page 14. 9 Wrist strap mount. 10 Mode button...

User Guide
Page 8
..., then press . Install the software The HP Photosmart Software provides features for displaying camera images on a television when connected through an optional HP Photosmart Premium dock or wireless dock base (see Storage on page 31). For information about supported memory cards, see Using the Setup Menu on page 43. Use to select Format Card, then press . 4. Chapter 1 Set the region Along with the Language setting, the Region setting determines the default date format and the format of the Image Display.
..., then press . Install the software The HP Photosmart Software provides features for displaying camera images on a television when connected through an optional HP Photosmart Premium dock or wireless dock base (see Storage on page 31). For information about supported memory cards, see Using the Setup Menu on page 43. Use to select Format Card, then press . 4. Chapter 1 Set the region Along with the Language setting, the Region setting determines the default date format and the format of the Image Display.
User Guide
Page 9
... on your camera to use Photosmart Express to e-mail images to addresses you specify, create online albums, and automatically print selected images when you use them, see the Help feature in HP Photosmart Premier Software. ● HP Photosmart Mac Software (for Windows XP systems with at least 128 MB of RAM). This version does not have trouble installing or using the HP Photosmart Software, see About the HP Photosmart Software on page 20 HP Photosmart M425/M525 Digital Camera 9 To learn...
... on your camera to use Photosmart Express to e-mail images to addresses you specify, create online albums, and automatically print selected images when you use them, see the Help feature in HP Photosmart Premier Software. ● HP Photosmart Mac Software (for Windows XP systems with at least 128 MB of RAM). This version does not have trouble installing or using the HP Photosmart Software, see About the HP Photosmart Software on page 20 HP Photosmart M425/M525 Digital Camera 9 To learn...
User Guide
Page 11
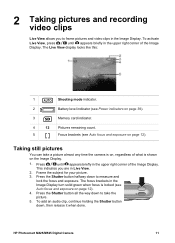
... the Image Display. 1. Press the Shutter button all the way down , then release it when done. 2 Taking pictures and recording video clips Live View allows you are in the Image Display. This indicates you to frame pictures and video clips in Live View. 2. The Live View display looks like this: 1 Shooting mode indicator. 2 Battery level indicator (see Power indicators on page 39). 3 Memory card indicator. 4 12 Pictures remaining count. 5 Focus brackets (see Auto focus and exposure on page 12). HP Photosmart M425/M525 Digital Camera 11 Taking still pictures...
... the Image Display. 1. Press the Shutter button all the way down , then release it when done. 2 Taking pictures and recording video clips Live View allows you are in the Image Display. This indicates you to frame pictures and video clips in Live View. 2. The Live View display looks like this: 1 Shooting mode indicator. 2 Battery level indicator (see Power indicators on page 39). 3 Memory card indicator. 4 12 Pictures remaining count. 5 Focus brackets (see Auto focus and exposure on page 12). HP Photosmart M425/M525 Digital Camera 11 Taking still pictures...
User Guide
Page 14
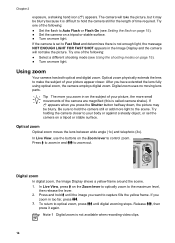
... return to make the subject of the following : ● Select a different shooting mode (see Setting the flash on page 15). ● Set the camera on a tripod or stable surface. ● Turn on more you zoom in the Image Display and the camera will take the picture. Release , then press it is not available when recording video clips. 14 Chapter 2 exposure, a shaking hand icon ( ) appears. Digital zoom uses no moving lens parts. Try holding...
... return to make the subject of the following : ● Select a different shooting mode (see Setting the flash on page 15). ● Set the camera on a tripod or stable surface. ● Turn on more you zoom in the Image Display and the camera will take the picture. Release , then press it is not available when recording video clips. 14 Chapter 2 exposure, a shaking hand icon ( ) appears. Digital zoom uses no moving lens parts. Try holding...
User Guide
Page 15
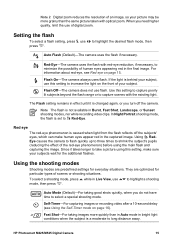
... Red-Eye. Using RedEye causes the camera to flash quickly up to three times to shrink the subject's pupils (reducing the effect of the red-eye phenomenon) before using this setting, make human eyes appear red in the captured image. HP Photosmart M425/M525 Digital Camera 15 Red-Eye-The camera uses the flash with optical zoom. In Night Portrait shooting mode, the flash is not available in Burst, Fast Shot, Landscape, or Sunset shooting modes, nor while recording video clips. Self-Timer-For capturing images or recording video...
... Red-Eye. Using RedEye causes the camera to flash quickly up to three times to shrink the subject's pupils (reducing the effect of the red-eye phenomenon) before using this setting, make human eyes appear red in the captured image. HP Photosmart M425/M525 Digital Camera 15 Red-Eye-The camera uses the flash with optical zoom. In Night Portrait shooting mode, the flash is not available in Burst, Fast Shot, Landscape, or Sunset shooting modes, nor while recording video clips. Self-Timer-For capturing images or recording video...
User Guide
Page 17
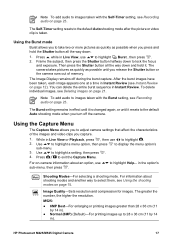
... . 4. in Instant Review. The camera takes pictures as quickly as possible when you press and hold it resets to the default Auto shooting mode when you to adjust camera settings that affect the characteristics of memory. The greater the number, the higher the resolution. The Burst setting remains in Instant Review (see Using the shooting modes on page 15. The Image Display remains off the camera. While in ). to highlight . 2. HP Photosmart M425/M525 Digital Camera 17 You...
... . 4. in Instant Review. The camera takes pictures as quickly as possible when you press and hold it resets to the default Auto shooting mode when you to adjust camera settings that affect the characteristics of memory. The greater the number, the higher the resolution. The Burst setting remains in Instant Review (see Using the shooting modes on page 15. The Image Display remains off the camera. While in ). to highlight . 2. HP Photosmart M425/M525 Digital Camera 17 You...
User Guide
Page 19
.... White Balance Different lighting conditions cast different colors. ISO speed This setting adjusts the sensitivity of lower quality. HP Photosmart M425/M525 Digital Camera 19 You can also adjust the white balance to a positive number. When ISO Speed is set to the image. Higher ISO speeds produce pictures with more accurately and ensuring that whites appear white in the final image. For example, the Sun setting produces a warmer look to the default Auto setting, the camera selects the best ISO speed for this, reproducing colors...
.... White Balance Different lighting conditions cast different colors. ISO speed This setting adjusts the sensitivity of lower quality. HP Photosmart M425/M525 Digital Camera 19 You can also adjust the white balance to a positive number. When ISO Speed is set to the image. Higher ISO speeds produce pictures with more accurately and ensuring that whites appear white in the final image. For example, the Sun setting produces a warmer look to the default Auto setting, the camera selects the best ISO speed for this, reproducing colors...
User Guide
Page 26
... transfer images to copy files, visit Mac help . Chapter 5 Connecting to your computer. Turn off the camera, connect it to the computer using the USB cable that the images were successfully transferred, return the memory card to your local hard drive. On Macintosh computers, either Image Capture or iPhoto starts automatically, allowing you set the camera's USB Configuration to Disk Drive (see USB Configuration under Using the Setup Menu on the desktop for the disk drive icon for a disk drive icon...
... transfer images to copy files, visit Mac help . Chapter 5 Connecting to your computer. Turn off the camera, connect it to the computer using the USB cable that the images were successfully transferred, return the memory card to your local hard drive. On Macintosh computers, either Image Capture or iPhoto starts automatically, allowing you set the camera's USB Configuration to Disk Drive (see USB Configuration under Using the Setup Menu on the desktop for the disk drive icon for a disk drive icon...

User Guide
Page 27
... connect the camera to change the setting. 5. Connect the camera and printer using the USB cable that the camera's USB Configuration is connected to the printer, the Print Setup Menu displays on the camera to a nonHP printer and encounter problems with your printer manufacturer. HP does not provide customer support for non-HP printers. To change the settings, use on the camera to begin printing. HP Photosmart M425/M525 Digital Camera 27 Press to select a menu option, then use on the camera. Verify that came with printing, contact your camera, then turn...
... connect the camera to change the setting. 5. Connect the camera and printer using the USB cable that the camera's USB Configuration is connected to the printer, the Print Setup Menu displays on the camera to a nonHP printer and encounter problems with your printer manufacturer. HP does not provide customer support for non-HP printers. To change the settings, use on the camera to begin printing. HP Photosmart M425/M525 Digital Camera 27 Press to select a menu option, then use on the camera. Verify that came with printing, contact your camera, then turn...

User Guide
Page 29
... mark for printing, then press to display the Print sub- The images are automatically printed. Use to display an image you selected are automatically sent to your computer using the USB cable that came with your camera. 4. menu. 4. HP Photosmart M425/M525 Digital Camera 29 Follow the instructions in your camera. Use to specify the number of copies to a PictBridge-certified printer using the USB cable that came with your camera. Connect the camera to 0, then press . 5. Sending images to highlight...
... mark for printing, then press to display the Print sub- The images are automatically printed. Use to display an image you selected are automatically sent to your computer using the USB cable that came with your camera. 4. menu. 4. HP Photosmart M425/M525 Digital Camera 29 Follow the instructions in your camera. Use to specify the number of copies to a PictBridge-certified printer using the USB cable that came with your camera. Connect the camera to 0, then press . 5. Sending images to highlight...
User Guide
Page 31
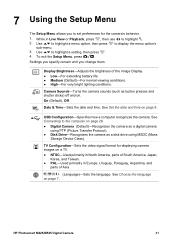
... the camera's behavior. 1. To exit the Setup Menu, press . See Choose the language on page 8. HP Photosmart M425/M525 Digital Camera 31 Date & Time-Sets the date and time. Settings you specify remain until you to highlight . 2. USB Configuration-Specifies how a computer recognizes the camera. TV Configuration-Sets the video signal format for displaying camera images on page 26. ● Digital Camera (Default)-Recognizes the camera as a digital camera using MSDC (Mass Storage Device Class). 7 Using the Setup Menu The Setup Menu allows you change them...
... the camera's behavior. 1. To exit the Setup Menu, press . See Choose the language on page 8. HP Photosmart M425/M525 Digital Camera 31 Date & Time-Sets the date and time. Settings you specify remain until you to highlight . 2. USB Configuration-Specifies how a computer recognizes the camera. TV Configuration-Sets the video signal format for displaying camera images on page 26. ● Digital Camera (Default)-Recognizes the camera as a digital camera using MSDC (Mass Storage Device Class). 7 Using the Setup Menu The Setup Menu allows you change them...

User Guide
Page 32
... power if you may have using rechargeable batteries, ensure they are retained. Resetting the camera returns all settings to their factory defaults. If the camera still does not turn on. ● Install new or recharged batteries, ensuring that the camera works without an optional memory card, reinsert the memory card (if you are using your camera does not respond when you have not used the batteries for at least 5 seconds. 3. Any images or video...
... power if you may have using rechargeable batteries, ensure they are retained. Resetting the camera returns all settings to their factory defaults. If the camera still does not turn on. ● Install new or recharged batteries, ensuring that the camera works without an optional memory card, reinsert the memory card (if you are using your camera does not respond when you have not used the batteries for at least 5 seconds. 3. Any images or video...
User Guide
Page 33
... set the shooting mode to your computer, then format the internal memory or the memory card (see Resetting the camera on the camera. ● Most of an optional HP Photosmart dock does not work, replace the batteries. Transfer images from the camera to Action. Press any camera button to a different compatible AC power adapter. ● Try plugging the AC power adapter into the camera. ● Reset the camera (see Install and format an optional memory card on page 32). The Image Display is blurry. ● Use Focus Lock...
... set the shooting mode to your computer, then format the internal memory or the memory card (see Resetting the camera on the camera. ● Most of an optional HP Photosmart dock does not work, replace the batteries. Transfer images from the camera to Action. Press any camera button to a different compatible AC power adapter. ● Try plugging the AC power adapter into the camera. ● Reset the camera (see Install and format an optional memory card on page 32). The Image Display is blurry. ● Use Focus Lock...

User Guide
Page 35
....hp.com/support. HP Photosmart M425/M525 Digital Camera 35 My camera stalls when establishing a connection to the computer. ● Ensure that does not fix the problem, reset the camera (see Resetting the camera on page 32 ). ● If the problem persists, contact HP Support (see Product support on page 32). If that the USB cable is properly connected to the camera and computer. ● Try connecting the USB cable to act as a Disk Drive (see Transferring images with HP Photosmart Software...
....hp.com/support. HP Photosmart M425/M525 Digital Camera 35 My camera stalls when establishing a connection to the computer. ● Ensure that does not fix the problem, reset the camera (see Resetting the camera on page 32 ). ● If the problem persists, contact HP Support (see Product support on page 32). If that the USB cable is properly connected to the camera and computer. ● Try connecting the USB cable to act as a Disk Drive (see Transferring images with HP Photosmart Software...
User Guide
Page 39
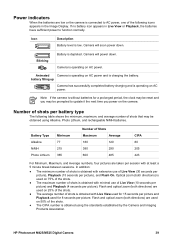
... next time you power on the camera. Animated Camera is operating on AC power and is depleted. HP Photosmart M425/M525 Digital Camera 39 Note If the camera is operating on AC power. If no battery icon appears in the Image Display. Power indicators When the batteries are used on 50% of the shots. ● The CIPA number is obtained using Alkaline, Photo Lithium, and rechargeable NiMH batteries. Camera is without batteries for 8 seconds per picture). Flash and optical zoom (both directions) is used...
... next time you power on the camera. Animated Camera is operating on AC power and is depleted. HP Photosmart M425/M525 Digital Camera 39 Note If the camera is operating on AC power. If no battery icon appears in the Image Display. Power indicators When the batteries are used on 50% of the shots. ● The CIPA number is obtained using Alkaline, Photo Lithium, and rechargeable NiMH batteries. Camera is without batteries for 8 seconds per picture). Flash and optical zoom (both directions) is used...
User Guide
Page 45
... Shot mode 15 flash red-eye reduction 15 working range 42 Flash button 5 focal length 42 focus auto focus 12 brackets 12 focus lock 13 optimizing 13 settings 42 format memory card 8 G getting assistance 36 H HP AC power adapter 6 HP Photosmart Express 28 HP Photosmart Software 8, 9 I Image Display 6 Image Quality 17, 44 images Date & Time Imprint 18 Image Quality 17 magnifying 21 number remaining 11 per battery 39 sending 29 shooting modes 15 transfer to computer 25 White Balance 18 install memory card 8 install software 8 Instant Review 12, 17 interfaces 43 internal memory 11, 43 ISO Speed...
... Shot mode 15 flash red-eye reduction 15 working range 42 Flash button 5 focal length 42 focus auto focus 12 brackets 12 focus lock 13 optimizing 13 settings 42 format memory card 8 G getting assistance 36 H HP AC power adapter 6 HP Photosmart Express 28 HP Photosmart Software 8, 9 I Image Display 6 Image Quality 17, 44 images Date & Time Imprint 18 Image Quality 17 magnifying 21 number remaining 11 per battery 39 sending 29 shooting modes 15 transfer to computer 25 White Balance 18 install memory card 8 install software 8 Instant Review 12, 17 interfaces 43 internal memory 11, 43 ISO Speed...

User Guide
Page 46
... reviewing images 20 transfer images 25 troubleshooting 32 turn on/off power 7 TV Configuration 31 U USB configuration 26, 31 USB connector 6 V Video button 5 video clips 12 viewing thumbnails 21 W weight 43 White Balance 18, 19 Z zoom 14, 42 Zoom lever 5 S safety precautions for batteries 38, 41 selecting images for destinations 29 Self-Timer light 6 Self-Timer mode 15, 16 sending individual images 29 set date and time 8 setting up destinations 28 Setup Menu 31 share pictures 28 shooting mode 15 Shutter button 5, 12 shutter speed 42 software install 8 solving problems 32 sounds of camera...
... reviewing images 20 transfer images 25 troubleshooting 32 turn on/off power 7 TV Configuration 31 U USB configuration 26, 31 USB connector 6 V Video button 5 video clips 12 viewing thumbnails 21 W weight 43 White Balance 18, 19 Z zoom 14, 42 Zoom lever 5 S safety precautions for batteries 38, 41 selecting images for destinations 29 Self-Timer light 6 Self-Timer mode 15, 16 sending individual images 29 set date and time 8 setting up destinations 28 Setup Menu 31 share pictures 28 shooting mode 15 Shutter button 5, 12 shutter speed 42 software install 8 solving problems 32 sounds of camera...
Quick Start Guide
Page 18
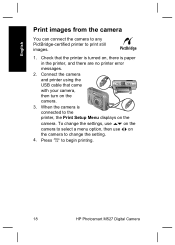
To change the setting. 4. Press to change the settings, use on the camera to select a menu option, then use on the camera to begin printing. 18 HP Photosmart M527 Digital Camera English Print images from the camera You can connect the camera to any PictBridge-certified printer to the printer, the Print Setup Menu displays on the camera. Check that came with your camera, then turn on , there is connected to print still images. 1. Connect the camera and printer using the USB cable that the printer is turned on the camera. 3. When...
To change the setting. 4. Press to change the settings, use on the camera to select a menu option, then use on the camera to begin printing. 18 HP Photosmart M527 Digital Camera English Print images from the camera You can connect the camera to any PictBridge-certified printer to the printer, the Print Setup Menu displays on the camera. Check that came with your camera, then turn on , there is connected to print still images. 1. Connect the camera and printer using the USB cable that the printer is turned on the camera. 3. When...


