HP LE1901w/LE1901wm and LE2201w LCD Monitors User Guide
Page 3
About This Guide This guide provides information on setting up the monitor, installing drivers, using the on-screen display menu, troubleshooting and technical specifications. ENWW iii NOTE: Text set off in this manner indicates that failure to equipment or loss of life. Text set off in this manner indicates that failure to follow directions could result in damage to follow directions could result in this manner provides important supplemental information. WARNING! CAUTION: Text set off in bodily harm or loss of information.
About This Guide This guide provides information on setting up the monitor, installing drivers, using the on-screen display menu, troubleshooting and technical specifications. ENWW iii NOTE: Text set off in this manner indicates that failure to equipment or loss of life. Text set off in this manner indicates that failure to follow directions could result in damage to follow directions could result in this manner provides important supplemental information. WARNING! CAUTION: Text set off in bodily harm or loss of information.
HP LE1901w/LE1901wm and LE2201w LCD Monitors User Guide
Page 5
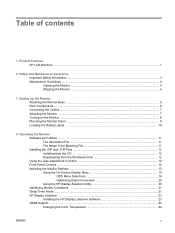
Table of contents 1 Product Features HP LCD Monitors ...1 2 Safety and Maintenance Guidelines Important Safety Information ...3 Maintenance Guidelines ...4 Cleaning the Monitor ...4 Shipping the Monitor ...4 3 Setting Up the Monitor Attaching the Monitor Base ...5 Rear Components ...6 Connecting the Cables ...7 Adjusting the Monitor ...7 Turning on the Monitor ...8 Mounting the Monitor Panel ...8 Locating the Rating Labels ...10 4 Operating the Monitor Software and Utilities ...11 The Information File...
Table of contents 1 Product Features HP LCD Monitors ...1 2 Safety and Maintenance Guidelines Important Safety Information ...3 Maintenance Guidelines ...4 Cleaning the Monitor ...4 Shipping the Monitor ...4 3 Setting Up the Monitor Attaching the Monitor Base ...5 Rear Components ...6 Connecting the Cables ...7 Adjusting the Monitor ...7 Turning on the Monitor ...8 Mounting the Monitor Panel ...8 Locating the Rating Labels ...10 4 Operating the Monitor Software and Utilities ...11 The Information File...
HP LE1901w/LE1901wm and LE2201w LCD Monitors User Guide
Page 6
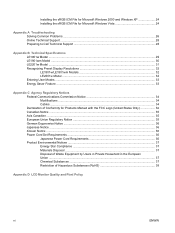
... Troubleshooting Solving Common Problems ...26 Online Technical Support ...28 Preparing to Call Technical Support 28 Appendix B Technical Specifications LE1901w Model ...29 LE1901wm Model ...30 LE2201w Model ...31 Recognizing Preset Display Resolutions 32 LE1901w/LE1901wm Models 32 LE2201w Model ...32 Entering User Modes ...33 Energy Saver Feature ...33 Appendix C Agency Regulatory Notices... Waste Equipment by Users in Private Household in the European Union ...37 Chemical Substances ...37 Restriction of Hazardous Substances (RoHS 38 Appendix D LCD Monitor Quality and Pixel Policy vi ENWW
... Troubleshooting Solving Common Problems ...26 Online Technical Support ...28 Preparing to Call Technical Support 28 Appendix B Technical Specifications LE1901w Model ...29 LE1901wm Model ...30 LE2201w Model ...31 Recognizing Preset Display Resolutions 32 LE1901w/LE1901wm Models 32 LE2201w Model ...32 Entering User Modes ...33 Energy Saver Feature ...33 Appendix C Agency Regulatory Notices... Waste Equipment by Users in Private Household in the European Union ...37 Chemical Substances ...37 Restriction of Hazardous Substances (RoHS 38 Appendix D LCD Monitor Quality and Pixel Policy vi ENWW
HP LE1901w/LE1901wm and LE2201w LCD Monitors User Guide
Page 7
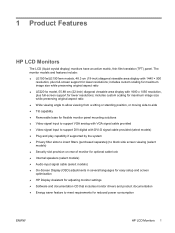
...1440 × 900 resolution, plus full-screen support for lower resolutions; The monitor models and features include: ● LE1901w/LE1901wm models, 48.3 cm (19-inch) diagonal viewable area display with DVI-D signal cable provided (select models) ● Plug and play capability...; LE2201w model, 55.88 cm (22-inch) diagonal viewable area display with 1680 x 1050 resolution, plus full-screen support for reduced power consumption ENWW HP LCD Monitors 1 1 Product Features HP LCD Monitors The LCD (liquid crystal display) monitors have an active matrix, thin-film transistor (TFT) panel.
...1440 × 900 resolution, plus full-screen support for lower resolutions; The monitor models and features include: ● LE1901w/LE1901wm models, 48.3 cm (19-inch) diagonal viewable area display with DVI-D signal cable provided (select models) ● Plug and play capability...; LE2201w model, 55.88 cm (22-inch) diagonal viewable area display with 1680 x 1050 resolution, plus full-screen support for reduced power consumption ENWW HP LCD Monitors 1 1 Product Features HP LCD Monitors The LCD (liquid crystal display) monitors have an active matrix, thin-film transistor (TFT) panel.
HP LE1901w/LE1901wm and LE2201w LCD Monitors User Guide
Page 13
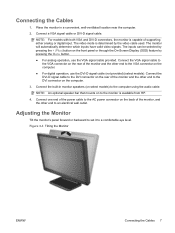
The monitor will automatically determine which inputs have valid video signals. The inputs can be selected by pressing the + (Plus) button on the front panel or through the On-Screen Display (OSD) feature by the video cable used. The video mode is determined by pressing the Menu ...mounts on the computer. 3. NOTE: For models with both VGA and DVI-D connectors, the monitor is available from HP. 4. Place the monitor in monitor speakers (on select models) to the monitor is capable of the monitor, and the other end to a comfortable eye level. Connect the built-in a convenient, ...
The monitor will automatically determine which inputs have valid video signals. The inputs can be selected by pressing the + (Plus) button on the front panel or through the On-Screen Display (OSD) feature by the video cable used. The video mode is determined by pressing the Menu ...mounts on the computer. 3. NOTE: For models with both VGA and DVI-D connectors, the monitor is available from HP. 4. Place the monitor in monitor speakers (on select models) to the monitor is capable of the monitor, and the other end to a comfortable eye level. Connect the built-in a convenient, ...
HP LE1901w/LE1901wm and LE2201w LCD Monitors User Guide
Page 14
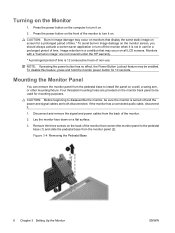
...the power and signal cables are both disconnected. If the monitor has a connected audio cable, disconnect it on the monitor back panel to install the panel on . 2. Remove the three screws on all LCD screens. Turning on a flat surface. 3. Monitors with a "burned-in image" are provided on . To... prolonged period of time.* To avoid burn-in image damage may occur on monitors that display the same static image on screen for a prolonged period of time. Four threaded mounting holes are not covered under the HP warranty. * A prolonged period of time is not in use . CAUTION: ...
...the power and signal cables are both disconnected. If the monitor has a connected audio cable, disconnect it on the monitor back panel to install the panel on . 2. Remove the three screws on all LCD screens. Turning on a flat surface. 3. Monitors with a "burned-in image" are provided on . To... prolonged period of time.* To avoid burn-in image damage may occur on monitors that display the same static image on screen for a prolonged period of time. Four threaded mounting holes are not covered under the HP warranty. * A prolonged period of time is not in use . CAUTION: ...
HP LE1901w/LE1901wm and LE2201w LCD Monitors User Guide
Page 15
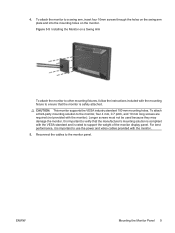
...to use the power and video cables provided with the monitor). To attach a third-party mounting solution to verify that the monitor is safely attached. Reconnect the cables to support the weight of the monitor display panel. Longer screws must not be used because they may... damage the monitor. It is important to the monitor, four 4 mm, 0.7 pitch, and 10 mm long screws are required (not provided with the monitor. 5. Figure 3-5 Installing the Monitor on the monitor. 4. ENWW Mounting the Monitor Panel 9 ...
...to use the power and video cables provided with the monitor). To attach a third-party mounting solution to verify that the monitor is safely attached. Reconnect the cables to support the weight of the monitor display panel. Longer screws must not be used because they may... damage the monitor. It is important to the monitor, four 4 mm, 0.7 pitch, and 10 mm long screws are required (not provided with the monitor. 5. Figure 3-5 Installing the Monitor on the monitor. 4. ENWW Mounting the Monitor Panel 9 ...
HP LE1901w/LE1901wm and LE2201w LCD Monitors User Guide
Page 18
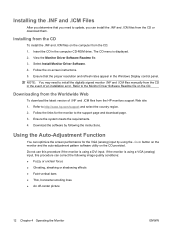
...INF and .ICM files from the HP monitors support Web site: 1. If the monitor is using the -/Auto button on the monitor and the auto-adjustment pattern software utility on the CD. Download the software by using a VGA (analog) input, this procedure if the monitor is displayed. 2. Installing the .INF and ....ICM Files After you can install the .INF and .ICM files from the CD or download them. Insert the CD in the Windows Display control panel. NOTE: You may need to http://www.hp.com/support and select the...
...INF and .ICM files from the HP monitors support Web site: 1. If the monitor is using the -/Auto button on the monitor and the auto-adjustment pattern software utility on the CD. Download the software by using a VGA (analog) input, this procedure if the monitor is displayed. 2. Installing the .INF and ....ICM Files After you can install the .INF and .ICM files from the CD or download them. Insert the CD in the Windows Display control panel. NOTE: You may need to http://www.hp.com/support and select the...
HP LE1901w/LE1901wm and LE2201w LCD Monitors User Guide
Page 19
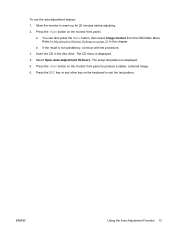
...exit the test pattern. Press the -/Auto button on the monitor front panel to warm up for 20 minutes before adjusting. 2. The setup test pattern is displayed. 4. Press the ESC key or any other key on the keyboard to Adjusting the Monitor Settings on page 15 in the disc drive. Allow the... monitor to produce a stable, centered image. 6. The CD menu is displayed. 5. Press the -/Auto button on the monitor front panel. ● You can also press the Menu button, ...
...exit the test pattern. Press the -/Auto button on the monitor front panel to warm up for 20 minutes before adjusting. 2. The setup test pattern is displayed. 4. Press the ESC key or any other key on the keyboard to Adjusting the Monitor Settings on page 15 in the disc drive. Allow the... monitor to produce a stable, centered image. 6. The CD menu is displayed. 5. Press the -/Auto button on the monitor front panel. ● You can also press the Menu button, ...
HP LE1901w/LE1901wm and LE2201w LCD Monitors User Guide
Page 21
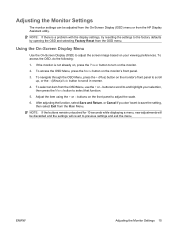
... be discarded and the settings will be adjusted from the On-Screen Display (OSD) menu or from the HP Display Assistant utility. Using the On-Screen Display Menu Use the On-Screen Display (OSD) to adjust the screen image based on the monitor's front panel to scroll up, or the - (Minus)/Auto button... to the factory defaults by opening the OSD and selecting Factory Reset from the OSD menu. If the monitor is a problem with the display settings, try resetting the settings to adjust the scale. 6. ENWW Adjusting the Monitor Settings 15 To access the OSD Menu, press the Menu button on the...
... be discarded and the settings will be adjusted from the On-Screen Display (OSD) menu or from the HP Display Assistant utility. Using the On-Screen Display Menu Use the On-Screen Display (OSD) to adjust the screen image based on the monitor's front panel to scroll up, or the - (Minus)/Auto button... to the factory defaults by opening the OSD and selecting Factory Reset from the OSD menu. If the monitor is a problem with the display settings, try resetting the settings to adjust the scale. 6. ENWW Adjusting the Monitor Settings 15 To access the OSD Menu, press the Menu button on the...
HP LE1901w/LE1901wm and LE2201w LCD Monitors User Guide
Page 22
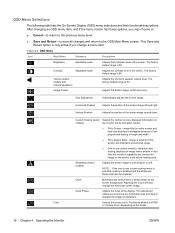
... level of the screen image up and down. OSD Menu Selections The following table lists the On-Screen Display (OSD) menu selections and their functional descriptions. Volume (select models with internal speakers) Adjusts the monitor's speaker volume level. Vertical Position Adjusts the position of the screen. Select: ● Fill to look distorted...
... level of the screen image up and down. OSD Menu Selections The following table lists the On-Screen Display (OSD) menu selections and their functional descriptions. Volume (select models with internal speakers) Adjusts the monitor's speaker volume level. Vertical Position Adjusts the position of the screen. Select: ● Fill to look distorted...
HP LE1901w/LE1901wm and LE2201w LCD Monitors User Guide
Page 23
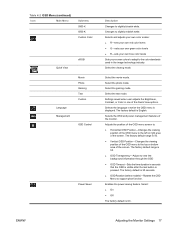
... (select models)-Rotates the OSD Menu to slightly blueish white. Select the text mode. Enables the power saving feature. ENWW Adjusting the Monitor Settings 17 Selects the OSD and power management features of the screen. Selects and adjusts your own color scales: ● R-sets your...color levels ● B-sets your own blue color levels Sets your screen colors to adapt to slightly reddish white. The factory default is displayed. Table 4-2 OSD Menu (continued) Icon Main Menu Submenu 9300 K 6500 K Custom Color Quick View Language Management sRGB Movie Photo Gaming...
... (select models)-Rotates the OSD Menu to slightly blueish white. Select the text mode. Enables the power saving feature. ENWW Adjusting the Monitor Settings 17 Selects the OSD and power management features of the screen. Selects and adjusts your own color scales: ● R-sets your...color levels ● B-sets your own blue color levels Sets your screen colors to adapt to slightly reddish white. The factory default is displayed. Table 4-2 OSD Menu (continued) Icon Main Menu Submenu 9300 K 6500 K Custom Color Quick View Language Management sRGB Movie Photo Gaming...
HP LE1901w/LE1901wm and LE2201w LCD Monitors User Guide
Page 24
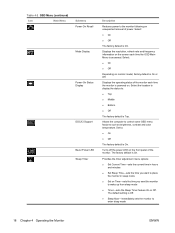
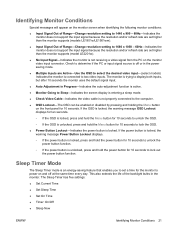
...Icon Main Menu Submenu Power On Recall Mode Display Power-On Status Display DDC/CI Support Bezel Power LED Sleep Timer Description Restores power to the monitor following an unexpected removal of the monitor each time the OSD Main Menu is accessed. Displays the operating status of power. The factory default... default setting is Top. Turns off the power LED on the screen each time the monitor is powered on. Displays the resolution, refresh rate and frequency information on the front panel of the monitor. Allows the computer to wake up from sleep mode ● Timer-sets the Sleep...
...Icon Main Menu Submenu Power On Recall Mode Display Power-On Status Display DDC/CI Support Bezel Power LED Sleep Timer Description Restores power to the monitor following an unexpected removal of the monitor each time the OSD Main Menu is accessed. Displays the operating status of power. The factory default... default setting is Top. Turns off the power LED on the screen each time the monitor is powered on. Displays the resolution, refresh rate and frequency information on the front panel of the monitor. Allows the computer to wake up from sleep mode ● Timer-sets the Sleep...
HP LE1901w/LE1901wm and LE2201w LCD Monitors User Guide
Page 25
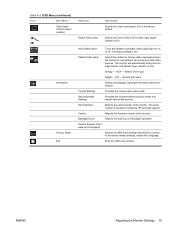
... the monitor. Service Support: http:// www.hp.com/...monitor. DVI is needed if contacting HP technical support. Selects and displays important information about the monitor.... The serial number is the factory default. Switch Video Input Selects the other (VGA or DVI) video input signal. The factory default is DVI. Digital - Serial Number Reports the serial number of backlight operation. Exits the OSD menu screen. Version Reports the firmware version of the monitor.... The monitor will automatically determine the...
... the monitor. Service Support: http:// www.hp.com/...monitor. DVI is needed if contacting HP technical support. Selects and displays important information about the monitor.... The serial number is the factory default. Switch Video Input Selects the other (VGA or DVI) video input signal. The factory default is DVI. Digital - Serial Number Reports the serial number of backlight operation. Exits the OSD menu screen. Version Reports the firmware version of the monitor.... The monitor will automatically determine the...
HP LE1901w/LE1901wm and LE2201w LCD Monitors User Guide
Page 26
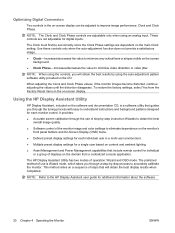
...Clock and Clock Phase. When adjusting the Clock and Clock Phase values, if the monitor images become distorted, continue adjusting the values until the distortion disappears. Using the HP Display Assistant Utility HP Display Assistant, included on the software and documentation CD, is Wizard mode, which takes... Clock Phase settings are not adjustable for individual or a group of displays on the domain from the Factory Reset menu in a multi-user environment. ● Multiple preset display settings for each monitor control. NOTE: The Clock and Clock Phase controls are adjustable only when...
...Clock and Clock Phase. When adjusting the Clock and Clock Phase values, if the monitor images become distorted, continue adjusting the values until the distortion disappears. Using the HP Display Assistant Utility HP Display Assistant, included on the software and documentation CD, is Wizard mode, which takes... Clock Phase settings are not adjustable for individual or a group of displays on the domain from the Factory Reset menu in a multi-user environment. ● Multiple preset display settings for each monitor control. NOTE: The Clock and Clock Phase controls are adjustable only when...
HP LE1901w/LE1901wm and LE2201w LCD Monitors User Guide
Page 27
... input connector. The monitor is trying to display both inputs, but after 10 seconds the monitor uses the default signal input. ● Auto Adjustment in the power saving mode. ● Multiple Inputs are set higher than the monitor supports (models LE1901w/LE1901wm). ● Input Signal Out of Range-Change resolution setting to 1680 x 1050 - 60Hz...
... input connector. The monitor is trying to display both inputs, but after 10 seconds the monitor uses the default signal input. ● Auto Adjustment in the power saving mode. ● Multiple Inputs are set higher than the monitor supports (models LE1901w/LE1901wm). ● Input Signal Out of Range-Change resolution setting to 1680 x 1050 - 60Hz...
HP LE1901w/LE1901wm and LE2201w LCD Monitors User Guide
Page 28
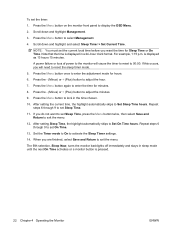
... panel to adjust the minutes. 9. Scroll down and highlight Management. 3. Note that the time is displayed in sleep mode until the next On Time activates or a monitor button is displayed as 13 hours 15 minutes. If this occurs, you reset the time for Sleep Time or On Time. Press ...enter the time for hours. 6. Press the - (Minus) or + (Plus) button to display the OSD Menu. 2. After setting the current time, the highlight automatically skips to adjust the hour. 7. is pressed. 22 Chapter 4 Operating the Monitor ENWW Press the - (Minus) or + (Plus) button to Set Sleep Time hours. ...
... panel to adjust the minutes. 9. Scroll down and highlight Management. 3. Note that the time is displayed in sleep mode until the next On Time activates or a monitor button is displayed as 13 hours 15 minutes. If this occurs, you reset the time for Sleep Time or On Time. Press ...enter the time for hours. 6. Press the - (Minus) or + (Plus) button to display the OSD Menu. 2. After setting the current time, the highlight automatically skips to adjust the hour. 7. is pressed. 22 Chapter 4 Operating the Monitor ENWW Press the - (Minus) or + (Plus) button to Set Sleep Time hours. ...
HP LE1901w/LE1901wm and LE2201w LCD Monitors User Guide
Page 29
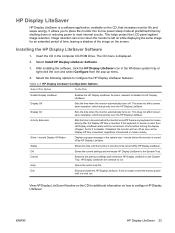
... current settings and minimizes HP Display LiteSaver to configure the HP Display LiteSaver features: Table 4-3 HP Display LiteSaver Configuration Options Select This Option To Do This Enable Display LiteSaver Enables the HP Display LiteSaver functions; Exit Exits and closes the HP Display LiteSaver. Installing the HP Display LiteSaver Software 1. Select Install HP Display LiteSaver Software. 3. Display Off Sets the time when the monitor automatically turns off if...
... current settings and minimizes HP Display LiteSaver to configure the HP Display LiteSaver features: Table 4-3 HP Display LiteSaver Configuration Options Select This Option To Do This Enable Display LiteSaver Enables the HP Display LiteSaver functions; Exit Exits and closes the HP Display LiteSaver. Installing the HP Display LiteSaver Software 1. Select Install HP Display LiteSaver Software. 3. Display Off Sets the time when the monitor automatically turns off if...
HP LE1901w/LE1901wm and LE2201w LCD Monitors User Guide
Page 30
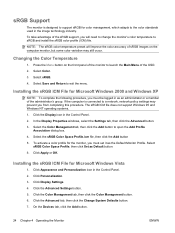
...Installing the sRGB ICM File for Microsoft Windows Vista 1. If the computer is designed to support sRGB for the monitor, you must be logged in the image technology industry. Click the Display icon in the Control Panel. 2. Click the Color Management tab, then click the Color Management button. 6.... the Add button 5. Select sRGB Color Space Profile, then click Set as an administrator or a member of the monitor to open the Add Profile Association dialog box. 4. Click Display Settings. 4. Click the Advanced Settings button. 5. On the Devices tab, click the Add button. 24 Chapter 4...
...Installing the sRGB ICM File for Microsoft Windows Vista 1. If the computer is designed to support sRGB for the monitor, you must be logged in the image technology industry. Click the Display icon in the Control Panel. 2. Click the Color Management tab, then click the Color Management button. 6.... the Add button 5. Select sRGB Color Space Profile, then click Set as an administrator or a member of the monitor to open the Add Profile Association dialog box. 4. Click Display Settings. 4. Click the Advanced Settings button. 5. On the Devices tab, click the Add button. 24 Chapter 4...
HP LE1901w/LE1901wm and LE2201w LCD Monitors User Guide
Page 32
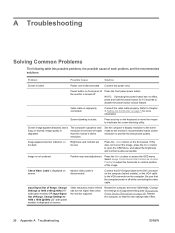
... power button. Video cable is active. The computer's graphics card resolution is displayed on front panel of the image. If this does not correct the image, press the Menu button to 1440 x 900 @ 60Hz (19" wide panel models) OR Input Signal Out of Range. Change Settings to... is off . Press any key on the front panel. Press the Menu button to adjust the horizontal or vertical position of the monitor is displayed on page 32). Restart the computer so that the computer power is fuzzy or blurred; Select Image Control/Horizontal Position or Vertical Position...
... power button. Video cable is active. The computer's graphics card resolution is displayed on front panel of the image. If this does not correct the image, press the Menu button to 1440 x 900 @ 60Hz (19" wide panel models) OR Input Signal Out of Range. Change Settings to... is off . Press any key on the front panel. Press the Menu button to adjust the horizontal or vertical position of the monitor is displayed on page 32). Restart the computer so that the computer power is fuzzy or blurred; Select Image Control/Horizontal Position or Vertical Position...

