Speaker Installation Guide
Page 1
... constituting an additional warranty. Printed in the express warranty statements accompanying such products and services. For additional support information refer to http:// www.hp.com/support. Speaker Installation Guide 2 HP LD4200 LCD Monitor 3 © Copyright 2009 Hewlett-Packard Development Company, L.P. The information contained herein is subject to change without notice.The only warranties for technical or...
... constituting an additional warranty. Printed in the express warranty statements accompanying such products and services. For additional support information refer to http:// www.hp.com/support. Speaker Installation Guide 2 HP LD4200 LCD Monitor 3 © Copyright 2009 Hewlett-Packard Development Company, L.P. The information contained herein is subject to change without notice.The only warranties for technical or...

HP LD4200 and LD4700 LCD Monitors User Guide
Page 5
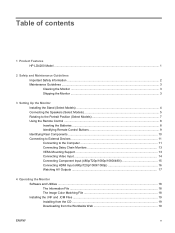
Table of contents 1 Product Features HP Digital Signage Models ...1 2 Safety and Maintenance Guidelines Important Safety Information ...2 Maintenance Guidelines ...3 Cleaning the Monitor ...3 Shipping the Monitor ...3 3 Setting Up the Monitor Installing the Stand (Sold Separately 4 Connecting the Speakers (Sold Separately 6 Rotating to the Portrait Position (Select Models 8 Using the Remote Control ...9 Inserting the Batteries ...9 Identifying Remote Control Buttons...
Table of contents 1 Product Features HP Digital Signage Models ...1 2 Safety and Maintenance Guidelines Important Safety Information ...2 Maintenance Guidelines ...3 Cleaning the Monitor ...3 Shipping the Monitor ...3 3 Setting Up the Monitor Installing the Stand (Sold Separately 4 Connecting the Speakers (Sold Separately 6 Rotating to the Portrait Position (Select Models 8 Using the Remote Control ...9 Inserting the Batteries ...9 Identifying Remote Control Buttons...

HP LD4200 and LD4700 LCD Monitors User Guide
Page 7
...(Command : m c 52 20. Tile Mode (Command : d d 53 21. Tile V Position (Command : d f 54 23. Natural Mode (In Tilemode) (Command : d j 55 27. Speaker (Command : d v 57 32. Language (Command : f i 62 41. Reset (Command : f k 62 43. S/W Version (Command : f z 63 44. Input Select (Command : x ...only 49 12. Tile V Size (Command : d h 54 25. Tile H Position (Command : d e 53 22. DPM Select (Command : f j 62 42. Abnormal state (Command : z 51 17. Lamp fault Check (Command : d p 56 30. Color Temperature (Command : u)v 51 16. Tint (Command : j) (Video only 49 ...
...(Command : m c 52 20. Tile Mode (Command : d d 53 21. Tile V Position (Command : d f 54 23. Natural Mode (In Tilemode) (Command : d j 55 27. Speaker (Command : d v 57 32. Language (Command : f i 62 41. Reset (Command : f k 62 43. S/W Version (Command : f z 63 44. Input Select (Command : x ...only 49 12. Tile V Size (Command : d h 54 25. Tile H Position (Command : d e 53 22. DPM Select (Command : f j 62 42. Abnormal state (Command : z 51 17. Lamp fault Check (Command : d p 56 30. Color Temperature (Command : u)v 51 16. Tint (Command : j) (Video only 49 ...

HP LD4200 and LD4700 LCD Monitors User Guide
Page 9
The monitors feature: ● LD4200 model, 106.7 cm (42-inch) widescreen diagonal viewable area display with 1920 x 1080 native resolution ● LD4700 model, 119.28 cm (47-inch) widescreen diagonal ... Optional stand with cable management feature to position monitor on a desktop or table ● Optional mounting speakers ● Optional Thin Client mounting adapter plate ● Software and documentation CD provided ENWW HP Digital Signage Models 1 1 Product Features HP Digital Signage Models The HP LCD digital signage monitors have a wide aspect active matrix thin-film transistor...
The monitors feature: ● LD4200 model, 106.7 cm (42-inch) widescreen diagonal viewable area display with 1920 x 1080 native resolution ● LD4700 model, 119.28 cm (47-inch) widescreen diagonal ... Optional stand with cable management feature to position monitor on a desktop or table ● Optional mounting speakers ● Optional Thin Client mounting adapter plate ● Software and documentation CD provided ENWW HP Digital Signage Models 1 1 Product Features HP Digital Signage Models The HP LCD digital signage monitors have a wide aspect active matrix thin-film transistor...

HP LD4200 and LD4700 LCD Monitors User Guide
Page 10
..., desks, speakers, chests, or carts may accidentally step on the Web at all times. • Disconnect power from the electrical outlet. Do not pull on page 69. WARNING! LCD monitors that no one is included with the monitor. 2 Safety and Maintenance Guidelines Important Safety Information A power cord is included with the monitor. For your HP LCD monitor. To...
..., desks, speakers, chests, or carts may accidentally step on the Web at all times. • Disconnect power from the electrical outlet. Do not pull on page 69. WARNING! LCD monitors that no one is included with the monitor. 2 Safety and Maintenance Guidelines Important Safety Information A power cord is included with the monitor. For your HP LCD monitor. To...
HP LD4200 and LD4700 LCD Monitors User Guide
Page 14
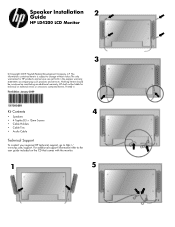
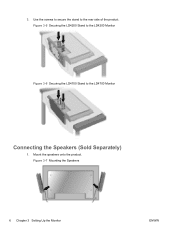
Mount the speakers onto the product. 3. Figure 3-7 Mounting the Speakers 6 Chapter 3 Setting Up the Monitor ENWW Use the screws to secure the stand to the LD4700 Monitor Connecting the Speakers (Sold Separately) 1. Figure 3-5 Securing the LD4200 Stand to the LD4200 Monitor Figure 3-6 Securing the LD4700 Stand to the rear side of the product.
Mount the speakers onto the product. 3. Figure 3-7 Mounting the Speakers 6 Chapter 3 Setting Up the Monitor ENWW Use the screws to secure the stand to the LD4700 Monitor Connecting the Speakers (Sold Separately) 1. Figure 3-5 Securing the LD4200 Stand to the LD4200 Monitor Figure 3-6 Securing the LD4700 Stand to the rear side of the product.

HP LD4200 and LD4700 LCD Monitors User Guide
Page 15
After installing the speakers, use the cable holders and cable ties (available on Select Models) ENWW Connecting the Speakers (Sold Separately) 7 Use the four Taptite D3 x 12mm screws to secure the speakers to the Monitor 3. Figure 3-9 Using the Cable Holders (Feature Available on Select Models) Figure 3-10 Using the Cable Ties (Feature Available on select models) to organize the speaker cables. Figure 3-8 Securing the Speakers to the monitor. 2.
After installing the speakers, use the cable holders and cable ties (available on Select Models) ENWW Connecting the Speakers (Sold Separately) 7 Use the four Taptite D3 x 12mm screws to secure the speakers to the Monitor 3. Figure 3-9 Using the Cable Holders (Feature Available on Select Models) Figure 3-10 Using the Cable Ties (Feature Available on select models) to organize the speaker cables. Figure 3-8 Securing the Speakers to the monitor. 2.
HP LD4200 and LD4700 LCD Monitors User Guide
Page 16
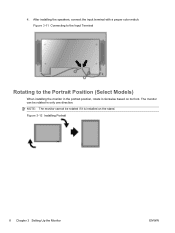
NOTE: The monitor cannot be rotated in the portrait position, rotate it is installed on its front. After installing the speakers, connect the input terminal with a proper color match. Figure 3-12 Installing Portrait 8 Chapter 3 Setting Up the Monitor ENWW The monitor can be rotated if it clockwise based on the stand. 4. Figure 3-11 Connecting to the Input Terminal Rotating to the Portrait Position (Select Models) When installing the monitor in only one direction.
NOTE: The monitor cannot be rotated in the portrait position, rotate it is installed on its front. After installing the speakers, connect the input terminal with a proper color match. Figure 3-12 Installing Portrait 8 Chapter 3 Setting Up the Monitor ENWW The monitor can be rotated if it clockwise based on the stand. 4. Figure 3-11 Connecting to the Input Terminal Rotating to the Portrait Position (Select Models) When installing the monitor in only one direction.

HP LD4200 and LD4700 LCD Monitors User Guide
Page 19
... cable to the line-out jack of the PC sound card Connects a wired remote control to the monitor Connects the video and audio equipment to the monitor Connects the speakers to the monitor NOTE: The line-out terminal is checked before connecting. If the Audio Out of the program. Component...connector 2 RS-232C serial ports 3 RGB PC, HDMI/DVI Ports 4 PC Sound Jack 5 Wired Remote Control Port 6 AV Ports 7 Speaker Ports Function Connects the AC power cord to the monitor Connects to select a menu item or save changes. Be sure the connecting terminal of the PC sound card has only...
... cable to the line-out jack of the PC sound card Connects a wired remote control to the monitor Connects the video and audio equipment to the monitor Connects the speakers to the monitor NOTE: The line-out terminal is checked before connecting. If the Audio Out of the program. Component...connector 2 RS-232C serial ports 3 RGB PC, HDMI/DVI Ports 4 PC Sound Jack 5 Wired Remote Control Port 6 AV Ports 7 Speaker Ports Function Connects the AC power cord to the monitor Connects to select a menu item or save changes. Be sure the connecting terminal of the PC sound card has only...
HP LD4200 and LD4700 LCD Monitors User Guide
Page 34
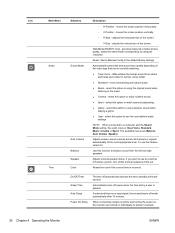
... the vertical size of the screen. ◦ V-Size - When connecting multiple monitors and turning the power on, the monitors are Balance, Auto Volume, Speaker. XGA Mode (RGB-PC only) - Adjusts internal speaker status. select this option to the most commanding and natural audio. ● ...settings. Automatically selects the best sound tone quality depending on individually to off the internal speakers of the set switches to prevent overload. 26 Chapter 4 Operating the Monitor ENWW moves the screen position vertically. ◦ H-Size - select this feature select On...
... the vertical size of the screen. ◦ V-Size - When connecting multiple monitors and turning the power on, the monitors are Balance, Auto Volume, Speaker. XGA Mode (RGB-PC only) - Adjusts internal speaker status. select this option to the most commanding and natural audio. ● ...settings. Automatically selects the best sound tone quality depending on individually to off the internal speakers of the set switches to prevent overload. 26 Chapter 4 Operating the Monitor ENWW moves the screen position vertically. ◦ H-Size - select this feature select On...

HP LD4200 and LD4700 LCD Monitors User Guide
Page 43
...HP LD4200 LCD Monitor Table B-1 HP LD4200 Specifications Display Type Viewable Image Size Pixel Pitch Maximum Weight Without Stand & Speaker With Speaker With Stand With Stand & Speaker Dimensions (Without Stand & Speaker) Height Depth Width Dimensions (With Speaker) Height Depth Width Dimensions (With Stand) Height Depth Width 106.73 cm TFT LCD...cm 99.56 cm 42 inches 42-inch diagonal 46.7 lbs. 48.3 lbs. 54.0 lbs. 55.7 lbs. 23.1 inches 4.5 inches 39.2 inches 23.1 inches 4.9 inches 39.2 inches 26.6 inches 11.5 inches 39.2 inches ENWW HP LD4200 LCD Monitor 35 Performance specifications ...
...HP LD4200 LCD Monitor Table B-1 HP LD4200 Specifications Display Type Viewable Image Size Pixel Pitch Maximum Weight Without Stand & Speaker With Speaker With Stand With Stand & Speaker Dimensions (Without Stand & Speaker) Height Depth Width Dimensions (With Speaker) Height Depth Width Dimensions (With Stand) Height Depth Width 106.73 cm TFT LCD...cm 99.56 cm 42 inches 42-inch diagonal 46.7 lbs. 48.3 lbs. 54.0 lbs. 55.7 lbs. 23.1 inches 4.5 inches 39.2 inches 23.1 inches 4.9 inches 39.2 inches 26.6 inches 11.5 inches 39.2 inches ENWW HP LD4200 LCD Monitor 35 Performance specifications ...
HP LD4200 and LD4700 LCD Monitors User Guide
Page 44
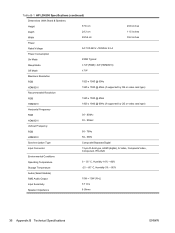
Table B-1 HP LD4200 Specifications (continued) Dimensions (With Stand & Speaker) Height 67.6 cm 26.6 inches Depth 29.3 cm 11.5 inches Width 99.56 cm 39.2 inches Power Rated Voltage AC 100-240V ~50/60Hz 2.2 A Power ... Operating Temperature 0 ~ 35° C, Humidity 10% ~ 80% Storage Temperature -20 ~ 60° C, Humidity 5% ~ 90% Audio (Select Models) RMS Audio Output 10W + 10W (R+L) Input Sensitivity 0.7 rms Speaker Impedance 8 Ohms 36 Appendix B Technical Specifications ENWW
Table B-1 HP LD4200 Specifications (continued) Dimensions (With Stand & Speaker) Height 67.6 cm 26.6 inches Depth 29.3 cm 11.5 inches Width 99.56 cm 39.2 inches Power Rated Voltage AC 100-240V ~50/60Hz 2.2 A Power ... Operating Temperature 0 ~ 35° C, Humidity 10% ~ 80% Storage Temperature -20 ~ 60° C, Humidity 5% ~ 90% Audio (Select Models) RMS Audio Output 10W + 10W (R+L) Input Sensitivity 0.7 rms Speaker Impedance 8 Ohms 36 Appendix B Technical Specifications ENWW
HP LD4200 and LD4700 LCD Monitors User Guide
Page 45
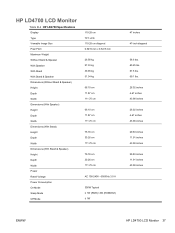
HP LD4700 LCD Monitor Table B-2 HP LD4700 Specifications Display Type Viewable Image Size Pixel Pitch Maximum Weight Without Stand & Speaker With Speaker With Stand With Stand & Speaker Dimensions (Without Stand & Speaker) Height Depth Width Dimensions (With Speaker) Height Depth Width Dimensions (With Stand) Height Depth Width Dimensions (With Stand & Speaker) Height Depth Width Power Rated Voltage Power Consumption On Mode Sleep... inches 4.67 inches 43.98 inches 29.83 inches 11.91 inches 43.98 inches 29.83 inches 11.91 inches 43.98 inches ENWW HP LD4700 LCD Monitor 37
HP LD4700 LCD Monitor Table B-2 HP LD4700 Specifications Display Type Viewable Image Size Pixel Pitch Maximum Weight Without Stand & Speaker With Speaker With Stand With Stand & Speaker Dimensions (Without Stand & Speaker) Height Depth Width Dimensions (With Speaker) Height Depth Width Dimensions (With Stand) Height Depth Width Dimensions (With Stand & Speaker) Height Depth Width Power Rated Voltage Power Consumption On Mode Sleep... inches 4.67 inches 43.98 inches 29.83 inches 11.91 inches 43.98 inches 29.83 inches 11.91 inches 43.98 inches ENWW HP LD4700 LCD Monitor 37

HP LD4200 and LD4700 LCD Monitors User Guide
Page 51
...Mode (In Tile mode) 27. Lamp fault check 30. Auto Sleep 39. Power On Delay 40. Language 41. range : 01H~63H. Elapsed time return 28. Speaker 32. Off Timer (On/Off Timer) Time 37. by setting '00H', server can control all sets will send the ack message, so it should not... the same time, it 's impossible the check the whole ack messages. Time 33. On Timer (On/Off Timer) Time 36. Sleep Time 38. DPM Select 42. S/W Version 44. ENWW Transmission / Receiving Protocol 43 Reset 43. Off Timer (On/Off Timer) On, Off 35. Because all products. * In case of product....
...Mode (In Tile mode) 27. Lamp fault check 30. Auto Sleep 39. Power On Delay 40. Language 41. range : 01H~63H. Elapsed time return 28. Speaker 32. Off Timer (On/Off Timer) Time 37. by setting '00H', server can control all sets will send the ack message, so it should not... the same time, it 's impossible the check the whole ack messages. Time 33. On Timer (On/Off Timer) Time 36. Sleep Time 38. DPM Select 42. S/W Version 44. ENWW Transmission / Receiving Protocol 43 Reset 43. Off Timer (On/Off Timer) On, Off 35. Because all products. * In case of product....

HP LD4200 and LD4700 LCD Monitors User Guide
Page 65
Speaker (Command : d v) Turn the speaker on or off. Transmission [d][v][][Set ID][][Data][Cr] Data 0 : Off 1 : On Acknowledgement [v][][Set ID][][OK/NG][Data][x] 32. 31. Transmission [f][a][][Set ID][][Data1][][Data2][][Data3][Cr] [Data1] 0 : Monday 1 : Tuesday 2 : Wednesday 3 : Thursday 4 : Friday 5 : Saturday 6 : Sunday [Data2] 0H~17H (Hours) [Data3] 00H~3BH (Minutes) Acknowledgement [a][][Set ID][][OK/NG][Data1][Data2][Data3][x] ENWW Transmission / Receiving Protocol 57 Time (Command : f a) Set the current time.
Speaker (Command : d v) Turn the speaker on or off. Transmission [d][v][][Set ID][][Data][Cr] Data 0 : Off 1 : On Acknowledgement [v][][Set ID][][OK/NG][Data][x] 32. 31. Transmission [f][a][][Set ID][][Data1][][Data2][][Data3][Cr] [Data1] 0 : Monday 1 : Tuesday 2 : Wednesday 3 : Thursday 4 : Friday 5 : Saturday 6 : Sunday [Data2] 0H~17H (Hours) [Data3] 00H~3BH (Minutes) Acknowledgement [a][][Set ID][][OK/NG][Data1][Data2][Data3][x] ENWW Transmission / Receiving Protocol 57 Time (Command : f a) Set the current time.
HP LD4200 LCD Monitor User Guide
Page 5
Table of contents 1 Product Features HP LD4200 Model ...1 2 Safety and Maintenance Guidelines Important Safety Information ...2 Maintenance Guidelines ...3 Cleaning the Monitor ...3 Shipping the Monitor ...3 3 Setting Up the Monitor Installing the Stand (Select Models) ...4 Connecting the Speakers (Select Models 5 Rotating to the Portrait Position (Select Models 7 Using the Remote Control ...8 Inserting the Batteries ...8 Identifying Remote Control Buttons 9 Identifying Rear...
Table of contents 1 Product Features HP LD4200 Model ...1 2 Safety and Maintenance Guidelines Important Safety Information ...2 Maintenance Guidelines ...3 Cleaning the Monitor ...3 Shipping the Monitor ...3 3 Setting Up the Monitor Installing the Stand (Select Models) ...4 Connecting the Speakers (Select Models 5 Rotating to the Portrait Position (Select Models 7 Using the Remote Control ...8 Inserting the Batteries ...8 Identifying Remote Control Buttons 9 Identifying Rear...

HP LD4200 LCD Monitor User Guide
Page 7
...: k) (Video only 46 12. Abnomal state (Command : z 48 17. Tile Mode (Command : d d 50 21. Tile V Position (Command : d f 51 23. Tile ID Set (Command : d i 51 26. Speaker (Command : d v 54 32. Power On Delay (Command : f h 58 40. Key (Command : m c 49 20. Tile H Size (Command : d g 51 24. Auto volume (Command : d u 53 31.... (On/Off Timer) On, Off (Command : F b 55 34. Off Timer (On/Off Timer) On, Off (Command : f c 55 35. DPM Select (Command : f j 59 42. Balance (Command : t 47 15. Tint (Command : j) (Video only 46 11. Reset (Command : f k 59 43.
...: k) (Video only 46 12. Abnomal state (Command : z 48 17. Tile Mode (Command : d d 50 21. Tile V Position (Command : d f 51 23. Tile ID Set (Command : d i 51 26. Speaker (Command : d v 54 32. Power On Delay (Command : f h 58 40. Key (Command : m c 49 20. Tile H Size (Command : d g 51 24. Auto volume (Command : d u 53 31.... (On/Off Timer) On, Off (Command : F b 55 34. Off Timer (On/Off Timer) On, Off (Command : f c 55 35. DPM Select (Command : f j 59 42. Balance (Command : t 47 15. Tint (Command : j) (Video only 46 11. Reset (Command : f k 59 43.

HP LD4200 LCD Monitor User Guide
Page 9
The monitor features: ● 106.7 cm (42-inch) widescreen diagonal viewable area display with 1920 x 1080 native resolution ● Wide viewing angle up to 178° horizontal and 178°...hole pattern ● Optional stand with cable management feature to position monitor on a desktop or table ● Optional mounting speakers ● Optional Thin Client mounting adapter plate ● Software and documentation CD provided ENWW HP LD4200 Model 1 1 Product Features HP LD4200 Model The HP LD4200 LCD digital signage monitor has a wide aspect active matrix thin-film transistor (TFT) panel...
The monitor features: ● 106.7 cm (42-inch) widescreen diagonal viewable area display with 1920 x 1080 native resolution ● Wide viewing angle up to 178° horizontal and 178°...hole pattern ● Optional stand with cable management feature to position monitor on a desktop or table ● Optional mounting speakers ● Optional Thin Client mounting adapter plate ● Software and documentation CD provided ENWW HP LD4200 Model 1 1 Product Features HP LD4200 Model The HP LD4200 LCD digital signage monitor has a wide aspect active matrix thin-film transistor (TFT) panel...
HP LD4200 LCD Monitor User Guide
Page 10
... route all power cords for the computer and its peripheral devices (such as a power strip or Uninterruptible Power Supply (UPS). LCD monitors that no one is easily accessible at http://www.hp.com/ergo and/or on the correct power cord set to use only a power source and connection appropriate for computer users..., or tripped over. 2 Chapter 2 Safety and Maintenance Guidelines ENWW For information on the documentation CD, if one may accidentally step on dressers, bookcases, shelves, desks, speakers, chests, or carts may fall over them.
... route all power cords for the computer and its peripheral devices (such as a power strip or Uninterruptible Power Supply (UPS). LCD monitors that no one is easily accessible at http://www.hp.com/ergo and/or on the correct power cord set to use only a power source and connection appropriate for computer users..., or tripped over. 2 Chapter 2 Safety and Maintenance Guidelines ENWW For information on the documentation CD, if one may accidentally step on dressers, bookcases, shelves, desks, speakers, chests, or carts may fall over them.

HP LD4200 LCD Monitor User Guide
Page 13
Mount the speakers onto the product. Figure 3-3 Securing the Stand to the monitor. Use the four Taptite D3 x 12mm screws to secure the speakers to the Monitor Connecting the Speakers (Select Models) 1. 3. Figure 3-4 Mounting the Speakers 2. Use the screws to secure the stand to the Monitor ENWW Connecting the Speakers (Select Models) 5 Figure 3-5 Securing the Speakers to the rear side of the product.
Mount the speakers onto the product. Figure 3-3 Securing the Stand to the monitor. Use the four Taptite D3 x 12mm screws to secure the speakers to the Monitor Connecting the Speakers (Select Models) 1. 3. Figure 3-4 Mounting the Speakers 2. Use the screws to secure the stand to the Monitor ENWW Connecting the Speakers (Select Models) 5 Figure 3-5 Securing the Speakers to the rear side of the product.


