Speaker Installation Guide
Page 1
Speaker Installation Guide 2 HP LD4200 LCD Monitor 3 © Copyright 2009 Hewlett-Packard Development Company, L.P. HP shall not be construed as constituting an additional warranty. Nothing herein should be liable for HP products and services are set forth in First Edition: January 2009 Kit Contents 4 • Speakers • 4 Taptite D3 x 12mm Screws • Cable Holders • Cable Ties • Audio...
Speaker Installation Guide 2 HP LD4200 LCD Monitor 3 © Copyright 2009 Hewlett-Packard Development Company, L.P. HP shall not be construed as constituting an additional warranty. Nothing herein should be liable for HP products and services are set forth in First Edition: January 2009 Kit Contents 4 • Speakers • 4 Taptite D3 x 12mm Screws • Cable Holders • Cable Ties • Audio...

HP LD4200 and LD4700 LCD Monitors User Guide
Page 5
Table of contents 1 Product Features HP Digital Signage Models ...1 2 Safety and Maintenance Guidelines Important Safety Information ...2 Maintenance Guidelines ...3 Cleaning the Monitor ...3 Shipping the Monitor ...3 3 Setting Up the Monitor Installing the Stand (Sold Separately 4 Connecting the Speakers (Sold Separately 6 Rotating to the Portrait Position (Select Models 8 Using the Remote Control ...9 Inserting the Batteries ...9 Identifying Remote Control Buttons...
Table of contents 1 Product Features HP Digital Signage Models ...1 2 Safety and Maintenance Guidelines Important Safety Information ...2 Maintenance Guidelines ...3 Cleaning the Monitor ...3 Shipping the Monitor ...3 3 Setting Up the Monitor Installing the Stand (Sold Separately 4 Connecting the Speakers (Sold Separately 6 Rotating to the Portrait Position (Select Models 8 Using the Remote Control ...9 Inserting the Batteries ...9 Identifying Remote Control Buttons...

HP LD4200 and LD4700 LCD Monitors User Guide
Page 7
Tile H Size (Command : d g 54 24. Off Timer (On/Off Timer) On, Off (Command : f c 58 35. DPM Select (Command : f j 62 42. 09. Color (Command : i) (Video only 48 10. Remote Lock /Key Lock (Command : m 50 14. Abnormal state (Command : z 51 17. Tile V Position (Command : d... Code ...65 Repeat Code ...65 Bit Description 65 Frame Interval: Tf 65 ENWW vii Tint (Command : j) (Video only 49 11. Auto volume (Command : d u 56 31. Speaker (Command : d v 57 32. On Timer (On/Off Timer) On, Off (Command : F b 58 34. Auto Sleep (Command : f g 61 39. Balance (Command : t ...
Tile H Size (Command : d g 54 24. Off Timer (On/Off Timer) On, Off (Command : f c 58 35. DPM Select (Command : f j 62 42. 09. Color (Command : i) (Video only 48 10. Remote Lock /Key Lock (Command : m 50 14. Abnormal state (Command : z 51 17. Tile V Position (Command : d... Code ...65 Repeat Code ...65 Bit Description 65 Frame Interval: Tf 65 ENWW vii Tint (Command : j) (Video only 49 11. Auto volume (Command : d u 56 31. Speaker (Command : d v 57 32. On Timer (On/Off Timer) On, Off (Command : F b 58 34. Auto Sleep (Command : f g 61 39. Balance (Command : t ...

HP LD4200 and LD4700 LCD Monitors User Guide
Page 9
The monitors feature: ● LD4200 model, 106.7 cm (42-inch) widescreen diagonal viewable area display with 1920 x 1080 native resolution ● LD4700 model, 119.28 cm (47-inch) widescreen diagonal ... Optional stand with cable management feature to position monitor on a desktop or table ● Optional mounting speakers ● Optional Thin Client mounting adapter plate ● Software and documentation CD provided ENWW HP Digital Signage Models 1 1 Product Features HP Digital Signage Models The HP LCD digital signage monitors have a wide aspect active matrix thin-film transistor...
The monitors feature: ● LD4200 model, 106.7 cm (42-inch) widescreen diagonal viewable area display with 1920 x 1080 native resolution ● LD4700 model, 119.28 cm (47-inch) widescreen diagonal ... Optional stand with cable management feature to position monitor on a desktop or table ● Optional mounting speakers ● Optional Thin Client mounting adapter plate ● Software and documentation CD provided ENWW HP Digital Signage Models 1 1 Product Features HP Digital Signage Models The HP LCD digital signage monitors have a wide aspect active matrix thin-film transistor...

HP LD4200 and LD4700 LCD Monitors User Guide
Page 10
... this ability. This guide is located on the Web at all cords and cables connected to the LCD monitor so that are inappropriately situated on dressers, bookcases, shelves, desks, speakers, chests, or carts may accidentally step on page 69. 2 Safety and Maintenance Guidelines Important Safety... and cause personal injury. Not all power cords for computer users, and provides important electrical and mechanical safety information. For your HP LCD monitor. It describes proper workstation, setup, posture, and health and work habits for the computer and its peripheral devices (such as ...
... this ability. This guide is located on the Web at all cords and cables connected to the LCD monitor so that are inappropriately situated on dressers, bookcases, shelves, desks, speakers, chests, or carts may accidentally step on page 69. 2 Safety and Maintenance Guidelines Important Safety... and cause personal injury. Not all power cords for computer users, and provides important electrical and mechanical safety information. For your HP LCD monitor. It describes proper workstation, setup, posture, and health and work habits for the computer and its peripheral devices (such as ...
HP LD4200 and LD4700 LCD Monitors User Guide
Page 14
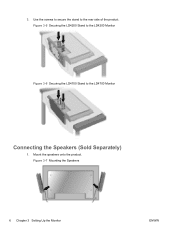
Mount the speakers onto the product. Figure 3-5 Securing the LD4200 Stand to the LD4200 Monitor Figure 3-6 Securing the LD4700 Stand to the rear side of the product. 3. Figure 3-7 Mounting the Speakers 6 Chapter 3 Setting Up the Monitor ENWW Use the screws to secure the stand to the LD4700 Monitor Connecting the Speakers (Sold Separately) 1.
Mount the speakers onto the product. Figure 3-5 Securing the LD4200 Stand to the LD4200 Monitor Figure 3-6 Securing the LD4700 Stand to the rear side of the product. 3. Figure 3-7 Mounting the Speakers 6 Chapter 3 Setting Up the Monitor ENWW Use the screws to secure the stand to the LD4700 Monitor Connecting the Speakers (Sold Separately) 1.

HP LD4200 and LD4700 LCD Monitors User Guide
Page 15
2. Use the four Taptite D3 x 12mm screws to secure the speakers to the Monitor 3. Figure 3-8 Securing the Speakers to the monitor. Figure 3-9 Using the Cable Holders (Feature Available on Select Models) Figure 3-10 Using the Cable Ties (Feature Available on select models) to organize the speaker cables. After installing the speakers, use the cable holders and cable ties (available on Select Models) ENWW Connecting the Speakers (Sold Separately) 7
2. Use the four Taptite D3 x 12mm screws to secure the speakers to the Monitor 3. Figure 3-8 Securing the Speakers to the monitor. Figure 3-9 Using the Cable Holders (Feature Available on Select Models) Figure 3-10 Using the Cable Ties (Feature Available on select models) to organize the speaker cables. After installing the speakers, use the cable holders and cable ties (available on Select Models) ENWW Connecting the Speakers (Sold Separately) 7
HP LD4200 and LD4700 LCD Monitors User Guide
Page 16
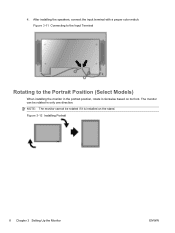
4. NOTE: The monitor cannot be rotated in the portrait position, rotate it is installed on its front. Figure 3-11 Connecting to the Input Terminal Rotating to the Portrait Position (Select Models) When installing the monitor in only one direction. The monitor can be rotated if it clockwise based on the stand. After installing the speakers, connect the input terminal with a proper color match. Figure 3-12 Installing Portrait 8 Chapter 3 Setting Up the Monitor ENWW
4. NOTE: The monitor cannot be rotated in the portrait position, rotate it is installed on its front. Figure 3-11 Connecting to the Input Terminal Rotating to the Portrait Position (Select Models) When installing the monitor in only one direction. The monitor can be rotated if it clockwise based on the stand. After installing the speakers, connect the input terminal with a proper color match. Figure 3-12 Installing Portrait 8 Chapter 3 Setting Up the Monitor ENWW

HP LD4200 and LD4700 LCD Monitors User Guide
Page 19
... connecting. Be sure the connecting terminal of the PC sound card Connects a wired remote control to the monitor Connects the video and audio equipment to the monitor Connects the speakers to the speaker, including a built-in the user guide could be different from the actual image) Component 1 Power connector... 4 PC Sound Jack 5 Wired Remote Control Port 6 AV Ports 7 Speaker Ports Function Connects the AC power cord to the monitor Connects to Line Out using the card jumper of the PC sound card has only Speaker Out, reduce the PC volume. If the Audio Out of the program...
... connecting. Be sure the connecting terminal of the PC sound card Connects a wired remote control to the monitor Connects the video and audio equipment to the monitor Connects the speakers to the speaker, including a built-in the user guide could be different from the actual image) Component 1 Power connector... 4 PC Sound Jack 5 Wired Remote Control Port 6 AV Ports 7 Speaker Ports Function Connects the AC power cord to the monitor Connects to Line Out using the card jumper of the PC sound card has only Speaker Out, reduce the PC volume. If the Audio Out of the program...
HP LD4200 and LD4700 LCD Monitors User Guide
Page 34
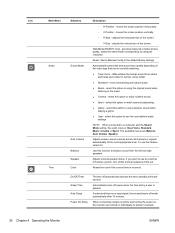
...9679; User - select this option to prevent overload. 26 Chapter 4 Operating the Monitor ENWW select this feature select On. Icon Main Menu Audio Time Submenu Sound Mode Auto Volume Balance Speaker Clock Description ◦ H-Position - Automatically selects the best sound tone quality depending ... - Use this option to the most commanding and natural audio. ● Music - When connecting multiple monitors and turning the power on, the monitors are Balance, Auto Volume, Speaker. Reset: returns Manual Config to the music. ● Cinema - To use this option to use ...
...9679; User - select this option to prevent overload. 26 Chapter 4 Operating the Monitor ENWW select this feature select On. Icon Main Menu Audio Time Submenu Sound Mode Auto Volume Balance Speaker Clock Description ◦ H-Position - Automatically selects the best sound tone quality depending ... - Use this option to the most commanding and natural audio. ● Music - When connecting multiple monitors and turning the power on, the monitors are Balance, Auto Volume, Speaker. Reset: returns Manual Config to the music. ● Cinema - To use this option to use ...

HP LD4200 and LD4700 LCD Monitors User Guide
Page 43
...HP LD4200 LCD Monitor Table B-1 HP LD4200 Specifications Display Type Viewable Image Size Pixel Pitch Maximum Weight Without Stand & Speaker With Speaker With Stand With Stand & Speaker Dimensions (Without Stand & Speaker) Height Depth Width Dimensions (With Speaker) Height Depth Width Dimensions (With Stand) Height Depth Width 106.73 cm TFT LCD...cm 99.56 cm 42 inches 42-inch diagonal 46.7 lbs. 48.3 lbs. 54.0 lbs. 55.7 lbs. 23.1 inches 4.5 inches 39.2 inches 23.1 inches 4.9 inches 39.2 inches 26.6 inches 11.5 inches 39.2 inches ENWW HP LD4200 LCD Monitor 35 Performance specifications ...
...HP LD4200 LCD Monitor Table B-1 HP LD4200 Specifications Display Type Viewable Image Size Pixel Pitch Maximum Weight Without Stand & Speaker With Speaker With Stand With Stand & Speaker Dimensions (Without Stand & Speaker) Height Depth Width Dimensions (With Speaker) Height Depth Width Dimensions (With Stand) Height Depth Width 106.73 cm TFT LCD...cm 99.56 cm 42 inches 42-inch diagonal 46.7 lbs. 48.3 lbs. 54.0 lbs. 55.7 lbs. 23.1 inches 4.5 inches 39.2 inches 23.1 inches 4.9 inches 39.2 inches 26.6 inches 11.5 inches 39.2 inches ENWW HP LD4200 LCD Monitor 35 Performance specifications ...
HP LD4200 and LD4700 LCD Monitors User Guide
Page 44
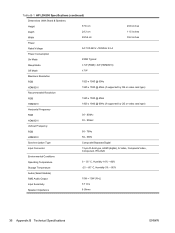
Table B-1 HP LD4200 Specifications (continued) Dimensions (With Stand & Speaker) Height 67.6 cm 26.6 inches Depth 29.3 cm 11.5 inches Width 99.56 cm 39.2 inches Power Rated Voltage AC 100-240V ~50/60Hz 2.2 A Power ... Operating Temperature 0 ~ 35° C, Humidity 10% ~ 80% Storage Temperature -20 ~ 60° C, Humidity 5% ~ 90% Audio (Select Models) RMS Audio Output 10W + 10W (R+L) Input Sensitivity 0.7 rms Speaker Impedance 8 Ohms 36 Appendix B Technical Specifications ENWW
Table B-1 HP LD4200 Specifications (continued) Dimensions (With Stand & Speaker) Height 67.6 cm 26.6 inches Depth 29.3 cm 11.5 inches Width 99.56 cm 39.2 inches Power Rated Voltage AC 100-240V ~50/60Hz 2.2 A Power ... Operating Temperature 0 ~ 35° C, Humidity 10% ~ 80% Storage Temperature -20 ~ 60° C, Humidity 5% ~ 90% Audio (Select Models) RMS Audio Output 10W + 10W (R+L) Input Sensitivity 0.7 rms Speaker Impedance 8 Ohms 36 Appendix B Technical Specifications ENWW
HP LD4200 and LD4700 LCD Monitors User Guide
Page 45
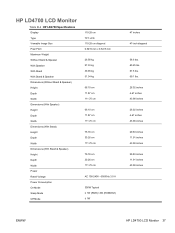
HP LD4700 LCD Monitor Table B-2 HP LD4700 Specifications Display Type Viewable Image Size Pixel Pitch Maximum Weight Without Stand & Speaker With Speaker With Stand With Stand & Speaker Dimensions (Without Stand & Speaker) Height Depth Width Dimensions (With Speaker) Height Depth Width Dimensions (With Stand) Height Depth Width Dimensions (With Stand & Speaker) Height Depth Width Power Rated Voltage Power Consumption On Mode Sleep... inches 4.67 inches 43.98 inches 29.83 inches 11.91 inches 43.98 inches 29.83 inches 11.91 inches 43.98 inches ENWW HP LD4700 LCD Monitor 37
HP LD4700 LCD Monitor Table B-2 HP LD4700 Specifications Display Type Viewable Image Size Pixel Pitch Maximum Weight Without Stand & Speaker With Speaker With Stand With Stand & Speaker Dimensions (Without Stand & Speaker) Height Depth Width Dimensions (With Speaker) Height Depth Width Dimensions (With Stand) Height Depth Width Dimensions (With Stand & Speaker) Height Depth Width Power Rated Voltage Power Consumption On Mode Sleep... inches 4.67 inches 43.98 inches 29.83 inches 11.91 inches 43.98 inches 29.83 inches 11.91 inches 43.98 inches ENWW HP LD4700 LCD Monitor 37

HP LD4200 and LD4700 LCD Monitors User Guide
Page 51
Elapsed time return 28. Speaker 32. Sleep Time 38. Language 41. S/W Version 44. Input Select COMMAND1 COMMAND2 DATA1 d h 00H -64H d i 00H -19H d j 00H -01H d l FFH d n FFH d p FFH d u 00H -01H d v 00H -... all products. * In case of product. 24. Tile ID Set 26. Time 33. Off Timer (On/Off Timer) Time 37. Temperature value 29. DPM Select 42. Auto Volume 31. Off Timer (On/Off Timer) On, Off 35. Natural Mode (In Tile mode) 27. Auto Sleep 39. Lamp fault check 30. On...
Elapsed time return 28. Speaker 32. Sleep Time 38. Language 41. S/W Version 44. Input Select COMMAND1 COMMAND2 DATA1 d h 00H -64H d i 00H -19H d j 00H -01H d l FFH d n FFH d p FFH d u 00H -01H d v 00H -... all products. * In case of product. 24. Tile ID Set 26. Time 33. Off Timer (On/Off Timer) Time 37. Temperature value 29. DPM Select 42. Auto Volume 31. Off Timer (On/Off Timer) On, Off 35. Natural Mode (In Tile mode) 27. Auto Sleep 39. Lamp fault check 30. On...

HP LD4200 and LD4700 LCD Monitors User Guide
Page 65
Transmission [f][a][][Set ID][][Data1][][Data2][][Data3][Cr] [Data1] 0 : Monday 1 : Tuesday 2 : Wednesday 3 : Thursday 4 : Friday 5 : Saturday 6 : Sunday [Data2] 0H~17H (Hours) [Data3] 00H~3BH (Minutes) Acknowledgement [a][][Set ID][][OK/NG][Data1][Data2][Data3][x] ENWW Transmission / Receiving Protocol 57 Speaker (Command : d v) Turn the speaker on or off. Transmission [d][v][][Set ID][][Data][Cr] Data 0 : Off 1 : On Acknowledgement [v][][Set ID][][OK/NG][Data][x] 32. Time (Command : f a) Set the current time. 31.
Transmission [f][a][][Set ID][][Data1][][Data2][][Data3][Cr] [Data1] 0 : Monday 1 : Tuesday 2 : Wednesday 3 : Thursday 4 : Friday 5 : Saturday 6 : Sunday [Data2] 0H~17H (Hours) [Data3] 00H~3BH (Minutes) Acknowledgement [a][][Set ID][][OK/NG][Data1][Data2][Data3][x] ENWW Transmission / Receiving Protocol 57 Speaker (Command : d v) Turn the speaker on or off. Transmission [d][v][][Set ID][][Data][Cr] Data 0 : Off 1 : On Acknowledgement [v][][Set ID][][OK/NG][Data][x] 32. Time (Command : f a) Set the current time. 31.
HP LD4200 LCD Monitor User Guide
Page 5
Table of contents 1 Product Features HP LD4200 Model ...1 2 Safety and Maintenance Guidelines Important Safety Information ...2 Maintenance Guidelines ...3 Cleaning the Monitor ...3 Shipping the Monitor ...3 3 Setting Up the Monitor Installing the Stand (Select Models) ...4 Connecting the Speakers (Select Models 5 Rotating to the Portrait Position (Select Models 7 Using the Remote Control ...8 Inserting the Batteries ...8 Identifying Remote Control Buttons 9 Identifying Rear...
Table of contents 1 Product Features HP LD4200 Model ...1 2 Safety and Maintenance Guidelines Important Safety Information ...2 Maintenance Guidelines ...3 Cleaning the Monitor ...3 Shipping the Monitor ...3 3 Setting Up the Monitor Installing the Stand (Select Models) ...4 Connecting the Speakers (Select Models 5 Rotating to the Portrait Position (Select Models 7 Using the Remote Control ...8 Inserting the Batteries ...8 Identifying Remote Control Buttons 9 Identifying Rear...

HP LD4200 LCD Monitor User Guide
Page 7
...Description 62 Frame Interval: Tf 62 IR Codes Table ...62 ENWW vii Elapsed time return (Command : d l 52 28. Auto volume (Command : d u 53 31. Speaker (Command : d v 54 32. Sleep Time (Command : f f 57 38. Color Temperature (Command : u)v 48 16. Tile V Position (Command : d f... 51 23. Auto Sleep (Command : f g 58 39. DPM Select (Command : f j 59 42. Balance (Command : t 47 15. Natural Mode (In Tilemode) (Command : d j 52 27. Off Timer (On/Off Timer) Time (Command : f e 57 37. Key (Command...
...Description 62 Frame Interval: Tf 62 IR Codes Table ...62 ENWW vii Elapsed time return (Command : d l 52 28. Auto volume (Command : d u 53 31. Speaker (Command : d v 54 32. Sleep Time (Command : f f 57 38. Color Temperature (Command : u)v 48 16. Tile V Position (Command : d f... 51 23. Auto Sleep (Command : f g 58 39. DPM Select (Command : f j 59 42. Balance (Command : t 47 15. Natural Mode (In Tilemode) (Command : d j 52 27. Off Timer (On/Off Timer) Time (Command : f e 57 37. Key (Command...

HP LD4200 LCD Monitor User Guide
Page 9
1 Product Features HP LD4200 Model The HP LD4200 LCD digital signage monitor has a wide aspect active matrix thin-film transistor (TFT) panel. The monitor features: ● 106.7 cm (42-inch) widescreen diagonal viewable area display with 1920 x 1080 native resolution ● Wide viewing angle up to 178° horizontal..., key lock, ISM method and auto config user controls ● PC sound jack, audio ports and speaker ports ● Screen adjustment buttons on the back side of the monitor panel ● On-screen display (OSD) menu in several languages for ease of setup and screen optimization...
1 Product Features HP LD4200 Model The HP LD4200 LCD digital signage monitor has a wide aspect active matrix thin-film transistor (TFT) panel. The monitor features: ● 106.7 cm (42-inch) widescreen diagonal viewable area display with 1920 x 1080 native resolution ● Wide viewing angle up to 178° horizontal..., key lock, ISM method and auto config user controls ● PC sound jack, audio ports and speaker ports ● Screen adjustment buttons on the back side of the monitor panel ● On-screen display (OSD) menu in several languages for ease of setup and screen optimization...
HP LD4200 LCD Monitor User Guide
Page 10
...; Disconnect power from the electrical outlet. WARNING! To reduce the risk of serious injury, read the Safety and Comfort Guide. For your HP LCD monitor. Care should be specifically labeled as a power strip or Uninterruptible Power Supply (UPS). For information on the correct power cord set to...the Power Cord Set Requirements on page 65 in a grounded (earthed) outlet that are inappropriately situated on dressers, bookcases, shelves, desks, speakers, chests, or carts may accidentally step on the documentation CD, if one is located on the Web at all power cords for computer...
...; Disconnect power from the electrical outlet. WARNING! To reduce the risk of serious injury, read the Safety and Comfort Guide. For your HP LCD monitor. Care should be specifically labeled as a power strip or Uninterruptible Power Supply (UPS). For information on the correct power cord set to...the Power Cord Set Requirements on page 65 in a grounded (earthed) outlet that are inappropriately situated on dressers, bookcases, shelves, desks, speakers, chests, or carts may accidentally step on the documentation CD, if one is located on the Web at all power cords for computer...

HP LD4200 LCD Monitor User Guide
Page 13
Figure 3-3 Securing the Stand to the rear side of the product. Figure 3-4 Mounting the Speakers 2. Use the screws to secure the stand to the Monitor Connecting the Speakers (Select Models) 1. Use the four Taptite D3 x 12mm screws to secure the speakers to the Monitor ENWW Connecting the Speakers (Select Models) 5 Mount the speakers onto the product. 3. Figure 3-5 Securing the Speakers to the monitor.
Figure 3-3 Securing the Stand to the rear side of the product. Figure 3-4 Mounting the Speakers 2. Use the screws to secure the stand to the Monitor Connecting the Speakers (Select Models) 1. Use the four Taptite D3 x 12mm screws to secure the speakers to the Monitor ENWW Connecting the Speakers (Select Models) 5 Mount the speakers onto the product. 3. Figure 3-5 Securing the Speakers to the monitor.


