
HP LD4200 and LD4700 LCD Monitors User Guide
Page 5
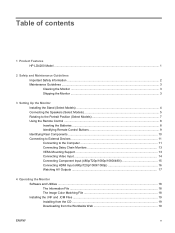
Table of contents 1 Product Features HP Digital Signage Models ...1 2 Safety and Maintenance Guidelines Important Safety Information ...2 Maintenance Guidelines ...3 Cleaning the Monitor ...3 Shipping the Monitor ...3 3 Setting Up the Monitor Installing the Stand (Sold Separately 4 Connecting the Speakers (Sold Separately 6 Rotating to the Portrait Position (Select Models 8 Using the Remote Control ...9 Inserting the Batteries ...9 Identifying Remote Control Buttons...
Table of contents 1 Product Features HP Digital Signage Models ...1 2 Safety and Maintenance Guidelines Important Safety Information ...2 Maintenance Guidelines ...3 Cleaning the Monitor ...3 Shipping the Monitor ...3 3 Setting Up the Monitor Installing the Stand (Sold Separately 4 Connecting the Speakers (Sold Separately 6 Rotating to the Portrait Position (Select Models 8 Using the Remote Control ...9 Inserting the Batteries ...9 Identifying Remote Control Buttons...

HP LD4200 and LD4700 LCD Monitors User Guide
Page 9
1 Product Features HP Digital Signage Models The HP LCD digital signage monitors have a wide aspect active matrix thin-film transistor (TFT) panel. The monitors feature: ● LD4200 model, 106.7 cm (42-inch) widescreen diagonal viewable area display with 1920 x 1080 native resolution ● LD4700 model, ...Security cable provision on rear panel to lock down the monitor and help prevent theft ● Support VESA compliant mounting interface with 600 x 400 hole pattern ● Optional stand with cable management feature to position monitor on a desktop or table ● Optional mounting ...
1 Product Features HP Digital Signage Models The HP LCD digital signage monitors have a wide aspect active matrix thin-film transistor (TFT) panel. The monitors feature: ● LD4200 model, 106.7 cm (42-inch) widescreen diagonal viewable area display with 1920 x 1080 native resolution ● LD4700 model, ...Security cable provision on rear panel to lock down the monitor and help prevent theft ● Support VESA compliant mounting interface with 600 x 400 hole pattern ● Optional stand with cable management feature to position monitor on a desktop or table ● Optional mounting ...
HP LD4200 and LD4700 LCD Monitors User Guide
Page 12
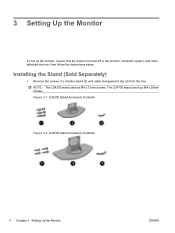
The LD4700 stand uses four M4 x 26mm screws. Remove the screws (1), monitor stand (2) and cable management clip (3) from the box. 3 Setting Up the Monitor To set up the monitor, ensure that the power is turned off to the monitor, computer system, and other attached devices, then follow the instructions below. NOTE: The LD4200 stand uses six M4 x 12mm screws. Installing the Stand (Sold Separately) 1. Figure 3-1 LD4200 Stand Accessory Contents Figure 3-2 LD4700 Stand Accessory Contents 4 Chapter 3 Setting Up the Monitor ENWW
The LD4700 stand uses four M4 x 26mm screws. Remove the screws (1), monitor stand (2) and cable management clip (3) from the box. 3 Setting Up the Monitor To set up the monitor, ensure that the power is turned off to the monitor, computer system, and other attached devices, then follow the instructions below. NOTE: The LD4200 stand uses six M4 x 12mm screws. Installing the Stand (Sold Separately) 1. Figure 3-1 LD4200 Stand Accessory Contents Figure 3-2 LD4700 Stand Accessory Contents 4 Chapter 3 Setting Up the Monitor ENWW

HP LD4200 and LD4700 LCD Monitors User Guide
Page 13
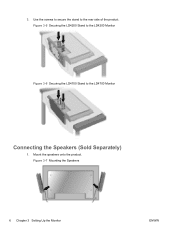
Connect the stand as shown in the following illustrations. Figure 3-3 Sliding the LD4200 Stand Onto the LD4200 Monitor Figure 3-4 Sliding the LD4700 Stand Onto the LD4700 Monitor ENWW Installing the Stand (Sold Separately) 5 Place a soft cloth on the table and place the product with the screen facing downward. 2.
Connect the stand as shown in the following illustrations. Figure 3-3 Sliding the LD4200 Stand Onto the LD4200 Monitor Figure 3-4 Sliding the LD4700 Stand Onto the LD4700 Monitor ENWW Installing the Stand (Sold Separately) 5 Place a soft cloth on the table and place the product with the screen facing downward. 2.
HP LD4200 and LD4700 LCD Monitors User Guide
Page 14
Figure 3-5 Securing the LD4200 Stand to the LD4200 Monitor Figure 3-6 Securing the LD4700 Stand to the rear side of the product. Figure 3-7 Mounting the Speakers 6 Chapter 3 Setting Up the Monitor ENWW Mount the speakers onto the product. Use the screws to secure the stand to the LD4700 Monitor Connecting the Speakers (Sold Separately) 1. 3.
Figure 3-5 Securing the LD4200 Stand to the LD4200 Monitor Figure 3-6 Securing the LD4700 Stand to the rear side of the product. Figure 3-7 Mounting the Speakers 6 Chapter 3 Setting Up the Monitor ENWW Mount the speakers onto the product. Use the screws to secure the stand to the LD4700 Monitor Connecting the Speakers (Sold Separately) 1. 3.
HP LD4200 and LD4700 LCD Monitors User Guide
Page 16
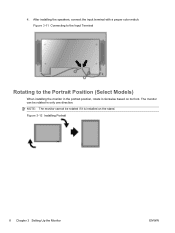
After installing the speakers, connect the input terminal with a proper color match. NOTE: The monitor cannot be rotated in the portrait position, rotate it is installed on its front. Figure 3-11 Connecting to the Input Terminal Rotating to the Portrait Position (Select Models) When installing the monitor in only one direction. Figure 3-12 Installing Portrait 8 Chapter 3 Setting Up the Monitor ENWW 4. The monitor can be rotated if it clockwise based on the stand.
After installing the speakers, connect the input terminal with a proper color match. NOTE: The monitor cannot be rotated in the portrait position, rotate it is installed on its front. Figure 3-11 Connecting to the Input Terminal Rotating to the Portrait Position (Select Models) When installing the monitor in only one direction. Figure 3-12 Installing Portrait 8 Chapter 3 Setting Up the Monitor ENWW 4. The monitor can be rotated if it clockwise based on the stand.

HP LD4200 and LD4700 LCD Monitors User Guide
Page 43
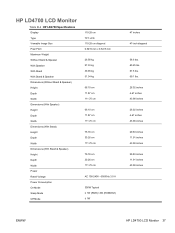
...HP LD4200 LCD Monitor Table B-1 HP LD4200 Specifications Display Type Viewable Image Size Pixel Pitch Maximum Weight Without Stand & Speaker With Speaker With Stand With Stand & Speaker Dimensions (Without Stand & Speaker) Height Depth Width Dimensions (With Speaker) Height Depth Width Dimensions (With Stand) Height Depth Width 106.73 cm TFT LCD...cm 99.56 cm 42 inches 42-inch diagonal 46.7 lbs. 48.3 lbs. 54.0 lbs. 55.7 lbs. 23.1 inches 4.5 inches 39.2 inches 23.1 inches 4.9 inches 39.2 inches 26.6 inches 11.5 inches 39.2 inches ENWW HP LD4200 LCD Monitor 35 Performance specifications ...
...HP LD4200 LCD Monitor Table B-1 HP LD4200 Specifications Display Type Viewable Image Size Pixel Pitch Maximum Weight Without Stand & Speaker With Speaker With Stand With Stand & Speaker Dimensions (Without Stand & Speaker) Height Depth Width Dimensions (With Speaker) Height Depth Width Dimensions (With Stand) Height Depth Width 106.73 cm TFT LCD...cm 99.56 cm 42 inches 42-inch diagonal 46.7 lbs. 48.3 lbs. 54.0 lbs. 55.7 lbs. 23.1 inches 4.5 inches 39.2 inches 23.1 inches 4.9 inches 39.2 inches 26.6 inches 11.5 inches 39.2 inches ENWW HP LD4200 LCD Monitor 35 Performance specifications ...
HP LD4200 and LD4700 LCD Monitors User Guide
Page 45
HP LD4700 LCD Monitor Table B-2 HP LD4700 Specifications Display Type Viewable Image Size Pixel Pitch Maximum Weight Without Stand & Speaker With Speaker With Stand With Stand & Speaker Dimensions (Without Stand & Speaker) Height Depth Width Dimensions (With Speaker) Height Depth Width Dimensions (With Stand) Height Depth Width Dimensions (With Stand & Speaker) Height Depth Width Power Rated Voltage Power Consumption On Mode Sleep... inches 4.67 inches 43.98 inches 29.83 inches 11.91 inches 43.98 inches 29.83 inches 11.91 inches 43.98 inches ENWW HP LD4700 LCD Monitor 37
HP LD4700 LCD Monitor Table B-2 HP LD4700 Specifications Display Type Viewable Image Size Pixel Pitch Maximum Weight Without Stand & Speaker With Speaker With Stand With Stand & Speaker Dimensions (Without Stand & Speaker) Height Depth Width Dimensions (With Speaker) Height Depth Width Dimensions (With Stand) Height Depth Width Dimensions (With Stand & Speaker) Height Depth Width Power Rated Voltage Power Consumption On Mode Sleep... inches 4.67 inches 43.98 inches 29.83 inches 11.91 inches 43.98 inches 29.83 inches 11.91 inches 43.98 inches ENWW HP LD4700 LCD Monitor 37
HP LD4200 and LD4700 LCD Monitors User Guide
Page 59
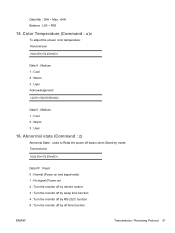
... : Read 0 : Normal (Power on and signal exist) 1 : No signal (Power on) 2 : Turn the monitor off by remote control 3 : Turn the monitor off by sleep time function 4 : Turn the monitor off by RS-232C function 8 : Turn the monitor off by off status when Stand-by mode. Transmission [k][u][ ][Set ID][ ][Data][Cr] Data 0 : Medium 1 : Cool 2 : Warm 3 : User...
... : Read 0 : Normal (Power on and signal exist) 1 : No signal (Power on) 2 : Turn the monitor off by remote control 3 : Turn the monitor off by sleep time function 4 : Turn the monitor off by RS-232C function 8 : Turn the monitor off by off status when Stand-by mode. Transmission [k][u][ ][Set ID][ ][Data][Cr] Data 0 : Medium 1 : Cool 2 : Warm 3 : User...
HP LD4200 LCD Monitor User Guide
Page 5
Table of contents 1 Product Features HP LD4200 Model ...1 2 Safety and Maintenance Guidelines Important Safety Information ...2 Maintenance Guidelines ...3 Cleaning the Monitor ...3 Shipping the Monitor ...3 3 Setting Up the Monitor Installing the Stand (Select Models) ...4 Connecting the Speakers (Select Models 5 Rotating to the Portrait Position (Select Models 7 Using the Remote Control ...8 Inserting the Batteries ...8 Identifying Remote Control Buttons 9 ...
Table of contents 1 Product Features HP LD4200 Model ...1 2 Safety and Maintenance Guidelines Important Safety Information ...2 Maintenance Guidelines ...3 Cleaning the Monitor ...3 Shipping the Monitor ...3 3 Setting Up the Monitor Installing the Stand (Select Models) ...4 Connecting the Speakers (Select Models 5 Rotating to the Portrait Position (Select Models 7 Using the Remote Control ...8 Inserting the Batteries ...8 Identifying Remote Control Buttons 9 ...

HP LD4200 LCD Monitor User Guide
Page 9
1 Product Features HP LD4200 Model The HP LD4200 LCD digital signage monitor has a wide aspect active matrix thin-film transistor (TFT) panel. The monitor features: ● 106.7 cm (42-inch) widescreen diagonal viewable area display with 1920 x 1080 native resolution ● Wide viewing angle... mounting interface with 600 x 400 hole pattern ● Optional stand with cable management feature to position monitor on a desktop or table ● Optional mounting speakers ● Optional Thin Client mounting adapter plate ● Software and documentation CD provided ENWW HP LD4200 Model 1
1 Product Features HP LD4200 Model The HP LD4200 LCD digital signage monitor has a wide aspect active matrix thin-film transistor (TFT) panel. The monitor features: ● 106.7 cm (42-inch) widescreen diagonal viewable area display with 1920 x 1080 native resolution ● Wide viewing angle... mounting interface with 600 x 400 hole pattern ● Optional stand with cable management feature to position monitor on a desktop or table ● Optional mounting speakers ● Optional Thin Client mounting adapter plate ● Software and documentation CD provided ENWW HP LD4200 Model 1

HP LD4200 LCD Monitor User Guide
Page 12
... screws (1), monitor stand (2) and cable management clip (3) from the box. Place a soft cloth on the table and place the product with the screen facing downward. Figure 3-2 Sliding the Stand Onto the Monitor 4 Chapter 3 Setting Up the Monitor ENWW 3 Setting Up the Monitor To set up the monitor, ensure that... the power is turned off to the monitor, computer system, and other attached devices, then follow the ...
... screws (1), monitor stand (2) and cable management clip (3) from the box. Place a soft cloth on the table and place the product with the screen facing downward. Figure 3-2 Sliding the Stand Onto the Monitor 4 Chapter 3 Setting Up the Monitor ENWW 3 Setting Up the Monitor To set up the monitor, ensure that... the power is turned off to the monitor, computer system, and other attached devices, then follow the ...

HP LD4200 LCD Monitor User Guide
Page 13
Mount the speakers onto the product. Figure 3-4 Mounting the Speakers 2. Use the screws to secure the stand to the Monitor Connecting the Speakers (Select Models) 1. Figure 3-3 Securing the Stand to the rear side of the product. Figure 3-5 Securing the Speakers to the monitor. Use the four Taptite D3 x 12mm screws to secure the speakers to the Monitor ENWW Connecting the Speakers (Select Models) 5 3.
Mount the speakers onto the product. Figure 3-4 Mounting the Speakers 2. Use the screws to secure the stand to the Monitor Connecting the Speakers (Select Models) 1. Figure 3-3 Securing the Stand to the rear side of the product. Figure 3-5 Securing the Speakers to the monitor. Use the four Taptite D3 x 12mm screws to secure the speakers to the Monitor ENWW Connecting the Speakers (Select Models) 5 3.

HP LD4200 LCD Monitor User Guide
Page 15
Figure 3-8 Connecting to the Input Terminal Rotating to the Portrait Position (Select Models) 7 NOTE: The monitor cannot be rotated in the portrait position, rotate it is installed on its front. After installing the speakers, connect the input terminal with a proper color match. 4. The monitor can be rotated if it clockwise based on the stand. Figure 3-9 Installing Portrait ENWW Rotating to the Portrait Position (Select Models) When installing the monitor in only one direction.
Figure 3-8 Connecting to the Input Terminal Rotating to the Portrait Position (Select Models) 7 NOTE: The monitor cannot be rotated in the portrait position, rotate it is installed on its front. After installing the speakers, connect the input terminal with a proper color match. 4. The monitor can be rotated if it clockwise based on the stand. Figure 3-9 Installing Portrait ENWW Rotating to the Portrait Position (Select Models) When installing the monitor in only one direction.

HP LD4200 LCD Monitor User Guide
Page 42
...Technical Specifications NOTE: All performance specifications are provided by the component manufacturers. HP LD4200 LCD Monitor Table B-1 HP LD4200 Specifications Display Type Viewable Image Size Pixel Pitch Maximum Weight Without Stand & Speaker With Speaker With Stand With Stand & Speaker Dimensions (Without Stand & Speaker) Height Depth Width Dimensions (With Speaker) Height Depth Width ...Stand & Speaker) 106.73 cm TFT LCD 106.73 cm diagonal 0.681 mm x 0.681 mm 21.2 kg 21.9 kg 24.5 kg 25.3 kg 58.76 cm 11.39 cm 99.56 cm 58.76 cm 12.57 cm 99.56 cm 67.6 cm 29.3 cm 99.56 cm 42 inches 42...
...Technical Specifications NOTE: All performance specifications are provided by the component manufacturers. HP LD4200 LCD Monitor Table B-1 HP LD4200 Specifications Display Type Viewable Image Size Pixel Pitch Maximum Weight Without Stand & Speaker With Speaker With Stand With Stand & Speaker Dimensions (Without Stand & Speaker) Height Depth Width Dimensions (With Speaker) Height Depth Width ...Stand & Speaker) 106.73 cm TFT LCD 106.73 cm diagonal 0.681 mm x 0.681 mm 21.2 kg 21.9 kg 24.5 kg 25.3 kg 58.76 cm 11.39 cm 99.56 cm 58.76 cm 12.57 cm 99.56 cm 67.6 cm 29.3 cm 99.56 cm 42 inches 42...

HP LD4200 LCD Monitor User Guide
Page 56
Abnomal state (Command : z) Abnormal State : Used to Read the power off status when Stand-by off by mode. Color Temperature (Command : u)v To adjust the screen color temperature. Data Min : 00H ~ Max : 64H Balance : L50 ~ R50 15. Transmission [k][u][ ][Set... ][Set ID][ ][Data][Cr] Data FF : Read 0 : Normal (Power on and signal exist) 1 : No signal (Power on) 2 : Turn the monitor off by remote control 3 : Turn the monitor off by sleep time function 4 : Turn the monitor off by RS-232C function 8 : Turn the monitor off time function 48 Appendix C Controlling the Multiple Product ENWW
Abnomal state (Command : z) Abnormal State : Used to Read the power off status when Stand-by off by mode. Color Temperature (Command : u)v To adjust the screen color temperature. Data Min : 00H ~ Max : 64H Balance : L50 ~ R50 15. Transmission [k][u][ ][Set... ][Set ID][ ][Data][Cr] Data FF : Read 0 : Normal (Power on and signal exist) 1 : No signal (Power on) 2 : Turn the monitor off by remote control 3 : Turn the monitor off by sleep time function 4 : Turn the monitor off by RS-232C function 8 : Turn the monitor off time function 48 Appendix C Controlling the Multiple Product ENWW
Stand Installation Guide
Page 1
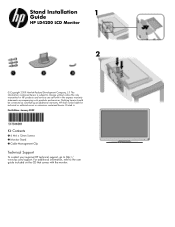
... herein is subject to change without notice.The only warranties for technical or editorial errors or omissions contained herein. HP shall not be construed as constituting an additional warranty. SOURCE AUTO/SET ON/OFF Printed in the express warranty ...for HP products and services are set forth in First Edition: January 2009 Kit Contents 1 6 M4 x 12mm Screws 2 Monitor Stand 3 Cable Management Clip Technical Support To contact your regional HP technical support, go to the user guide included on the CD that comes with the monitor. Stand Installation Guide 1 HP LD4200 LCD Monitor 2...
... herein is subject to change without notice.The only warranties for technical or editorial errors or omissions contained herein. HP shall not be construed as constituting an additional warranty. SOURCE AUTO/SET ON/OFF Printed in the express warranty ...for HP products and services are set forth in First Edition: January 2009 Kit Contents 1 6 M4 x 12mm Screws 2 Monitor Stand 3 Cable Management Clip Technical Support To contact your regional HP technical support, go to the user guide included on the CD that comes with the monitor. Stand Installation Guide 1 HP LD4200 LCD Monitor 2...


