HP LA1751g and LA1951g LCD Monitors
Page 5
... Monitor Unfolding the Monitor Pedestal Base 5 Rear Components ...6 Connecting the Signal and Power Cables 7 Connecting USB Devices ...8 Cable Management ...8 Adjusting the Monitor ...9 Turning on the Monitor ...11 Using the Accessory Rails ...12 Removing the Monitor Pedestal Base 13 Mounting the Monitor ...14 Locating the Rating Labels ...15 Installing a Cable Lock ...15 4 Operating the Monitor Software and Utilities ...16 The Information File ...16 The Image Color Matching File 16 Installing the .INF and .ICM Files ...17 Installing from the CD ...17 Downloading...
... Monitor Unfolding the Monitor Pedestal Base 5 Rear Components ...6 Connecting the Signal and Power Cables 7 Connecting USB Devices ...8 Cable Management ...8 Adjusting the Monitor ...9 Turning on the Monitor ...11 Using the Accessory Rails ...12 Removing the Monitor Pedestal Base 13 Mounting the Monitor ...14 Locating the Rating Labels ...15 Installing a Cable Lock ...15 4 Operating the Monitor Software and Utilities ...16 The Information File ...16 The Image Color Matching File 16 Installing the .INF and .ICM Files ...17 Installing from the CD ...17 Downloading...

HP LA1751g and LA1951g LCD Monitors
Page 6
Using the On-Screen Display Menu 20 OSD Menu Selections 21 Optimizing Digital Conversion 24 Using the HP Display Assistant Utility 25 Identifying Monitor Conditions ...25 Sleep Timer Mode ...26 HP Display LiteSaver ...27 Installing the HP Display LiteSaver Software 27 sRGB Support ...28 Changing the Color Temperature 28 Installing the sRGB ICM File for Microsoft Windows 2000 and Windows XP 28 Installing the sRGB ICM File for Microsoft Windows Vista 29 Appendix A Troubleshooting Solving Common Problems ...30 Online Technical Support ...32...
Using the On-Screen Display Menu 20 OSD Menu Selections 21 Optimizing Digital Conversion 24 Using the HP Display Assistant Utility 25 Identifying Monitor Conditions ...25 Sleep Timer Mode ...26 HP Display LiteSaver ...27 Installing the HP Display LiteSaver Software 27 sRGB Support ...28 Changing the Color Temperature 28 Installing the sRGB ICM File for Microsoft Windows 2000 and Windows XP 28 Installing the sRGB ICM File for Microsoft Windows Vista 29 Appendix A Troubleshooting Solving Common Problems ...30 Online Technical Support ...32...
HP LA1751g and LA1951g LCD Monitors
Page 9
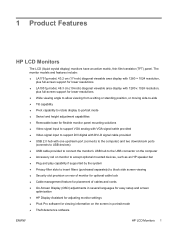
...LA1951g model, 48.3 cm (19-inch) diagonal viewable area display with 1280 x 1024 resolution, plus full-screen support for lower resolutions ● Wide viewing angle to allow viewing from a sitting or standing position, or moving side-to-side ● Tilt capability ● Pivot capability to rotate display to portrait mode ● Swivel and height adjustment capabilities ● Removable base for flexible monitor panel mounting solutions ● Video signal input to support VGA analog with VGA signal cable provided ● Video signal input to support DVI digital with DVI-D signal cable...
...LA1951g model, 48.3 cm (19-inch) diagonal viewable area display with 1280 x 1024 resolution, plus full-screen support for lower resolutions ● Wide viewing angle to allow viewing from a sitting or standing position, or moving side-to-side ● Tilt capability ● Pivot capability to rotate display to portrait mode ● Swivel and height adjustment capabilities ● Removable base for flexible monitor panel mounting solutions ● Video signal input to support VGA analog with VGA signal cable provided ● Video signal input to support DVI digital with DVI-D signal cable...
HP LA1751g and LA1951g LCD Monitors
Page 12
... the ampere rating (AMPS or A) for each device. ● Install the monitor near an outlet that you can substantially increase the life expectancy of the unit. 2. Disconnect the monitor by using a screen saver program and turning off the monitor and unplug the power cord from excessive light, heat or moisture. ● When removing the monitor stand, you must not be blocked or covered. You can...
... the ampere rating (AMPS or A) for each device. ● Install the monitor near an outlet that you can substantially increase the life expectancy of the unit. 2. Disconnect the monitor by using a screen saver program and turning off the monitor and unplug the power cord from excessive light, heat or moisture. ● When removing the monitor stand, you must not be blocked or covered. You can...
HP LA1751g and LA1951g LCD Monitors
Page 19
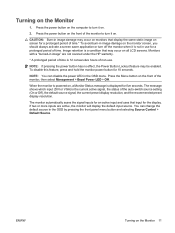
... display resolution. Press the Menu button on all LCD screens. The monitor automatically scans the signal inputs for an active input and uses that display the same static image on monitors that input for 10 seconds. Monitors with a "burned-in the OSD by pressing the front panel menu button and selecting Source Control > Default Source. The message shows which input (DVI or VGA) is displayed for a prolonged period of the monitor to turn it on . 2. You can disable the power LED in use . ENWW Turning...
... display resolution. Press the Menu button on all LCD screens. The monitor automatically scans the signal inputs for an active input and uses that display the same static image on monitors that input for 10 seconds. Monitors with a "burned-in the OSD by pressing the front panel menu button and selecting Source Control > Default Source. The message shows which input (DVI or VGA) is displayed for a prolonged period of the monitor to turn it on . 2. You can disable the power LED in use . ENWW Turning...
HP LA1751g and LA1951g LCD Monitors
Page 25
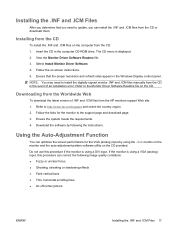
...://www.hp.com/support and select the country region. 2. Downloading from the CD or download them. Ensure that you need to the Monitor Driver Software Readme file on the CD. Insert the CD in the Windows Display control panel. Refer to update, you can correct the following the instructions. If the monitor is using a DVI input. Installing the .INF and .ICM Files After you determine that the proper resolution and refresh rates...
...://www.hp.com/support and select the country region. 2. Downloading from the CD or download them. Ensure that you need to the Monitor Driver Software Readme file on the CD. Insert the CD in the Windows Display control panel. Refer to update, you can correct the following the instructions. If the monitor is using a DVI input. Installing the .INF and .ICM Files After you determine that the proper resolution and refresh rates...
HP LA1751g and LA1951g LCD Monitors
Page 27
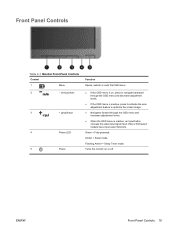
... OSD menu is inactive, press to activate the auto adjustment feature to optimize the screen image. ● Navigates forward through the OSD menu and increases adjustment levels. ● When the OSD menu is on or off. Front Panel Controls Table 4-1 Monitor Front Panel Controls Control 1 Menu 2 - (minus)/Auto 3 + (plus)/Input 4 Power LED 5 Power Function Opens, selects or exits the OSD menu. ● If the OSD menu is inactive, an Input button chooses the video input signal input, VGA or DVI (select models have input select function). ENWW Front Panel Controls 19 Green...
... OSD menu is inactive, press to activate the auto adjustment feature to optimize the screen image. ● Navigates forward through the OSD menu and increases adjustment levels. ● When the OSD menu is on or off. Front Panel Controls Table 4-1 Monitor Front Panel Controls Control 1 Menu 2 - (minus)/Auto 3 + (plus)/Input 4 Power LED 5 Power Function Opens, selects or exits the OSD menu. ● If the OSD menu is inactive, an Input button chooses the video input signal input, VGA or DVI (select models have input select function). ENWW Front Panel Controls 19 Green...
HP LA1751g and LA1951g LCD Monitors
Page 28
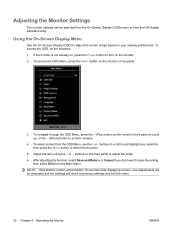
...-Screen Display (OSD) to adjust the screen image based on the monitor's front panel to scroll up, or the - (Minus) button to adjust the scale. 6. Adjust the item using the + or - NOTE: If the buttons remain untouched for 10 seconds while displaying a menu, new adjustments will revert to and highlight your viewing preferences. Adjusting the Monitor Settings The monitor settings can be discarded and the settings will be adjusted from the On-Screen Display (OSD) menu or from the HP Display...
...-Screen Display (OSD) to adjust the screen image based on the monitor's front panel to scroll up, or the - (Minus) button to adjust the scale. 6. Adjust the item using the + or - NOTE: If the buttons remain untouched for 10 seconds while displaying a menu, new adjustments will revert to and highlight your viewing preferences. Adjusting the Monitor Settings The monitor settings can be discarded and the settings will be adjusted from the On-Screen Display (OSD) menu or from the HP Display...

HP LA1751g and LA1951g LCD Monitors
Page 29
...on the screen background. Horizontal Position Adjusts the position of the screen. Custom Color Selects and adjusts your own color scales: ● R-sets your own red color levels ● G-sets your own green color levels ● B-sets your screen colors to adapt to Screen - Table 4-2 OSD Menu Icon Main Menu Submenu Description Brightness Adjustable scale Adjusts the brightness level of the screen image up and down. Color Selects the screen color. sRGB Sets your own blue color levels Image Control Adjusts the screen image. (VGA input only) Auto Adjustment...
...on the screen background. Horizontal Position Adjusts the position of the screen. Custom Color Selects and adjusts your own color scales: ● R-sets your own red color levels ● G-sets your own green color levels ● B-sets your screen colors to adapt to Screen - Table 4-2 OSD Menu Icon Main Menu Submenu Description Brightness Adjustable scale Adjusts the brightness level of the screen image up and down. Color Selects the screen color. sRGB Sets your own blue color levels Image Control Adjusts the screen image. (VGA input only) Auto Adjustment...

HP LA1751g and LA1951g LCD Monitors
Page 30
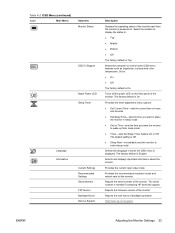
... information through the OSD. Power On Recall Restores power to remove any horizontal noise and clear or sharpen the image of the display. Select: ● On ● Off The factory default is 5 - 60 seconds. The range is On. 22 Chapter 4 Operating the Monitor ENWW Displays the resolution, refresh rate and frequency information on -screen display (OSD) controls. Table 4-2 OSD Menu (continued) Icon Main Menu OSD Control Management Submenu Description Clock Phase Horizontal OSD Position Vertical OSD Position OSD Transparency Adjusts the focus of...
... information through the OSD. Power On Recall Restores power to remove any horizontal noise and clear or sharpen the image of the display. Select: ● On ● Off The factory default is 5 - 60 seconds. The range is On. 22 Chapter 4 Operating the Monitor ENWW Displays the resolution, refresh rate and frequency information on -screen display (OSD) controls. Table 4-2 OSD Menu (continued) Icon Main Menu OSD Control Management Submenu Description Clock Phase Horizontal OSD Position Vertical OSD Position OSD Transparency Adjusts the focus of...
HP LA1751g and LA1951g LCD Monitors
Page 31
... resolution mode and refresh rate for the monitor. Selects and displays important information about the monitor. Select the location to display the status to wake up from sleep mode ● Timer-sets the Sleep Timer feature On or Off. Set to control some OSD menu features such as brightness, contrast and color temperature. Table 4-2 OSD Menu (continued) Icon Main Menu Submenu Monitor Status DDC/CI Support Bezel Power LED Sleep Timer Language Information Current Settings Recommended Settings Serial Number FW Version Backlight Hours Service Support...
... resolution mode and refresh rate for the monitor. Selects and displays important information about the monitor. Select the location to display the status to wake up from sleep mode ● Timer-sets the Sleep Timer feature On or Off. Set to control some OSD menu features such as brightness, contrast and color temperature. Table 4-2 OSD Menu (continued) Icon Main Menu Submenu Monitor Status DDC/CI Support Bezel Power LED Sleep Timer Language Information Current Settings Recommended Settings Serial Number FW Version Backlight Hours Service Support...
HP LA1751g and LA1951g LCD Monitors
Page 32
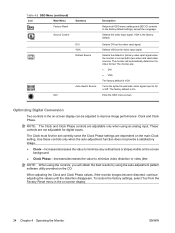
... on the CD. The factory default is connected to improve image performance: Clock and Clock Phase. Optimizing Digital Conversion Two controls in the on -screen display can be set correctly since the Clock Phase settings are : ● DVI ● VGA The factory default is the factory default. Exits the OSD menu screen. NOTE: When using an analog input. Selects the default or primary video input signal when the monitor is On. Turns the system's automatic video signal input to On or Off.
... on the CD. The factory default is connected to improve image performance: Clock and Clock Phase. Optimizing Digital Conversion Two controls in the on -screen display can be set correctly since the Clock Phase settings are : ● DVI ● VGA The factory default is the factory default. Exits the OSD menu screen. NOTE: When using an analog input. Selects the default or primary video input signal when the monitor is On. Turns the system's automatic video signal input to On or Off.
HP LA1751g and LA1951g LCD Monitors
Page 33
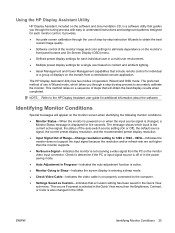
... screen display is entering a sleep mode. ● Check Video Cable-Indicates the video cable is Wizard mode, which input is the current active signal, the status of the auto-switch source setting (On or Off), the default source signal, the current preset display resolution, and the recommended preset display resolution. ● Input Signal Out of the monitor image and color settings to the HP Display Assistant user guide for five seconds. Check to determine if the PC or input signal source is off or in the power saving mode. ● Auto Adjustment...
... screen display is entering a sleep mode. ● Check Video Cable-Indicates the video cable is Wizard mode, which input is the current active signal, the status of the auto-switch source setting (On or Off), the default source signal, the current preset display resolution, and the recommended preset display resolution. ● Input Signal Out of the monitor image and color settings to the HP Display Assistant user guide for five seconds. Check to determine if the PC or input signal source is off or in the power saving mode. ● Auto Adjustment...
HP LA1751g and LA1951g LCD Monitors
Page 34
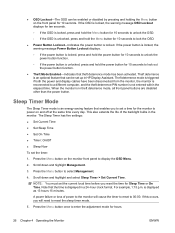
... set up in HP Display Assistant. ● OSD Lockout-The OSD can be enabled or disabled by pressing and holding the Menu button on the monitor front panel to lock the OSD. ● Power Button Lockout-Indicates the power button is displayed in theft deterrence mode, all front panel buttons are disabled other than the power button. Note that can be set the timer: 1. A power failure or loss of the backlight bulbs in the monitor. When the monitor...
... set up in HP Display Assistant. ● OSD Lockout-The OSD can be enabled or disabled by pressing and holding the Menu button on the monitor front panel to lock the OSD. ● Power Button Lockout-Indicates the power button is displayed in theft deterrence mode, all front panel buttons are disabled other than the power button. Note that can be set the timer: 1. A power failure or loss of the backlight bulbs in the monitor. When the monitor...
HP LA1751g and LA1951g LCD Monitors
Page 35
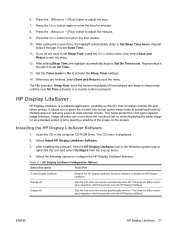
.... After installing the software, click the HP Display LiteSaver icon in sleep mode until the next On Time activates or a monitor button is left on the screen. This does not affect screen saver operation, which has priority over the HP Display LiteSaver. Press the Menu button again to most internal circuits. Set the Timer mode to On to adjust the hour. 7. This helps protect the LCD panel against image retention. Image retention...
.... After installing the software, click the HP Display LiteSaver icon in sleep mode until the next On Time activates or a monitor button is left on the screen. This does not affect screen saver operation, which has priority over the HP Display LiteSaver. Press the Menu button again to most internal circuits. Set the Timer mode to On to adjust the hour. 7. This helps protect the LCD panel against image retention. Image retention...

HP LA1751g and LA1951g LCD Monitors
Page 36
... does not support Windows 95 and Windows NT operating systems. 1. OK Stores the current settings and minimizes HP Display LiteSaver to disable. Select sRGB. 4. In the Display Properties windows, select the Settings tab, then click the Advanced button. 28 Chapter 4 Operating the Monitor ENWW View HP Display LiteSaver Readme on the front panel of time before turning the display off by HP Display LiteSaver. If disabled, the monitor will need to change the monitor's color temperature...
... does not support Windows 95 and Windows NT operating systems. 1. OK Stores the current settings and minimizes HP Display LiteSaver to disable. Select sRGB. 4. In the Display Properties windows, select the Settings tab, then click the Advanced button. 28 Chapter 4 Operating the Monitor ENWW View HP Display LiteSaver Readme on the front panel of time before turning the display off by HP Display LiteSaver. If disabled, the monitor will need to change the monitor's color temperature...
HP LA1751g and LA1951g LCD Monitors
Page 38
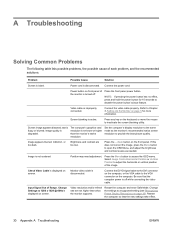
.... Connect the power cord. Change the settings to open the OSD Menu, and adjust the brightness and contrast scales as the monitor's recommended native screen resolution to the VGA connector on page 35). Image is not centered Check Video Cable is blank. Brightness and contrast are set lower or higher than what the monitor supports. Be sure that the new settings take effect. 30 Appendix A Troubleshooting ENWW Problem Possible Cause Solution Screen is displayed on front panel of the image. Power button on screen. Video resolution and/or refresh rate...
.... Connect the power cord. Change the settings to open the OSD Menu, and adjust the brightness and contrast scales as the monitor's recommended native screen resolution to the VGA connector on page 35). Image is not centered Check Video Cable is blank. Brightness and contrast are set lower or higher than what the monitor supports. Be sure that the new settings take effect. 30 Appendix A Troubleshooting ENWW Problem Possible Cause Solution Screen is displayed on front panel of the image. Power button on screen. Video resolution and/or refresh rate...
HP LA1751g and LA1951g LCD Monitors
Page 41
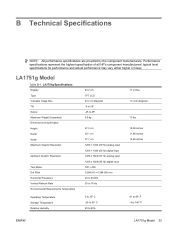
... Specifications Display Type Viewable Image Size Tilt Swivel Maximum Weight (Unpacked) Dimensions (include base) Height Depth Width Maximum Graphic Resolution Optimum Graphic Resolution Text Mode Dot Pitch Horizontal Frequency Vertical Refresh Rate Environmental Requirements Temperature Operating Temperature Storage Temperature Relative Humidity 43.2 cm TFT LCD 43.2 cm diagonal -5 to 35° -45 to 45° 6.8 kg 47.2 cm 30.1 cm 37.7 cm 1280 × 1024 (60 Hz) analog input...
... Specifications Display Type Viewable Image Size Tilt Swivel Maximum Weight (Unpacked) Dimensions (include base) Height Depth Width Maximum Graphic Resolution Optimum Graphic Resolution Text Mode Dot Pitch Horizontal Frequency Vertical Refresh Rate Environmental Requirements Temperature Operating Temperature Storage Temperature Relative Humidity 43.2 cm TFT LCD 43.2 cm diagonal -5 to 35° -45 to 45° 6.8 kg 47.2 cm 30.1 cm 37.7 cm 1280 × 1024 (60 Hz) analog input...
HP LA1751g and LA1951g LCD Monitors
Page 42
Table B-1 LA1751g Specifications (continued) Power Source 100 - 240 VAC, 50 - 60 Hz Altitude: Operating 0 to 3657.6 m 0 to 12,000 feet Storage 0 to 12192 m 0 to 40,000 feet Power Consumption (maximum)
Table B-1 LA1751g Specifications (continued) Power Source 100 - 240 VAC, 50 - 60 Hz Altitude: Operating 0 to 3657.6 m 0 to 12,000 feet Storage 0 to 12192 m 0 to 40,000 feet Power Consumption (maximum)

HP LA1751g and LA1951g LCD Monitors
Page 43
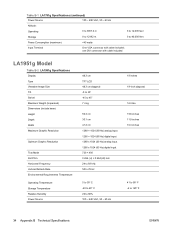
Table B-2 LA1951g Specifications (continued) Altitude: Operating 0 to 3657.6 m 0 to 12,000 feet Storage 0 to 12192 m 0 to 40,000 feet Power Consumption (maximum)
Table B-2 LA1951g Specifications (continued) Altitude: Operating 0 to 3657.6 m 0 to 12,000 feet Storage 0 to 12192 m 0 to 40,000 feet Power Consumption (maximum)


