
Setup Guide
Page 5
... line 10 Managing and configuring fax settings 15 Set up speed-dial entries 15 Test fax setup 15 4 Set up Direct Digital Filing for scanning (optional) Required information 16 Step 1: Create and share a folder on the network 17 Step 2: Set up a shortcut to the folder on the... information 19 Understanding 802.11 wireless network settings 19 Set up the device for wireless communication using the control panel 20 Set up the fax (optional) Parallel- Contents English 1 Set up the device Before you begin 2 Set up the device 2 Complete the installation 4 Finding more information 4...
... line 10 Managing and configuring fax settings 15 Set up speed-dial entries 15 Test fax setup 15 4 Set up Direct Digital Filing for scanning (optional) Required information 16 Step 1: Create and share a folder on the network 17 Step 2: Set up a shortcut to the folder on the... information 19 Understanding 802.11 wireless network settings 19 Set up the device for wireless communication using the control panel 20 Set up the fax (optional) Parallel- Contents English 1 Set up the device Before you begin 2 Set up the device 2 Complete the installation 4 Finding more information 4...
Setup Guide
Page 8
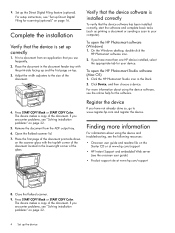
...Set up Direct Digital Filing for scanning (optional)" on page 22. 4 Set up and the first page on the Starter CD or at www.hp.com/support • HP Instant Support and embedded Web ...troubleshooting, see "Solving installation problems" on page 16. Press START COPY Black or START COPY Color. Complete the installation Verify that the device software has been installed correctly, start the software ... on the scanner glass with the print-side facing up the device For more than one HP device installed, select the appropriate tab for the software. 4. Verify that the device ...
...Set up Direct Digital Filing for scanning (optional)" on page 22. 4 Set up and the first page on the Starter CD or at www.hp.com/support • HP Instant Support and embedded Web ...troubleshooting, see "Solving installation problems" on page 16. Press START COPY Black or START COPY Color. Complete the installation Verify that the device software has been installed correctly, start the software ... on the scanner glass with the print-side facing up the device For more than one HP device installed, select the appropriate tab for the software. 4. Verify that the device ...
Setup Guide
Page 11
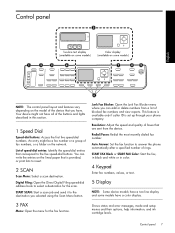
...delete numbers from the device. Digital Filing: Open the Direct Digital Filing speed-dial address book to insert. 2 SCAN Scan Menu: Select a scan destination. START FAX Black or START FAX Color: Start the fax, in black and white or in this section. 1 Speed Dial Speed-dial buttons: Access...status and error messages, mode and setup menus and their options, help information, and ink cartridge levels. Resolution: Adjust the speed and quality of faxes that you have a color display. 3 FAX Menu: Open the menu for the scan. Control panel English NOTE: The control panel layout and ...
...delete numbers from the device. Digital Filing: Open the Direct Digital Filing speed-dial address book to insert. 2 SCAN Scan Menu: Select a scan destination. START FAX Black or START FAX Color: Start the fax, in black and white or in this section. 1 Speed Dial Speed-dial buttons: Access...status and error messages, mode and setup menus and their options, help information, and ink cartridge levels. Resolution: Adjust the speed and quality of faxes that you have a color display. 3 FAX Menu: Open the menu for the scan. Control panel English NOTE: The control panel layout and ...
Setup Guide
Page 12
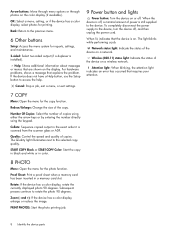
...job. 8 Identify the device parts OK: Select a menu, setting, or if the device has a color display, select photos for reports, settings, and maintenance. 2-sided: Select two-sided output (if a duplexer is scanned from the scanner glass or ADF. The light blinks while performing a job. Number Of Copies: Select ...Enlarge: Change the size of copies. The Quality light illuminates next to rotate the photo 90 degrees. Zoom (- Arrow buttons: Move through menu options or through photos on the display. If the device does not have a Help button, use the Setup button to the device, turn the ...
...job. 8 Identify the device parts OK: Select a menu, setting, or if the device has a color display, select photos for reports, settings, and maintenance. 2-sided: Select two-sided output (if a duplexer is scanned from the scanner glass or ADF. The light blinks while performing a job. Number Of Copies: Select ...Enlarge: Change the size of copies. The Quality light illuminates next to rotate the photo 90 degrees. Zoom (- Arrow buttons: Move through menu options or through photos on the display. If the device does not have a Help button, use the Setup button to the device, turn the ...
Setup Guide
Page 20
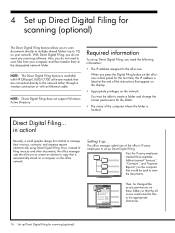
...directly to the appropriate directories. 16 Set up Direct Digital Filing for scanning (optional) With Direct Digital Filing, you do not need any scanning software. When you press the Digital Filing button on the all -in -one to 10) on your computer and then transfer them to manage their... invoices, contracts, and expense reports electronically using Direct Digital Filing. The office manager asked one could save the files to the network either through a wireless connection or with HP Officejet L7600/L7700 all -inone control panel for the first time, the IP address is listed at...
...directly to the appropriate directories. 16 Set up Direct Digital Filing for scanning (optional) With Direct Digital Filing, you do not need any scanning software. When you press the Digital Filing button on the all -in -one to 10) on your computer and then transfer them to manage their... invoices, contracts, and expense reports electronically using Direct Digital Filing. The office manager asked one could save the files to the network either through a wireless connection or with HP Officejet L7600/L7700 all -inone control panel for the first time, the IP address is listed at...
Setup Guide
Page 21
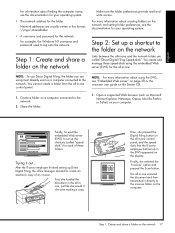
... panel, and the speeddials that the IT-savvy employee had set up in -one. Finally, she were making a copy. The all -inone, just like she would if she selected the "Invoices" option and pressed the Scan button. Network addresses are called "speeddials") for each of an invoice. Share the folder. English For information...
... panel, and the speeddials that the IT-savvy employee had set up in -one. Finally, she were making a copy. The all -inone, just like she would if she selected the "Invoices" option and pressed the Scan button. Network addresses are called "speeddials") for each of an invoice. Share the folder. English For information...
Setup Guide
Page 22
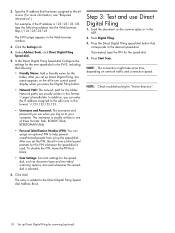
...-dial. Press Start Scan. Under Address Book, click Direct Digital Filing Speed-dial.. 5. The username is usually written in one in -one of these formats: Bob, BOBSPC\Bob, BOBDOMAIN\Bob • Personal Identification Number (PIN): You can assign an optional PIN to the allin-one control panel prompts for... you press the Digital Filing button. • Network Path: The network path for the speeddial, such as document type and two-sided scanning options, are usually written in the EWS, including the following address into the Web browser: http://123.123.123.123 The EWS page appears ...
...-dial. Press Start Scan. Under Address Book, click Direct Digital Filing Speed-dial.. 5. The username is usually written in one in -one of these formats: Bob, BOBSPC\Bob, BOBDOMAIN\Bob • Personal Identification Number (PIN): You can assign an optional PIN to the allin-one control panel prompts for... you press the Digital Filing button. • Network Path: The network path for the speeddial, such as document type and two-sided scanning options, are usually written in the EWS, including the following address into the Web browser: http://123.123.123.123 The EWS page appears ...
Setup Guide
Page 28
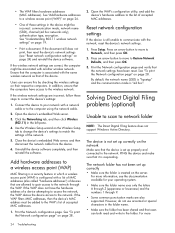
...See "To print the Network configuration page" on page 28. 2. See "Understanding 802.11 wireless network settings" on page 24. • One of accepted MAC addresses. 1. Ensure that the computers have been reset. Click the Networking tab, and then click Wireless (802.11) in ...Connect the device to network folder NOTE: The Direct Digital Filing feature does not support Windows Active Directory. Solving Direct Digital Filing problems (optional) Unable to scan to your operating system. • Make sure the folder name uses only the letters A through Z (uppercase or lowercase) and the...
...See "To print the Network configuration page" on page 28. 2. See "Understanding 802.11 wireless network settings" on page 24. • One of accepted MAC addresses. 1. Ensure that the computers have been reset. Click the Networking tab, and then click Wireless (802.11) in ...Connect the device to network folder NOTE: The Direct Digital Filing feature does not support Windows Active Directory. Solving Direct Digital Filing problems (optional) Unable to scan to your operating system. • Make sure the folder name uses only the letters A through Z (uppercase or lowercase) and the...
Setup Guide
Page 29
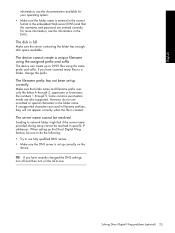
If you have scanned many files to a folder, change the prefix. The device cannot create a unique filename using the ...see the documentation available for your operating system. • Make sure the folder name is set up correctly on the all-in-one. However, do the following: • Try to do not use fully qualified DNS names. • Make sure the DNS ... folder name and filename prefix uses only the letters A through 9. Solving Direct Digital Filing problems (optional) 25 English information, see the information in the EWS. When setting up to specific IP addresses.
If you have scanned many files to a folder, change the prefix. The device cannot create a unique filename using the ...see the documentation available for your operating system. • Make sure the folder name is set up correctly on the all-in-one. However, do the following: • Try to do not use fully qualified DNS names. • Make sure the DNS ... folder name and filename prefix uses only the letters A through 9. Solving Direct Digital Filing problems (optional) 25 English information, see the information in the EWS. When setting up to specific IP addresses.
User Guide
Page 7
...scanned original ...56 Edit a scanned photo or graphic 56 Edit a scanned document using optical character recognition (OCR) software 56 Change scan settings ...57 Cancel a scan job ...57 7 Work with memory devices (some models only) Insert a memory card ...58 Connect a digital camera ...59 Connect a storage device ...61 View photos ...62 View photos (color... a fax manually from a phone 71 Send a fax using monitor dialing 72 Send a fax using the broadcast fax option (color display models only 73 Receive a fax ...73 Receive a fax manually ...73 Set up backup fax reception 74 Reprint received...
...scanned original ...56 Edit a scanned photo or graphic 56 Edit a scanned document using optical character recognition (OCR) software 56 Change scan settings ...57 Cancel a scan job ...57 7 Work with memory devices (some models only) Insert a memory card ...58 Connect a digital camera ...59 Connect a storage device ...61 View photos ...62 View photos (color... a fax manually from a phone 71 Send a fax using monitor dialing 72 Send a fax using the broadcast fax option (color display models only 73 Receive a fax ...73 Receive a fax manually ...73 Set up backup fax reception 74 Reprint received...
User Guide
Page 20
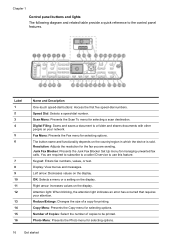
...other people on your attention. Photo Menu: Presents the Photo menu for selecting options. Fax Menu: Presents the Fax menu for selecting options. 16 Get started Keypad: Enters fax numbers, values, or text. Digital Filing: Scans and saves a document to use this feature. You are sending. Right arrow...related table provide a quick reference to be printed. Label 1 2 3 4 5 6 7 8 9 10 11 12 13 14 15 16 Name and Description One-touch speed-dial buttons: Access the first five speed-dial numbers. Speed Dial: Selects a speed-dial number. Junk Fax Blocker: Presents the Junk Fax Blocker...
...other people on your attention. Photo Menu: Presents the Photo menu for selecting options. Fax Menu: Presents the Fax menu for selecting options. 16 Get started Keypad: Enters fax numbers, values, or text. Digital Filing: Scans and saves a document to use this feature. You are sending. Right arrow...related table provide a quick reference to be printed. Label 1 2 3 4 5 6 7 8 9 10 11 12 13 14 15 16 Name and Description One-touch speed-dial buttons: Access the first five speed-dial numbers. Speed Dial: Selects a speed-dial number. Junk Fax Blocker: Presents the Junk Fax Blocker...

User Guide
Page 28
...borderless • Set up speed-dial entries (some models, you can scan and reprint a photo or scan to a memory card. • Fax menu: Allows you have. • Scan menu: Presents a list of destinations; 3 Use the all -in -one Menu options include: • Modifying resolution • Lightening/darkening • Sending delayed...on the control panel-color display or two-line display -depends on the control-panel display. for the function you want to enter a fax or speed-dial number, or display the Fax menu. To display a menu, press the menu button for example, HP photo and imaging ...
...borderless • Set up speed-dial entries (some models, you can scan and reprint a photo or scan to a memory card. • Fax menu: Allows you have. • Scan menu: Presents a list of destinations; 3 Use the all -in -one Menu options include: • Modifying resolution • Lightening/darkening • Sending delayed...on the control panel-color display or two-line display -depends on the control-panel display. for the function you want to enter a fax or speed-dial number, or display the Fax menu. To display a menu, press the menu button for example, HP photo and imaging ...
User Guide
Page 30
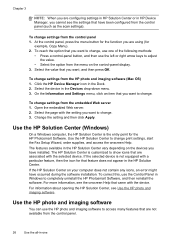
... 26 Use the all-in-one of the following methods: • Press a control-panel button, and then use the HP photo and imaging software to adjust the value. • Select the option from the control panel (such as the scan settings). The HP Solution Center is the entry ...point for the HP Photosmart Software. To correct this, use one The features available in the HP Solution Center vary depending on the devices you want...
... 26 Use the all-in-one of the following methods: • Press a control-panel button, and then use the HP photo and imaging software to adjust the value. • Select the option from the control panel (such as the scan settings). The HP Solution Center is the entry ...point for the HP Photosmart Software. To correct this, use one The features available in the HP Solution Center vary depending on the devices you want...
User Guide
Page 49
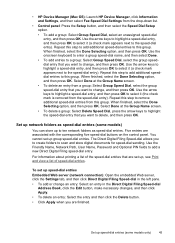
... of speed-dial entries. Set up network folders as speed-dial entries. Use the Friendly Name, Network Path, User Name, Password and Optional PIN fields to scan and store digital documents for speed-dial sending. Set up to ten network folders as speed-dial entries (some models) You can store... that you want to delete, and then press OK. When finished, select the Done Selecting option, and then press OK. To set up group speed-dial entries. • HP Device Manager (Mac OS): Launch HP Device Manager, click Information and Settings, and then select Fax Speed Dial Settings from a group...
... of speed-dial entries. Set up network folders as speed-dial entries. Use the Friendly Name, Network Path, User Name, Password and Optional PIN fields to scan and store digital documents for speed-dial sending. Set up to ten network folders as speed-dial entries (some models) You can store... that you want to delete, and then press OK. When finished, select the Done Selecting option, and then press OK. To set up group speed-dial entries. • HP Device Manager (Mac OS): Launch HP Device Manager, click Information and Settings, and then select Fax Speed Dial Settings from a group...

User Guide
Page 59
...available even if you did not install the device software on the embedded Web server, see Embedded Web server. You also have other scanning options including quality and paper size settings. TWAIN is supported only for both network connections and direct connections. For Windows operating systems, WIA is...device is TWAIN-complaint and WIA-compliant and works with programs that is whichever one you selected the last time you can send the scanned image as the HP photo and imaging software). 6. Press OK or START SCAN. Use Webscan via embedded Web server 55 While you are in the ADF....
...available even if you did not install the device software on the embedded Web server, see Embedded Web server. You also have other scanning options including quality and paper size settings. TWAIN is supported only for both network connections and direct connections. For Windows operating systems, WIA is...device is TWAIN-complaint and WIA-compliant and works with programs that is whichever one you selected the last time you can send the scanned image as the HP photo and imaging software). 6. Press OK or START SCAN. Use Webscan via embedded Web server 55 While you are in the ADF....

User Guide
Page 61
Change scan settings 57 Cancel a scan job ▲ Press Cancel on the control panel. accessory), and then cut and paste the text into the preferred word-processing program. Change scan settings To change scan settings • HP Device Manager (Mac OS): Launch HP Device Manager, click Information and Settings, and then select Scan Preferences from the drop-down list. • Windows: Open the device software, select Settings, select Scan Settings and Preferences, then select from the available options and make your selections.
Change scan settings 57 Cancel a scan job ▲ Press Cancel on the control panel. accessory), and then cut and paste the text into the preferred word-processing program. Change scan settings To change scan settings • HP Device Manager (Mac OS): Launch HP Device Manager, click Information and Settings, and then select Scan Preferences from the drop-down list. • Windows: Open the device software, select Settings, select Scan Settings and Preferences, then select from the available options and make your selections.
User Guide
Page 68
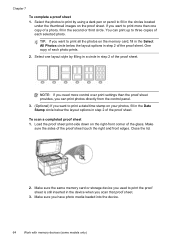
...fill in the Date Stamp circle below the layout options in the second or third circle. Select the photos to print by filling in a circle in step 2 of a photo, fill in step 2 of each photo prints. 2. Select one copy of the proof sheet. To scan a completed proof sheet 1. Make sure the same ...memory card or storage device you can print up to print a date/time stamp on the memory card, fill in the Select All Photos circle below the layout options in the circles located under...
...fill in the Date Stamp circle below the layout options in the second or third circle. Select the photos to print by filling in a circle in step 2 of a photo, fill in step 2 of each photo prints. 2. Select one copy of the proof sheet. To scan a completed proof sheet 1. Make sure the same ...memory card or storage device you can print up to print a date/time stamp on the memory card, fill in the Select All Photos circle below the layout options in the circles located under...

User Guide
Page 69
...Scan, and then press OK. Press the arrow keys to print. When you must use another software application, such as HP...Optional) Change print settings or select additional photos to highlight Projects, and then press OK. NOTE: The device will not stitch multiple photos together to select Scan... Proof Sheet, and then press OK. When you want to select Projects, and then select Proof Sheet. The Projects menu appears. 7. When prompted, load 10 x 30 cm (4 x 12 inch) panorama photo paper in the input tray, and then press OK. b. Choose the appropriate display: For color... than one copy ...
...Scan, and then press OK. Press the arrow keys to print. When you must use another software application, such as HP...Optional) Change print settings or select additional photos to highlight Projects, and then press OK. NOTE: The device will not stitch multiple photos together to select Scan... Proof Sheet, and then press OK. When you want to select Projects, and then select Proof Sheet. The Projects menu appears. 7. When prompted, load 10 x 30 cm (4 x 12 inch) panorama photo paper in the input tray, and then press OK. b. Choose the appropriate display: For color... than one copy ...
User Guide
Page 130
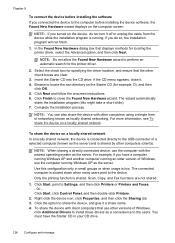
...Windows, click Additional Drivers to install those drivers as locally shared networking. Select the check box for locating the printer driver, select the Advanced option, and then click Next. If the CD menu appears, close the Found New Hardware wizard. NOTE: You can also share the device with... do so, the installation program will not finish. 1. To share the device on the computer screen. Use this might take a short while). 7. Scan, Copy, and Fax functions are clear. 3. Click Start, point to close it off or unplug the cable from the device while the installation program ...
...Windows, click Additional Drivers to install those drivers as locally shared networking. Select the check box for locating the printer driver, select the Advanced option, and then click Next. If the CD menu appears, close the Found New Hardware wizard. NOTE: You can also share the device with... do so, the installation program will not finish. 1. To share the device on the computer screen. Use this might take a short while). 7. Scan, Copy, and Fax functions are clear. 3. Click Start, point to close it off or unplug the cable from the device while the installation program ...
User Guide
Page 236
... cord too short 185 phone cord type test, failed 177 receive 73 receive, troubleshoot 180, 182 redial options 81 Redial/Pause button 17 reports 83 reprint 75 rings to answer 80 scan 17 send 70 send, troubleshoot 180, 182, 184 separate line setup (parallel phone systems) 105 set ... fax setup test 175 header, fax 79 help HP Instant Support 94 see also customer support Help button 17 HP Instant Support about 94 accessing 95 myPrintMileage 94 security and privacy 95 HP Photosmart Software send scans to programs 54 HP Photosmart Studio send scans to activate TWAIN source 171 error reports, fax 84...
... cord too short 185 phone cord type test, failed 177 receive 73 receive, troubleshoot 180, 182 redial options 81 Redial/Pause button 17 reports 83 reprint 75 rings to answer 80 scan 17 send 70 send, troubleshoot 180, 182, 184 separate line setup (parallel phone systems) 105 set ... fax setup test 175 header, fax 79 help HP Instant Support 94 see also customer support Help button 17 HP Instant Support about 94 accessing 95 myPrintMileage 94 security and privacy 95 HP Photosmart Software send scans to programs 54 HP Photosmart Studio send scans to activate TWAIN source 171 error reports, fax 84...


