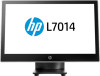
Quick Setup Guide
Page 1
.../15.6-inch: 1366 x 768 1 HP L7010t, L7014t, L7016t Retail Point of Sale Touch Monitors attached to HP RP9 G1 Retail Systems HP L7014 Retail Point of Sale Monitors attached to HP RP9 G1 Retail Systems OR HP L7010t, L7014t, L7016t Retail Point of Sale Touch Monitors attached to HP RP5 or RP5800 Retail Systems, or an HP Desktop Mini OR HP L7014 Retail Point of Sale Monitors attached to change without...
.../15.6-inch: 1366 x 768 1 HP L7010t, L7014t, L7016t Retail Point of Sale Touch Monitors attached to HP RP9 G1 Retail Systems HP L7014 Retail Point of Sale Monitors attached to HP RP9 G1 Retail Systems OR HP L7010t, L7014t, L7016t Retail Point of Sale Touch Monitors attached to HP RP5 or RP5800 Retail Systems, or an HP Desktop Mini OR HP L7014 Retail Point of Sale Monitors attached to change without...
User Guide
Page 5
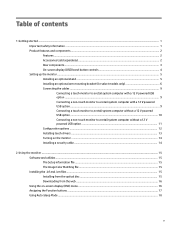
... select models only 6 Connecting the cables ...9 Connecting a touch monitor to a retail system computer with a 12 V powered USB option ...9 Connecting a non-touch monitor to a retail system computer with a 12 V powered USB option ...9 Connecting a touch monitor to a retail system computer without a 12 V powered USB option ...10 Connecting a non-touch monitor to a retail system computer without a 12 V powered USB option ...11...
... select models only 6 Connecting the cables ...9 Connecting a touch monitor to a retail system computer with a 12 V powered USB option ...9 Connecting a non-touch monitor to a retail system computer with a 12 V powered USB option ...9 Connecting a touch monitor to a retail system computer without a 12 V powered USB option ...10 Connecting a non-touch monitor to a retail system computer without a 12 V powered USB option ...11...
User Guide
Page 8
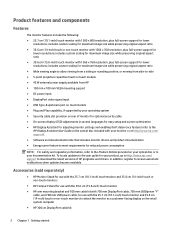
...● Security cable slot provision on rear of HP programs and drivers. Product features and components Features The monitor features include the following: ● 25.7 cm (10.1-inch) touch monitor with 1366 x 768 resolution, plus full-screen ...support for lower resolutions; includes custom scaling for maximum image size while preserving original aspect ratio ● Wide viewing angle to allow viewing from a sitting or standing position, or moving from side-to the Product Notices provided on the retail system computer ● HP...
...● Security cable slot provision on rear of HP programs and drivers. Product features and components Features The monitor features include the following: ● 25.7 cm (10.1-inch) touch monitor with 1366 x 768 resolution, plus full-screen ...support for lower resolutions; includes custom scaling for maximum image size while preserving original aspect ratio ● Wide viewing angle to allow viewing from a sitting or standing position, or moving from side-to the Product Notices provided on the retail system computer ● HP...
User Guide
Page 11
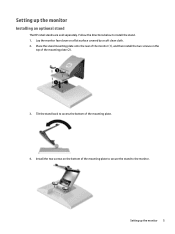
Install the two screws on a flat surface covered by a soft clean cloth. 2. Setting up the monitor Installing an optional stand The HP retail stands are sold separately. Tilt the stand back to install the stand. 1. Lay the monitor face down on the bottom of the mounting plate to secure the stand to the monitor. Place the stand mounting plate onto the rear of the monitor (1), and then install the two screws on the top of the mounting plate. 4. Follow the directions below to access the bottom of the mounting plate (2). 3. Setting up the monitor 5
Install the two screws on a flat surface covered by a soft clean cloth. 2. Setting up the monitor Installing an optional stand The HP retail stands are sold separately. Tilt the stand back to install the stand. 1. Lay the monitor face down on the bottom of the mounting plate to secure the stand to the monitor. Place the stand mounting plate onto the rear of the monitor (1), and then install the two screws on the top of the mounting plate. 4. Follow the directions below to access the bottom of the mounting plate (2). 3. Setting up the monitor 5
User Guide
Page 12
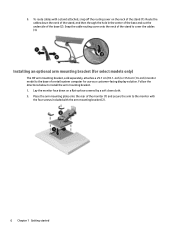
...cover onto the neck of the stand to the base of the monitor (1) and secure the arm to install the arm mounting bracket. 1. Place the arm mounting plate onto the rear of a retail system computer for select models only) The HP arm mounting bracket, sold separately, attaches a 25.7 cm (10....1-inch) or 35.6 cm (14-inch) monitor model to cover the cables (3). 5. Follow the directions below to the...
...cover onto the neck of the stand to the base of the monitor (1) and secure the arm to install the arm mounting bracket. 1. Place the arm mounting plate onto the rear of a retail system computer for select models only) The HP arm mounting bracket, sold separately, attaches a 25.7 cm (10....1-inch) or 35.6 cm (14-inch) monitor model to cover the cables (3). 5. Follow the directions below to the...

User Guide
Page 13
... underside of the arm (1) and attach the cables to cover the cables (4). 4. Setting up the monitor 7 To route the cables on the arm mounting bracket, snap off the routing cover on the front of the retail system computer base (1), and then secure the bracket with the screw (2). Route the cables through the... the bottom retainer (3), and then snap the routing cover onto the arm to the rear I/O on a flat surface covered by a soft clean cloth. 5. 3. Lay the retail system computer face down on the monitor.
... underside of the arm (1) and attach the cables to cover the cables (4). 4. Setting up the monitor 7 To route the cables on the arm mounting bracket, snap off the routing cover on the front of the retail system computer base (1), and then secure the bracket with the screw (2). Route the cables through the... the bottom retainer (3), and then snap the routing cover onto the arm to the rear I/O on a flat surface covered by a soft clean cloth. 5. 3. Lay the retail system computer face down on the monitor.

User Guide
Page 14
NOTE: For more information on connecting the cables to the retail system computer, refer to the retail system computer's rear I/O. Route the cables from the monitor's arm mounting bracket up through the center hole in the base of the retail system computer and connect the cables to the documentation included with the computer. 8 Chapter 1 Getting started 6.
NOTE: For more information on connecting the cables to the retail system computer, refer to the retail system computer's rear I/O. Route the cables from the monitor's arm mounting bracket up through the center hole in the base of the retail system computer and connect the cables to the documentation included with the computer. 8 Chapter 1 Getting started 6.

User Guide
Page 15
...12 for your video input and power port configuration. See Configuration options on your configuration are sold separately and are available from HP. Connecting a non-touch monitor to a retail system computer with a 12 V powered USB option, connect the following cables. ● DisplayPort cable - The cables for... connector on the rear of the retail system computer or using a touch monitor as a stand-alone display connected to the retail system computer (with a 12 V powered USB option If you are mounting a touch monitor to the base of the monitor and the other end to the ...
...12 for your video input and power port configuration. See Configuration options on your configuration are sold separately and are available from HP. Connecting a non-touch monitor to a retail system computer with a 12 V powered USB option, connect the following cables. ● DisplayPort cable - The cables for... connector on the rear of the retail system computer or using a touch monitor as a stand-alone display connected to the retail system computer (with a 12 V powered USB option If you are mounting a touch monitor to the base of the monitor and the other end to the ...

User Guide
Page 16
...to the USB Type-B port on the monitor and connect the Type-A end of the monitor and the other end to a USB 2.0 Type-A port on the retail system computer. Connecting a touch monitor to a retail system computer without a 12 V powered USB option If you are using a touch monitor as a stand-alone display connected to... cable - Connect the barrel end of the power cable to the power connector on the rear of the monitor and connect the powered USB end of the cable to a retail system computer or HP desktop computer that does not have a 12 V powered USB port, connect the following cables. ● ...
...to the USB Type-B port on the monitor and connect the Type-A end of the monitor and the other end to a USB 2.0 Type-A port on the retail system computer. Connecting a touch monitor to a retail system computer without a 12 V powered USB option If you are using a touch monitor as a stand-alone display connected to... cable - Connect the barrel end of the power cable to the power connector on the rear of the monitor and connect the powered USB end of the cable to a retail system computer or HP desktop computer that does not have a 12 V powered USB port, connect the following cables. ● ...

User Guide
Page 17
... adapter cable to the rear of the monitor and connect the AC power cable to the power adapter and to a retail system computer or HP desktop computer that does not have a 12 V powered USB port, connect the following cables. ● DisplayPort cable - Connecting a non-touch monitor to a retail system computer without a 12 V powered USB option...
... adapter cable to the rear of the monitor and connect the AC power cable to the power adapter and to a retail system computer or HP desktop computer that does not have a 12 V powered USB port, connect the following cables. ● DisplayPort cable - Connecting a non-touch monitor to a retail system computer without a 12 V powered USB option...
User Guide
Page 18
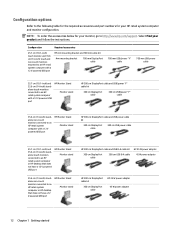
...700 mm USB power cable 25.7 cm (10.1-inch) and 35.6 cm (14-inch) standalone touch monitors connected to an HP retail system computer with a 12 V powered USB port HP Monitor Stand Monitor stand HP 300 cm DisplayPort cable and USB/power "Y" cable kit 300 cm DisplayPort cable 300 cm USB/power ..."Y" cable 35.6 cm (14-inch) standalone non-touch monitor connected to an HP retail system computer with a 12 V powered USB port HP Monitor Stand Monitor stand HP 300 cm DisplayPort cable and USB power cable kit 300 cm DisplayPort cable 300 cm USB power cable...
...700 mm USB power cable 25.7 cm (10.1-inch) and 35.6 cm (14-inch) standalone touch monitors connected to an HP retail system computer with a 12 V powered USB port HP Monitor Stand Monitor stand HP 300 cm DisplayPort cable and USB/power "Y" cable kit 300 cm DisplayPort cable 300 cm USB/power ..."Y" cable 35.6 cm (14-inch) standalone non-touch monitor connected to an HP retail system computer with a 12 V powered USB port HP Monitor Stand Monitor stand HP 300 cm DisplayPort cable and USB power cable kit 300 cm DisplayPort cable 300 cm USB power cable...
User Guide
Page 19
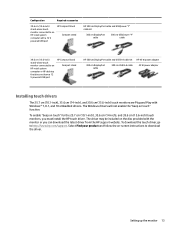
... cm DisplayPort cable 300 cm USB/power "Y" cable 39.6 cm (15.6-inch) stand-alone touch monitor connected to an HP retail system computer or HP desktop that does not have a 12 V powered USB port HP Compact Stand Compact stand HP 300 cm DisplayPort cable and USB B-A cable kit 300 cm DisplayPort cable 300 cm USB B-A cable...
... cm DisplayPort cable 300 cm USB/power "Y" cable 39.6 cm (15.6-inch) stand-alone touch monitor connected to an HP retail system computer or HP desktop that does not have a 12 V powered USB port HP Compact Stand Compact stand HP 300 cm DisplayPort cable and USB B-A cable kit 300 cm DisplayPort cable 300 cm USB B-A cable...

