Quick Setup Guide
Page 1
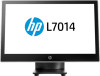
... to HP RP9 G1 Retail Systems HP L7014 Retail Point of Sale Monitors attached to HP RP9 G1 Retail Systems OR HP L7010t, L7014t, L7016t Retail Point of Sale Touch Monitors attached to HP RP5 or RP5800 Retail Systems, or an HP Desktop Mini OR HP L7014 Retail Point of Sale Monitors attached to change without notice. Printed in xxxxx 300 cm DisplayPort cable 300 cm USB power cable...
... to HP RP9 G1 Retail Systems HP L7014 Retail Point of Sale Monitors attached to HP RP9 G1 Retail Systems OR HP L7010t, L7014t, L7016t Retail Point of Sale Touch Monitors attached to HP RP5 or RP5800 Retail Systems, or an HP Desktop Mini OR HP L7014 Retail Point of Sale Monitors attached to change without notice. Printed in xxxxx 300 cm DisplayPort cable 300 cm USB power cable...
User Guide
Page 2
... Edition: March 2016 First Edition: January 2016 Document Part Number: 851545-002 Select Find your product. Windows is subject to http://www.hp.com/support. The information contained herein is either a registered trademark or trademark of Microsoft Corporation in the express warranty statements accompanying such products and services. To access the latest user guide, go to change without notice.
... Edition: March 2016 First Edition: January 2016 Document Part Number: 851545-002 Select Find your product. Windows is subject to http://www.hp.com/support. The information contained herein is either a registered trademark or trademark of Microsoft Corporation in the express warranty statements accompanying such products and services. To access the latest user guide, go to change without notice.
User Guide
Page 5
... ...12 Installing touch drivers ...13 Turning on the monitor ...14 Installing a security cable ...14 2 Using the monitor ...15 Software and utilities ...15 The Setup information file ...15 The Image Color Matching file ...15 Installing the .inf and .icm files ...15 Installing from the optical disc ...15 Downloading from the web ...16 Using the on-screen display (OSD) menu ...16 Assigning the Function buttons ...17 Using Auto-Sleep Mode...
... ...12 Installing touch drivers ...13 Turning on the monitor ...14 Installing a security cable ...14 2 Using the monitor ...15 Software and utilities ...15 The Setup information file ...15 The Image Color Matching file ...15 Installing the .inf and .icm files ...15 Installing from the optical disc ...15 Downloading from the web ...16 Using the on-screen display (OSD) menu ...16 Assigning the Function buttons ...17 Using Auto-Sleep Mode...
User Guide
Page 6
... Appendix A Technical specifications ...24 25.7 cm/10.1-inch model ...24 35.6 cm/14-inch model ...24 39.6 cm/15.6-inch model ...25 Optional external power adapter ...26 Preset display resolutions ...26 25.7 cm/10.1-inch model ...26 35.6 cm/14-inch and 39.6 cm/15.6-inch models 26 Entering user modes ...27 Energy saver feature ...27 Appendix B Accessibility ...28 Supported assistive technologies ...28...
... Appendix A Technical specifications ...24 25.7 cm/10.1-inch model ...24 35.6 cm/14-inch model ...24 39.6 cm/15.6-inch model ...25 Optional external power adapter ...26 Preset display resolutions ...26 25.7 cm/10.1-inch model ...26 35.6 cm/14-inch and 39.6 cm/15.6-inch models 26 Entering user modes ...27 Energy saver feature ...27 Appendix B Accessibility ...28 Supported assistive technologies ...28...
User Guide
Page 7
... luminous environment to some form of serious injury, read the Safety and Comfort Guide. Do not disable the power cord grounding pin, for each device. the power strips must be pulled, grabbed, or tripped over them so that the total ampere rating of the products connected to use only a power source and connection appropriate for entertainment purposes. Disconnect the...
... luminous environment to some form of serious injury, read the Safety and Comfort Guide. Do not disable the power cord grounding pin, for each device. the power strips must be pulled, grabbed, or tripped over them so that the total ampere rating of the products connected to use only a power source and connection appropriate for entertainment purposes. Disconnect the...
User Guide
Page 8
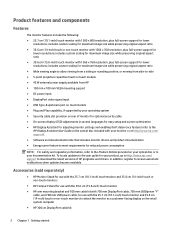
... settings and enabling theft deterrence feature (refer to the HP Display Assistant User Guide on the optical disc included with your monitor or at http://www.hp.com/ support). ● Software and documentation disc that includes monitor drivers and product documentation ● Energy saver feature to -side ● 5-point projective capacitive touch on touch models ● 45 W external power supply available from HP...
... settings and enabling theft deterrence feature (refer to the HP Display Assistant User Guide on the optical disc included with your monitor or at http://www.hp.com/ support). ● Software and documentation disc that includes monitor drivers and product documentation ● Energy saver feature to -side ● 5-point projective capacitive touch on touch models ● 45 W external power supply available from HP...

User Guide
Page 10
... Control (1) Menu button (2)-(4) Function buttons Function Opens and closes the OSD. NOTE: You can reconfigure the Function buttons in the OSD to the buttons will appear on the screen when the OSD is open. The navigation indicators next to quickly select the most commonly used operations. Use these buttons to navigate through the OSD. NOTE: To view an OSD menu simulator, visit the HP Customer Self Repair Services Media Library...
... Control (1) Menu button (2)-(4) Function buttons Function Opens and closes the OSD. NOTE: You can reconfigure the Function buttons in the OSD to the buttons will appear on the screen when the OSD is open. The navigation indicators next to quickly select the most commonly used operations. Use these buttons to navigate through the OSD. NOTE: To view an OSD menu simulator, visit the HP Customer Self Repair Services Media Library...
User Guide
Page 19
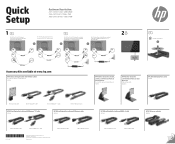
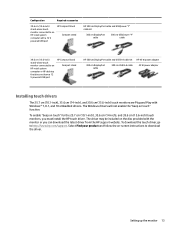
...-alone touch monitor connected to download the driver. To enable "beep on -screen instructions to an HP retail system computer or HP desktop that does not have a 12 V powered USB port HP Compact Stand Compact stand HP 300 cm DisplayPort cable and USB B-A cable kit 300 cm DisplayPort cable 300 cm USB B-A cable HP 45 W power adapter 45 W power adapter Installing touch drivers The 25.7 cm (10...
...-alone touch monitor connected to download the driver. To enable "beep on -screen instructions to an HP retail system computer or HP desktop that does not have a 12 V powered USB port HP Compact Stand Compact stand HP 300 cm DisplayPort cable and USB B-A cable kit 300 cm DisplayPort cable 300 cm USB B-A cable HP 45 W power adapter 45 W power adapter Installing touch drivers The 25.7 cm (10...
User Guide
Page 20
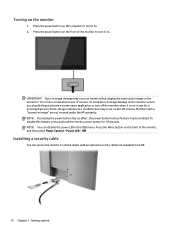
... to a fixed object with a "burned-in use for a prolonged period of nonuse. Image retention is not in image" are not covered under the HP warranty. Installing a security cable You can disable the power LED in image damage may occur on the screen for 10 seconds. Press the power button on the computer to turn it is a condition that display the same...
... to a fixed object with a "burned-in use for a prolonged period of nonuse. Image retention is not in image" are not covered under the HP warranty. Installing a security cable You can disable the power LED in image damage may occur on the screen for 10 seconds. Press the power button on the computer to turn it is a condition that display the same...
User Guide
Page 21
... files are data files that are used by Windows operating systems to ensure monitor compatibility with graphics programs to provide consistent color matching from monitor screen to printer, or from scanner to monitor screen. The optical disc menu is VESA DDC2- Select Install Monitor Driver Software. 4. NOTE: You may need to update, you can install on the computer: ● .inf (Setup information file...
... files are data files that are used by Windows operating systems to ensure monitor compatibility with graphics programs to provide consistent color matching from monitor screen to printer, or from scanner to monitor screen. The optical disc menu is VESA DDC2- Select Install Monitor Driver Software. 4. NOTE: You may need to update, you can install on the computer: ● .inf (Setup information file...
User Guide
Page 22
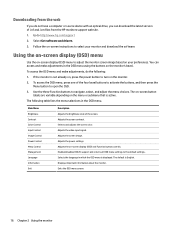
Using the on-screen display (OSD) menu Use the on-screen display (OSD) menu to adjust the monitor screen image based on your monitor and download the software. Adjusts the on the monitor's bezel. Enables/disables DDC/CI support and returns all OSD menu settings to open the OSD. 3. Downloading from the HP monitors support web site. 1. Follow the on-screen instructions to turn on , press the power button to select your...
Using the on-screen display (OSD) menu Use the on-screen display (OSD) menu to adjust the monitor screen image based on your monitor and download the software. Adjusts the on the monitor's bezel. Enables/disables DDC/CI support and returns all OSD menu settings to open the OSD. 3. Downloading from the HP monitors support web site. 1. Follow the on-screen instructions to turn on , press the power button to select your...

User Guide
Page 23
... change the Function buttons from their default values so that when the buttons are shown below. Assigning the Function buttons Pressing one of the four OSD bezel buttons activates the buttons and displays the button icons on -screen display) menu. You can assign only the three Function buttons. You can quickly access commonly used menu items. To assign the Function buttons: 1. NOTE: You can not reassign the Menu button. Opens the Brightness adjustment scale. The factory default button...
... change the Function buttons from their default values so that when the buttons are shown below. Assigning the Function buttons Pressing one of the four OSD bezel buttons activates the buttons and displays the button icons on -screen display) menu. You can assign only the three Function buttons. You can quickly access commonly used menu items. To assign the Function buttons: 1. NOTE: You can not reassign the Menu button. Opens the Brightness adjustment scale. The factory default button...

User Guide
Page 24
..., if you to open the OSD. Using Auto-Sleep Mode The monitor supports an OSD (on-screen display) menu option called Auto-Sleep Mode that allows you activate the mouse or keyboard). The monitor draws less than 0.5 W of the four OSD bezel buttons to activate the buttons, and then press the Menu button to enable or disable a reduced power state for the monitor...
..., if you to open the OSD. Using Auto-Sleep Mode The monitor supports an OSD (on-screen display) menu option called Auto-Sleep Mode that allows you activate the mouse or keyboard). The monitor draws less than 0.5 W of the four OSD bezel buttons to activate the buttons, and then press the Menu button to enable or disable a reduced power state for the monitor...
User Guide
Page 25
... needed. Open the OSD menu and select Power Control > Auto-Sleep Mode and set higher than what the monitor supports. Press and hold the monitor power button for seconds to disable the power button lockout feature. The monitor's power button lockout function is enabled. Power button is off but it did not seem to disable the power button lockout function. Be sure the computer power is turned off . Press any key on...
... needed. Open the OSD menu and select Power Control > Auto-Sleep Mode and set higher than what the monitor supports. Press and hold the monitor power button for seconds to disable the power button lockout feature. The monitor's power button lockout function is enabled. Power button is off but it did not seem to disable the power button lockout function. Be sure the computer power is turned off . Press any key on...

User Guide
Page 26
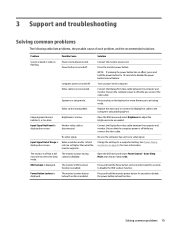
... is quickly removed from sleep mode. The USB cable is either removed or connected. Touch operation does not function properly on page 23 for detailed instructions. When the monitor used is lost. The USB connection is only capable of time to recover from the monitor and reinserted, and the touch function is in again. The screen may damage the display. ● Never disassemble or repair...
... is quickly removed from sleep mode. The USB cable is either removed or connected. Touch operation does not function properly on page 23 for detailed instructions. When the monitor used is lost. The USB connection is only capable of time to recover from the monitor and reinserted, and the touch function is in again. The screen may damage the display. ● Never disassemble or repair...
User Guide
Page 27
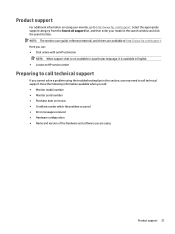
... model number ● Monitor serial number ● Purchase date on using Product support 21 Here you can: ● Chat online with an HP technician NOTE: When support chat is not available in a particular language, it is available in English. ● Locate an HP service center Preparing to call technical support. Product support For additional information on invoice ● Conditions under which the problem occurred ● Error messages...
... model number ● Monitor serial number ● Purchase date on using Product support 21 Here you can: ● Chat online with an HP technician NOTE: When support chat is not available in a particular language, it is available in English. ● Locate an HP service center Preparing to call technical support. Product support For additional information on invoice ● Conditions under which the problem occurred ● Error messages...

User Guide
Page 29
... operating instructions. It may damage the monitor. Cleaning the monitor 1. Turn off the monitor and disconnect power from the computer by using a screen saver program and turning off when not in use. These openings must lay the monitor facedown on the screen surface. Never push objects of the monitor by unplugging the power cord from excessive light, heat, or moisture. ● When removing...
... operating instructions. It may damage the monitor. Cleaning the monitor 1. Turn off the monitor and disconnect power from the computer by using a screen saver program and turning off when not in use. These openings must lay the monitor facedown on the screen surface. Never push objects of the monitor by unplugging the power cord from excessive light, heat, or moisture. ● When removing...
User Guide
Page 30
... product specifications provided in the user guide might have changed between the time of manufacturing and delivery of your monitor model to find the model-specific QuickSpecs. 25.7 cm/10.1-inch model Technical specifications Display Type Viewable image size Maximum weight (unpacked): Dimensions (display head only): Height Depth Width Maximum graphic resolution Optimum graphic resolution Environmental requirements: Operating Temperature Nonoperating Temperature Power source Power supply output rating Input terminal 25...
... product specifications provided in the user guide might have changed between the time of manufacturing and delivery of your monitor model to find the model-specific QuickSpecs. 25.7 cm/10.1-inch model Technical specifications Display Type Viewable image size Maximum weight (unpacked): Dimensions (display head only): Height Depth Width Maximum graphic resolution Optimum graphic resolution Environmental requirements: Operating Temperature Nonoperating Temperature Power source Power supply output rating Input terminal 25...
User Guide
Page 32
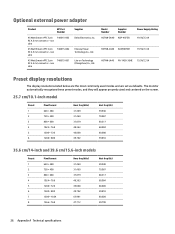
... HSTNN-LA40 PA-1450-36HE 19.5V/2.31A Preset display resolutions The display resolutions listed below are the most commonly used modes and are set as defaults. non slim 740015-002 45 Watt Smart nPFC 3 pin RC 4.5 mm connector - Chicony Power Technology Co., Ltd. Lite-on the screen. 25.7 cm/10.1-inch model Preset 1 2 3 4 5 6 Pixel format 640 × 480 720 × 400...
... HSTNN-LA40 PA-1450-36HE 19.5V/2.31A Preset display resolutions The display resolutions listed below are the most commonly used modes and are set as defaults. non slim 740015-002 45 Watt Smart nPFC 3 pin RC 4.5 mm connector - Chicony Power Technology Co., Ltd. Lite-on the screen. 25.7 cm/10.1-inch model Preset 1 2 3 4 5 6 Pixel format 640 × 480 720 × 400...
User Guide
Page 33
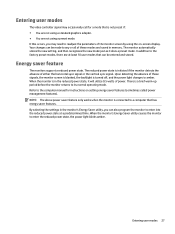
..., you can be entered and stored. There is turned off, and the power light changes to amber. Entering user modes 27 The monitor automatically stores the new setting, and then recognizes the new mode just as it will utilize 0.5 watts of the monitor screen by using a preset mode. Energy saver feature The monitors support a reduced power state. Refer to its normal operating mode. NOTE: The above power saver feature only...
..., you can be entered and stored. There is turned off, and the power light changes to amber. Entering user modes 27 The monitor automatically stores the new setting, and then recognizes the new mode just as it will utilize 0.5 watts of the monitor screen by using a preset mode. Energy saver feature The monitors support a reduced power state. Refer to its normal operating mode. NOTE: The above power saver feature only...


