User Guide
Page 7
... updates to the user guide for wall mounting application NOTE: For safety and regulatory information, refer to http://www.hp.com/support, and select your documentation kit. The monitor features include: ● 38.1 cm/15.0 in your country. Compatible with VGA, SVGA and XGA (non-...Display (OSD) adjustments in several languages for easy setup and screen optimization ● Software and documentation disc that includes the USB touch driver, HP monitor driver software and product documentation ● Detachable stand for your product, go to the Product Notices provided on your media disc,...
... updates to the user guide for wall mounting application NOTE: For safety and regulatory information, refer to http://www.hp.com/support, and select your documentation kit. The monitor features include: ● 38.1 cm/15.0 in your country. Compatible with VGA, SVGA and XGA (non-...Display (OSD) adjustments in several languages for easy setup and screen optimization ● Software and documentation disc that includes the USB touch driver, HP monitor driver software and product documentation ● Detachable stand for your product, go to the Product Notices provided on your media disc,...
User Guide
Page 11
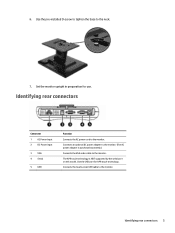
... the USB port for use. 6. Connects an optional DC power adapter to the monitor. (The AC power adapter is NOT supported by the serial port on this model. Identifying rear connectors 5 Identifying rear connectors Connector 1 AC Power... Input 2 DC Power Input 3 VGA 4 Serial 5 USB Function Connects the AC power cord to the neck. 7. The APR touch technology is purchased separately.) Connects the VGA video cable to the monitor. Set the monitor upright in preparation for APR touch technology. Connects the touchscreen USB cable to the...
... the USB port for use. 6. Connects an optional DC power adapter to the monitor. (The AC power adapter is NOT supported by the serial port on this model. Identifying rear connectors 5 Identifying rear connectors Connector 1 AC Power... Input 2 DC Power Input 3 VGA 4 Serial 5 USB Function Connects the AC power cord to the neck. 7. The APR touch technology is purchased separately.) Connects the VGA video cable to the monitor. Set the monitor upright in preparation for APR touch technology. Connects the touchscreen USB cable to the...

User Guide
Page 12
...to turn it on power cords or cables. Connecting the cables 1. Connect the VGA video cable between the monitor's USB connector and your region. Connect the USB touch cable between the monitor's VGA input connector and your safety, do not place anything on . Press the power button to the ...equipment: Do not disable the power cord grounding plug. Connect the power cable between the AC power source and the monitor's AC input power jack...
...to turn it on power cords or cables. Connecting the cables 1. Connect the VGA video cable between the monitor's USB connector and your region. Connect the USB touch cable between the monitor's VGA input connector and your safety, do not place anything on . Press the power button to the ...equipment: Do not disable the power cord grounding plug. Connect the power cable between the AC power source and the monitor's AC input power jack...
User Guide
Page 13
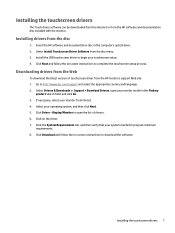
Installing the touchscreen drivers The Touch driver software can be downloaded from the Internet or from the disc menu. 3. Select Install Touchscreen Driver Software from the HP software and documentation disc included with the monitor. Downloading drivers from the HP monitors support Web site: 1. If necessary, select your monitor from the disc 1. Click Download and follow the...
Installing the touchscreen drivers The Touch driver software can be downloaded from the Internet or from the disc menu. 3. Select Install Touchscreen Driver Software from the HP software and documentation disc included with the monitor. Downloading drivers from the HP monitors support Web site: 1. If necessary, select your monitor from the disc 1. Click Download and follow the...
User Guide
Page 16
You may need these numbers when contacting HP about the monitor model. The rating labels are located on the monitor provide the spare part number, product number, and serial number. CAUTION: In order to protect the monitor, be sure to hold the base when adjusting the LCD, and take care not to 90 degrees). Tilting the monitor For viewing clarity, tilt the monitor forward (up to -5 degrees) or backward (up the monitor Locating the rating labels The rating labels on the rear panel of the monitor display head. 10 Chapter 3 Setting up to touch the screen.
You may need these numbers when contacting HP about the monitor model. The rating labels are located on the monitor provide the spare part number, product number, and serial number. CAUTION: In order to protect the monitor, be sure to hold the base when adjusting the LCD, and take care not to 90 degrees). Tilting the monitor For viewing clarity, tilt the monitor forward (up to -5 degrees) or backward (up the monitor Locating the rating labels The rating labels on the rear panel of the monitor display head. 10 Chapter 3 Setting up to touch the screen.

User Guide
Page 19
... a keyboard key). Also, to fit the display. Power To turn the monitor on this monitor will look best when your computer's output resolution matches this monitor's native resolution, which is 1024 x 768. Touch Your monitor is factory-calibrated and should not need for adjustments for analog VGA video,...LED on the bottom of disuse are "remembered" by the monitor to reduce the need manual calibration (unless the input video is scaled by the monitor. Touching the screen will likely not require video adjustments. The touch function is not active until the USB cable is connected to...
... a keyboard key). Also, to fit the display. Power To turn the monitor on this monitor will look best when your computer's output resolution matches this monitor's native resolution, which is 1024 x 768. Touch Your monitor is factory-calibrated and should not need for adjustments for analog VGA video,...LED on the bottom of disuse are "remembered" by the monitor to reduce the need manual calibration (unless the input video is scaled by the monitor. Touching the screen will likely not require video adjustments. The touch function is not active until the USB cable is connected to...
User Guide
Page 22
... Adjust your computer's resolution/timing mode to be within the allowable timing ranges specified for your monitor (see website for specifications) Monitor display image looks abnormal Adjust your computer's resolution/timing mode to be in the OSD Touch functionality doesn't work Verify your PC has the latest drivers installed Perform the calibration routine...
... Adjust your computer's resolution/timing mode to be within the allowable timing ranges specified for your monitor (see website for specifications) Monitor display image looks abnormal Adjust your computer's resolution/timing mode to be in the OSD Touch functionality doesn't work Verify your PC has the latest drivers installed Perform the calibration routine...