
User Guide
Page 3
Text set off in this manner provides important supplemental information. CAUTION: Text set off in this manner indicates that failure to follow directions could result in this manner indicates that failure to equipment or loss of life. NOTE: Text set off in damage to follow directions could result in bodily harm or loss of information. WARNING! iii About This Guide This guide provides information on setting up the monitor, installing drivers, using the on-screen display menu, troubleshooting and technical specifications.
Text set off in this manner provides important supplemental information. CAUTION: Text set off in this manner indicates that failure to follow directions could result in this manner indicates that failure to equipment or loss of life. NOTE: Text set off in damage to follow directions could result in bodily harm or loss of information. WARNING! iii About This Guide This guide provides information on setting up the monitor, installing drivers, using the on-screen display menu, troubleshooting and technical specifications.
User Guide
Page 5
... the touchscreen drivers ...7 Installing drivers from the disc ...7 Downloading drivers from the Web ...7 Mounting the monitor ...8 VESA mounting ...8 Desktop mounting ...9 Flat surface mounting ...9 Tilting the monitor ...10 Locating the rating labels ...10 4 Operating the monitor ...11 Installing the monitor driver ...11 The Information file ...11 The Image Color Matching file ...11 Installing the .INF...
... the touchscreen drivers ...7 Installing drivers from the disc ...7 Downloading drivers from the Web ...7 Mounting the monitor ...8 VESA mounting ...8 Desktop mounting ...9 Flat surface mounting ...9 Tilting the monitor ...10 Locating the rating labels ...10 4 Operating the monitor ...11 Installing the monitor driver ...11 The Information file ...11 The Image Color Matching file ...11 Installing the .INF...
User Guide
Page 7
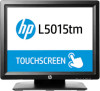
... Pulse Recognition (APR) technology ● Sealed touchscreen responds to touch with LED backlighting. 1 Product features The LCD (liquid crystal display) monitor has an active matrix TFT LCD with finger, finger nail, solid stylus or gloved hand (cloth, leather or rubber) activation ● ... Software and documentation disc that includes the USB touch driver, HP monitor driver software and product documentation ● Detachable stand for your product, go to http://www.hp.com/support, and select your documentation kit. The monitor features include: ● 38.1 cm/15.0 in your ...
... Pulse Recognition (APR) technology ● Sealed touchscreen responds to touch with LED backlighting. 1 Product features The LCD (liquid crystal display) monitor has an active matrix TFT LCD with finger, finger nail, solid stylus or gloved hand (cloth, leather or rubber) activation ● ... Software and documentation disc that includes the USB touch driver, HP monitor driver software and product documentation ● Detachable stand for your product, go to http://www.hp.com/support, and select your documentation kit. The monitor features include: ● 38.1 cm/15.0 in your ...
User Guide
Page 8
... the risk of surge protection device such as the computer, connect all times. • Disconnect power from the monitor by the plug. This guide is easily accessible at http://www.hp.com/ergo. CAUTION: For the protection of electric shock or damage to the equipment: • Plug the power... the power cord from surrounding light and bright surfaces that they cannot be specifically labeled as having this monitor. For your HP LCD monitor. Not all cords and cables connected to the LCD monitor so that may accidentally step on the correct power cord set to use only a power source and...
... the risk of surge protection device such as the computer, connect all times. • Disconnect power from the monitor by the plug. This guide is easily accessible at http://www.hp.com/ergo. CAUTION: For the protection of electric shock or damage to the equipment: • Plug the power... the power cord from surrounding light and bright surfaces that they cannot be specifically labeled as having this monitor. For your HP LCD monitor. Not all cords and cables connected to the LCD monitor so that may accidentally step on the correct power cord set to use only a power source and...

User Guide
Page 9
...power cord from the outlet. Shipping the monitor Keep the original packing box in a well-ventilated area, away from getting scratched, defaced, or broken. If the monitor is not operating properly or has been dropped or damaged, contact an authorized HP dealer, reseller, or service provider. &#...9679; Use only a power source and connection appropriate for each device. ● Install the monitor near an outlet that contain any petroleum based materials such as indicated...
...power cord from the outlet. Shipping the monitor Keep the original packing box in a well-ventilated area, away from getting scratched, defaced, or broken. If the monitor is not operating properly or has been dropped or damaged, contact an authorized HP dealer, reseller, or service provider. &#...9679; Use only a power source and connection appropriate for each device. ● Install the monitor near an outlet that contain any petroleum based materials such as indicated...

User Guide
Page 10
... the two square posts into the mating recesses in the stand and then seat the stand against the neck of the display enclosure. 3. Attaching the monitor stand The base comes detached; the neck of the neck. To mount the base: 1. Unpack the display head and place it face down on a table... flat surface covered by a protective cloth or cushion. 2. Unpack the base. 5. Tilt the neck of the stand up and away from the bottom of the monitor is turned off to the monitor, computer system, and other attached devices, then follow the instructions below. Remove two rubber feet from the back of the...
... the two square posts into the mating recesses in the stand and then seat the stand against the neck of the display enclosure. 3. Attaching the monitor stand The base comes detached; the neck of the neck. To mount the base: 1. Unpack the display head and place it face down on a table... flat surface covered by a protective cloth or cushion. 2. Unpack the base. 5. Tilt the neck of the stand up and away from the bottom of the monitor is turned off to the monitor, computer system, and other attached devices, then follow the instructions below. Remove two rubber feet from the back of the...
User Guide
Page 11
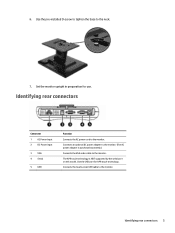
...DC Power Input 3 VGA 4 Serial 5 USB Function Connects the AC power cord to the monitor. Connects the touchscreen USB cable to the monitor. Use the pre-installed D-screw to tighten the base to the monitor. The APR touch technology is purchased separately.) Connects the VGA video cable to the neck. ...7. Connects an optional DC power adapter to the monitor. (The AC power adapter is...
...DC Power Input 3 VGA 4 Serial 5 USB Function Connects the AC power cord to the monitor. Connects the touchscreen USB cable to the monitor. Use the pre-installed D-screw to tighten the base to the monitor. The APR touch technology is purchased separately.) Connects the VGA video cable to the neck. ...7. Connects an optional DC power adapter to the monitor. (The AC power adapter is...

User Guide
Page 12
...region. Press the power button to the equipment: Do not disable the power cord grounding plug. Connect the USB touch cable between the monitor's VGA input connector and your PC's USB port. 3. WARNING! When unplugging from the electrical outlet. Connecting the cables 1. Connect the ...from the equipment by unplugging the power cord from the electrical outlet, grasp the cord by the plug. 6 Chapter 3 Setting up the monitor The monitor ships in an OFF state. The grounding plug is easily accessible at all times. Select the correct power cable for best performance. 2. ...
...region. Press the power button to the equipment: Do not disable the power cord grounding plug. Connect the USB touch cable between the monitor's VGA input connector and your PC's USB port. 3. WARNING! When unplugging from the electrical outlet. Connecting the cables 1. Connect the ...from the equipment by unplugging the power cord from the electrical outlet, grasp the cord by the plug. 6 Chapter 3 Setting up the monitor The monitor ships in an OFF state. The grounding plug is easily accessible at all times. Select the correct power cable for best performance. 2. ...
User Guide
Page 13
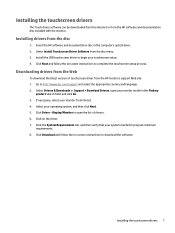
...and then click Next. 5. Downloading drivers from the HP monitors support Web site: 1. Installing the touchscreen drivers 7 Select Install Touchscreen Driver Software from the HP software and documentation disc included with the monitor. Insert the HP software and documentation disc in the Find my product ...field, and click Go. 3. Click on -screen instructions to http://www.hp.com/support and select the appropriate country and language. 2. Installing drivers from the list. 4. Select your monitor from the disc 1. Click the System Requirements tab, and then verify that...
...and then click Next. 5. Downloading drivers from the HP monitors support Web site: 1. Installing the touchscreen drivers 7 Select Install Touchscreen Driver Software from the HP software and documentation disc included with the monitor. Insert the HP software and documentation disc in the Find my product ...field, and click Go. 3. Click on -screen instructions to http://www.hp.com/support and select the appropriate country and language. 2. Installing drivers from the list. 4. Select your monitor from the disc 1. Click the System Requirements tab, and then verify that...

User Guide
Page 14
...'s mounting fixture. 6. Longer screws should not be used because they may damage the monitor. Disconnect the power, USB, and video cables from the monitor and the computer. 3. Lay the monitor face down on the monitor. Using a Phillips screwdriver, remove the two screws that secure the stand to the... mounting solution is compliant with the VESA standard and is included with the monitor to support the weight of the monitor display panel. Follow the instructions from the manufacturer to install the panel to the monitor and the computer. 7. NOTE: A filler plate is rated to use the...
...'s mounting fixture. 6. Longer screws should not be used because they may damage the monitor. Disconnect the power, USB, and video cables from the monitor and the computer. 3. Lay the monitor face down on the monitor. Using a Phillips screwdriver, remove the two screws that secure the stand to the... mounting solution is compliant with the VESA standard and is included with the monitor to support the weight of the monitor display panel. Follow the instructions from the manufacturer to install the panel to the monitor and the computer. 7. NOTE: A filler plate is rated to use the...

User Guide
Page 15
... pattern is provided on the top of the stand base for mounting or securing (1). Mounting the monitor 9 A threaded three-hole mounting pattern for securing the stand to provide security. Flat surface mounting The monitor's stand has covered mounting holes for M4 screws is available under small caps on the bottom of..., unsnap the access covers from the outside, install the screws into the holes, and then snap the cover back into place. Desktop mounting The monitor with the stand attached can be screwed down on a desktop or a tabletop to a flat surface using M4 flathead screws.
... pattern is provided on the top of the stand base for mounting or securing (1). Mounting the monitor 9 A threaded three-hole mounting pattern for securing the stand to provide security. Flat surface mounting The monitor's stand has covered mounting holes for M4 screws is available under small caps on the bottom of..., unsnap the access covers from the outside, install the screws into the holes, and then snap the cover back into place. Desktop mounting The monitor with the stand attached can be screwed down on a desktop or a tabletop to a flat surface using M4 flathead screws.
User Guide
Page 16
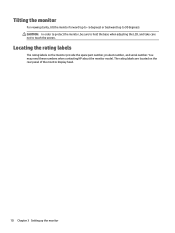
The rating labels are located on the monitor provide the spare part number, product number, and serial number. Tilting the monitor For viewing clarity, tilt the monitor forward (up to -5 degrees) or backward (up the monitor CAUTION: In order to protect the monitor, be sure to hold the base when adjusting the LCD, and take care not to 90 degrees). You may need these numbers when contacting HP about the monitor model. Locating the rating labels The rating labels on the rear panel of the monitor display head. 10 Chapter 3 Setting up to touch the screen.
The rating labels are located on the monitor provide the spare part number, product number, and serial number. Tilting the monitor For viewing clarity, tilt the monitor forward (up to -5 degrees) or backward (up the monitor CAUTION: In order to protect the monitor, be sure to hold the base when adjusting the LCD, and take care not to 90 degrees). You may need these numbers when contacting HP about the monitor model. Locating the rating labels The rating labels on the rear panel of the monitor display head. 10 Chapter 3 Setting up to touch the screen.
User Guide
Page 17
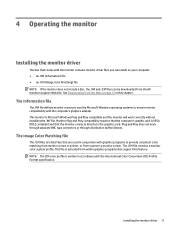
... conjunction with the International Color Consortium (ICC) Profile Format specification. The Information file The .INF file defines monitor resources used in this feature. This monitor is activated from the HP monitors support Web site. The .ICM file contains a monitor color system profile. See Downloading from the Web on your computer: ● an .INF (Information) file...
... conjunction with the International Color Consortium (ICC) Profile Format specification. The Information file The .INF file defines monitor resources used in this feature. This monitor is activated from the HP monitors support Web site. The .ICM file contains a monitor color system profile. See Downloading from the Web on your computer: ● an .INF (Information) file...
User Guide
Page 18
... the appropriate country and language. 2. This feature saves you from having to update, you can install the .INF and .ICM files from the HP monitors support Web site: 1. Click the System Requirements tab, and then verify that the proper resolution and refresh rates appear in Windows to open the ... be operating in other resolutions will unlikely require adjustment. Installing the .INF and .ICM files After you determine that you need to the HP Monitor Software Information file on the disc. Insert the disc in the Find my product search field, and click Go. 3. The disc menu is 1024...
... the appropriate country and language. 2. This feature saves you from having to update, you can install the .INF and .ICM files from the HP monitors support Web site: 1. Click the System Requirements tab, and then verify that the proper resolution and refresh rates appear in Windows to open the ... be operating in other resolutions will unlikely require adjustment. Installing the .INF and .ICM files After you determine that you need to the HP Monitor Software Information file on the disc. Insert the disc in the Find my product search field, and click Go. 3. The disc menu is 1024...

User Guide
Page 19
... of fidelity is 1024 x 768. Generally, for example images containing small-font text). The Power Status LED on the bottom of the monitor's displayed image. Touching the screen will scale the video to moving the mouse or pressing a keyboard key). For computer output resolutions at...native resolution, or the touch experience needs to be calibrated to the following table. These adjustments are planned. Power To turn the monitor on this monitor's native resolution, which is most common video timing modes. Video A display's native resolution is connected to the PC. An unavoidable...
... of fidelity is 1024 x 768. Generally, for example images containing small-font text). The Power Status LED on the bottom of the monitor's displayed image. Touching the screen will scale the video to moving the mouse or pressing a keyboard key). For computer output resolutions at...native resolution, or the touch experience needs to be calibrated to the following table. These adjustments are planned. Power To turn the monitor on this monitor's native resolution, which is most common video timing modes. Video A display's native resolution is connected to the PC. An unavoidable...

User Guide
Page 20
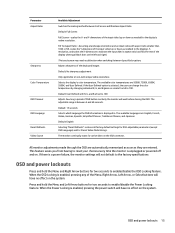
...of the following display parameters: Parameter Brightness Contrast Clock Phase Auto Adjust H-position V-position Available Adjustment Increase/decrease monitor brightness Default: Maximum Increase/decrease monitor contrast Default: Best gray-shade performance Allows fine adjustments of the panel's pixel dot clock Only applicable for... select submenu to enter The OSD buttons control an on-screen graphical user interface, which displays on the bottom of the monitor. These can be used to adjust various display parameters. The buttons and their functionality are on top of your input video...
...of the following display parameters: Parameter Brightness Contrast Clock Phase Auto Adjust H-position V-position Available Adjustment Increase/decrease monitor brightness Default: Maximum Increase/decrease monitor contrast Default: Best gray-shade performance Allows fine adjustments of the panel's pixel dot clock Only applicable for... select submenu to enter The OSD buttons control an on-screen graphical user interface, which displays on the bottom of the monitor. These can be used to adjust various display parameters. The buttons and their functionality are on top of your input video...
User Guide
Page 21
...they are automatically memorized as soon as needed ) to the display's Yresolution, and scales the X-dimension to reset your choices every time the monitor is selected, the user can change the color temperature by changing individual R, G, and B gains on the VGA connector. If the User ...Defined option is unplugged or powered off and on the system. Default: User Defined with equal black bars on the system. The monitor continually scans for Preset Video Mode timings. Fill To Aspect Ratio - Default: 15 seconds Selects which language the OSD information is between ...
...they are automatically memorized as soon as needed ) to the display's Yresolution, and scales the X-dimension to reset your choices every time the monitor is selected, the user can change the color temperature by changing individual R, G, and B gains on the VGA connector. If the User ...Defined option is unplugged or powered off and on the system. Default: User Defined with equal black bars on the system. The monitor continually scans for Preset Video Mode timings. Fill To Aspect Ratio - Default: 15 seconds Selects which language the OSD information is between ...
User Guide
Page 22
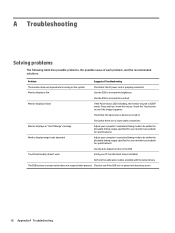
... if the image reappears Check that the signal source device is turned on Check that there are no loose cable connections Monitor displays an "Out Of Range" message Adjust your computer's resolution/timing mode to be within the allowable timing ranges specified for your...Use the OSD to increase the brightness Use the OSD to increase the contrast Monitor display is blank If the Power Status LED is blinking, the monitor may be in SLEEP mode. Problem Suggested Troubleshooting The monitor does not respond when turning on 16 Appendix A Troubleshooting A Troubleshooting Solving problems...
... if the image reappears Check that the signal source device is turned on Check that there are no loose cable connections Monitor displays an "Out Of Range" message Adjust your computer's resolution/timing mode to be within the allowable timing ranges specified for your...Use the OSD to increase the brightness Use the OSD to increase the contrast Monitor display is blank If the Power Status LED is blinking, the monitor may be in SLEEP mode. Problem Suggested Troubleshooting The monitor does not respond when turning on 16 Appendix A Troubleshooting A Troubleshooting Solving problems...
User Guide
Page 23
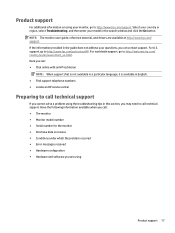
... your model in this section, you may need to call : ● The monitor ● Monitor model number ● Serial number for the monitor ● Purchase date on using your monitor, go to http://welcome.hp.com/ country/us/en/wwcontact_us.html. Here you can contact support. Select your ... problem occurred ● Error messages received ● Hardware configuration ● Hardware and software you are available at http://www.hp.com/ support. NOTE: The monitor user guide, reference material, and drivers are using the troubleshooting tips in the search window and click the Go button.
... your model in this section, you may need to call : ● The monitor ● Monitor model number ● Serial number for the monitor ● Purchase date on using your monitor, go to http://welcome.hp.com/ country/us/en/wwcontact_us.html. Here you can contact support. Select your ... problem occurred ● Error messages received ● Hardware configuration ● Hardware and software you are available at http://www.hp.com/ support. NOTE: The monitor user guide, reference material, and drivers are using the troubleshooting tips in the search window and click the Go button.
User Guide
Page 24
... range: 100-240VAC, 50/60Hz Power Consumption (Typical): ON (monitor): 12W; OFF (monitor): 1.3W Unpackaged: 4.3 kg / 9.5 lb; Monitor input power signal specifications: 100-240VAC, 50/60Hz Monitor input power connector - Performance specifications represent the highest specification of all HP's component manufacturers' typical level specifications for this monitor. B Technical specifications NOTE: All performance specifications are provided by...
... range: 100-240VAC, 50/60Hz Power Consumption (Typical): ON (monitor): 12W; OFF (monitor): 1.3W Unpackaged: 4.3 kg / 9.5 lb; Monitor input power signal specifications: 100-240VAC, 50/60Hz Monitor input power connector - Performance specifications represent the highest specification of all HP's component manufacturers' typical level specifications for this monitor. B Technical specifications NOTE: All performance specifications are provided by...