Specifications
Page 3
...Pivot Rotation Yes, 90° into portrait orientation Base Ships attached and is in the process of being certified to the DA - 13124 Canada - Operating 41° to 95° F (5° to 265 VAC; QuickSpecs HP L1950g 19-inch LCD Monitor Technical Specifications AssetControl Yes (accessible on /off; ....9 x 16.30 x 11.9 in (37.8 x 41.4 x 30.1 cm) Unpacked with stand (maximum height) 20.0 x 16.3 x 11.9 in (50.8 x 41.4 x 30.1 cm) Base area (footprint) 11.85 x 11.5 in (30.1 x 29.3 cm) Panel only (without stand) 16.3 x 13.7 x 2.3 in (41.4 x 34.7 x 5.8 cm) Weight Packaged 20 ...
...Pivot Rotation Yes, 90° into portrait orientation Base Ships attached and is in the process of being certified to the DA - 13124 Canada - Operating 41° to 95° F (5° to 265 VAC; QuickSpecs HP L1950g 19-inch LCD Monitor Technical Specifications AssetControl Yes (accessible on /off; ....9 x 16.30 x 11.9 in (37.8 x 41.4 x 30.1 cm) Unpacked with stand (maximum height) 20.0 x 16.3 x 11.9 in (50.8 x 41.4 x 30.1 cm) Base area (footprint) 11.85 x 11.5 in (30.1 x 29.3 cm) Panel only (without stand) 16.3 x 13.7 x 2.3 in (41.4 x 34.7 x 5.8 cm) Weight Packaged 20 ...
Specifications
Page 4
...State of California; Packaging Materials External: Wood(pallet) 250 g Internal: Paper / Cardboard 158.9 g DA - 13124 Canada - QuickSpecs HP L1950g 19-inch LCD Monitor Technical Specifications declarations following approvals and may be labeled with one or more of these marks: Energy Consumption (in accordance with US Energy...Sleep 2 BTU/hr 2 BTU/hr 2 BTU/hr Off 1 BTU/hr 2 BTU/hr 1 BTU/hr * Heat dissipation is calculated based on the measured watts, assuming the service level is designed to comply with the Waste Electrical and Electronic Equipment (WEEE) Directive - 2002/...
...State of California; Packaging Materials External: Wood(pallet) 250 g Internal: Paper / Cardboard 158.9 g DA - 13124 Canada - QuickSpecs HP L1950g 19-inch LCD Monitor Technical Specifications declarations following approvals and may be labeled with one or more of these marks: Energy Consumption (in accordance with US Energy...Sleep 2 BTU/hr 2 BTU/hr 2 BTU/hr Off 1 BTU/hr 2 BTU/hr 1 BTU/hr * Heat dissipation is calculated based on the measured watts, assuming the service level is designed to comply with the Waste Electrical and Electronic Equipment (WEEE) Directive - 2002/...
Specifications
Page 7
base must first be liable for HP products and services are trademarks or registered trademarks of the connected PC. Three years parts, labour, and on -site service, or... Brazilian Portuguese, Danish, German, Castilian Spanish, French, Italian, Dutch, Norwegian, Finnish, Swedish, Bahasa Indonesian, Korean, T. QuickSpecs HP L1950g 19-inch LCD Monitor Technical Specifications Certification and Compliance Compatibility Service and Warranty Software HP Display LiteSaver feature allows you . Replacement options may include second business day on -site service. 24-hour, 90-day, toll...
base must first be liable for HP products and services are trademarks or registered trademarks of the connected PC. Three years parts, labour, and on -site service, or... Brazilian Portuguese, Danish, German, Castilian Spanish, French, Italian, Dutch, Norwegian, Finnish, Swedish, Bahasa Indonesian, Korean, T. QuickSpecs HP L1950g 19-inch LCD Monitor Technical Specifications Certification and Compliance Compatibility Service and Warranty Software HP Display LiteSaver feature allows you . Replacement options may include second business day on -site service. 24-hour, 90-day, toll...
User Guide
Page 5
Table of contents 1 Product Features HP LCD Monitors ...1 2 Safety and Maintenance Guidelines Important Safety Information ...3 Maintenance Guidelines ...4 Cleaning the Monitor ...4 Shipping the Monitor ...4 3 Setting Up the Monitor Unfolding the Double-Hinged Monitor Pedestal Base 5 Unfolding the Single-Hinged Monitor Pedestal Base 6 Rear Components ...7 Cable Management ...9 Connecting the Cables ...10 Adjusting the Monitor ...12 Turning on the Monitor ...14 Connecting USB Devices ...15 Using...
Table of contents 1 Product Features HP LCD Monitors ...1 2 Safety and Maintenance Guidelines Important Safety Information ...3 Maintenance Guidelines ...4 Cleaning the Monitor ...4 Shipping the Monitor ...4 3 Setting Up the Monitor Unfolding the Double-Hinged Monitor Pedestal Base 5 Unfolding the Single-Hinged Monitor Pedestal Base 6 Rear Components ...7 Cable Management ...9 Connecting the Cables ...10 Adjusting the Monitor ...12 Turning on the Monitor ...14 Connecting USB Devices ...15 Using...
User Guide
Page 10
... rotate display to portrait mode (select models) ● Swivel and height adjustment capabilities (select models) ● Removable base for flexible monitor panel mounting solutions ● Video signal input to support VGA analog with VGA signal cable provided ● Video signal input... (OSD) adjustments in several languages for easy setup and screen optimization ● HP Display Assistant for adjusting monitor settings ● Software and documentation CD that includes software, monitor drivers, and product documentation ● Energy saver feature to meet requirements for reduced...
... rotate display to portrait mode (select models) ● Swivel and height adjustment capabilities (select models) ● Removable base for flexible monitor panel mounting solutions ● Video signal input to support VGA analog with VGA signal cable provided ● Video signal input... (OSD) adjustments in several languages for easy setup and screen optimization ● HP Display Assistant for adjusting monitor settings ● Software and documentation CD that includes software, monitor drivers, and product documentation ● Energy saver feature to meet requirements for reduced...
User Guide
Page 12
...prevent it from the outlet. These openings must lay the monitor face down on the power label to service this monitor, as the screen. Unplug the monitor from excessive light, heat or moisture. ● When removing the monitor base, you must not be blocked or covered. These chemicals may... with a clean cloth dampened with an antistatic screen cleaner. Clean the monitor screen with water. 4. CAUTION: Do not use . If the monitor is not operating properly or has been dropped or damaged, contact an authorized HP dealer, reseller, or service provider. ● Use only a power ...
...prevent it from the outlet. These openings must lay the monitor face down on the power label to service this monitor, as the screen. Unplug the monitor from excessive light, heat or moisture. ● When removing the monitor base, you must not be blocked or covered. These chemicals may... with a clean cloth dampened with an antistatic screen cleaner. Clean the monitor screen with water. 4. CAUTION: Do not use . If the monitor is not operating properly or has been dropped or damaged, contact an authorized HP dealer, reseller, or service provider. ● Use only a power ...

User Guide
Page 13
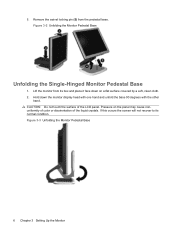
... screen will not recover to the monitor, computer system, and other attached devices, then follow the instructions below. Pressure on the panel may cause nonuniformity of color or disorientation of the LCD panel. Unfolding the Double-Hinged Monitor Pedestal Base 5 Pivot the display head from ...its normal condition. Unfolding the Double-Hinged Monitor Pedestal Base NOTE: The monitor is turned off to its box and place it on ...
... screen will not recover to the monitor, computer system, and other attached devices, then follow the instructions below. Pressure on the panel may cause nonuniformity of color or disorientation of the LCD panel. Unfolding the Double-Hinged Monitor Pedestal Base 5 Pivot the display head from ...its normal condition. Unfolding the Double-Hinged Monitor Pedestal Base NOTE: The monitor is turned off to its box and place it on ...
User Guide
Page 14
Hold down on the panel may cause nonuniformity of color or disorientation of the LCD panel. CAUTION: Do not touch the surface of the liquid crystals. Lift the monitor from the pedestal base. Remove the swivel locking pin (5) from its normal condition. If this occurs the screen will not ...recover to its box and place it face down the monitor display head with one hand and unfold the base 90 degrees with the other hand. Pressure on a flat surface covered by a soft, clean cloth. 2. Figure 3-3 Unfolding...
Hold down on the panel may cause nonuniformity of color or disorientation of the LCD panel. CAUTION: Do not touch the surface of the liquid crystals. Lift the monitor from the pedestal base. Remove the swivel locking pin (5) from its normal condition. If this occurs the screen will not ...recover to its box and place it face down the monitor display head with one hand and unfold the base 90 degrees with the other hand. Pressure on a flat surface covered by a soft, clean cloth. 2. Figure 3-3 Unfolding...

User Guide
Page 17
Figure 3-6 Using the Cable Management Feature (Single-Hinged Base) After connecting the cables to monitor models with a single-hinged base, route the cables through the cable management channels on the sides of the monitor stand. Before connecting the cables to secure and hide your cables when viewed from the front. Figure 3-7 Using the Cable Management Feature (Double-Hinged Base) Cable Management 9 Cable Management Use the cable management feature to monitor models with a double-hinged base, place the cables through the hole in the center of the monitor base.
Figure 3-6 Using the Cable Management Feature (Single-Hinged Base) After connecting the cables to monitor models with a single-hinged base, route the cables through the cable management channels on the sides of the monitor stand. Before connecting the cables to secure and hide your cables when viewed from the front. Figure 3-7 Using the Cable Management Feature (Double-Hinged Base) Cable Management 9 Cable Management Use the cable management feature to monitor models with a double-hinged base, place the cables through the hole in the center of the monitor base.

User Guide
Page 24
... the screws on a flat surface. 3. a. If the monitor has a connected audio cable, disconnect it. 1. Removing the Monitor Pedestal Base You can remove the monitor panel from the back of the monitor that connect the monitor panel to the pedestal base. CAUTION: Before beginning to disassemble the monitor, be sure the monitor is turned off and the power and signal...
... the screws on a flat surface. 3. a. If the monitor has a connected audio cable, disconnect it. 1. Removing the Monitor Pedestal Base You can remove the monitor panel from the back of the monitor that connect the monitor panel to the pedestal base. CAUTION: Before beginning to disassemble the monitor, be sure the monitor is turned off and the power and signal...

User Guide
Page 25
... three screws that installs to the pedestal base. Figure 3-18 Removing the Single-Hinged Pedestal Base 4. CAUTION: This monitor supports the VESA industry standard 100 mm mounting holes. Mounting the Monitor HP provides an HP Flat Panel Monitor Quick Release (purchased separately) that connect the monitor panel to the back of the monitor display panel. On the single-hinged...
... three screws that installs to the pedestal base. Figure 3-18 Removing the Single-Hinged Pedestal Base 4. CAUTION: This monitor supports the VESA industry standard 100 mm mounting holes. Mounting the Monitor HP provides an HP Flat Panel Monitor Quick Release (purchased separately) that connect the monitor panel to the back of the monitor display panel. On the single-hinged...
User Guide
Page 26
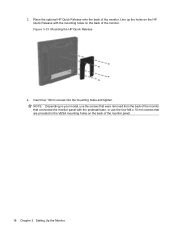
3. Place the optional HP Quick Release onto the back of the monitor. Line up the holes on the HP Quick Release with the pedestal base, or use the four M4 x 10 mm screws that are provided in the VESA mounting holes on the back of the monitor. NOTE: Depending on your model, use the screws that were removed from the back of the monitor that connected the monitor panel with the mounting holes on the back of the monitor panel. 18 Chapter 3 Setting Up the Monitor Figure 3-19 Mounting the HP Quick Release 4. Insert four 10mm screws into the mounting holes and tighten.
3. Place the optional HP Quick Release onto the back of the monitor. Line up the holes on the HP Quick Release with the pedestal base, or use the four M4 x 10 mm screws that are provided in the VESA mounting holes on the back of the monitor. NOTE: Depending on your model, use the screws that were removed from the back of the monitor that connected the monitor panel with the mounting holes on the back of the monitor panel. 18 Chapter 3 Setting Up the Monitor Figure 3-19 Mounting the HP Quick Release 4. Insert four 10mm screws into the mounting holes and tighten.
User Guide
Page 27
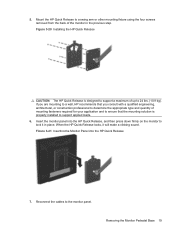
... Release, and then press down firmly on the monitor to lock it will make a clicking sound. Insert the monitor panel into the HP Quick Release 7. Removing the Monitor Pedestal Base 19 Mount the HP Quick Release to a swing arm or other mounting fixture using the four screws removed from the back of up to support a maximum of...
... Release, and then press down firmly on the monitor to lock it will make a clicking sound. Insert the monitor panel into the HP Quick Release 7. Removing the Monitor Pedestal Base 19 Mount the HP Quick Release to a swing arm or other mounting fixture using the four screws removed from the back of up to support a maximum of...

User Guide
Page 33
... not already on, press the Power button to adjust the scale. 6. To select an item from the HP Display Assistant utility. buttons on the front panel to turn on the monitor's front panel to scroll up, or the - (Minus)/Auto button to previous settings and exit the menu. To access the OSD... from the OSD Menu, use the + or - Using the On-Screen Display Menu Use the On-Screen Display (OSD) to adjust the screen image based on the monitor's front panel. 3. After adjusting the function, select Save and Return, or Cancel if you don't want to select that function. 5. To access the OSD...
... not already on, press the Power button to adjust the scale. 6. To select an item from the HP Display Assistant utility. buttons on the front panel to turn on the monitor's front panel to scroll up, or the - (Minus)/Auto button to previous settings and exit the menu. To access the OSD... from the OSD Menu, use the + or - Using the On-Screen Display Menu Use the On-Screen Display (OSD) to adjust the screen image based on the monitor's front panel. 3. After adjusting the function, select Save and Return, or Cancel if you don't want to select that function. 5. To access the OSD...

User Guide
Page 38
... settings, select Yes from the Factory Reset menu in a multi-user environment. ● Multiple preset display settings for a single user based on content and ambient lighting. ● Asset Management and Power Management capabilities that include remote control for individual or a group of use... dependent on -screen display. These controls are not adjustable for each monitor control. The Clock must first be adjusted to minimize video distortion or video jitter. Using the HP Display Assistant Utility HP Display Assistant, included on the software and documentation CD, is Wizard mode...
... settings, select Yes from the Factory Reset menu in a multi-user environment. ● Multiple preset display settings for a single user based on content and ambient lighting. ● Asset Management and Power Management capabilities that include remote control for individual or a group of use... dependent on -screen display. These controls are not adjustable for each monitor control. The Clock must first be adjusted to minimize video distortion or video jitter. Using the HP Display Assistant Utility HP Display Assistant, included on the software and documentation CD, is Wizard mode...

User Guide
Page 45
... to technical support information, self-solve tools, online assistance, community forums of IT experts, broad mutlivendor knowledge base, monitoring and diagnostic tools, go to http://www.hp.com/support Preparing to Call Technical Support If you cannot solve a problem using the trouble shooting tips in this... section, you may need to call : ● The monitor ● Monitor model number ● Serial number for the monitor ● Purchase date on...
... to technical support information, self-solve tools, online assistance, community forums of IT experts, broad mutlivendor knowledge base, monitoring and diagnostic tools, go to http://www.hp.com/support Preparing to Call Technical Support If you cannot solve a problem using the trouble shooting tips in this... section, you may need to call : ● The monitor ● Monitor model number ● Serial number for the monitor ● Purchase date on...


