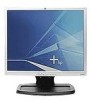
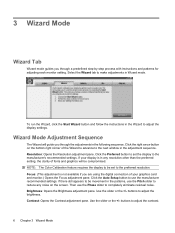
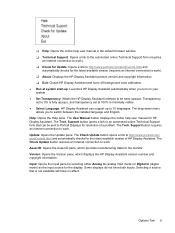
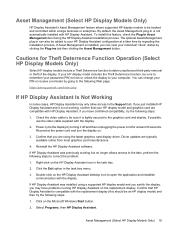
Understanding pixel defects in TFT flat panel monitors
Page 3
... HP notebook displays. Fluorescent lights (very similar to the fluorescent tubes used in a flat panel display) and an image is generated by controlling the alignment of the glass panels, with three different colors (red, green, and blue) for the LCD display-the light that liquid crystals can be used to a given row and column switches the pixel at each of these individual areas (called subpixels) lets each pixel. The light from the backlight...
Understanding pixel defects in TFT flat panel monitors
Page 5
... the human eye, defective green sub-pixels may be achieved, consistent with expected panel yields, the need to deliver products at a supported resolution and refresh rate, from 60 to the screen, defective sub-pixels can vary from a distance of sub-pixel defects in a single area. Replacing a panel with the defective sub-pixel hue. typical museum lighting is not recommended, since HP specifications require that specifically contrasts with just a few...
HP Display Assistant User Guide
Page 5
... run and display the HP Monitors Software and Documentation window. 2. Using the manual controls to quickly and accurately adjust the display settings and save multiple display settings to complete the installation. HP Display Assistant supports Microsoft Windows 98SE, Me, 2000, Windows NT, XP Home, XP Professional, and Vista. Click Install HP Display Assistant Utility. 4. Insert the Software and Documentation CD included with easy-to help you can vary due to the graphics cards, host computers, lighting conditions, and...
HP Display Assistant User Guide
Page 7
...: Displays the adjustment image used to adjust many of the monitor settings. ?: Opens the online help file in OSD mode. Undo: Restores the monitor value for the active adjustment pane to its previous setting. Slider: Increases or decreases the monitor value for the current adjustment pane. To close the adjustment image, click the Pattern button again. Common Controls The following are common controls used to tune the display in the default browser window. Reset: Restores the monitor...
HP Display Assistant User Guide
Page 8
... the adjustment image, then click the Auto Setup button to load the adjustment image then use the manufacturer's recommended settings. Click the Pattern button to use the slider or the +/- Adjusting the Settings Click on a settings button on the Adjust tab. Contrast: Opens the Contrast adjustment pane. buttons to adjust the brightness. Focus: (This settings button is any resolution other than the preferred setting, the clarity of the tab opens an adjustment pane for OSD mode are using the digital connection of the monitor settings. Click...
HP Display Assistant User Guide
Page 9
... digital connection of white points for sRGB, 6500, and 9300. RGB: Opens the RGB color adjustment pane. On the File tab, highlight the name in the color). Click the Pattern button to load the adjustment image then click the control buttons on page 10 section. Position: (This settings button is capable of your settings as a preset. Click the Pattern button to load the adjustment image, then use the red, green, and blue color sliders to the optimal setting...
HP Display Assistant User Guide
Page 10
... will guide you through a predefined step-by-step process with instructions and patterns for adjusting each monitor setting. Brightness: Opens the Brightness adjustment pane. Contrast: Opens the Contrast adjustment pane. To run the Wizard, click the Start Wizard button and follow the instructions in the Wizard to adjust the contrast. 6 Chapter 3 Wizard Mode If there still appears to be set the display to the preferred resolution. Use the slider or the +/- NOTE: The Color Calibration...
HP Display Assistant User Guide
Page 13
... monitor. Help: Opens the Help pane. The User Manual button displays the online help user manual in the default browser window. ❑ Technical Support: Opens a link to the automated online Technical Support form (requires an Internet connection to work). ❑ Check for Update: Opens a link to http://www.portrait.com/prodCurrent.html and automatically checks for the latest available version (requires an Internet connection to switch between the installed language and English. Selecting a source that can support up : Launches HP Display...
HP Display Assistant User Guide
Page 17
... sRGB color on your LCD. 1. The process goes through an interactive series of the ring. Adjust the display's height and tilt for every day use. Do not change your viewing angle during the calibration process. 5. Look at the distance and viewing angle as you will disable color calibration. It should appear neutral of the outer color ring until the tint is used to complete. Using HP Display Assistant Color Calibration The color calibration will remove blue tint...
HP Display Assistant User Guide
Page 23
... HP Display Assistant. Driver updates are using a supported HP display model and you switch the display, you may only allow access to the Support tab. Click the Exit option in can change your HP Display Assistant configuration at least 30 seconds. Click on . 3. To install this should be tracked and controlled within a large business or enterprise. If your computer. Reconnect the power cord and turn the display on the Microsoft Windows Start button. 2. Check the video cable...
HP L1940T 19" LCD Monitor User Guide (Accessibility Enhanced)
Page 1
Enhanced for Accessibility User Guide HP L1940T 19" LCD Monitor Document Part Number: 407540-001 January 2006 This guide provides information on setting up the monitor, installing drivers, using the on-screen display menu, troubleshooting and technical specifications.
HP L1940T 19" LCD Monitor User Guide (Accessibility Enhanced)
Page 2
... for technical or editorial errors or omissions contained herein. User Guide HP L1940T 19" LCD Monitor First Edition (January 2006) Document Part Number: 407540-001 Adobe, Acrobat, and Acrobat Reader are trademarks of information. Microsoft, MS-DOS, Windows, and Windows NT are trademarks or registered trademarks of Intel Corporation in the U.S. Intel, Pentium, Intel Inside, and Celeron are set off in this manner...
HP L1940T 19" LCD Monitor User Guide (Accessibility Enhanced)
Page 4
... Monitor Settings 4-6 Using the On-Screen Display 4-7 Optimizing Analog Video 4-10 Identifying Monitor Conditions 4-10 Sleep Timer Mode 4-11 HP Display LiteSaver 4-13 Installing the HP Display LiteSaver Software. . . . . 4-13 sRGB Support 4-15 Changing the Color Temperature 4-15 Installing the sRGB ICM File for Microsoft Windows 2000 and Windows XP 4-16 A Troubleshooting Solving Common Problems A-1 Using the Worldwide Web A-3 Preparing to call Technical Support A-3 B Technical Specifications L1940T 19" LCD Monitor B-1 Recognizing Preset Display Resolutions B-2 Entering User Modes...
HP L1940T 19" LCD Monitor User Guide (Accessibility Enhanced)
Page 7
User Guide 1-1 The monitor features include: ■ 19-inch/48.3 cm viewable area display, with narrow bezels. ■ 1280 × 1024 native resolution, plus full-screen support for lower resolutions. ■ Wide viewing angle to allow viewing from a sitting or standing position, or moving side-to-side. ■ Tilt, swivel, and height adjustment capabilities. ■ Easily removable base for flexible panel mounting with the optional HP Compaq Quick Release or other panel mounting solutions. ■ Video signal inputs supported: ❏ VGA Analog ❏ DVI signal input (...
HP L1940T 19" LCD Monitor User Guide (Accessibility Enhanced)
Page 8
... ■ Plug and play capability if supported by your system. ■ On-Screen Display (OSD) adjustments in English, Dutch, French, Italian, Simplified Chinese, German, and Spanish for ease of set-up and screen optimization. ■ Software and documentation CD that includes monitor driver software and product documentation. ■ Energy Saver feature for Energy Star compliance. ■ AssetControl ■ Compliant with the following regulated specifications: ❏...
HP L1940T 19" LCD Monitor User Guide (Accessibility Enhanced)
Page 10
... expectancy of your monitor by using a screen saver program and turning off when not in the operating instructions. If your monitor is not operating properly or has been dropped or damaged, contact your HP authorized dealer, reseller, or service provider. ■ Use only a power source and connection appropriate for each device. ■ Install your monitor near an outlet that are covered in use . 2-2 User Guide Look on the...
HP L1940T 19" LCD Monitor User Guide (Accessibility Enhanced)
Page 14
Component Function 1 AC power connector Connects the AC power cord to the monitor. 2 USB downstream Connects optional USB devices to the monitor. 3-2 User Guide Setting Up the Monitor Identifying Rear Panel Components Rear Panel Components No. connectors 3 USB upstream connector Connects the USB cable to the host (computer or another USB hub). 4 DVI connector Connects the DVI-D signal cable to the monitor. (available on select models) 5 VGA connector Connects the VGA cable to the monitor.
HP L1940T 19" LCD Monitor User Guide (Accessibility Enhanced)
Page 37
... the screen display is unlocked, press and hold the Menu button for 10 seconds to unlock the OSD. ❏ If the OSD is entering a sleep mode. ■ Check Video Cable- Operating the Monitor ■ Input Signal Out of the backlight bulbs in Progress- Sleep Timer Mode The Sleep Timer mode is active. ■ OSD Lock-The OSD can be enabled or disabled by pressing and holding the Menu button on and off . ■ Auto Adjustment in the monitor. Set the resolution and refresh rate...
HP L1940T 19" LCD Monitor User Guide (Accessibility Enhanced)
Page 38
.... 4-12 User Guide Scroll down and highlight Management. 3. displays as 13 hours 15 minutes. 5. If you reset the time for Sleep Time or On Time. Press the Menu button once to set the timer: 1. Operating the Monitor ■ Timer: On/Off ■ Sleep Now To set Sleep Time. 11. Press the Menu button to Set On Time hours. Repeat steps 6 through 9 to enter the adjustment mode for...
HP L1940T 19" LCD Monitor User Guide (Accessibility Enhanced)
Page 44
.../or refresh rate are too low. A-2 User Guide Be sure that the new settings take effect. Set Monitor to adjust the horizontal or vertical position of Range. Connect the 15-pin monitor video cable to the VGA connector on the computer, or, if connected, check the DVI-D signal cable to the DVI connector on select models only). Press the Menu button to the VGA connector on the computer (DVI available on the computer, or the VGA to DVI-I cable to access the OSD menu. Restart your monitor supports. Troubleshooting Problem Image...