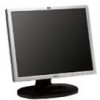
L1925 Flat Panel Monitor - User's Guide - Enhanced for accessibilty
Page 3
... Important Safety Information 2-1 Maintenance Guidelines 2-2 Cleaning the Monitor 2-4 Shipping the Monitor 2-4 3 Setting Up the Monitor Selecting the Signal Connectors and Cables 3-5 Removing the Monitor Base 3-6 Mounting the Monitor 3-8 4 Operating the Monitor Installing the Information Files 4-1 Front Panel Components 4-2 Adjusting Monitor Settings 4-3 Using the On-Screen Display 4-3 Adjusting Screen Quality 4-7 Optimizing Analog Video 4-7 A Troubleshooting Solving Common Problems A-1 Using the Worldwide Web A-3 Preparing to call Technical Support A-3 User's Guide iii
L1925 Flat Panel Monitor - User's Guide - Enhanced for accessibilty
Page 5
The monitor features include: ■ Large 19-inch (48.3 cm) viewable area display. ■ 1280 × 1024 native resolution, plus full-screen support for lower resolutions. ■ Wide viewing angle to allow viewing from a sitting or standing position, or moving side-to-side. ■ Tilt and swivel adjustment capabilities. ■ Removable base for flexible mounting solutions. ■ Multiple video inputs supported: ❏ VGA Analog ❏ DVI-I supports either Analog or Digital signal input ■ VGA analog and DVI-Digital signal cables included. ■ Plug and play ...
L1925 Flat Panel Monitor - User's Guide - Enhanced for accessibilty
Page 8
... service provider. ■ Adjust only those controls that are discussed in the operating instructions. Disconnect the monitor by pulling the cord. 2-2 User's Guide Adjust only those controls that you can easily reach. Safety and Maintenance Guidelines Ä CAUTION: For the protection of your monitor, as well as your computer, connect all power strips provide surge protection; Not all power cords for each device. ■ Install your...
L1925 Flat Panel Monitor - User's Guide - Enhanced for accessibilty
Page 11
.... 2. 3 Setting Up the Monitor To set up the monitor, ensure that the power is turned off to the monitor, computer system, and other end of the monitor. ✎ The DVI-D cable supplied with this monitor is for use with this cable. When connecting the DVI-D signal cable to the DVI connector on the monitor, you must have a DVI-compatible graphics card installed for digital-to-digital connection only. Connect one end of the monitor signal cable to the video connector on the rear panel of...
L1925 Flat Panel Monitor - User's Guide - Enhanced for accessibilty
Page 15
... power cord into a grounded (earthed) electrical outlet that display the same static image on the monitor front bezel. When unplugging from the electrical outlet, grasp the cord by the DVI-I input (not provided with the monitor). User's Guide 3-5 Disconnect power from the electrical outlet. The inputs can be attached to DVI-D signal cable provided. The grounding plug is determined by unplugging the power cord from the monitor by the video cable used. For digital...
L1925 Flat Panel Monitor - User's Guide - Enhanced for accessibilty
Page 16
... power and signal cables are both disconnected. Attempting to remove the monitor from the back of the monitor. 3-6 User's Guide Lay the front bezel down , and that the monitor is lying flat, front bezel down on a soft area to prevent it from getting scratched, defaced, or broken Å WARNING: Do not remove the base from the monitor while the monitor is set to mount the monitor on a wall...
L1925 Flat Panel Monitor - User's Guide - Enhanced for accessibilty
Page 20
... Menu button Opens the On-Screen Display (OSD) menu. 2 Select/Auto button • When OSD is active, selects adjustment items from the OSD menus. • When OSD is inactive, automatically activates the "Auto Adjustment" feature for optimum image. 3 OSD Navigation/ • When OSD is active, navigates OSD menu and Input Select button adjusts scale settings. • When OSD is inactive, selects signal input (DVI-I or D-Sub). 4 Power LED Glows Green= monitor is in sleep mode. 5 Power Switch Powers the monitor on . Glows Amber= monitor is powered on and off. 4-2 User's Guide...
L1925 Flat Panel Monitor - User's Guide - Enhanced for accessibilty
Page 21
one for basic adjustments, and one for screen settings are available; Two OSD menus are located in the menu window to view the On-Screen Display (OSD) Menu. Using the On-Screen Display The adjustments for advanced adjustments. User's Guide 4-3 The Main Controls window pops up and you can make adjustments to your monitor to make your adjustments. Operating the Monitor Adjusting Monitor Settings Press the menu button on -screen display (OSD) menus. Use the left and right arrow keys in the on the front panel of your monitor's various features.
L1925 Flat Panel Monitor - User's Guide - Enhanced for accessibilty
Page 28
Press the Menu button to adjust the horizontal or vertical position of Range. A-2 User's Guide "Out of the image. Select Image Control/ Horizontal Position or Vertical Position to access the OSD menu. Troubleshooting Problem Image appears blurred, indistinct, or too dark. Monitor video cable is not centered. Image is disconnected. Video resolution and/or refresh rate are too low. Connect the 15-pin monitor video cable to the VGA connector on the computer, or connect the DVI-D signal cable to a supported setting (see "Factory Preset Display Modes Table" in ...
L1925 Flat Panel Monitor - User's Guide - Enhanced for accessibilty
Page 33
... mode. Technical Specifications Entering User Modes The video controller signal may need to readjust the parameters of the monitor screen by using a preset mode. Energy Saver Feature When the monitor is in the reduced power state, the monitor will be made to any or all of these signals, the monitor screen is blanked, the backlight is turned off, and the Power light is green. Upon detecting the absence of power and the Power light is turned amber. B-4 User's Guide...
L1925 Flat Panel Monitor - User's Guide - Enhanced for accessibilty
Page 38
... Energy Star program. C-4 User's Guide The power cord must be found in the country where you should be walked on using the Energy Saving features can be between 100-120V or 200-240V. Power Cord Set Requirements The monitor power supply is provided with the Energy Star Logo meet the requirements of power cord to use in that country. A power cord should be rated for the product and...
HP L1925 Flat Panel Monitor Users Guide
Page 5
... L1925 Flat Panel Display has an active matrix, thin-film transistor (TFT), liquid crystal display (LCD). User's Guide 1-1 The monitor features include: ■ Large 19-inch (48.3 cm) viewable area display. ■ 1280 × 1024 native resolution, plus full-screen support for lower resolutions. ■ Wide viewing angle to allow viewing from a sitting or standing position, or moving side-to-side. ■ Tilt and swivel adjustment capabilities. ■ Removable base for flexible mounting solutions. ■ Multiple video inputs supported: ❏ VGA Analog ❏ DVI-I supports...
HP L1925 Flat Panel Monitor Users Guide
Page 8
... rating of the cord. the power strips must be specifically labeled as having this product yourself. Disconnect the monitor by pulling the cord. 2-2 User's Guide If your monitor is not operating properly or has been dropped or damaged, contact your HP authorized dealer, reseller, or service provider. ■ Adjust only those controls that are covered in the operating instructions. ■ Use only a power source and connection appropriate for this monitor...
HP L1925 Flat Panel Monitor Users Guide
Page 15
... times. User's Guide 3-5 Do not place anything on a cord or cable. Do not pull on power cords or cables. For analog operation, a DVI-A to VGA signal cable must be selected through the On-Screen Display (OSD) feature or by the video cable used. Plug the power cord into a grounded (earthed) electrical outlet that display the same static image on the monitor front bezel. The monitor will automatically determine which inputs have valid video signals. The video mode supported by the DVI-I connector. Arrange...
HP L1925 Flat Panel Monitor Users Guide
Page 16
... Å WARNING: Do not remove the base from the monitor while the monitor is in injury to the user. 1. Before removing the monitor from the back of the monitor. 3-6 User's Guide Disconnect and remove the signal and power cables from the base, ensure that the base is set to disassemble the monitor, be sure the monitor is lying flat, front bezel down on a wall, a swing arm or other mounting fixture. Read the caution...
HP L1925 Flat Panel Monitor Users Guide
Page 20
... 4-2 User's Guide Operating the Monitor Front Panel Components ' No. Control Function 1 Menu button Opens the On-Screen Display (OSD) menu. 2 Select/Auto button • When OSD is active, selects adjustment items from the OSD menus. • When OSD is inactive, automatically activates the "Auto Adjustment" feature for optimum image. 3 OSD Navigation/ • When OSD is active, navigates OSD menu and Input Select button adjusts scale settings. • When OSD is inactive, selects signal input (DVI-I or D-Sub). 4 Power LED Glows Green= monitor is in sleep mode. 5 Power Switch...
HP L1925 Flat Panel Monitor Users Guide
Page 21
Using the On-Screen Display The adjustments for advanced adjustments. one for basic adjustments, and one for screen settings are available; User's Guide 4-3 The Main Controls window pops up and you can make your monitor's various features. Two OSD menus are located in the menu window to view the On-Screen Display (OSD) Menu. Use the left and right arrow keys in the on the front panel of your monitor to make adjustments to your adjustments. Operating the Monitor Adjusting Monitor Settings Press the menu button on -screen display (OSD) menus.
HP L1925 Flat Panel Monitor Users Guide
Page 28
... video cable. Be sure that the new settings take effect. "Out of the image. If this does not correct the image, press the Menu button to the DVI connector on the computer, or connect the DVI-D signal cable to open the Basic OSD Menu, and adjust the brightness and contrast scales as needed. Restart your monitor supports. A-2 User's Guide Troubleshooting Problem Image appears blurred, indistinct, or too dark. Connect the 15-pin monitor video cable to the VGA connector on the computer. Position may need adjustment...
HP L1925 Flat Panel Monitor Users Guide
Page 33
... Power light is turned amber. In addition to readjust the parameters of the monitor screen by using the on setting energy saver features (sometimes called power management features). ✎ The above energy saver feature only works when connected to its normal operating mode, the monitor uses less than 2 watts of power. Technical Specifications Entering User Modes The video controller signal may need to the 16 factory preset modes, there are not using a preset mode. Your changes...
HP L1925 Flat Panel Monitor Users Guide
Page 38
... of the computer manual. Agency Regulatory Notices EPA Energy Star Compliance Monitors that are marked with the Energy Star Logo meet the requirements of power cord to use, contact your HP authorized service provider. The power cord must be rated for the product and for energy efficiency. If you purchased the equipment. Power Cord Set Requirements The monitor power supply is approved for use in the energy...