

User Manual
Page 4
... specific warranty terms applicable to change without prior written consent of this document may be photocopied, reproduced, or translated into another language without notice. © Copyright 2006 Hewlett-Packard Development Company, L.P. Publication Number 5991-4724 October 2006 Applicable Product ProCurve Switch 1800-24G (J9028A) Safety Before installing and operating this product, please read the "Installation Precautions" in Chapter 2, "Installing the Switch...
... specific warranty terms applicable to change without prior written consent of this document may be photocopied, reproduced, or translated into another language without notice. © Copyright 2006 Hewlett-Packard Development Company, L.P. Publication Number 5991-4724 October 2006 Applicable Product ProCurve Switch 1800-24G (J9028A) Safety Before installing and operating this product, please read the "Installation Precautions" in Chapter 2, "Installing the Switch...
User Manual
Page 5
... Basic Troubleshooting Tips 4-1 Diagnosing with the LEDs 4-2 Diagnostic Tips 4-2 Forgotten the IP Address or Password 4-3 Testing the Switch by Resetting It 4-3 v Verify the Switch Passes Self Test 2-4 3. Connect the Network Cables 2-10 6. Mount the Switch 2-5 4. Installing or Removing mini-GBICs 2-10 3 Configuring the Switch Initial Configuration 3-1 Changing the PC's IP Address 3-2 Where to a Power Source 2-10 5. Contents 1 Switch Overview Switch Hardware Features 1-1 LEDs 1-2 LED Mode Select Button and Indicator LEDs 1-2 Switch Features 1-3 2 Installing the Switch...
... Basic Troubleshooting Tips 4-1 Diagnosing with the LEDs 4-2 Diagnostic Tips 4-2 Forgotten the IP Address or Password 4-3 Testing the Switch by Resetting It 4-3 v Verify the Switch Passes Self Test 2-4 3. Connect the Network Cables 2-10 6. Mount the Switch 2-5 4. Installing or Removing mini-GBICs 2-10 3 Configuring the Switch Initial Configuration 3-1 Changing the PC's IP Address 3-2 Where to a Power Source 2-10 5. Contents 1 Switch Overview Switch Hardware Features 1-1 LEDs 1-2 LED Mode Select Button and Indicator LEDs 1-2 Switch Features 1-3 2 Installing the Switch...

User Manual
Page 6
ProCurve Networking Customer Support Services 4-4 Before Calling Support 4-4 A Switch Specifications Physical A-1 Electrical A-1 Environmental A-1 Acoustic A-2 Connectors A-2 Safety A-2 Lasers A-2 B Safety and EMC Regulatory Statements Safety Information B-1 EMC Regulatory Statements B-8 C Recycle Statements Waste Electrical and Electronic Equipment (WEEE) Statements C-1 Index vi
ProCurve Networking Customer Support Services 4-4 Before Calling Support 4-4 A Switch Specifications Physical A-1 Electrical A-1 Environmental A-1 Acoustic A-2 Connectors A-2 Safety A-2 Lasers A-2 B Safety and EMC Regulatory Statements Safety Information B-1 EMC Regulatory Statements B-8 C Recycle Statements Waste Electrical and Electronic Equipment (WEEE) Statements C-1 Index vi
User Manual
Page 7
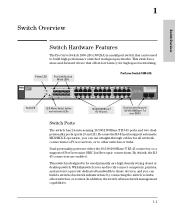
... switch. In addition, the switch offers network management capabilities. 1-1 Power LED Port Link/Act and Mode LEDs ProCurve Switch 1800-24G Fault LED LED Mode Select button and indicator LEDs 10/100/1000Base-T RJ-45 ports Dual-personality ports (10/100/1000Base-T or mini-GBIC) Switch Ports The switch has 24 auto-sensing 10/100/1000Base-T RJ-45 ports and two dualpersonality ports (ports 23 and 24). Dual-personality ports use straight-through cables for all network connections to PCs or servers...
... switch. In addition, the switch offers network management capabilities. 1-1 Power LED Port Link/Act and Mode LEDs ProCurve Switch 1800-24G Fault LED LED Mode Select button and indicator LEDs 10/100/1000Base-T RJ-45 ports Dual-personality ports (10/100/1000Base-T or mini-GBIC) Switch Ports The switch has 24 auto-sensing 10/100/1000Base-T RJ-45 ports and two dualpersonality ports (ports 23 and 24). Dual-personality ports use straight-through cables for all network connections to PCs or servers...
User Manual
Page 8
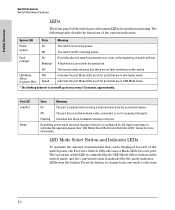
... switch is powered on the switch panel, and the current selection is controlled by the LED Mode Select button on or reset, at the beginning of switch self test. LED Mode Select (2 green LEDs) FDx Speed Indicates the port Mode LEDs are lit for ports that are no active network cable connected, or is an on the port. Indicates the port Mode LEDs are lit for ports that can be displayed for each of the switch ports, the ProCurve Switch 1800-24G uses a Mode LED...
... switch is powered on the switch panel, and the current selection is controlled by the LED Mode Select button on or reset, at the beginning of switch self test. LED Mode Select (2 green LEDs) FDx Speed Indicates the port Mode LEDs are lit for ports that are no active network cable connected, or is an on the port. Indicates the port Mode LEDs are lit for ports that can be displayed for each of the switch ports, the ProCurve Switch 1800-24G uses a Mode LED...
User Manual
Page 9
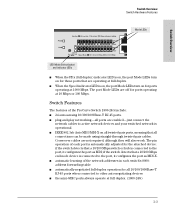
...-and-play networking-all ports are enabled-just connect the network cables to other auto-negotiating devices ■ the mini-GBIC ports always operate at full duplex. (1800-24G) 1-3 The port Mode LEDs are not required, although they will also work. Switch Overview Switch Overview Switch Hardware Features Mode LEDs LED Mode Select button and indicator LEDs ■ When the FDx (full duplex) indicator LED is on, the port Mode LEDs turn on for those ports that are operating...
...-and-play networking-all ports are enabled-just connect the network cables to other auto-negotiating devices ■ the mini-GBIC ports always operate at full duplex. (1800-24G) 1-3 The port Mode LEDs are not required, although they will also work. Switch Overview Switch Overview Switch Hardware Features Mode LEDs LED Mode Select button and indicator LEDs ■ When the FDx (full duplex) indicator LED is on, the port Mode LEDs turn on for those ports that are operating...
User Manual
Page 14
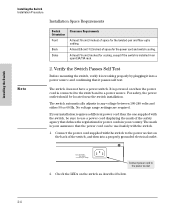
... is working properly by plugging it passes self test. The mark is your assurance that the power cord can be used safely with the switch, be located near the switch installation. Connect power cord to any voltage between 100-240 volts and either 50 or 60 Hz. At least 7.6 cm (3 inches) for the twisted-pair and fiber-optic cabling. The switch does...
... is working properly by plugging it passes self test. The mark is your assurance that the power cord can be used safely with the switch, be located near the switch installation. Connect power cord to any voltage between 100-240 volts and either 50 or 60 Hz. At least 7.6 cm (3 inches) for the twisted-pair and fiber-optic cabling. The switch does...

User Manual
Page 15
... Mode LEDs behave according to active network devices, the Link and Mode LEDs will stay off . • The Speed LED remains on indicating the default LED mode. • The port LEDs on a wall 2-5 When the self test completes successfully: • The Power LED remains on. • The Fault LED remains off . If the ports are not connected to the mode selected. If the ports are connected to complete. Port Link/Act and Mode LED Installing the Switch Installation Procedure Installing the Switch Power LED...
... Mode LEDs behave according to active network devices, the Link and Mode LEDs will stay off . • The Speed LED remains on indicating the default LED mode. • The port LEDs on a wall 2-5 When the self test completes successfully: • The Power LED remains on. • The Fault LED remains off . If the ports are not connected to the mode selected. If the ports are connected to complete. Port Link/Act and Mode LED Installing the Switch Installation Procedure Installing the Switch Power LED...
User Manual
Page 19
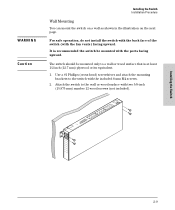
... (not included). Use a #1 Phillips (cross-head) screwdriver and attach the mounting brackets to the wall or wood surface with the ports facing upward. WARNING Caution Installing the Switch Installation Procedure Wall Mounting You can mount the switch on a wall as shown in the illustration on the next page. Attach the switch to the switch with the fan vents) facing upward. Installing the Switch 2-9 For...
... (not included). Use a #1 Phillips (cross-head) screwdriver and attach the mounting brackets to the wall or wood surface with the ports facing upward. WARNING Caution Installing the Switch Installation Procedure Wall Mounting You can mount the switch on a wall as shown in the illustration on the next page. Attach the switch to the switch with the fan vents) facing upward. Installing the Switch 2-9 For...
User Manual
Page 20
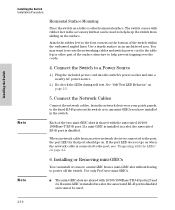
Connect the Network Cables Connect the network cables, from an active network device is connected to the port, the port LED for that can install or remove a mini-GBIC from sliding on the surface. When a network cable from the network devices or your patch panels, to the fixed RJ-45 ports on the switch or to any mini-GBICs you have installed in the switch. Note ■ The mini-GBIC slots are shared with...
Connect the Network Cables Connect the network cables, from an active network device is connected to the port, the port LED for that can install or remove a mini-GBIC from sliding on the surface. When a network cable from the network devices or your patch panels, to the fixed RJ-45 ports on the switch or to any mini-GBICs you have installed in the switch. Note ■ The mini-GBIC slots are shared with...
User Manual
Page 21
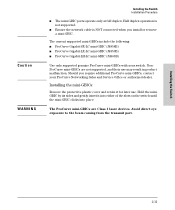
...; ProCurve Gigabit-LX-LC mini-GBIC (J4859B) ■ ProCurve Gigabit-LH-LC mini-GBIC (J4860B) Use only supported genuine ProCurve mini-GBICs with your ProCurve Networking Sales and Service Office or authorized dealer. Installing the mini-GBICs: Remove the protective plastic cover and retain it into either of the slots on the switch until the mini-GBIC clicks into place. Installing the Switch 2-11 The ProCurve...
...; ProCurve Gigabit-LX-LC mini-GBIC (J4859B) ■ ProCurve Gigabit-LH-LC mini-GBIC (J4860B) Use only supported genuine ProCurve mini-GBICs with your ProCurve Networking Sales and Service Office or authorized dealer. Installing the mini-GBICs: Remove the protective plastic cover and retain it into either of the slots on the switch until the mini-GBIC clicks into place. Installing the Switch 2-11 The ProCurve...
User Manual
Page 23
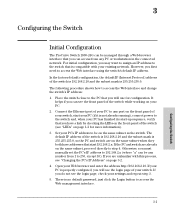
... have a link by checking the LEDs on the front-panel of the switch (see the login page of the switch is 192.168.2.10 and the subnet mask is no default password, just click the Login button to access the Web management interface. 3-1 Configuring the Switch 3 Configuring the Switch Initial Configuration The ProCurve Switch 1800-24G can be managed through a Web-browser interface that you can access from any number from 1 to 255, except 10). Set your settings and...
... have a link by checking the LEDs on the front-panel of the switch (see the login page of the switch is 192.168.2.10 and the subnet mask is no default password, just click the Login button to access the Web management interface. 3-1 Configuring the Switch 3 Configuring the Switch Initial Configuration The ProCurve Switch 1800-24G can be managed through a Web-browser interface that you can access from any number from 1 to 255, except 10). Set your settings and...

User Manual
Page 24
... checked are required at this connection, click to select Internet Protocol (TCP/IP), and then click Properties to Go From Here For more information on the Web browser interface and all the fields before logging out. In IP address, Subnet mask, and Default gateway, type your PC: 1. Click OK to Start, Settings, Network and Dial-up Connections. 2. Where to open Internet Protocol (TCP/IP) Properties dialog box. 4. Configuring the Switch...
... checked are required at this connection, click to select Internet Protocol (TCP/IP), and then click Properties to Go From Here For more information on the Web browser interface and all the fields before logging out. In IP address, Subnet mask, and Default gateway, type your PC: 1. Click OK to Start, Settings, Network and Dial-up Connections. 2. Where to open Internet Protocol (TCP/IP) Properties dialog box. 4. Configuring the Switch...
User Manual
Page 25
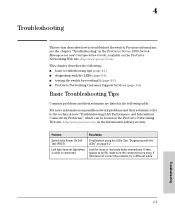
... different cable. This chapter describes the following table. Resolution Troubleshoot using the LEDs. For more information, see the chapter "Troubleshooting" in the Information Library section. 4 Troubleshooting This section describes how to be found on the ProCurve Networking Web site, http://www.procurve.com, in the ProCurve Series 1800 Switch Management and Configuration Guide, available on the ProCurve Networking Web site, http://www.procurve.com. Problem Switch fails Power On Self Test (POST) Link light does not light when a cable is connected. Troubleshooting 4-1
... different cable. This chapter describes the following table. Resolution Troubleshoot using the LEDs. For more information, see the chapter "Troubleshooting" in the Information Library section. 4 Troubleshooting This section describes how to be found on the ProCurve Networking Web site, http://www.procurve.com, in the ProCurve Series 1800 Switch Management and Configuration Guide, available on the ProCurve Networking Web site, http://www.procurve.com. Problem Switch fails Power On Self Test (POST) Link light does not light when a cable is connected. Troubleshooting 4-1
User Manual
Page 26
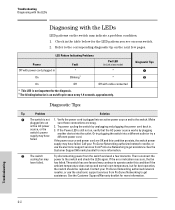
... switch and check the LEDs again. source, or the switch's power supply may have failed. If the power source and power cord are snug. Contact your ProCurve Networking authorized network reseller, or use the electronic support services from ProCurve Networking to operate under this condition persists, the switch power supply may continue to get assistance. LED Pattern Indicating Problems Power Off with power cord plugged in On Fault * Blinking1 Port LED (in Link view mode) * * On Off Off with the LEDs LED...
... switch and check the LEDs again. source, or the switch's power supply may have failed. If the power source and power cord are snug. Contact your ProCurve Networking authorized network reseller, or use the electronic support services from ProCurve Networking to operate under this condition persists, the switch power supply may continue to get assistance. LED Pattern Indicating Problems Power Off with power cord plugged in On Fault * Blinking1 Port LED (in Link view mode) * * On Off Off with the LEDs LED...
User Manual
Page 27
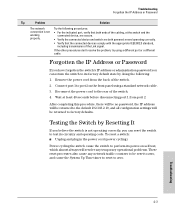
... and operating code. If the other procedures don't resolve the problem, try using a standard network cable. 3. Reconnect the power cord to test its power-on the front panel using a different port or a different cable. Forgotten the IP Address or Password If you have forgotten the switch's IP address or administration password you can return the switch to its factory default state by Resetting It If you believe the switch is not working properly...
... and operating code. If the other procedures don't resolve the problem, try using a standard network cable. 3. Reconnect the power cord to test its power-on the front panel using a different port or a different cable. Forgotten the IP Address or Password If you have forgotten the switch's IP address or administration password you can return the switch to its factory default state by Resetting It If you believe the switch is not working properly...

User Manual
Page 31
... terminals, power cord, or supplied power cord set. Handle exposed metal components of the network with this symbol, refer to the product documentation to get more than one power distribution system, be an uninterruptible safety earth ground from the main power source to hazardous transient voltages (such as lightning or disturbances in the manual denotes a hazard that can damage equipment. Servicing There...
... terminals, power cord, or supplied power cord set. Handle exposed metal components of the network with this symbol, refer to the product documentation to get more than one power distribution system, be an uninterruptible safety earth ground from the main power source to hazardous transient voltages (such as lightning or disturbances in the manual denotes a hazard that can damage equipment. Servicing There...

Brochure
Page 1
... ideal for RJ-45 10/100/1000 or mini-GBIC fiber Gigabit connectivity. ProCurve Switch 1800 Series The ProCurve Switch 1800 series consists of two Gigabit, fanless, Web-Managed switches that are managed via an intuitive Web interface. unmanaged switches, with 2 dual-personality ports for deployment in open offices that require silent operation. The ProCurve Switch 1800 series is ideal for fundamental networking protocols such as trunking and VLANs. The ProCurve Switch 1800-24G is a small form factor...
... ideal for RJ-45 10/100/1000 or mini-GBIC fiber Gigabit connectivity. ProCurve Switch 1800 Series The ProCurve Switch 1800 series consists of two Gigabit, fanless, Web-Managed switches that are managed via an intuitive Web interface. unmanaged switches, with 2 dual-personality ports for deployment in open offices that require silent operation. The ProCurve Switch 1800 series is ideal for fundamental networking protocols such as trunking and VLANs. The ProCurve Switch 1800-24G is a small form factor...

Brochure
Page 2
... 8 links (ports) per trunk Layer 2 switching • VLAN support and tagging: support up to 64 port-based VLANs and dynamic configuration of IEEE 802.1Q VLAN tagging, providing security between workgroups Security • Management password: provides security so that only authorized access to the Web browser interface is allowed Quality of Service (QoS) • Traffic prioritization: honors priority of traffic based on 802.1p to deliver data to devices based on the priority and type...
... 8 links (ports) per trunk Layer 2 switching • VLAN support and tagging: support up to 64 port-based VLANs and dynamic configuration of IEEE 802.1Q VLAN tagging, providing security between workgroups Security • Management password: provides security so that only authorized access to the Web browser interface is allowed Quality of Service (QoS) • Traffic prioritization: honors priority of traffic based on 802.1p to deliver data to devices based on the priority and type...

Brochure
Page 7
... the same server Recommended software Microsoft Windows 2003 Server Windows XP SP2 Windows XP Professional SP2 Browsers Microsoft Internet Explorer version 5.0 or later Supported platforms HP OpenView Network Node Manager version 6.41 or 7.01 or 7.5 (optional) Additional requirements NOTE: ProCurve Network Immunity Manager when loaded on the number of devices attached to the network as constituting an additional warranty. Some degradation in the express warranty statements accompanying such products and services.
... the same server Recommended software Microsoft Windows 2003 Server Windows XP SP2 Windows XP Professional SP2 Browsers Microsoft Internet Explorer version 5.0 or later Supported platforms HP OpenView Network Node Manager version 6.41 or 7.01 or 7.5 (optional) Additional requirements NOTE: ProCurve Network Immunity Manager when loaded on the number of devices attached to the network as constituting an additional warranty. Some degradation in the express warranty statements accompanying such products and services.


