Safety and Regulatory Information Desktops, Thin Clients, and Personal Workstations
Page 5
... Ergonomics Notice ...3 Laser Safety ...3 CDRH Regulations ...3 Compliance with International Regulations 4 Laser Product Label ...4 Laser Information ...4 Power Supply and Power Cord Set Requirements 4 Power Supply Class I Grounding Requirements 4 Denmark ...4 Norway ...4 Sweden ...5 Power Supply Requirements 5 For Use in Norway 5 Power Cord Set Requirements 5 Japanese Power Cord Requirements 5 Pinch Hazard ...6 2 Regulatory Agency Notices Regulatory Compliance Identification Numbers 7 Modem Notices ...7 Telecommunications Device Approvals...
... Ergonomics Notice ...3 Laser Safety ...3 CDRH Regulations ...3 Compliance with International Regulations 4 Laser Product Label ...4 Laser Information ...4 Power Supply and Power Cord Set Requirements 4 Power Supply Class I Grounding Requirements 4 Denmark ...4 Norway ...4 Sweden ...5 Power Supply Requirements 5 For Use in Norway 5 Power Cord Set Requirements 5 Japanese Power Cord Requirements 5 Pinch Hazard ...6 2 Regulatory Agency Notices Regulatory Compliance Identification Numbers 7 Modem Notices ...7 Telecommunications Device Approvals...
Safety and Regulatory Information Desktops, Thin Clients, and Personal Workstations
Page 7
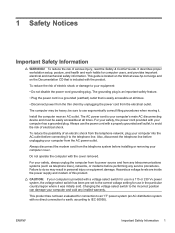
... your computer has a grounded plug. To reduce the possibility of electrical shock. Do not operate the computer with your safety, the power cord provided with the cover removed. CAUTION: If your computer into the AC outlet before performing any telecommunications systems (such as telephone lines),... at www.hp.com/ergo and on the Documentation CD that is provided with the product. 1 Safety Notices Important Safety Information WARNING! This guide is located on the Web at all times. • Disconnect power from the thin client by unplugging the power cord from the ...
... your computer has a grounded plug. To reduce the possibility of electrical shock. Do not operate the computer with your safety, the power cord provided with the cover removed. CAUTION: If your computer into the AC outlet before performing any telecommunications systems (such as telephone lines),... at www.hp.com/ergo and on the Documentation CD that is provided with the product. 1 Safety Notices Important Safety Information WARNING! This guide is located on the Web at all times. • Disconnect power from the thin client by unplugging the power cord from the ...
Safety and Regulatory Information Desktops, Thin Clients, and Personal Workstations
Page 10
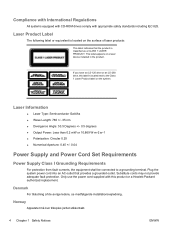
... de øvrige ledere, se medfølgende installationsvejledning. Substitute cords may not provide adequate fault protection. Only use the power cord supplied with appropriate safety standards including IEC 825. Plug the system power cord into an AC outlet that the product is classified as a CLASS...or 10,869 W·m-2 sr-1 ● Polarization: Circular 0.25 ● Numerical Aperture: 0.45 +/- 0.04 Power Supply and Power Cord Set Requirements Power Supply Class I Grounding Requirements For protection from fault currents, the equipment shall be connected to the Class 1 Laser ...
... de øvrige ledere, se medfølgende installationsvejledning. Substitute cords may not provide adequate fault protection. Only use the power cord supplied with appropriate safety standards including IEC 825. Plug the system power cord into an AC outlet that the product is classified as a CLASS...or 10,869 W·m-2 sr-1 ● Polarization: Circular 0.25 ● Numerical Aperture: 0.45 +/- 0.04 Power Supply and Power Cord Set Requirements Power Supply Class I Grounding Requirements For protection from fault currents, the equipment shall be connected to the Class 1 Laser ...

Safety and Regulatory Information Desktops, Thin Clients, and Personal Workstations
Page 11
...the diameter of the wire must be a minimum of 0.75 mm2 or 18AWG. If the power cord is not likely to all countries: 1. If the power cord set requirements, contact your authorized HP dealer, reseller, or service provider. Sweden Apparaten skall anslutas till jordat uttag, när den ... a shock and fire hazard. The voltage select switch feature on or pinched by an acceptable accredited agency responsible for use power cords from Hewlett-Packard or an approved HP source. Power supplies on any line voltage between 1.8 m (6 feet) and 3.6 m (12 feet). For safety reasons, use the...
...the diameter of the wire must be a minimum of 0.75 mm2 or 18AWG. If the power cord is not likely to all countries: 1. If the power cord set requirements, contact your authorized HP dealer, reseller, or service provider. Sweden Apparaten skall anslutas till jordat uttag, när den ... a shock and fire hazard. The voltage select switch feature on or pinched by an acceptable accredited agency responsible for use power cords from Hewlett-Packard or an approved HP source. Power supplies on any line voltage between 1.8 m (6 feet) and 3.6 m (12 feet). For safety reasons, use the...
PC Basics Guide
Page 8
The connectors on the front or the back of the base. Protecting Your PC Using a Power Surge Suppressor Power surges, for example, voltage spikes, power outages, or brownouts may cause software problems. Symptoms of voltage spikes include a flickering video display, unexpected PC startups, and the ...responding to your data files. And • Prevent damage from voltage spikes by installing a PC surge suppressor between the electrical outlet and the PC power cord. External PC Components You may have other components, such as: • Optical drives that play or record (burn) CD or DVD discs,...
The connectors on the front or the back of the base. Protecting Your PC Using a Power Surge Suppressor Power surges, for example, voltage spikes, power outages, or brownouts may cause software problems. Symptoms of voltage spikes include a flickering video display, unexpected PC startups, and the ...responding to your data files. And • Prevent damage from voltage spikes by installing a PC surge suppressor between the electrical outlet and the PC power cord. External PC Components You may have other components, such as: • Optical drives that play or record (burn) CD or DVD discs,...
PC Basics Guide
Page 20
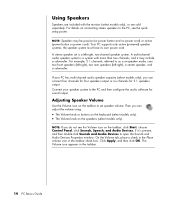
...are included with more than two channels, and it is a left -right), a center speaker, and a subwoofer. Your PC supports only active (powered) speaker systems; Connect your PC has multi-channel audio speaker capacity (select models only), you can connect four channels for four speakers output or six... Sounds, Speech, and Audio Devices, if it may be passive (no power button and no power cord) or active (power button or power cord). The Volume icon appears in the taskbar check box. the speaker system must have its own power cord. NOTE: If you do not see the quick setup poster. NOTE: ...
...are included with more than two channels, and it is a left -right), a center speaker, and a subwoofer. Your PC supports only active (powered) speaker systems; Connect your PC has multi-channel audio speaker capacity (select models only), you can connect four channels for four speakers output or six... Sounds, Speech, and Audio Devices, if it may be passive (no power button and no power cord) or active (power button or power cord). The Volume icon appears in the taskbar check box. the speaker system must have its own power cord. NOTE: If you do not see the quick setup poster. NOTE: ...

Upgrading and Servicing Guide
Page 6
...damage the electronic components of personal injury from electrical shock or hot surfaces, disconnect the power cord from the wall outlet, and allow the internal system components to cool before touching. 4 Disconnect the power cord from the electrical outlet and then from the PC. 5 Disconnect all other side ... frame until it aside. The first time you loosen these screws, you installed an add-in this order after closing the PC: 1 Reconnect the power cord. Removing the Side Panel 1 See "Before Opening the PC" on page 1. 2 Loosen the two thumbscrews on page 2. 2 Upgrading and Servicing ...
...damage the electronic components of personal injury from electrical shock or hot surfaces, disconnect the power cord from the wall outlet, and allow the internal system components to cool before touching. 4 Disconnect the power cord from the electrical outlet and then from the PC. 5 Disconnect all other side ... frame until it aside. The first time you loosen these screws, you installed an add-in this order after closing the PC: 1 Reconnect the power cord. Removing the Side Panel 1 See "Before Opening the PC" on page 1. 2 Loosen the two thumbscrews on page 2. 2 Upgrading and Servicing ...
Setup Poster - Page 2
Page 1
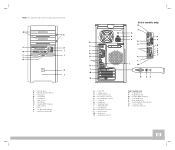
... Video Out Floppy drive D - Door K - PS/2 Mouse connector E - Center speaker/subwoofer port U - S-Video (TV Out) V - FireWire (IEEE 1394) port I K L M N A - Power LED B - PS/2 Keyboard connector F - Digital Audio In P - Rear speaker port T - Serial port G - Parallel port H - Microphone connector L - Card reader E - Hard drive Activity light D...vary by model. H A - Optical drive Eject buttons C - Microphone H - USB 2.0 ports J - On button with Indicator L - Power Cord connector D - Audio Line In N - Digital Audio Out Q - Side speaker port S -
... Video Out Floppy drive D - Door K - PS/2 Mouse connector E - Center speaker/subwoofer port U - S-Video (TV Out) V - FireWire (IEEE 1394) port I K L M N A - Power LED B - PS/2 Keyboard connector F - Digital Audio In P - Rear speaker port T - Serial port G - Parallel port H - Microphone connector L - Card reader E - Hard drive Activity light D...vary by model. H A - Optical drive Eject buttons C - Microphone H - USB 2.0 ports J - On button with Indicator L - Power Cord connector D - Audio Line In N - Digital Audio Out Q - Side speaker port S -

Getting Started Guide
Page 30
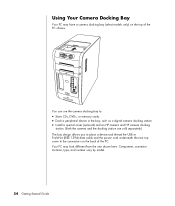
... plugged in or when the USB power from the PC is sometimes referred to as an external drive, refer to the documentation that connect to a USB port on the front or the back of most PCs. For some HP and Compaq PCs (select models only), the HP Personal Media Drive is in the... As an external drive, the HP Personal Media Drive connects and disconnects easily from the bay without turning off . NOTE: The drive can cause damage to fit inside a horizontal or vertical drive bay. WARNING: Do not move the PC with software, an external USB cable, and an external power cord and power adapter.
... plugged in or when the USB power from the PC is sometimes referred to as an external drive, refer to the documentation that connect to a USB port on the front or the back of most PCs. For some HP and Compaq PCs (select models only), the HP Personal Media Drive is in the... As an external drive, the HP Personal Media Drive connects and disconnects easily from the bay without turning off . NOTE: The drive can cause damage to fit inside a horizontal or vertical drive bay. WARNING: Do not move the PC with software, an external USB cable, and an external power cord and power adapter.
Getting Started Guide
Page 35
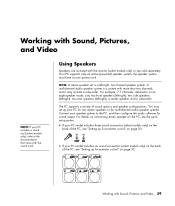
... connectors (select models only) on the back of sound options and speaker configurations. the speaker system must have its own power cord. You may include a subwoofer. Your PC supports only an active (powered) speaker system; For details on connecting stereo speakers to the PC, see the quick setup poster. • If your PC...
... connectors (select models only) on the back of sound options and speaker configurations. the speaker system must have its own power cord. You may include a subwoofer. Your PC supports only an active (powered) speaker system; For details on connecting stereo speakers to the PC, see the quick setup poster. • If your PC...

Getting Started Guide
Page 53
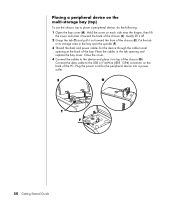
You can use the multi-storage bay to the connectors on the top of the chassis. • Install the special cover and an HP camera and HP camera docking station (both sold separately). Component, connector location, type, and number vary by model. Using Your Multi-storage Bay Your PC may look ... Sound, Pictures, and Video 47 The bay design allows you to place a device and thread the USB or FireWire (IEEE 1394) data cable and the power cord underneath the rear top cover to : • Store CDs, DVDs, or memory cards. • Dock a peripheral device in the bay, such as a digital camera ...
You can use the multi-storage bay to the connectors on the top of the chassis. • Install the special cover and an HP camera and HP camera docking station (both sold separately). Component, connector location, type, and number vary by model. Using Your Multi-storage Bay Your PC may look ... Sound, Pictures, and Video 47 The bay design allows you to place a device and thread the USB or FireWire (IEEE 1394) data cable and the power cord underneath the rear top cover to : • Store CDs, DVDs, or memory cards. • Dock a peripheral device in the bay, such as a digital camera ...

Getting Started Guide
Page 55
Plug the power cord for a peripheral device, do the following: 1 Open the bay cover (A). Gently lift it toward the back of the chassis (C). Working with Sound, Pictures, and Video 49 Hold the cover on the back of the bay (D). Connect data and power cables to the peripheral device, and place the peripheral in the... through the cable tunnel opening at the back of the PC. Docking a peripheral device To use the multi-storage bay for the peripheral device into a power outlet.
Plug the power cord for a peripheral device, do the following: 1 Open the bay cover (A). Gently lift it toward the back of the chassis (C). Working with Sound, Pictures, and Video 49 Hold the cover on the back of the bay (D). Connect data and power cables to the peripheral device, and place the peripheral in the... through the cable tunnel opening at the back of the PC. Docking a peripheral device To use the multi-storage bay for the peripheral device into a power outlet.
Getting Started Guide
Page 56
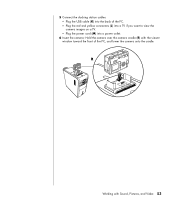
... chassis (E). Place the cables in the bay near the hinges, then lift the cover and slide it toward the front of the PC. Plug the power cord for the device through the cable tunnel opening and replace the bay cover. Gently lift it off. 2 Grasp the tab (T) and pull it out toward... the tab opening at the back of the chassis (C). Hold the cover on each side near the spindle (F). 3 Thread the data and power cables for the peripheral device into a power outlet. 50 Getting Started Guide Close the cover. 4 Connect the cables to place a peripheral device, do the following: 1 Open the bay ...
... chassis (E). Place the cables in the bay near the hinges, then lift the cover and slide it toward the front of the PC. Plug the power cord for the device through the cable tunnel opening and replace the bay cover. Gently lift it off. 2 Grasp the tab (T) and pull it out toward... the tab opening at the back of the chassis (C). Hold the cover on each side near the spindle (F). 3 Thread the data and power cables for the peripheral device into a power outlet. 50 Getting Started Guide Close the cover. 4 Connect the cables to place a peripheral device, do the following: 1 Open the bay ...
Getting Started Guide
Page 59
Working with the viewer window toward the front of the PC. • Plug the red and yellow connectors (L) into a TV if you want to view the camera images on a TV. • Plug the power cord (M) into a power outlet. 6 Insert the camera: Hold the camera over the camera cradle (R) with Sound, Pictures, and Video 53 5 Connect the docking station cables: • Plug the USB cable (K) into the back of the PC, and lower the camera onto the cradle.
Working with the viewer window toward the front of the PC. • Plug the red and yellow connectors (L) into a TV if you want to view the camera images on a TV. • Plug the power cord (M) into a power outlet. 6 Insert the camera: Hold the camera over the camera cradle (R) with Sound, Pictures, and Video 53 5 Connect the docking station cables: • Plug the USB cable (K) into the back of the PC, and lower the camera onto the cradle.
Getting Started Guide
Page 60
.... • Install a special cover (optional) and an HP camera and HP camera docking station. (Both the camera and the docking station are sold separately.) The bay design allows you to place a device and thread the USB or FireWire (IEEE 1394) data cable and the power cord underneath the rear top cover to the connectors...
.... • Install a special cover (optional) and an HP camera and HP camera docking station. (Both the camera and the docking station are sold separately.) The bay design allows you to place a device and thread the USB or FireWire (IEEE 1394) data cable and the power cord underneath the rear top cover to the connectors...
Getting Started Guide
Page 63
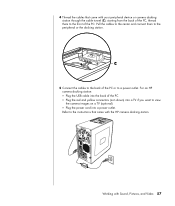
Refer to the instructions that came with the HP camera docking station. For an HP camera docking station: • Plug the USB cable into the back of the PC. 4 Thread the cables that came with your peripheral device or camera ... station. 5 Connect the cables to the back of the PC or to view the camera images on a TV (optional). • Plug the power cord into a TV if you want to a power outlet. Pull the cables to the center and connect them to the front of the PC. • Plug the red and yellow...
Refer to the instructions that came with the HP camera docking station. For an HP camera docking station: • Plug the USB cable into the back of the PC. 4 Thread the cables that came with your peripheral device or camera ... station. 5 Connect the cables to the back of the PC or to view the camera images on a TV (optional). • Plug the power cord into a TV if you want to a power outlet. Pull the cables to the center and connect them to the front of the PC. • Plug the red and yellow...

Getting Started Guide
Page 98
... PC: Click Start, click Turn Off Computer, and then click Restart. 92 Getting Started Guide Check whether speakers are not properly connected. Active speakers have a power cord and On button, and connect to resume from standby mode. CD-ROM, CD-RW, DVD-ROM, or DVD Writer Drive Symptom Problem Solution CD-ROM...
... PC: Click Start, click Turn Off Computer, and then click Restart. 92 Getting Started Guide Check whether speakers are not properly connected. Active speakers have a power cord and On button, and connect to resume from standby mode. CD-ROM, CD-RW, DVD-ROM, or DVD Writer Drive Symptom Problem Solution CD-ROM...

Warranty and Support Guide
Page 21
... between 3 and 30 seconds of fire, electric shock, and injury to persons, including the following: • Do not use the power cord with the cover removed. The RN can damage your PC and void any service procedures. Also, disconnect the telephone line before installing or... connecting it was initially sold. Failure to do so may be a remote risk of all times. Replace only with your safety, the power cord provided with the same, or equivalent, type recommended by the manufacturer. WARNING: Your PC is incorrectly replaced. • For automatically initiated...
... between 3 and 30 seconds of fire, electric shock, and injury to persons, including the following: • Do not use the power cord with the cover removed. The RN can damage your PC and void any service procedures. Also, disconnect the telephone line before installing or... connecting it was initially sold. Failure to do so may be a remote risk of all times. Replace only with your safety, the power cord provided with the same, or equivalent, type recommended by the manufacturer. WARNING: Your PC is incorrectly replaced. • For automatically initiated...
Warranty and Support Guide
Page 14
...those specified in the Upgrading and Servicing Guide may result in personal injury or equipment damage. WARNING: Use of electrical shock. The AC power cord is your PC and void any telecommunications systems (such as telephone lines), networks, or modems before connecting it was initially sold. The ...LED Product The CD and DVD drives contain a laser system and are inside the power supply and modem of an explosion if the battery is located on a laser device installed in your safety, the power cord provided with the cover removed. For your product. 14 There is danger of this...
...those specified in the Upgrading and Servicing Guide may result in personal injury or equipment damage. WARNING: Use of electrical shock. The AC power cord is your PC and void any telecommunications systems (such as telephone lines), networks, or modems before connecting it was initially sold. The ...LED Product The CD and DVD drives contain a laser system and are inside the power supply and modem of an explosion if the battery is located on a laser device installed in your safety, the power cord provided with the cover removed. For your product. 14 There is danger of this...
Warranty and Support Guide
Page 20
... throw them away but collect as those you receive with the limits for a Class B digital device, pursuant to the electrical power system. FCC Regulatory and Safety Information (USA Only) Federal Communications Commission (FCC) Radio Frequency Interference Statement WARNING: This equipment has...procedures when moving the computer. This equipment generates, uses, and can be sure to use shielded signal cables and the power cord supplied with the instructions, may cause harmful interference to provide reasonable protection against harmful interference in this document before installing ...
... throw them away but collect as those you receive with the limits for a Class B digital device, pursuant to the electrical power system. FCC Regulatory and Safety Information (USA Only) Federal Communications Commission (FCC) Radio Frequency Interference Statement WARNING: This equipment has...procedures when moving the computer. This equipment generates, uses, and can be sure to use shielded signal cables and the power cord supplied with the instructions, may cause harmful interference to provide reasonable protection against harmful interference in this document before installing ...