
Getting Started - Windows 7
Page 6
Pinching/Zooming 24 Rotating 24 5 Maintenance Inserting or removing the battery ...25 Replacing or upgrading the hard drive 27 Removing the hard drive ...27 Installing the hard drive ...28 Adding or replacing memory modules 30 Updating ...
Pinching/Zooming 24 Rotating 24 5 Maintenance Inserting or removing the battery ...25 Replacing or upgrading the hard drive 27 Removing the hard drive ...27 Installing the hard drive ...28 Adding or replacing memory modules 30 Updating ...

Getting Started - Windows 7
Page 8
...workstation setup, posture, health, and work habits To access this guide, select Start > Help and Support > User Guides. ● How to maximize battery life ● How to use the multimedia features of the computer ● How to protect the computer ● How to care for the device... 2 Chapter 1 Welcome Worldwide Telephone Numbers booklet HP support telephone numbers This booklet is provided with several resources to help ● Software, driver, and BIOS (Setup Utility) updates ● ...
...workstation setup, posture, health, and work habits To access this guide, select Start > Help and Support > User Guides. ● How to maximize battery life ● How to use the multimedia features of the computer ● How to protect the computer ● How to care for the device... 2 Chapter 1 Welcome Worldwide Telephone Numbers booklet HP support telephone numbers This booklet is provided with several resources to help ● Software, driver, and BIOS (Setup Utility) updates ● ...

Getting Started - Windows 7
Page 19
NOTE: The computer fan starts up automatically to cycle on and off during routine operation. It is normal for the internal fan to cool internal components and prevent overheating. Bottom Component (1) Battery bay (2) Vents (4) (3) Battery release latch (4) Memory module compartment (5) Hard drive bay Description Holds the battery. Releases the battery from the battery bay. Contains the two memory module slots. Enable airflow to cool internal components. Bottom 13 Holds the hard drive.
NOTE: The computer fan starts up automatically to cycle on and off during routine operation. It is normal for the internal fan to cool internal components and prevent overheating. Bottom Component (1) Battery bay (2) Vents (4) (3) Battery release latch (4) Memory module compartment (5) Hard drive bay Description Holds the battery. Releases the battery from the battery bay. Contains the two memory module slots. Enable airflow to cool internal components. Bottom 13 Holds the hard drive.

Getting Started - Windows 7
Page 20
Additional hardware Component Description (1) Power cord* Connects an AC adapter to an AC outlet. (2) AC adapter Converts AC power to DC power. (3) Battery* Powers the computer when the computer is not plugged into external power. *Batteries and power cords vary in appearance by region and country. 14 Chapter 2 Getting to know your computer
Additional hardware Component Description (1) Power cord* Connects an AC adapter to an AC outlet. (2) AC adapter Converts AC power to DC power. (3) Battery* Powers the computer when the computer is not plugged into external power. *Batteries and power cords vary in appearance by region and country. 14 Chapter 2 Getting to know your computer
Getting Started - Windows 7
Page 31
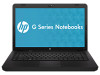
To remove the battery: Inserting or removing the battery 25 5 Maintenance ● Inserting or removing the battery ● Replacing or upgrading the hard drive ● Adding or replacing memory modules ● Updating programs and drivers ● Routine care Inserting or removing the battery NOTE: For additional information on using the battery, refer to the HP Notebook Reference Guide. The battery release latch (3) automatically locks the battery into the battery bay (2) until it is seated. To insert the battery: ▲ Insert the battery (1) into place.
To remove the battery: Inserting or removing the battery 25 5 Maintenance ● Inserting or removing the battery ● Replacing or upgrading the hard drive ● Adding or replacing memory modules ● Updating programs and drivers ● Routine care Inserting or removing the battery NOTE: For additional information on using the battery, refer to the HP Notebook Reference Guide. The battery release latch (3) automatically locks the battery into the battery bay (2) until it is seated. To insert the battery: ▲ Insert the battery (1) into place.
Getting Started - Windows 7
Page 32
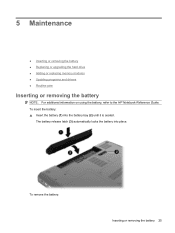
CAUTION: Removing a battery that is the sole power source for the computer can cause loss of information, save your work and initiate Hibernation or shut down on a flat surface, with the battery bay toward you. 2. To prevent loss of information. Turn the computer upside down the computer through Windows before removing the battery. 1. Slide the battery release latch (1) to release the battery 3. Pivot the battery (2) upward and remove it (3) from the computer. 26 Chapter 5 Maintenance
CAUTION: Removing a battery that is the sole power source for the computer can cause loss of information, save your work and initiate Hibernation or shut down on a flat surface, with the battery bay toward you. 2. To prevent loss of information. Turn the computer upside down the computer through Windows before removing the battery. 1. Slide the battery release latch (1) to release the battery 3. Pivot the battery (2) upward and remove it (3) from the computer. 26 Chapter 5 Maintenance
Getting Started - Windows 7
Page 33
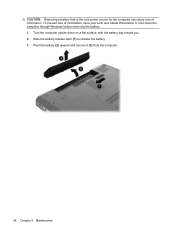
If you , loosen the two hard drive cover screws (1). 8. Save your work. 2. Remove the battery from the AC outlet. 5. Grasp the tabs (2) on by pressing the power button. Removing the hard drive To remove the hard drive: 1. Turn the computer ...
If you , loosen the two hard drive cover screws (1). 8. Save your work. 2. Remove the battery from the AC outlet. 5. Grasp the tabs (2) on by pressing the power button. Removing the hard drive To remove the hard drive: 1. Turn the computer ...
Getting Started - Windows 7
Page 35
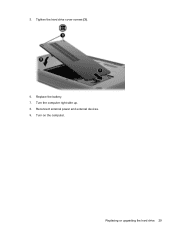
Turn the computer right-side up. 8. Reconnect external power and external devices. 9. Turn on the computer. 5. Replacing or upgrading the hard drive 29 Replace the battery. 7. Tighten the hard drive cover screws (3). 6.
Turn the computer right-side up. 8. Reconnect external power and external devices. 9. Turn on the computer. 5. Replacing or upgrading the hard drive 29 Replace the battery. 7. Tighten the hard drive cover screws (3). 6.
Getting Started - Windows 7
Page 36
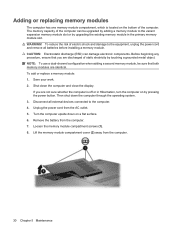
... the power button. Disconnect all external devices connected to the equipment, unplug the power cord and remove all batteries before installing a memory module. Shut down the computer through the operating system. 3. Remove the battery from the computer. 7. Loosen the memory module compartment screws (1). 8. The memory capacity of electric shock and damage to...
... the power button. Disconnect all external devices connected to the equipment, unplug the power cord and remove all batteries before installing a memory module. Shut down the computer through the operating system. 3. Remove the battery from the computer. 7. Loosen the memory module compartment screws (1). 8. The memory capacity of electric shock and damage to...
Getting Started - Windows 7
Page 38
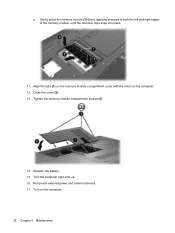
Gently press the memory module (3) down, applying pressure to both the left and right edges of the memory module, until the retention clips snap into place. 11. Replace the battery. 15. Align the tabs (1) on the memory module compartment cover with the notch on the computer. 32 Chapter 5 Maintenance Turn the computer right-side up. 16. Turn on the computer. 12. Tighten the memory module compartment screws (3). 14. Reconnect external power and external devices. 17. Close the cover (2). 13. c.
Gently press the memory module (3) down, applying pressure to both the left and right edges of the memory module, until the retention clips snap into place. 11. Replace the battery. 15. Align the tabs (1) on the memory module compartment cover with the notch on the computer. 32 Chapter 5 Maintenance Turn the computer right-side up. 16. Turn on the computer. 12. Tighten the memory module compartment screws (3). 14. Reconnect external power and external devices. 17. Close the cover (2). 13. c.

Getting Started - Windows 7
Page 45
... Warranty period (5) Model description Have this information when traveling internationally. If your computer. The serial number label is affixed inside the battery bay. ● Microsoft® Certificate of the countries or regions in which the devices have been approved for use. The regulatory...internationally with your computer model includes one or more wireless devices, one or more certification labels are affixed inside the battery bay. ● Regulatory label-Provides regulatory information about optional wireless devices and the approval markings of some of Authenticity...
... Warranty period (5) Model description Have this information when traveling internationally. If your computer. The serial number label is affixed inside the battery bay. ● Microsoft® Certificate of the countries or regions in which the devices have been approved for use. The regulatory...internationally with your computer model includes one or more wireless devices, one or more certification labels are affixed inside the battery bay. ● Regulatory label-Provides regulatory information about optional wireless devices and the approval markings of some of Authenticity...
Getting Started - Windows 7
Page 46
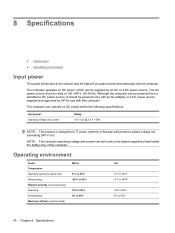
...powered from a standalone DC power source, it should be powered only with an AC adapter or a DC power source supplied and approved by HP for IT power systems in this computer. The computer can operate on DC power, which can be found on the system regulatory label inside the... battery bay of the computer. 8 Specifications ● Input power ● Operating environment Input power The power information in Norway with phase-to travel internationally ...
...powered from a standalone DC power source, it should be powered only with an AC adapter or a DC power source supplied and approved by HP for IT power systems in this computer. The computer can operate on DC power, which can be found on the system regulatory label inside the... battery bay of the computer. 8 Specifications ● Input power ● Operating environment Input power The power information in Norway with phase-to travel internationally ...
Getting Started - Windows 7
Page 48
...10 B backing up customized window, toolbar, and menu bar settings 36 personal files 36 battery bay 39 battery bay, identifying 13 battery release latch, identifying 13 battery, identifying 14 battery, replacing 25 bays battery 13 hard drive 13 Bluetooth label 39 buttons power 7 TouchPad 5 C caps lock light...8 esc 8 fn 8 Windows applications 8 Windows logo 8 L labels Bluetooth 39 regulatory 39 serial number 39 wireless certification 39 WLAN 39 latch, battery release 13 lights caps lock 6 drive light 10 optical drive 9 power 6, 9 TouchPad 5 webcam 11 wireless 6 M memory module inserting 31 ...
...10 B backing up customized window, toolbar, and menu bar settings 36 personal files 36 battery bay 39 battery bay, identifying 13 battery release latch, identifying 13 battery, identifying 14 battery, replacing 25 bays battery 13 hard drive 13 Bluetooth label 39 buttons power 7 TouchPad 5 C caps lock light...8 esc 8 fn 8 Windows applications 8 Windows logo 8 L labels Bluetooth 39 regulatory 39 serial number 39 wireless certification 39 WLAN 39 latch, battery release 13 lights caps lock 6 drive light 10 optical drive 9 power 6, 9 TouchPad 5 webcam 11 wireless 6 M memory module inserting 31 ...

HP Notebook User Guide - SuSE Linux
Page 6
... settings 30 Changing the current power management settings 30 Using battery power ...30 Displaying the remaining battery charge 31 Inserting or removing the battery 32 Charging a battery ...33 Maximizing battery life ...34 Managing low battery levels 34 Identifying low battery levels 34 Resolving a low battery level 35 Resolving a low battery level when external power is available ....... 35 Resolving a low...
... settings 30 Changing the current power management settings 30 Using battery power ...30 Displaying the remaining battery charge 31 Inserting or removing the battery 32 Charging a battery ...33 Maximizing battery life ...34 Managing low battery levels 34 Identifying low battery levels 34 Resolving a low battery level 35 Resolving a low battery level when external power is available ....... 35 Resolving a low...

HP Notebook User Guide - SuSE Linux
Page 9
...Update your programs and drivers with several resources to the Internet ● Computer utilities ● Regulatory and safety information ● Battery disposal information Finding information 1 The list of the software preinstalled on the computer. You can also refer to download updates from... HP. You can also go to http://www.hp.com/support to the software manufacturer's instructions, which may be updated with the computer, select Computer > Help. For...
...Update your programs and drivers with several resources to the Internet ● Computer utilities ● Regulatory and safety information ● Battery disposal information Finding information 1 The list of the software preinstalled on the computer. You can also refer to download updates from... HP. You can also go to http://www.hp.com/support to the software manufacturer's instructions, which may be updated with the computer, select Computer > Help. For...

HP Notebook User Guide - SuSE Linux
Page 20
Releases the battery from the battery bay. Holds the hard drive. 12 Chapter 2 Getting to cool internal components and prevent overheating. NOTE: The computer fan starts up automatically to know your computer It is normal for the internal fan to cool internal components. Bottom Component (1) Battery bay (2) Vents (4) (3) Battery release latch (4) Memory module compartment (5) Hard drive bay Description Holds the battery. Contains the two memory module slots. Enable airflow to cycle on and off during routine operation.
Releases the battery from the battery bay. Holds the hard drive. 12 Chapter 2 Getting to cool internal components and prevent overheating. NOTE: The computer fan starts up automatically to know your computer It is normal for the internal fan to cool internal components. Bottom Component (1) Battery bay (2) Vents (4) (3) Battery release latch (4) Memory module compartment (5) Hard drive bay Description Holds the battery. Contains the two memory module slots. Enable airflow to cycle on and off during routine operation.

HP Notebook User Guide - SuSE Linux
Page 21
Additional hardware Component Description (1) Power cord* Connects an AC adapter to an AC outlet. (2) AC adapter Converts AC power to DC power. (3) Battery* Powers the computer when the computer is not plugged into external power. *Batteries and power cords vary in appearance by region and country. Additional hardware 13
Additional hardware Component Description (1) Power cord* Connects an AC adapter to an AC outlet. (2) AC adapter Converts AC power to DC power. (3) Battery* Powers the computer when the computer is not plugged into external power. *Batteries and power cords vary in appearance by region and country. Additional hardware 13

HP Notebook User Guide - SuSE Linux
Page 36
...Computer > Shutdown > Shut Down. Shut down the computer under any of the following conditions: ● When you need to replace the battery or access components inside the computer ● When you are unable to use the preceding shut down procedures, try the following emergency procedures ... be unused and disconnected from external power for at least 5 seconds. ● Disconnect the computer from external power, and then remove the battery. 28 Chapter 6 Power management Save your work and close all open programs. 2. The Shut Down command closes all open programs, including the...
...Computer > Shutdown > Shut Down. Shut down the computer under any of the following conditions: ● When you need to replace the battery or access components inside the computer ● When you are unable to use the preceding shut down procedures, try the following emergency procedures ... be unused and disconnected from external power for at least 5 seconds. ● Disconnect the computer from external power, and then remove the battery. 28 Chapter 6 Power management Save your work and close all open programs. 2. The Shut Down command closes all open programs, including the...

HP Notebook User Guide - SuSE Linux
Page 37
...is in the Suspend state or in Hibernation. When Hibernation is initiated, your work returns to initiate Hibernation after a period of inactivity when running on battery power. ● Select Computer > Shutdown > Suspend. ● Click the Power icon, located on and your work is set at the factory ...on the hard drive and the computer turns off. When Suspend is in the Suspend state for an extended period or if the battery reaches a critical battery level while in Control Center. If the computer is initiated, the power light blinks and the screen clears. Power settings and timeouts...
...is in the Suspend state or in Hibernation. When Hibernation is initiated, your work returns to initiate Hibernation after a period of inactivity when running on battery power. ● Select Computer > Shutdown > Suspend. ● Click the Power icon, located on and your work is set at the factory ...on the hard drive and the computer turns off. When Suspend is in the Suspend state for an extended period or if the battery reaches a critical battery level while in Control Center. If the computer is initiated, the power light blinks and the screen clears. Power settings and timeouts...

HP Notebook User Guide - SuSE Linux
Page 38
... Viewing the current power management settings ▲ Right-click the Power icon in the notification area at the far right of remaining battery charge, left-click the Power icon. ● To access Power Management Preferences, right-click the Power icon, and then click ...Changing the current power management settings 1. For information on increasing or decreasing display brightness, refer to quickly access power settings, view remaining battery charge, and select a different power plan. ● To display the percentage of the taskbar. The Power icon allows you conserve power...
... Viewing the current power management settings ▲ Right-click the Power icon in the notification area at the far right of remaining battery charge, left-click the Power icon. ● To access Power Management Preferences, right-click the Power icon, and then click ...Changing the current power management settings 1. For information on increasing or decreasing display brightness, refer to quickly access power settings, view remaining battery charge, and select a different power plan. ● To display the percentage of the taskbar. The Power icon allows you conserve power...


