
User Manual
Page 3
Also, do not place the device directly on a hard, flat surface. The device and the AC adapter comply with the user-accessible surface temperature limits defined by the International Standard for Safety of overheating the device, do not allow another hard surface, ...such as an adjoining optional printer, or a soft surface, such as pillows or rugs or clothing, during operation. Do not allow the AC adapter to contact the skin or a soft surface, such as pillows or rugs or clothing, to block airflow. To reduce the possibility of heat-related injuries...
Also, do not place the device directly on a hard, flat surface. The device and the AC adapter comply with the user-accessible surface temperature limits defined by the International Standard for Safety of overheating the device, do not allow another hard surface, ...such as an adjoining optional printer, or a soft surface, such as pillows or rugs or clothing, during operation. Do not allow the AC adapter to contact the skin or a soft surface, such as pillows or rugs or clothing, to block airflow. To reduce the possibility of heat-related injuries...
User Manual
Page 10
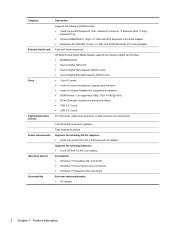
... 2.0 (1 port) 97% Duracoat, island-style keyboard, no spill-resistance (in black finish) TouchPad with multi-touch gestures Taps enabled as default Supports the following HP AC adapters: ● 65-W (non-smart) PFC RC V EM 3-wire HP AC adapter Supports the following batteries: ● 6-cell, 59 WHr 5.4 AH Li-ion battery Preinstalled: ● Windows 7 Home Basic (64-
... 2.0 (1 port) 97% Duracoat, island-style keyboard, no spill-resistance (in black finish) TouchPad with multi-touch gestures Taps enabled as default Supports the following HP AC adapters: ● 65-W (non-smart) PFC RC V EM 3-wire HP AC adapter Supports the following batteries: ● 6-cell, 59 WHr 5.4 AH Li-ion battery Preinstalled: ● Windows 7 Home Basic (64-
User Manual
Page 17
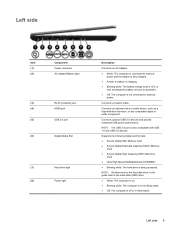
... USB power performance. NOTE: All references to the hard disk drive in Hibernation. Left side Item (1) (2) Component Power connector AC adapter/Battery light (3) RJ-45 (network) jack (4) HDMI port (5) USB 3.0 port (6) Digital Media Slot (7) Hard drive light (8) Power light Description ...Connects an AC adapter. ● White: The computer is connected to external power and the battery is fully charged. ● Amber: A battery is charging. &#...
... USB power performance. NOTE: All references to the hard disk drive in Hibernation. Left side Item (1) (2) Component Power connector AC adapter/Battery light (3) RJ-45 (network) jack (4) HDMI port (5) USB 3.0 port (6) Digital Media Slot (7) Hard drive light (8) Power light Description ...Connects an AC adapter. ● White: The computer is connected to external power and the battery is fully charged. ● Amber: A battery is charging. &#...
User Manual
Page 24
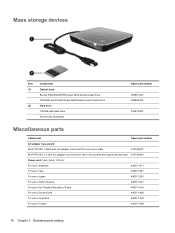
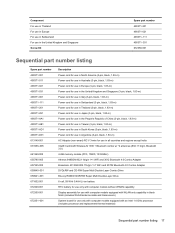
...) Spare part number 659941-001 659940-001 672616-001 Miscellaneous parts Component Spare part number AC adapter (non-smart): 65-W PFC RC V EM 3-wire AC adapter (non-smart) for use only in India 613149-001 65-W PFC RC V 3-wire AC adapter (non-smart) for use in all countries and regions except India 613149-001 Power cord...
...) Spare part number 659941-001 659940-001 672616-001 Miscellaneous parts Component Spare part number AC adapter (non-smart): 65-W PFC RC V EM 3-wire AC adapter (non-smart) for use only in India 613149-001 65-W PFC RC V 3-wire AC adapter (non-smart) for use in all countries and regions except India 613149-001 Power cord...
User Manual
Page 25
...Taiwan (3-pin, black, 1.83-m) Power cord for use in South Korea (3-pin, black, 1.83-m) Power cord for use in Argentina (3-pin, black, 1.83-m) AC Adapter (non-smart) RC V 3-wire for use in all countries and regions except India Intel® Centrino® Wireless-N 1030 + Bluetooth combo w/ *2 antennas (...4-GB memory module (PC3, 10600, 1333-MHz) Atheros 9485GN 802.11b/g/n 1×1 WiFi and 3012 Bluetooth 4.0 Combo Adapter Broadcom 4313GN 802.11b/g/n 1×1 WiFi and 20702 Bluetooth 4.0 Combo Adapter DVD±RW and CD-RW Super Multi Double-Layer Combo Drive Blu-ray ROM DVD±R/RW Super Multi...
...Taiwan (3-pin, black, 1.83-m) Power cord for use in South Korea (3-pin, black, 1.83-m) Power cord for use in Argentina (3-pin, black, 1.83-m) AC Adapter (non-smart) RC V 3-wire for use in all countries and regions except India Intel® Centrino® Wireless-N 1030 + Bluetooth combo w/ *2 antennas (...4-GB memory module (PC3, 10600, 1333-MHz) Atheros 9485GN 802.11b/g/n 1×1 WiFi and 3012 Bluetooth 4.0 Combo Adapter Broadcom 4313GN 802.11b/g/n 1×1 WiFi and 20702 Bluetooth 4.0 Combo Adapter DVD±RW and CD-RW Super Multi Double-Layer Combo Drive Blu-ray ROM DVD±R/RW Super Multi...
User Manual
Page 33
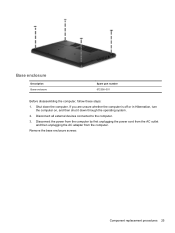
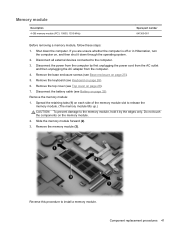
Disconnect the power from the computer by first unplugging the power cord from the AC outlet and then unplugging the AC adapter from the computer. Disconnect all external devices connected to the computer. 3. Base enclosure Description Base enclosure Spare part number 672356-001 Before disassembling the computer, follow these steps: 1. If you are unsure whether the computer is off or in Hibernation, turn the computer on, and then shut it down the computer. Remove the base enclosure screws: Component replacement procedures 25 Shut down through the operating system. 2.
Disconnect the power from the computer by first unplugging the power cord from the AC outlet and then unplugging the AC adapter from the computer. Disconnect all external devices connected to the computer. 3. Base enclosure Description Base enclosure Spare part number 672356-001 Before disassembling the computer, follow these steps: 1. If you are unsure whether the computer is off or in Hibernation, turn the computer on, and then shut it down the computer. Remove the base enclosure screws: Component replacement procedures 25 Shut down through the operating system. 2.
User Manual
Page 35
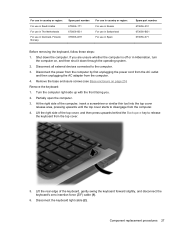
... cover starts to the computer. 3. Component replacement procedures 27 Disconnect the power from the computer by first unplugging the power cord from the AC outlet and then unplugging the AC adapter from the top cover. 5. Disconnect the keyboard light cable (2) . Shut down through the operating system. 2. Lift the rear edge of the top...
... cover starts to the computer. 3. Component replacement procedures 27 Disconnect the power from the computer by first unplugging the power cord from the AC outlet and then unplugging the AC adapter from the top cover. 5. Disconnect the keyboard light cable (2) . Shut down through the operating system. 2. Lift the rear edge of the top...
User Manual
Page 36
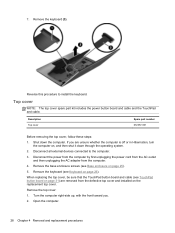
... Keyboard on the replacement top cover. Remove the keyboard (3). Disconnect the power from the computer by first unplugging the power cord from the AC outlet and then unplugging the AC adapter from the defective top cover and installed on page 26). Remove the top cover: 1. Top cover NOTE: The top cover spare part...
... Keyboard on the replacement top cover. Remove the keyboard (3). Disconnect the power from the computer by first unplugging the power cord from the AC outlet and then unplugging the AC adapter from the defective top cover and installed on page 26). Remove the top cover: 1. Top cover NOTE: The top cover spare part...
User Manual
Page 38
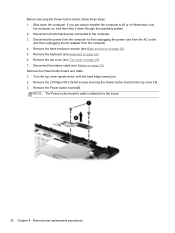
Disconnect the power from the computer by first unplugging the power cord from the AC outlet and then unplugging the AC adapter from the computer. 4. Remove the Power button board (2). Remove the keyboard (see Battery on page 32). Turn the top cover upside down the computer. NOTE: ...
Disconnect the power from the computer by first unplugging the power cord from the AC outlet and then unplugging the AC adapter from the computer. 4. Remove the Power button board (2). Remove the keyboard (see Battery on page 32). Turn the top cover upside down the computer. NOTE: ...
User Manual
Page 39
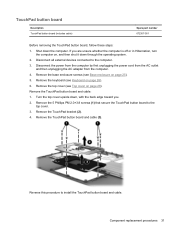
... connected to install the TouchPad button board and cable. Disconnect the power from the computer by first unplugging the power cord from the AC outlet and then unplugging the AC adapter from the computer. 4. Remove the TouchPad button board and cable: 1. Remove the TouchPad bracket (2). 4. Component replacement procedures 31 Remove the base enclosure...
... connected to install the TouchPad button board and cable. Disconnect the power from the computer by first unplugging the power cord from the AC outlet and then unplugging the AC adapter from the computer. 4. Remove the TouchPad button board and cable: 1. Remove the TouchPad bracket (2). 4. Component replacement procedures 31 Remove the base enclosure...
User Manual
Page 40
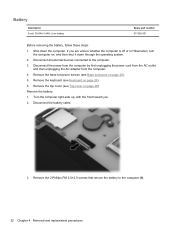
Disconnect the power from the computer by first unplugging the power cord from the AC outlet and then unplugging the AC adapter from the computer. 4. Remove the battery: 1. Shut down through the operating system. 2. Remove the 2 Phillips PM 2.0×3.0 screws that secure the battery to the computer. 3. ...
Disconnect the power from the computer by first unplugging the power cord from the AC outlet and then unplugging the AC adapter from the computer. 4. Remove the battery: 1. Shut down through the operating system. 2. Remove the 2 Phillips PM 2.0×3.0 screws that secure the battery to the computer. 3. ...
User Manual
Page 42
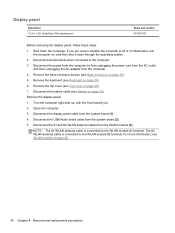
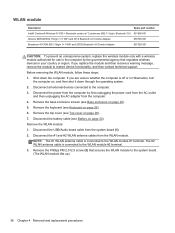
...these steps: 1. Disconnect the power from the computer by first unplugging the power cord from the AC outlet and then unplugging the AC adapter from the WLAN module (3). Remove the top cover (see Base enclosure on page 32). Disconnect ...the #1 and #2 WLAN antenna cables from the computer. 4. Open the computer. 3. Disconnect the display panel cable from the system board (2). 5. The #2 WLAN antenna cable is connected to the WLAN module #1 terminal. Display panel Description 13...
...these steps: 1. Disconnect the power from the computer by first unplugging the power cord from the AC outlet and then unplugging the AC adapter from the WLAN module (3). Remove the top cover (see Base enclosure on page 32). Disconnect ...the #1 and #2 WLAN antenna cables from the computer. 4. Open the computer. 3. Disconnect the display panel cable from the system board (2). 5. The #2 WLAN antenna cable is connected to the WLAN module #1 terminal. Display panel Description 13...
User Manual
Page 44
...11 b/g/n, Bluetooth 3.0) 631956-001 Atheros 9485GN 802.11b/g/n 1×1 WiFi and 3012 Bluetooth 4.0 Combo Adapter 655795-001 Broadcom 4313GN 802.11b/g/n 1×1 WiFi and 20702 Bluetooth 4.0 Combo Adapter 657325-001 CAUTION: To prevent an unresponsive system, replace the wireless module only with a wireless module ...authorized for use in the computer by first unplugging the power cord from the AC outlet and then unplugging the AC adapter from the computer. 4. Shut down through the operating system. 2. Remove the keyboard (see Battery on page 32...
...11 b/g/n, Bluetooth 3.0) 631956-001 Atheros 9485GN 802.11b/g/n 1×1 WiFi and 3012 Bluetooth 4.0 Combo Adapter 655795-001 Broadcom 4313GN 802.11b/g/n 1×1 WiFi and 20702 Bluetooth 4.0 Combo Adapter 657325-001 CAUTION: To prevent an unresponsive system, replace the wireless module only with a wireless module ...authorized for use in the computer by first unplugging the power cord from the AC outlet and then unplugging the AC adapter from the computer. 4. Shut down through the operating system. 2. Remove the keyboard (see Battery on page 32...
User Manual
Page 45
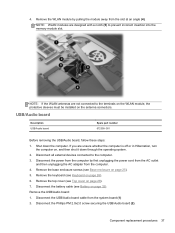
... 28). 7. 4. Remove the keyboard (see Top cover on page 26). 6. Remove the WLAN module by first unplugging the power cord from the AC outlet and then unplugging the AC adapter from the system board (1) 2. Component replacement procedures 37 Disconnect the Phillips PM 2.0x2.0 screw securing the USB/Audio board (2). Disconnect all external devices...
... 28). 7. 4. Remove the keyboard (see Top cover on page 26). 6. Remove the WLAN module by first unplugging the power cord from the AC outlet and then unplugging the AC adapter from the system board (1) 2. Component replacement procedures 37 Disconnect the Phillips PM 2.0x2.0 screw securing the USB/Audio board (2). Disconnect all external devices...
User Manual
Page 47
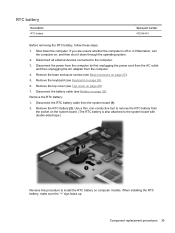
... or in Hibernation, turn the computer on computer models. Disconnect the power from the computer by first unplugging the power cord from the AC outlet and then unplugging the AC adapter from the system board (1). 2. Remove the keyboard (see Top cover on page 26). 6. Remove the RTC battery (2). Remove the RTC battery: 1. Remove...
... or in Hibernation, turn the computer on computer models. Disconnect the power from the computer by first unplugging the power cord from the AC outlet and then unplugging the AC adapter from the system board (1). 2. Remove the keyboard (see Top cover on page 26). 6. Remove the RTC battery (2). Remove the RTC battery: 1. Remove...
User Manual
Page 48
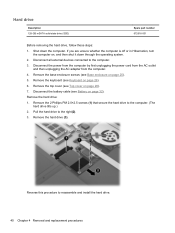
... the right(2). 3. Pull the hard drive to the computer. 3. Disconnect the power from the computer by first unplugging the power cord from the AC outlet and then unplugging the AC adapter from the computer. 4. Disconnect the battery cable (see Top cover on , and then shut it down the computer. Hard drive Description 128...
... the right(2). 3. Pull the hard drive to the computer. 3. Disconnect the power from the computer by first unplugging the power cord from the AC outlet and then unplugging the AC adapter from the computer. 4. Disconnect the battery cable (see Top cover on , and then shut it down the computer. Hard drive Description 128...
User Manual
Page 49
... the computer. 4. Disconnect the battery cable (see Top cover on , and then shut it by first unplugging the power cord from the AC outlet and then unplugging the AC adapter from the computer by the edges only. Disconnect all external devices connected to the computer. 3. Do not touch the components on page 32...
... the computer. 4. Disconnect the battery cable (see Top cover on , and then shut it by first unplugging the power cord from the AC outlet and then unplugging the AC adapter from the computer by the edges only. Disconnect all external devices connected to the computer. 3. Do not touch the components on page 32...
User Manual
Page 50
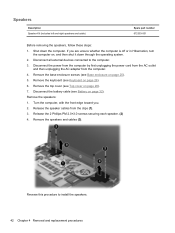
.... 4. Release the 2 Phillips PM 2.0×3.0 screws securing each speaker. (2) 4. Disconnect the power from the computer by first unplugging the power cord from the AC outlet and then unplugging the AC adapter from the clips (1). 3. Remove the keyboard (see Battery on page 32). Disconnect the battery cable (see Keyboard on page 25). 5. If you...
.... 4. Release the 2 Phillips PM 2.0×3.0 screws securing each speaker. (2) 4. Disconnect the power from the computer by first unplugging the power cord from the AC outlet and then unplugging the AC adapter from the clips (1). 3. Remove the keyboard (see Battery on page 32). Disconnect the battery cable (see Keyboard on page 25). 5. If you...
User Manual
Page 51
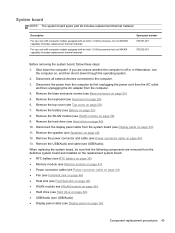
...the WLAN module (see Speakers on page 36). 9. Disconnect the power from the computer by first unplugging the power cord from the AC outlet and then unplugging the AC adapter from the system board (see Top cover on page 34). 11. Remove the speaker (see WLAN module on page 42). 12....the system board, be sure that the following components are unsure whether the computer is off or in Hibernation, turn the computer on page 44). 13. Description For use only with computer models equipped with an Intel 1.4 GHz processor, but not WWAN capability (includes replacement thermal material) For use...
...the WLAN module (see Speakers on page 36). 9. Disconnect the power from the computer by first unplugging the power cord from the AC outlet and then unplugging the AC adapter from the system board (see Top cover on page 34). 11. Remove the speaker (see WLAN module on page 42). 12....the system board, be sure that the following components are unsure whether the computer is off or in Hibernation, turn the computer on page 44). 13. Description For use only with computer models equipped with an Intel 1.4 GHz processor, but not WWAN capability (includes replacement thermal material) For use...
User Manual
Page 53
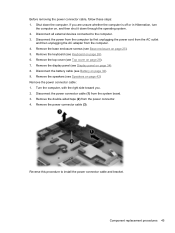
... on page 28). 7. Shut down through the operating system. 2. If you . 2. Disconnect the power from the computer by first unplugging the power cord from the AC outlet and then unplugging the AC adapter from the computer. 4. Before removing the power connector cable, follow these steps: 1.
... on page 28). 7. Shut down through the operating system. 2. If you . 2. Disconnect the power from the computer by first unplugging the power cord from the AC outlet and then unplugging the AC adapter from the computer. 4. Before removing the power connector cable, follow these steps: 1.


