

HP Fax 700/750 - (English) User Guide
Page 7
Unpacking and Connecting Your HP FAX-700/750 To unpack and connect your HP FAX-700/750, follow the instructions on the following pages to: Unpack and remove packing material Connect the power and cord phone line Load paper Install the print cartridge Open the document trays When you have completed unpacking and connecting, turn to Setting up Your HP FAX-700/750. 2
Unpacking and Connecting Your HP FAX-700/750 To unpack and connect your HP FAX-700/750, follow the instructions on the following pages to: Unpack and remove packing material Connect the power and cord phone line Load paper Install the print cartridge Open the document trays When you have completed unpacking and connecting, turn to Setting up Your HP FAX-700/750. 2

HP Fax 700/750 - (English) User Guide
Page 10
Installing the print cartridge If a cartridge is already installed, remove it snaps into the cradle. ek 47 Turn on the fax, then open the top cover. ek 18 Put the print cartridge into place. ek 19 Push the print cartridge forward firmly until it . Be careful not to touch the ink nozzles or the copper contacts. Gently remove both pieces of tape. Then close the top cover. 5 STOP ek 27 Handle the new print cartridge only by the green top.
Installing the print cartridge If a cartridge is already installed, remove it snaps into the cradle. ek 47 Turn on the fax, then open the top cover. ek 18 Put the print cartridge into place. ek 19 Push the print cartridge forward firmly until it . Be careful not to touch the ink nozzles or the copper contacts. Gently remove both pieces of tape. Then close the top cover. 5 STOP ek 27 Handle the new print cartridge only by the green top.

HP Fax 700/750 - (English) User Guide
Page 68
Remove the jammed paper. Do not attempt to clear memory, then start over. ek_32 ek_22 To clear a paper jam: Lift and remove the paper delivery tray. Note: If a document jam happens while you are storing to memory, press Stop on the front panel to clear paper from the print cartridge area. Then slide the tray back in until it stops. 63 Then close the cover. Caution: be sure to press both sides of the cover until it snaps closed. Clearing document and paper jams ek_10 To clear a document jam: Lift the front panel and remove the jammed document.
Remove the jammed paper. Do not attempt to clear memory, then start over. ek_32 ek_22 To clear a paper jam: Lift and remove the paper delivery tray. Note: If a document jam happens while you are storing to memory, press Stop on the front panel to clear paper from the print cartridge area. Then slide the tray back in until it stops. 63 Then close the cover. Caution: be sure to press both sides of the cover until it snaps closed. Clearing document and paper jams ek_10 To clear a document jam: Lift the front panel and remove the jammed document.
HP Fax 700/750 - (English) User Guide
Page 72
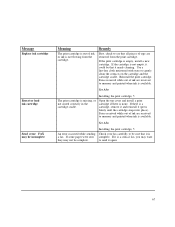
... there is not empty, it could be sure that it needs cleaning. Installing the print cartridge, 5 Check your fax carefully to memory and printed when ink is not flowing from the print cartridge. Faxes received while out of ink are received to be that all pieces of ink, or ink...sent, they may not be incomplete Meaning The print cartridge is none. Open the top cover and install a print cartridge if there is out of tape are removed from the cartridge. Message Replace ink cartridge Reseat or load ink cartridge Send error FAX may be complete. Remedy First, check to gently clean...
... there is not empty, it could be sure that it needs cleaning. Installing the print cartridge, 5 Check your fax carefully to memory and printed when ink is not flowing from the print cartridge. Faxes received while out of ink are received to be that all pieces of ink, or ink...sent, they may not be incomplete Meaning The print cartridge is none. Open the top cover and install a print cartridge if there is out of tape are removed from the cartridge. Message Replace ink cartridge Reseat or load ink cartridge Send error FAX may be complete. Remedy First, check to gently clean...
HP Fax 700/750 - (English) User Guide
Page 76
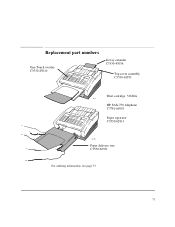
Replacement part numbers One-Touch overlay C3530-85010 In tray extender C3530-43056 Top cover assembly C3530-63051 Print cartridge 51626A ek 8 HP FAX-750 telephone C3781-60001 Paper separator C3530-62913 ek-22 Paper delivery tray C3530-62351 For ordering information, see page 73 71
Replacement part numbers One-Touch overlay C3530-85010 In tray extender C3530-43056 Top cover assembly C3530-63051 Print cartridge 51626A ek 8 HP FAX-750 telephone C3781-60001 Paper separator C3530-62913 ek-22 Paper delivery tray C3530-62351 For ordering information, see page 73 71
HP Fax 700/750 - (English) User Guide
Page 84
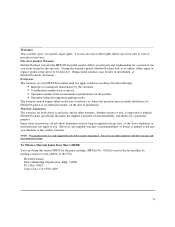
One-Year Limited Warranty Hewlett-Packard warrants the HP FAX facsimile against defects in materials and workmanship for a period of one year duration of this address in the fax machine by the end user. Exclusions The warranty on the date of the environmental specifications for a particular ...-Packard's discretion. Unauthorized modification or misuse. The warranty period begins either on the date of merchantability or fitness is for the print cartridge (HP Part No. 51626A) used in the USA: Hewlett-Packard Direct Marketing Organization, Bldg. 51LSE P.O. Some states or provinces do not ...
One-Year Limited Warranty Hewlett-Packard warrants the HP FAX facsimile against defects in materials and workmanship for a period of one year duration of this address in the fax machine by the end user. Exclusions The warranty on the date of the environmental specifications for a particular ...-Packard's discretion. Unauthorized modification or misuse. The warranty period begins either on the date of merchantability or fitness is for the print cartridge (HP Part No. 51626A) used in the USA: Hewlett-Packard Direct Marketing Organization, Bldg. 51LSE P.O. Some states or provinces do not ...
Service Manual
Page 6
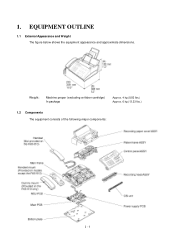
Weight: Machine proper (excluding a ribbon cartridge) In package Approx. 4 kg (8.82 lbs.) Approx. 6 kg (13.23 lbs.) 1.2 Components The equipment consists of the following major components: I - 1 EQUIPMENT OUTLINE 1.1 External Appearance and Weight The figure below shows the equipment appearance and approximate dimensions. 1.
Weight: Machine proper (excluding a ribbon cartridge) In package Approx. 4 kg (8.82 lbs.) Approx. 6 kg (13.23 lbs.) 1.2 Components The equipment consists of the following major components: I - 1 EQUIPMENT OUTLINE 1.1 External Appearance and Weight The figure below shows the equipment appearance and approximate dimensions. 1.

Service Manual
Page 18
... whose power transmission route can be switched by the planetary gear systems and the solenoid. This switching allows the equipment to those on the ribbon cartridge, as shown in the figure below (On the outer side of the drive unit), the rotational torque of the drive unit Gear Train III - 5 If...
... whose power transmission route can be switched by the planetary gear systems and the solenoid. This switching allows the equipment to those on the ribbon cartridge, as shown in the figure below (On the outer side of the drive unit), the rotational torque of the drive unit Gear Train III - 5 If...
Service Manual
Page 23
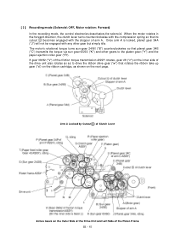
The motor's rotational torque turns sun gear 24/90 ("B") counterclockwise so that rotates the ribbon take-up gear ("a") on the ribbon cartridge, as to the platen gear ("Y") and the paper ejection roller gear ("R"). Once arm A is locked, planet gear 34A ("J") will not be engaged with the stopper ...
The motor's rotational torque turns sun gear 24/90 ("B") counterclockwise so that rotates the ribbon take-up gear ("a") on the ribbon cartridge, as to the platen gear ("Y") and the paper ejection roller gear ("R"). Once arm A is locked, planet gear 34A ("J") will not be engaged with the stopper ...

Service Manual
Page 25
... ("z") on the inner side of arm A from Cutout of Clutch Lever Active Gears on the Outer Side of the Drive Unit and on the ribbon cartridge, as to drive the friction torque transmission ASSY and ribbon drive gear ("w") that planet gear 34A ("J") transmits the torque to the document scanner mechanism (e.g., the...
... ("z") on the inner side of arm A from Cutout of Clutch Lever Active Gears on the Outer Side of the Drive Unit and on the ribbon cartridge, as to drive the friction torque transmission ASSY and ribbon drive gear ("w") that planet gear 34A ("J") transmits the torque to the document scanner mechanism (e.g., the...
Service Manual
Page 27
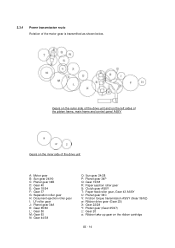
... (Gear 39/62) w: Ribbon drive gear (Gear 25) X: Gear 22/28 Y: Platen gear (Gear 25/27) z: Gear 20 a: Ribbon take-up gear on the ribbon cartridge III - 14
... (Gear 39/62) w: Ribbon drive gear (Gear 25) X: Gear 22/28 Y: Platen gear (Gear 25/27) z: Gear 20 a: Ribbon take-up gear on the ribbon cartridge III - 14
Service Manual
Page 43
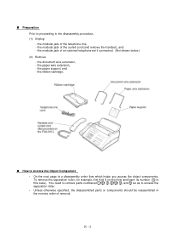
... page is a disassembly order flow which helps you access the object components. n How to the disassembly procedure, (1) Unplug - IV - 3 the paper wire extension, - the ribbon cartridge.
... page is a disassembly order flow which helps you access the object components. n How to the disassembly procedure, (1) Unplug - IV - 3 the paper wire extension, - the ribbon cartridge.
Service Manual
Page 145
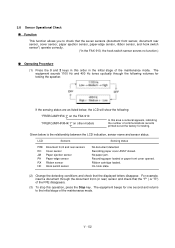
... front sensor, document rear sensor, cover sensor, paper ejection sensor, paper-edge sensor, ribbon sensor, and hook switch sensor*) operate correctly. (*In the FAX-910, the hook switch sensor serves no function.) n Operating Procedure (1) Press the 3 and 2 keys in this area a numeral appears, indicating the ...400 Hz tones cyclically through the document front (or rear) sensor and check that the "F" ( or "E") of the maintenance mode. Ribbon cartridge loaded. The equipment beeps for testing the speaker. Given below , the LCD will show the following volumes for one second and returns to ...
... front sensor, document rear sensor, cover sensor, paper ejection sensor, paper-edge sensor, ribbon sensor, and hook switch sensor*) operate correctly. (*In the FAX-910, the hook switch sensor serves no function.) n Operating Procedure (1) Press the 3 and 2 keys in this area a numeral appears, indicating the ...400 Hz tones cyclically through the document front (or rear) sensor and check that the "F" ( or "E") of the maintenance mode. Ribbon cartridge loaded. The equipment beeps for testing the speaker. Given below , the LCD will show the following volumes for one second and returns to ...

Service Manual
Page 153
... any message on the following pages. "_ _" indicates an error code. VI - 2 Messages on the LCD DOCUMENT JAM CLEAN UP SCANNER SCANNER ERROR PRINTER FAULT CHANGE CARTRIDGE MACHINE ERROR _ _ or MACHINE ERR _ _ _ _ PC BUSY OR FAIL Probable Cause n Document loading error (1) The document rear sensor detects no ink ribbon is loaded...
... any message on the following pages. "_ _" indicates an error code. VI - 2 Messages on the LCD DOCUMENT JAM CLEAN UP SCANNER SCANNER ERROR PRINTER FAULT CHANGE CARTRIDGE MACHINE ERROR _ _ or MACHINE ERR _ _ _ _ PC BUSY OR FAIL Probable Cause n Document loading error (1) The document rear sensor detects no ink ribbon is loaded...


