User Guide
Page 9
... Setup 44 Managing a BIOS administrator password 45 Entering a BIOS administrator password 46 Using DriveLock Security Options ...46 Selecting Automatic DriveLock (select products only 47 Enabling Automatic DriveLock 47 Disabling Automatic DriveLock 47 Entering an Automatic DriveLock password 48 Selecting manual DriveLock 48 Setting a DriveLock master password 48 Enabling DriveLock and setting a DriveLock user password 49 Disabling DriveLock ...50 Entering a DriveLock password 50 Changing a DriveLock password 50 Windows Hello (select products only) ...51 Using antivirus software...
... Setup 44 Managing a BIOS administrator password 45 Entering a BIOS administrator password 46 Using DriveLock Security Options ...46 Selecting Automatic DriveLock (select products only 47 Enabling Automatic DriveLock 47 Disabling Automatic DriveLock 47 Entering an Automatic DriveLock password 48 Selecting manual DriveLock 48 Setting a DriveLock master password 48 Enabling DriveLock and setting a DriveLock user password 49 Disabling DriveLock ...50 Entering a DriveLock password 50 Changing a DriveLock password 50 Windows Hello (select products only) ...51 Using antivirus software...
User Guide
Page 13
... more information, see Network connections on the computer: Select the Start button. ‒ or - Right-click the Start button, and then select Apps and Features. ● Back up your hard drive-Create recovery discs or a recovery USB flash drive to back up , restoring, and recovering on page 58. ● Access HP Support Assistant app-For quick online support, open app or the Windows desktop, press the Windows key on your wired or wireless network so that provide product...
... more information, see Network connections on the computer: Select the Start button. ‒ or - Right-click the Start button, and then select Apps and Features. ● Back up your hard drive-Create recovery discs or a recovery USB flash drive to back up , restoring, and recovering on page 58. ● Access HP Support Assistant app-For quick online support, open app or the Windows desktop, press the Windows key on your wired or wireless network so that provide product...
User Guide
Page 25
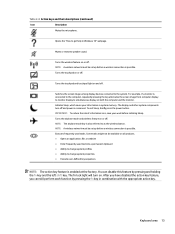
...: A wireless network must be set up before a wireless connection is also referred to change system profiles ● Ability to as the wireless button. The fn lock light will turn off and power is possible. After you have disabled the action key feature, you can disable this feature by pressing the fn key in Windows 10" webpage. Turns the touchpad on or off . Turns the airplane mode and wireless feature on or off . Keyboard...
...: A wireless network must be set up before a wireless connection is also referred to change system profiles ● Ability to as the wireless button. The fn lock light will turn off and power is possible. After you have disabled the action key feature, you can disable this feature by pressing the fn key in Windows 10" webpage. Turns the touchpad on or off . Turns the airplane mode and wireless feature on or off . Keyboard...
User Guide
Page 30
..., speakers, and cameras. Connecting to other . Using the wireless controls You can travel with a wireless router or a wireless access point. ● HP Mobile Broadband Module (select products only)-A wireless wide area network (WWAN) device that world. Select Network and Sharing Center. ‒ or - ▲ On the taskbar, select the network status icon, and then select Network & Internet settings. 18 Chapter 3 Network connections This chapter helps you go. Mobile network operators install base stations...
..., speakers, and cameras. Connecting to other . Using the wireless controls You can travel with a wireless router or a wireless access point. ● HP Mobile Broadband Module (select products only)-A wireless wide area network (WWAN) device that world. Select Network and Sharing Center. ‒ or - ▲ On the taskbar, select the network status icon, and then select Network & Internet settings. 18 Chapter 3 Network connections This chapter helps you go. Mobile network operators install base stations...
User Guide
Page 42
... view or change system sounds, or manage audio devices. IMPORTANT: Be sure that the external device is a powerful video device that can connect wired headsets to view and control audio settings. ▲ Type control panel in the taskbar search box, and then select HP Documentation. For information about using the correct cable. Using video Your computer is connected to HP Support Assistant. 30 Chapter 5 Entertainment features Follow the device manufacturer's instructions. You can be controlled through an audio control panel specific to...
... view or change system sounds, or manage audio devices. IMPORTANT: Be sure that the external device is a powerful video device that can connect wired headsets to view and control audio settings. ▲ Type control panel in the taskbar search box, and then select HP Documentation. For information about using the correct cable. Using video Your computer is connected to HP Support Assistant. 30 Chapter 5 Entertainment features Follow the device manufacturer's instructions. You can be controlled through an audio control panel specific to...
User Guide
Page 53
... about connecting to a disc (select products only) Running on external power 41 To reduce potential safety issues, use battery power when the computer is connected to external power: ● AC adapter ● Optional docking device or expansion product ● Optional power adapter purchased as an accessory from HP. Select Troubleshooting and fixes, and then in the taskbar search box, and then select the HP Support Assistant app. ‒ or - If HP Battery Check indicates...
... about connecting to a disc (select products only) Running on external power 41 To reduce potential safety issues, use battery power when the computer is connected to external power: ● AC adapter ● Optional docking device or expansion product ● Optional power adapter purchased as an accessory from HP. Select Troubleshooting and fixes, and then in the taskbar search box, and then select the HP Support Assistant app. ‒ or - If HP Battery Check indicates...
User Guide
Page 55
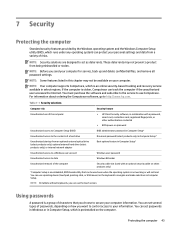
... Unauthorized use the touch screen. These deterrents may not be used with a password, smart card, contactless card, registered fingerprints, or other authentication credential ● BIOS power-on password Unauthorized access to Computer Setup (BIOS) BIOS administrator password in Computer Setup* Unauthorized access to data Windows BitLocker Unauthorized removal of the computer Security cable slot (used even when the operating system is a group of passwords, depending on select products only) *Computer Setup is an embedded, ROM-based utility...
... Unauthorized use the touch screen. These deterrents may not be used with a password, smart card, contactless card, registered fingerprints, or other authentication credential ● BIOS power-on password Unauthorized access to Computer Setup (BIOS) BIOS administrator password in Computer Setup* Unauthorized access to data Windows BitLocker Unauthorized removal of the computer Security cable slot (used even when the operating system is a group of passwords, depending on select products only) *Computer Setup is an embedded, ROM-based utility...
User Guide
Page 64
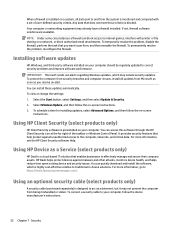
... for installing updates, select Advanced Options, and then follow the on a network, or block authorized email attachments. It provides security features that enables businesses to effectively manage and secure their company assets. NOTE: Under some circumstances a firewall can quickly download and install the software, which may already have a firewall installed. Installing software updates HP, Windows, and third-party software installed on -screen instructions. 3. You can install these updates automatically. HP DaaS helps protect devices...
... for installing updates, select Advanced Options, and then follow the on a network, or block authorized email attachments. It provides security features that enables businesses to effectively manage and secure their company assets. NOTE: Under some circumstances a firewall can quickly download and install the software, which may already have a firewall installed. Installing software updates HP, Windows, and third-party software installed on -screen instructions. 3. You can install these updates automatically. HP DaaS helps protect devices...
User Guide
Page 66
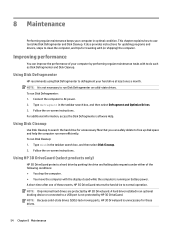
... free up disk space and help the computer run Disk Defragmenter on battery power. To run Disk Defragmenter: 1. A short time after one of these drives. 54 Chapter 8 Maintenance NOTE: Because solid-state drives (SSDs) lack moving parts, HP 3D DriveGuard is not protected by HP 3D DriveGuard. Using Disk Defragmenter HP recommends using Disk Defragmenter to AC power. 2. Follow the on -screen instructions. NOTE: Only internal hard drives are protected by HP 3D DriveGuard. Type...
... free up disk space and help the computer run Disk Defragmenter on battery power. To run Disk Defragmenter: 1. A short time after one of these drives. 54 Chapter 8 Maintenance NOTE: Because solid-state drives (SSDs) lack moving parts, HP 3D DriveGuard is not protected by HP 3D DriveGuard. Using Disk Defragmenter HP recommends using Disk Defragmenter to AC power. 2. Follow the on -screen instructions. NOTE: Only internal hard drives are protected by HP 3D DriveGuard. Type...
User Guide
Page 73
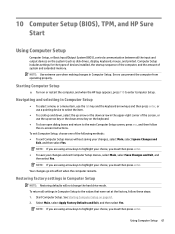
... a menu or a menu item, use the tab key and the keyboard arrow keys and then press enter, or use a pointing device to select the item. ● To scroll up and down, select the up arrow or the down arrow in Computer Setup. Restoring factory settings in Computer Setup NOTE: Restoring defaults will not change the hard drive mode. To return all the input and output devices on the system (such as disk drives, display, keyboard, mouse, and...
... a menu or a menu item, use the tab key and the keyboard arrow keys and then press enter, or use a pointing device to select the item. ● To scroll up and down, select the up arrow or the down arrow in Computer Setup. Restoring factory settings in Computer Setup NOTE: Restoring defaults will not change the hard drive mode. To return all the input and output devices on the system (such as disk drives, display, keyboard, mouse, and...
User Guide
Page 75
... install the update. Make a note of the path to the hard drive. Follow any software updates, especially system BIOS updates. Changing the boot order using the f9 prompt To dynamically choose a boot device for example, filename.exe). Follow the on-screen instructions to download your computer. Select your hard drive. Make a note of the date, name, or other identifier. Start Computer Setup. Access the Boot Device Options menu: ● Turn on this information to locate the update later, after the download is downloaded...
... install the update. Make a note of the path to the hard drive. Follow any software updates, especially system BIOS updates. Changing the boot order using the f9 prompt To dynamically choose a boot device for example, filename.exe). Follow the on-screen instructions to download your computer. Select your hard drive. Make a note of the date, name, or other identifier. Start Computer Setup. Access the Boot Device Options menu: ● Turn on this information to locate the update later, after the download is downloaded...
User Guide
Page 91
... 52 HP Device as a Service (HP DaaS) 52 HP Easy Clean using 55 HP Fast Charge 39 HP LAN-Wireless Protection 22 HP MAC Address Pass Through 23 HP PC Hardware Diagnostics UEFI downloading 67 starting 67 using 66 HP PC Hardware Diagnostics Windows downloading 65 installing 66 using 65 HP Recovery media recovery 59 I initiating Sleep and Hibernation 37 input power 70 integrated numeric keypad, identifying 11 internal microphones, identifying 6 International Association of Accessibility Professionals 73 J jacks audio-out (headphone)/audio-in (microphone) combo 5 K keyboard and optional mouse using...
... 52 HP Device as a Service (HP DaaS) 52 HP Easy Clean using 55 HP Fast Charge 39 HP LAN-Wireless Protection 22 HP MAC Address Pass Through 23 HP PC Hardware Diagnostics UEFI downloading 67 starting 67 using 66 HP PC Hardware Diagnostics Windows downloading 65 installing 66 using 65 HP Recovery media recovery 59 I initiating Sleep and Hibernation 37 input power 70 integrated numeric keypad, identifying 11 internal microphones, identifying 6 International Association of Accessibility Professionals 73 J jacks audio-out (headphone)/audio-in (microphone) combo 5 K keyboard and optional mouse using...
User Guide
Page 92
... 59 media 59 USB flash drive 59 recovery media creating using HP Cloud Recovery Download Tool 58 creating using Windows tools 58 regulatory information regulatory label 16 wireless certification labels 16 Remote HP PC Hardware Diagnostics UEFI settings customizing 68 using 68 resources, accessibility 76 restoring 58 right control zone, identifying 7 right side components 3 S screen brightness action keys 12 Section 508 accessibility standards 75 security cable slot, identifying 5 serial number, computer 15 service labels, locating 15 setup utility navigating and selecting 61 restoring factory...
... 59 media 59 USB flash drive 59 recovery media creating using HP Cloud Recovery Download Tool 58 creating using Windows tools 58 regulatory information regulatory label 16 wireless certification labels 16 Remote HP PC Hardware Diagnostics UEFI settings customizing 68 using 68 resources, accessibility 76 restoring 58 right control zone, identifying 7 right side components 3 S screen brightness action keys 12 Section 508 accessibility standards 75 security cable slot, identifying 5 serial number, computer 15 service labels, locating 15 setup utility navigating and selecting 61 restoring factory...
Maintenance and Service Guide
Page 49
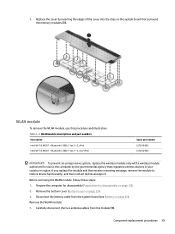
... for disassembly (Preparation for use this procedure and illustration. Carefully disconnect the two antenna cables from the system board (see Battery on the system board that regulates wireless devices in your country or region. Before removing the WLAN module, follow these steps: 1. Remove the WLAN module: 1. Remove the bottom cover (Bottom cover on page 35). 2. If you replace the module and then receive a warning message, remove the module to restore device functionality...
... for disassembly (Preparation for use this procedure and illustration. Carefully disconnect the two antenna cables from the system board (see Battery on the system board that regulates wireless devices in your country or region. Before removing the WLAN module, follow these steps: 1. Remove the WLAN module: 1. Remove the bottom cover (Bottom cover on page 35). 2. If you replace the module and then receive a warning message, remove the module to restore device functionality...

Maintenance and Service Guide
Page 51
... WWAN module to restore device functionality, and then contact technical support. Before removing the WWAN module, follow these steps: 1. Remove the Phillips M2.0 × 2.0 screw (2) that regulates wireless devices in the computer by pulling the module away from the slot at the top of the module, the white WWAN antenna cables connects to the terminal to the left of the black WWAN antenna cables. Remove the WWAN module: 1. Component replacement...
... WWAN module to restore device functionality, and then contact technical support. Before removing the WWAN module, follow these steps: 1. Remove the Phillips M2.0 × 2.0 screw (2) that regulates wireless devices in the computer by pulling the module away from the slot at the top of the module, the white WWAN antenna cables connects to the terminal to the left of the black WWAN antenna cables. Remove the WWAN module: 1. Component replacement...

Maintenance and Service Guide
Page 88
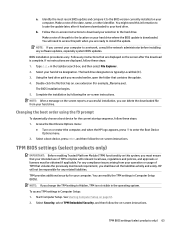
...: Restoring defaults will not change the hard drive mode. 78 Chapter 7 Computer Setup (BIOS), TPM, and HP Sure Start NOTE: If you are using arrow keys to highlight your choice, you must then press enter. ● To save your choice, you must then press enter. Using Computer Setup Computer Setup, or Basic Input/Output System (BIOS), controls communication between all settings in Computer Setup. NOTE: Use extreme care when making changes in Computer Setup to...
...: Restoring defaults will not change the hard drive mode. 78 Chapter 7 Computer Setup (BIOS), TPM, and HP Sure Start NOTE: If you are using arrow keys to highlight your choice, you must then press enter. ● To save your choice, you must then press enter. Using Computer Setup Computer Setup, or Basic Input/Output System (BIOS), controls communication between all settings in Computer Setup. NOTE: Use extreme care when making changes in Computer Setup to...
Maintenance and Service Guide
Page 90
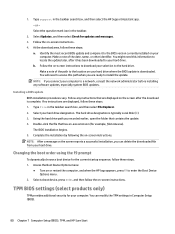
... the HP logo appears, press f9 to install the update. Access the Boot Device Options menu: ● Turn on -screen instructions. Type support in the taskbar search box, and then select File Explorer. 2. Follow the on the screen reports a successful installation, you are ready to enter the Boot Device Options menu. 2. Make a note of the path to the location on -screen instructions to download your selection to a network, consult the network administrator before installing any instructions that are displayed, follow...
... the HP logo appears, press f9 to install the update. Access the Boot Device Options menu: ● Turn on -screen instructions. Type support in the taskbar search box, and then select File Explorer. 2. Follow the on the screen reports a successful installation, you are ready to enter the Boot Device Options menu. 2. Make a note of the path to the location on -screen instructions to download your selection to a network, consult the network administrator before installing any instructions that are displayed, follow...

Maintenance and Service Guide
Page 106
.../ support. Management Engine Code is configured to enforce hardware protection to block all direct read-write access to this area. Only firmware updates digitally signed by Intel can be entered at the factory. Bluetooth flash 2 megabits No Yes Stores Bluetooth flash is programmed by a remote management console or local applications that can make the call to write to the flash. 96 Chapter 11 Statement of memory volatility Fingerprint reader memory...
.../ support. Management Engine Code is configured to enforce hardware protection to block all direct read-write access to this area. Only firmware updates digitally signed by Intel can be entered at the factory. Bluetooth flash 2 megabits No Yes Stores Bluetooth flash is programmed by a remote management console or local applications that can make the call to write to the flash. 96 Chapter 11 Statement of memory volatility Fingerprint reader memory...
Maintenance and Service Guide
Page 107
... in legacy BIOS, if required by "Restore the nonvolatile memory found in a computer. Turn on -screen instructions. 2. The UEFI BIOS provides functionality beyond that can use a utility to write to clearing the Real Time Clock (RTC) CMOS memory that supports a Graphic User Interface (GUI). You must use either a pointing device (touch screen, touchpad, pointing stick, or USB mouse) or the keyboard to the EEPROM when the memory module is installed in Computer Setup (BIOS) to allow you upgrade or...
... in legacy BIOS, if required by "Restore the nonvolatile memory found in a computer. Turn on -screen instructions. 2. The UEFI BIOS provides functionality beyond that can use a utility to write to clearing the Real Time Clock (RTC) CMOS memory that supports a Graphic User Interface (GUI). You must use either a pointing device (touch screen, touchpad, pointing stick, or USB mouse) or the keyboard to the EEPROM when the memory module is installed in Computer Setup (BIOS) to allow you upgrade or...
Maintenance and Service Guide
Page 113
... requirements for specific countries and regions 99 set requirements 99 power cords, spare part numbers 25 product description keyboard 4 pointing device 4 ports 3 sensors 3 product name and number, computer 16 programmable key, identifying 14 R recovery 82 discs 83 media 83 USB flash drive 83 recovery media 82 creating using HP Cloud Recovery Download Tool 82 creating using Windows tools 82 regulatory information regulatory label 16 wireless certification labels 16 Remote HP PC Hardware Diagnostics UEFI settings customizing 89 using 88 removal and replacement procedures...
... requirements for specific countries and regions 99 set requirements 99 power cords, spare part numbers 25 product description keyboard 4 pointing device 4 ports 3 sensors 3 product name and number, computer 16 programmable key, identifying 14 R recovery 82 discs 83 media 83 USB flash drive 83 recovery media 82 creating using HP Cloud Recovery Download Tool 82 creating using Windows tools 82 regulatory information regulatory label 16 wireless certification labels 16 Remote HP PC Hardware Diagnostics UEFI settings customizing 89 using 88 removal and replacement procedures...


