
HP Notebook Hard Drives & Solid State Drives Identifying, Preventing, Diagnosing and Recovering from Drive Failures Care and Mai
Page 6
... as support for the SATA Advanced Host Controller (AHCI) Interface. Intel Matrix Storage Manager Driver provides support for lower power consumption on computer systems equipped with Intel Matrix Storage Manager Technology. Intel Matrix Storage Technology driver HP offers the Intel Matrix Storage Manager driver for notebook PC models that are released to address known issues. Updates to the Intel Matrix Storage Manager driver are configured with Serial ATA hard disk drives...
... as support for the SATA Advanced Host Controller (AHCI) Interface. Intel Matrix Storage Manager Driver provides support for lower power consumption on computer systems equipped with Intel Matrix Storage Manager Technology. Intel Matrix Storage Technology driver HP offers the Intel Matrix Storage Manager driver for notebook PC models that are released to address known issues. Updates to the Intel Matrix Storage Manager driver are configured with Serial ATA hard disk drives...
Regulatory, Safety and Environmental Notices User Guide
Page 32
... notices for Safety of in a safe and controlled manner. do not allow another hard surface, such as an adjoining optional printer, or a soft surface, such as pillows or rugs or clothing, to block airflow. WARNING! WARNING! WARNING! It describes proper workstation setup, posture, and health and work habits for notebook computers WARNING! User-replaceable battery notices WARNING! Risk of fire...
... notices for Safety of in a safe and controlled manner. do not allow another hard surface, such as an adjoining optional printer, or a soft surface, such as pillows or rugs or clothing, to block airflow. WARNING! WARNING! WARNING! It describes proper workstation setup, posture, and health and work habits for notebook computers WARNING! User-replaceable battery notices WARNING! Risk of fire...

User Guide
Page 7
... ...9 Display ...12 Top ...13 TouchPad ...13 Lights ...14 Buttons, speakers, and fingerprint reader 15 Keys ...16 Bottom ...17 Labels ...18 3 Connecting to a network ...19 Connecting to a wireless network ...19 Using the wireless controls 19 Using the wireless button 19 Using operating system controls 19 Sharing data and drives and accessing software 20 Using a WLAN ...20 Using an Internet service provider 20 Setting up a WLAN 21 Configuring a wireless router 21 Protecting your WLAN 21 Connecting to a WLAN 22 Using Bluetooth wireless devices (select models only 22 Connecting to...
... ...9 Display ...12 Top ...13 TouchPad ...13 Lights ...14 Buttons, speakers, and fingerprint reader 15 Keys ...16 Bottom ...17 Labels ...18 3 Connecting to a network ...19 Connecting to a wireless network ...19 Using the wireless controls 19 Using the wireless button 19 Using operating system controls 19 Sharing data and drives and accessing software 20 Using a WLAN ...20 Using an Internet service provider 20 Setting up a WLAN 21 Configuring a wireless router 21 Protecting your WLAN 21 Connecting to a WLAN 22 Using Bluetooth wireless devices (select models only 22 Connecting to...
User Guide
Page 8
... ...24 Multimedia features ...24 Using the webcam ...26 Using audio ...26 Connecting speakers ...26 Connecting headphones and microphones 26 Using Beats Audio ...27 Accessing Beats Audio Control Panel 27 Enabling and disabling Beats Audio 27 Testing your audio features 27 Using video ...27 Connecting video devices by using an HDMI cable 28 Setting up HDMI audio 28 Discovering and connecting to Miracast-compatible wireless displays (select models only) ...29 5 Navigating the screen ...30 Using the TouchPad and gestures ...30 Tapping ...31 Scrolling ...32 2-finger pinch zoom...
... ...24 Multimedia features ...24 Using the webcam ...26 Using audio ...26 Connecting speakers ...26 Connecting headphones and microphones 26 Using Beats Audio ...27 Accessing Beats Audio Control Panel 27 Enabling and disabling Beats Audio 27 Testing your audio features 27 Using video ...27 Connecting video devices by using an HDMI cable 28 Setting up HDMI audio 28 Discovering and connecting to Miracast-compatible wireless displays (select models only) ...29 5 Navigating the screen ...30 Using the TouchPad and gestures ...30 Tapping ...31 Scrolling ...32 2-finger pinch zoom...
User Guide
Page 9
Using Windows shortcut keys 48 Using the hot keys 49 Using the integrated numeric keypad 49 6 Managing power ...50 Initiating Sleep and Hibernation ...50 Manually initiating and exiting Sleep 51 Manually initiating and exiting Hibernation (select models only 51 Setting password protection on wakeup 51 Using the power meter and power settings 52 Running on battery power ...52 Removing a user-replaceable battery 52 Finding battery information 53 Conserving battery power 53 Identifying low battery levels 53 Resolving a low battery level 54 Resolving...
Using Windows shortcut keys 48 Using the hot keys 49 Using the integrated numeric keypad 49 6 Managing power ...50 Initiating Sleep and Hibernation ...50 Manually initiating and exiting Sleep 51 Manually initiating and exiting Hibernation (select models only 51 Setting password protection on wakeup 51 Using the power meter and power settings 52 Running on battery power ...52 Removing a user-replaceable battery 52 Finding battery information 53 Conserving battery power 53 Identifying low battery levels 53 Resolving a low battery level 54 Resolving...

User Guide
Page 10
...updates 67 Installing HP and third-party software updates 67 Securing your wireless network ...67 Backing up your software applications and information 68 Using an optional security cable lock 68 9 Using Setup Utility (BIOS) and HP PC Hardware Diagnostics (UEFI 69 Starting Setup Utility (BIOS) ...69 Updating the BIOS ...69 Determining the BIOS version 69 Downloading a BIOS update 70 Using HP PC Hardware Diagnostics (UEFI 70 Downloading HP PC Hardware Diagnostics (UEFI) to a USB device 71 10 Backing up, restoring, and recovering ...72 Creating recovery media and backups 72 Creating HP...
...updates 67 Installing HP and third-party software updates 67 Securing your wireless network ...67 Backing up your software applications and information 68 Using an optional security cable lock 68 9 Using Setup Utility (BIOS) and HP PC Hardware Diagnostics (UEFI 69 Starting Setup Utility (BIOS) ...69 Updating the BIOS ...69 Determining the BIOS version 69 Downloading a BIOS update 70 Using HP PC Hardware Diagnostics (UEFI 70 Downloading HP PC Hardware Diagnostics (UEFI) to a USB device 71 10 Backing up, restoring, and recovering ...72 Creating recovery media and backups 72 Creating HP...

User Guide
Page 31
... the wireless devices are enabled at home, you can explore the globe and access information from the Start screen, type help , and then select Help and Support. Select Network and Internet, and then select Network and Sharing Center. In a PAN, each other Bluetooth-enabled devices such as computers, phones, printers, headsets, speakers, and cameras. From the Start screen, type control panel, and then select Control Panel. 2. Using the wireless controls You can control the wireless devices in corporate...
... the wireless devices are enabled at home, you can explore the globe and access information from the Start screen, type help , and then select Help and Support. Select Network and Internet, and then select Network and Sharing Center. In a PAN, each other Bluetooth-enabled devices such as computers, phones, printers, headsets, speakers, and cameras. From the Start screen, type control panel, and then select Control Panel. 2. Using the wireless controls You can control the wireless devices in corporate...

User Guide
Page 60
... a DVD or a BD. NOTE: A wireless network must be set up before a wireless connection is possible. Help and Support also provides automated troubleshooting tools and access to a simultaneous display on opening Setup Utility (BIOS), and then follow the instructions at the factory. After you have disabled the action key feature, you can perform actions quickly. For example, if a monitor is connected to the computer, repeatedly pressing this feature in combination with a specific key to...
... a DVD or a BD. NOTE: A wireless network must be set up before a wireless connection is possible. Help and Support also provides automated troubleshooting tools and access to a simultaneous display on opening Setup Utility (BIOS), and then follow the instructions at the factory. After you have disabled the action key feature, you can perform actions quickly. For example, if a monitor is connected to the computer, repeatedly pressing this feature in combination with a specific key to...
User Guide
Page 63
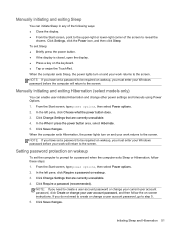
... the screen. Click Change Settings that are currently unavailable. 4. From the Start screen, type power options, then select Power options. 2. Initiating Sleep and Hibernation 51 NOTE: If you have set a password to be required on wakeup, you need to create or change your work will return to the screen. NOTE: If you must enter your Windows password before your user account password, and then follow these steps: 1. When the computer exits Hibernation, the power lights turn...
... the screen. Click Change Settings that are currently unavailable. 4. From the Start screen, type power options, then select Power options. 2. Initiating Sleep and Hibernation 51 NOTE: If you have set a password to be required on wakeup, you need to create or change your work will return to the screen. NOTE: If you must enter your Windows password before your user account password, and then follow these steps: 1. When the computer exits Hibernation, the power lights turn...

User Guide
Page 65
.... ● Turn off wireless devices when you are not using them. ● Disconnect unused external devices that are not using. ● Before you are not plugged into an external power source, such as an external hard drive connected to a USB port. ● Stop, disable, or remove any external media cards that is no longer holding a charge, run Battery Check in Power Options. ● Remove a user-replaceable battery from the computer if it from the Start screen, type support, select the HP Support Assistant app...
.... ● Turn off wireless devices when you are not using them. ● Disconnect unused external devices that are not using. ● Before you are not plugged into an external power source, such as an external hard drive connected to a USB port. ● Stop, disable, or remove any external media cards that is no longer holding a charge, run Battery Check in Power Options. ● Remove a user-replaceable battery from the computer if it from the Start screen, type support, select the HP Support Assistant app...

User Guide
Page 72
... safely delete to free up disk space by deleting unnecessary files. 2. HP recommends defragmenting your computer manually at any time. You may take more efficiently. Follow the on -screen instructions. 60 Chapter 7 Maintaining your hard drive and the number of fragmented files, Disk Defragmenter may set Disk Defragmenter to locate files, thus slowing down the computer. For additional information, access the Disk Defragmenter software Help. From the Start screen, type free...
... safely delete to free up disk space by deleting unnecessary files. 2. HP recommends defragmenting your computer manually at any time. You may take more efficiently. Follow the on -screen instructions. 60 Chapter 7 Maintaining your hard drive and the number of fragmented files, Disk Defragmenter may set Disk Defragmenter to locate files, thus slowing down the computer. For additional information, access the Disk Defragmenter software Help. From the Start screen, type free...
User Guide
Page 77
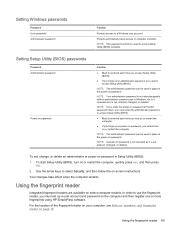
... you enter the power-on or restart the computer. Using the fingerprint reader Integrated fingerprint readers are available on -screen instructions. Setting Windows passwords Password User password Administrator password Function Protects access to computer contents. Using the fingerprint reader 65 Use the arrow keys to access Setup Utility (BIOS) contents. NOTE: This password cannot be used to select Security, and then follow the on select computer models. To start Setup Utility (BIOS), turn on password at the first password check, you cannot access Setup Utility (BIOS). NOTE...
... you enter the power-on or restart the computer. Using the fingerprint reader Integrated fingerprint readers are available on -screen instructions. Setting Windows passwords Password User password Administrator password Function Protects access to computer contents. Using the fingerprint reader 65 Use the arrow keys to access Setup Utility (BIOS) contents. NOTE: This password cannot be used to select Security, and then follow the on select computer models. To start Setup Utility (BIOS), turn on password at the first password check, you cannot access Setup Utility (BIOS). NOTE...

User Guide
Page 79
... updates from the Start screen, type control panel, and then select Control Panel. Any data that you can choose whether updates are designed to prevent unauthorized access to date. To change the settings, from Microsoft as soon as you regularly update the software and drivers that protects only the computer it can be preinstalled on -screen instructions. To download the latest versions, go to correct security problems and improve functionality...
... updates from the Start screen, type control panel, and then select Control Panel. Any data that you can choose whether updates are designed to prevent unauthorized access to date. To change the settings, from Microsoft as soon as you regularly update the software and drivers that protects only the computer it can be preinstalled on -screen instructions. To download the latest versions, go to correct security problems and improve functionality...
User Guide
Page 82
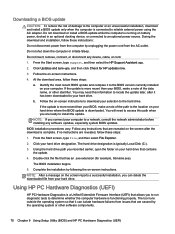
... 9 Using Setup Utility (BIOS) and HP PC Hardware Diagnostics (UEFI) Downloading a BIOS update CAUTION: To reduce the risk of damage to the computer or an unsuccessful installation, download and install a BIOS update only when the computer is connected to an optional power source. You will need this path when you connect your BIOS, make a note of the path to your hard drive designation. Do not download or install a BIOS update while the computer is running on -screen instructions. 4. The hard drive...
... 9 Using Setup Utility (BIOS) and HP PC Hardware Diagnostics (UEFI) Downloading a BIOS update CAUTION: To reduce the risk of damage to the computer or an unsuccessful installation, download and install a BIOS update only when the computer is connected to an optional power source. You will need this path when you connect your BIOS, make a note of the path to your hard drive designation. Do not download or install a BIOS update while the computer is running on -screen instructions. 4. The hard drive...

User Guide
Page 85
... to be connected to a USB port on -screen instructions. Restore and recovery 73 For more information, see Help and Support. Minimized Image Recovery installs only drivers and hardware-enabling applications. For more information and steps, see Recovering using HP Recovery Manager on page 74. the drive cannot be available for recovering your system. For more . To create HP Recovery media: IMPORTANT: For tablets, connect to the keyboard dock before you have not already created recovery media, see Recovering using a minimized image...
... to be connected to a USB port on -screen instructions. Restore and recovery 73 For more information, see Help and Support. Minimized Image Recovery installs only drivers and hardware-enabling applications. For more information and steps, see Recovering using HP Recovery Manager on page 74. the drive cannot be available for recovering your system. For more . To create HP Recovery media: IMPORTANT: For tablets, connect to the keyboard dock before you have not already created recovery media, see Recovering using a minimized image...

User Guide
Page 86
... used if the computer hard drive fails. Go to http://www.hp.com/support, select your personal data. If you have not already created recovery media, see Creating HP Recovery media on page 72. ● If the HP Recovery media does not work, you have not already created recovery media, see Creating HP Recovery media on -screen instructions. If you can also find contact information from one of HP Recovery media to restore the factory image to the replacement drive. The HP Recovery partition (select models...
... used if the computer hard drive fails. Go to http://www.hp.com/support, select your personal data. If you have not already created recovery media, see Creating HP Recovery media on page 72. ● If the HP Recovery media does not work, you have not already created recovery media, see Creating HP Recovery media on -screen instructions. If you can also find contact information from one of HP Recovery media to restore the factory image to the replacement drive. The HP Recovery partition (select models...

User Guide
Page 87
... Troubleshoot from the HP Recovery partition: IMPORTANT: For tablets, connect to the keyboard dock before you press the power button. 2. Insert the HP Recovery media you to remove the HP Recovery partition to recover the original system. Using HP Recovery media to recover You can no longer use HP Recovery media to free up all personal files. 2. To change the computer boot order. Restart the computer, quickly press esc, and then press f9 for an optical drive or a USB flash drive. Removing the HP Recovery partition (select models only) HP Recovery Manager...
... Troubleshoot from the HP Recovery partition: IMPORTANT: For tablets, connect to the keyboard dock before you press the power button. 2. Insert the HP Recovery media you to remove the HP Recovery partition to recover the original system. Using HP Recovery media to recover You can no longer use HP Recovery media to free up all personal files. 2. To change the computer boot order. Restart the computer, quickly press esc, and then press f9 for an optical drive or a USB flash drive. Removing the HP Recovery partition (select models only) HP Recovery Manager...

User Guide
Page 91
... (microphone) jack 6, 7, 25 B backing up software and information 68 backups 72 battery discharging 53 disposing 54 low battery levels 53 replacing 55 storing 54 battery cover, identifying 17 battery information, finding 53 battery lock, identifying 17 battery power 52 battery release latch 17 battery temperature 54 Beats Audio 27 Beats Audio Control Panel 27 Beats Audio hot key 27 BIOS determining version 69 downloading an update 70 updating 69 Bluetooth device 19, 22 Bluetooth label 18 boot order changing HP Recovery Manager 75 bottom 18 buttons left TouchPad...
... (microphone) jack 6, 7, 25 B backing up software and information 68 backups 72 battery discharging 53 disposing 54 low battery levels 53 replacing 55 storing 54 battery cover, identifying 17 battery information, finding 53 battery lock, identifying 17 battery power 52 battery release latch 17 battery temperature 54 Beats Audio 27 Beats Audio Control Panel 27 Beats Audio hot key 27 BIOS determining version 69 downloading an update 70 updating 69 Bluetooth device 19, 22 Bluetooth label 18 boot order changing HP Recovery Manager 75 bottom 18 buttons left TouchPad...

User Guide
Page 92
... M maintenance Disk Cleanup 60 Disk Defragmenter 60 memory card reader, identifying 9, 11, 25 memory card, identifying 9, 11 minimized image creating 74 minimized image recovery 74 Miracast 29 mouse, external setting preferences 30 mute light, identifying 14 N network jack, identifying 9, 10 num lock key, identifying 49 O operating environment 77 optical drive, identifying 6, 8, 24 original system recovery 74 P passwords Setup Utility (BIOS) 65 Windows 65 ports charging (powered) 25 HDMI 9, 10, 25, 28 Miracast 29 USB 3.0 6, 8, 9, 11, 25 USB 3.0 (powered) charging 9, 10 power battery 52 power...
... M maintenance Disk Cleanup 60 Disk Defragmenter 60 memory card reader, identifying 9, 11, 25 memory card, identifying 9, 11 minimized image creating 74 minimized image recovery 74 Miracast 29 mouse, external setting preferences 30 mute light, identifying 14 N network jack, identifying 9, 10 num lock key, identifying 49 O operating environment 77 optical drive, identifying 6, 8, 24 original system recovery 74 P passwords Setup Utility (BIOS) 65 Windows 65 ports charging (powered) 25 HDMI 9, 10, 25, 28 Miracast 29 USB 3.0 6, 8, 9, 11, 25 USB 3.0 (powered) charging 9, 10 power battery 52 power...
User Guide
Page 93
serial number 18 serial number, computer 18 service labels locating 18 setting password protection on wakeup 51 setup of WLAN 21 Setup Utility (BIOS) passwords 65 shipping the computer 62 shutdown 56 Sleep exiting 51 initiating 51 slots memory card reader 9, 11, 25 security cable 7, 10 software Disk Cleanup 60 Disk Defragmenter 60 software updates, installing 67 speakers connecting 26 identifying 15, 24 storing a battery 54 subwoofer, identifying 17 supported discs recovery 72 system recovery 74 system restore point creating 72 T temperature 54 testing...
serial number 18 serial number, computer 18 service labels locating 18 setting password protection on wakeup 51 setup of WLAN 21 Setup Utility (BIOS) passwords 65 shipping the computer 62 shutdown 56 Sleep exiting 51 initiating 51 slots memory card reader 9, 11, 25 security cable 7, 10 software Disk Cleanup 60 Disk Defragmenter 60 software updates, installing 67 speakers connecting 26 identifying 15, 24 storing a battery 54 subwoofer, identifying 17 supported discs recovery 72 system recovery 74 system restore point creating 72 T temperature 54 testing...


