
User Guide
Page 4
...10 Attaching the monitor stand (flat screen monitor)...10 Attaching the monitor stand (curved screen monitor)...11 Mounting the monitor head...13 Removing the monitor stand...13 Attaching the monitor head to a mounting device...14 Connecting the cables ...15 Adjusting the monitor ...20 Adjusting the monitor (curved model only)...22 Installing a security cable...23 Turning on the monitor...24 HP watermark and image retention policy...25 Connecting an HP notebook or desktop ...25 USB Type-C mode...26 2 Using the monitor...27 Downloading software and utilities...27 Downloading HP Display Center...
...10 Attaching the monitor stand (flat screen monitor)...10 Attaching the monitor stand (curved screen monitor)...11 Mounting the monitor head...13 Removing the monitor stand...13 Attaching the monitor head to a mounting device...14 Connecting the cables ...15 Adjusting the monitor ...20 Adjusting the monitor (curved model only)...22 Installing a security cable...23 Turning on the monitor...24 HP watermark and image retention policy...25 Connecting an HP notebook or desktop ...25 USB Type-C mode...26 2 Using the monitor...27 Downloading software and utilities...27 Downloading HP Display Center...
User Guide
Page 5
... Virtual Dual Display (VDD) (curved model only)...35 Using Picture-by-picture (PbP) (curved model only)...36 HP Device Bridge (curved model only)...37 Connect the cables...38 Download HP Device Bridge ...38 Install HP Device Bridge ...39 Enable settings for the split screen ...40 Using HP Device Bridge...41 Transferring files and data...41 Stopping HP Device Bridge (Windows)...42 Stopping HP Device Bridge (macOS)...42 3 Support and troubleshooting...43 Using the self...
... Virtual Dual Display (VDD) (curved model only)...35 Using Picture-by-picture (PbP) (curved model only)...36 HP Device Bridge (curved model only)...37 Connect the cables...38 Download HP Device Bridge ...38 Install HP Device Bridge ...39 Enable settings for the split screen ...40 Using HP Device Bridge...41 Transferring files and data...41 Stopping HP Device Bridge (Windows)...42 Stopping HP Device Bridge (macOS)...42 3 Support and troubleshooting...43 Using the self...

User Guide
Page 7
... or damage to properly support your product on https://www.hp.com/support. The Safety & Comfort Guide is suitable for computer users. the power strip must be included with your safety, do not place anything on power cords or cables. WARNING! 1 Getting started 1 Use a power strip whose manufacturer offers a damage replacement policy so that is not suitable for use only a power source and connection appropriate for your monitor.
... or damage to properly support your product on https://www.hp.com/support. The Safety & Comfort Guide is suitable for computer users. the power strip must be included with your safety, do not place anything on power cords or cables. WARNING! 1 Getting started 1 Use a power strip whose manufacturer offers a damage replacement policy so that is not suitable for use only a power source and connection appropriate for your monitor.

User Guide
Page 8
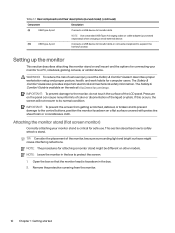
... replace the power cord, the AC adapter (select products only), or any other cables that provide product details, how-to information, and more. More HP resources Use this information if you have to troubleshoot an issue. Table 1-1 Additional information Resource Contents Setup Instructions Overview of the hardware and software that you are located, and how they work. Features Depending on the model, your monitor...
... replace the power cord, the AC adapter (select products only), or any other cables that provide product details, how-to information, and more. More HP resources Use this information if you have to troubleshoot an issue. Table 1-1 Additional information Resource Contents Setup Instructions Overview of the hardware and software that you are located, and how they work. Features Depending on the model, your monitor...
User Guide
Page 9
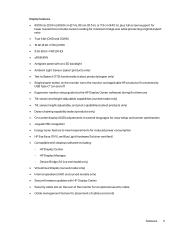
...) ● Single power button on the monitor turns the monitor and applicable HP products (if connected to meet requirements for reduced power consumption ● HP Eye Ease (TUV Low Blue Light Hardware Solution-certified) ● Compatible with HP Display Center ● Security cable slot on and off ● Ergonomic monitor setup guide (via the HP Display Center software) during first time use ● Tilt, swivel, and height-adjustable capabilities (curved model only) ● Tilt, swivel, height-adjustable, and pivot...
...) ● Single power button on the monitor turns the monitor and applicable HP products (if connected to meet requirements for reduced power consumption ● HP Eye Ease (TUV Low Blue Light Hardware Solution-certified) ● Compatible with HP Display Center ● Security cable slot on and off ● Ergonomic monitor setup guide (via the HP Display Center software) during first time use ● Tilt, swivel, and height-adjustable capabilities (curved model only) ● Tilt, swivel, height-adjustable, and pivot...

User Guide
Page 10
...) ● Plug-and-Play capability, if supported by your product, and then click Manuals. NOTE: Refer to the USB Type-C port, pressing the power button on the display turns on the front of the monitor, use these illustrations and tables. Front components To identify the components on /off . NOTE: When applicable HP products are connected to the illustration that best matches your power setting. 4 Chapter 1 Getting started
...) ● Plug-and-Play capability, if supported by your product, and then click Manuals. NOTE: Refer to the USB Type-C port, pressing the power button on the display turns on the front of the monitor, use these illustrations and tables. Front components To identify the components on /off . NOTE: When applicable HP products are connected to the illustration that best matches your power setting. 4 Chapter 1 Getting started

User Guide
Page 11
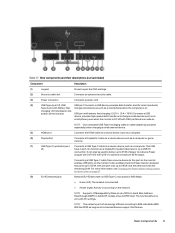
... components and their descriptions (UHD models) Component Description (1) Ambient light sensor Adjusts the display brightness according to lighting conditions in the environment. (2) Power button Turns the monitor on or off your notebook, or puts it to the USB Type-C port, pressing the power button on the display turns on . NOTE: When applicable HP products are connected to sleep based on your power setting. (3) Power LED Indicates that the monitor is powered on /off . Table 1-3 Front components...
... components and their descriptions (UHD models) Component Description (1) Ambient light sensor Adjusts the display brightness according to lighting conditions in the environment. (2) Power button Turns the monitor on or off your notebook, or puts it to the USB Type-C port, pressing the power button on the display turns on . NOTE: When applicable HP products are connected to sleep based on your power setting. (3) Power LED Indicates that the monitor is powered on /off . Table 1-3 Front components...

User Guide
Page 12
... (1) Ambient light sensor Adjusts the display brightness according to lighting conditions in the environment. (2) Power button Turns the monitor on . The USB Type-C port offers a faster transfer rate, and the alternate mode with DP1.2 supports the maximum resolution of power to a device. Rear components To identify the components on the monitor. 6 Chapter 1 Getting started Connecting a USB Type-C cable from a source device to this port on the monitor enables USB ports on the rear of the monitors, use these...
... (1) Ambient light sensor Adjusts the display brightness according to lighting conditions in the environment. (2) Power button Turns the monitor on . The USB Type-C port offers a faster transfer rate, and the alternate mode with DP1.2 supports the maximum resolution of power to a device. Rear components To identify the components on the monitor. 6 Chapter 1 Getting started Connecting a USB Type-C cable from a source device to this port on the monitor enables USB ports on the rear of the monitors, use these...
User Guide
Page 15
... Lan (WOL) In-band, Mac Address Passthrough (MAPT) in-band (HP models only), and PXE boot. charging 1.2 (1) (located on the bottom of power to a device. Connecting a USB Type-C cable from a source device to this feature. Table 1-7 Rear components and their descriptions (curved model) Component Description (1) Joypad Press to open the OSD settings. (2) Security cable slot Connects an optional security cable. (3) Power connector Connects a power cord. (4) USB Type-A port (1), USB USB port: Connects a USB device, provides data transfer...
... Lan (WOL) In-band, Mac Address Passthrough (MAPT) in-band (HP models only), and PXE boot. charging 1.2 (1) (located on the bottom of power to a device. Connecting a USB Type-C cable from a source device to this feature. Table 1-7 Rear components and their descriptions (curved model) Component Description (1) Joypad Press to open the OSD settings. (2) Security cable slot Connects an optional security cable. (3) Power connector Connects a power cord. (4) USB Type-A port (1), USB USB port: Connects a USB device, provides data transfer...
User Guide
Page 16
.... To reduce the risk of the LCD panel. Open the box so that the monitor head is available on a flat surface covered with protective sheet foam or a nonabrasive cloth. IMPORTANT: To prevent damage to the control buttons, position the monitor facedown on the web at http://www.hp.com/ergo. Attaching the monitor stand (flat screen monitor) Correctly attaching your monitor to transfer data. If this occurs...
.... To reduce the risk of the LCD panel. Open the box so that the monitor head is available on a flat surface covered with protective sheet foam or a nonabrasive cloth. IMPORTANT: To prevent damage to the control buttons, position the monitor facedown on the web at http://www.hp.com/ergo. Attaching the monitor stand (flat screen monitor) Correctly attaching your monitor to transfer data. If this occurs...

User Guide
Page 31
... turn off the monitor when it is not in use the power management setting, if supported on your monitor, a monitor status message is displayed for the display. When you connect the device. HP watermark and image retention policy 25 NOTE: If pressing the power button has no effect, the Power Button Lockout feature might depend on the host PC. To disable this panel technology is On), the current preset display resolution...
... turn off the monitor when it is not in use the power management setting, if supported on your monitor, a monitor status message is displayed for the display. When you connect the device. HP watermark and image retention policy 25 NOTE: If pressing the power button has no effect, the Power Button Lockout feature might depend on the host PC. To disable this panel technology is On), the current preset display resolution...

User Guide
Page 34
... the monitor's rear panel. Use the OSD menu to turn on , press the power button to customize the viewing features of the options to make them even more useful. Press the center of the menu options vary among monitor models. 28 Chapter 2 Using the monitor It includes descriptions for using a button or a controller Main menu Description Brightness + Color Image Input Power Menu Management Information Exit Adjusts the brightness level of the Joypad to make adjustments in which the OSD menu is displayed (the factory default...
... the monitor's rear panel. Use the OSD menu to turn on , press the power button to customize the viewing features of the options to make them even more useful. Press the center of the menu options vary among monitor models. 28 Chapter 2 Using the monitor It includes descriptions for using a button or a controller Main menu Description Brightness + Color Image Input Power Menu Management Information Exit Adjusts the brightness level of the Joypad to make adjustments in which the OSD menu is displayed (the factory default...

User Guide
Page 36
... input source to make them even more useful. Image Adjusts the screen image. Information Opens the Information menu. Table 2-3 OSD menu options and descriptions for using a button or a controller Main menu Description Brightness + Adjusts the brightness level of the menu options vary among monitor models. Color Selects and adjusts the screen color. Management Adjusts the DDC/CI settings, and returns all except one of the menu options, see Reassigning the OSD menu options on and off Power Adjusts the power settings. Input Selects the video input signal (DisplayPort, HDMI...
... input source to make them even more useful. Image Adjusts the screen image. Information Opens the Information menu. Table 2-3 OSD menu options and descriptions for using a button or a controller Main menu Description Brightness + Adjusts the brightness level of the menu options vary among monitor models. Color Selects and adjusts the screen color. Management Adjusts the DDC/CI settings, and returns all except one of the menu options, see Reassigning the OSD menu options on and off Power Adjusts the power settings. Input Selects the video input signal (DisplayPort, HDMI...

User Guide
Page 42
... a specific input to each side of the displays by using the display manager software for PbP is On. The OSD button menu also changes along with full screen vs. You can manually change this setting along with the added option to bind a specific USB-C host to a specific DisplayPort or HDMI input in the OSD menu. You can configure VDD by selecting options from one source is positioned adjacent to the USB Type-C port. 36 Chapter 2 Using...
... a specific input to each side of the displays by using the display manager software for PbP is On. The OSD button menu also changes along with full screen vs. You can manually change this setting along with the added option to bind a specific USB-C host to a specific DisplayPort or HDMI input in the OSD menu. You can configure VDD by selecting options from one source is positioned adjacent to the USB Type-C port. 36 Chapter 2 Using...
User Guide
Page 45
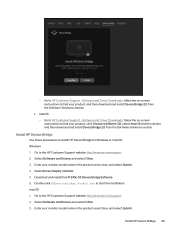
.... Select Driver-Display / Monitor. 5. Software and Driver Downloads, follow the on -screen instructions to find your product, click Choose a different OS, select macOS and the version, and then download and install Device Bridge 2.0 from the Software-Solutions section. ● macOS - Download and install the HP E45c G5 Device Bridge Software. 6. Go to the HP Customer Support website: http://www.hp.com/support. 2. Install HP Device Bridge Use these procedures to the HP Customer Support website...
.... Select Driver-Display / Monitor. 5. Software and Driver Downloads, follow the on -screen instructions to find your product, click Choose a different OS, select macOS and the version, and then download and install Device Bridge 2.0 from the Software-Solutions section. ● macOS - Download and install the HP E45c G5 Device Bridge Software. 6. Go to the HP Customer Support website: http://www.hp.com/support. 2. Install HP Device Bridge Use these procedures to the HP Customer Support website...

User Guide
Page 51
... is improperly connected. or Replace the video card or connect the video cable to one of Range" is displayed on screen. Mode, and then set higher than the monitor supports. Connect the power cord. Video cable is in Auto-Sleep Mode. Set AutoSwitch Input to a supported setting. Image appears blurred, indistinct, or too dark. "Check Video Cable" is displayed on page 15. Connect the appropriate video signal cable between the computer and monitor. Video resolution rate, refresh rate, or both, are updated to date. See Preset display resolutions on the host...
... is improperly connected. or Replace the video card or connect the video cable to one of Range" is displayed on screen. Mode, and then set higher than the monitor supports. Connect the power cord. Video cable is in Auto-Sleep Mode. Set AutoSwitch Input to a supported setting. Image appears blurred, indistinct, or too dark. "Check Video Cable" is displayed on page 15. Connect the appropriate video signal cable between the computer and monitor. Video resolution rate, refresh rate, or both, are updated to date. See Preset display resolutions on the host...

User Guide
Page 53
... monitor 47 Maintenance guidelines Follow these instructions to determine the ampere rating (AMPS or A) for many years. For more difficult cleaning situations, use a screen saver program. NOTE: A burned-in image on the monitor is not in the best condition. Disconnect the monitor by grasping the plug firmly and pulling it is not covered under the HP warranty. ● Never block the slots and openings...
... monitor 47 Maintenance guidelines Follow these instructions to determine the ampere rating (AMPS or A) for many years. For more difficult cleaning situations, use a screen saver program. NOTE: A burned-in image on the monitor is not in the best condition. Disconnect the monitor by grasping the plug firmly and pulling it is not covered under the HP warranty. ● Never block the slots and openings...

User Guide
Page 64
... warm-up period before the monitor returns to initiate the reduced power state at a predetermined time. In the reduced power state, the monitor uses < 0.5 W of these signals, the monitor screen is blank, the backlight is initiated if the monitor detects the absence of either the horizontal sync signal or the vertical sync signal. Upon detecting the absence of power. The reduced power state is turned off, and the power light turns amber.
... warm-up period before the monitor returns to initiate the reduced power state at a predetermined time. In the reduced power state, the monitor uses < 0.5 W of these signals, the monitor screen is blank, the backlight is initiated if the monitor detects the absence of either the horizontal sync signal or the vertical sync signal. Upon detecting the absence of power. The reduced power state is turned off, and the power light turns amber.

User Guide
Page 68
... and video playback features, their associated user documentation, and their customer support. To turn on Accessibility Mode, set the language to English, and then select Management > Accessibility > On. - To turn off Accessibility Mode, select Management > Accessibility > Off. When Accessibility Mode is turned off . These regulations are enacting regulations to improve access to products and services for persons with disabilities. Standards The US Access Board created...
... and video playback features, their associated user documentation, and their customer support. To turn on Accessibility Mode, set the language to English, and then select Management > Accessibility > On. - To turn off Accessibility Mode, select Management > Accessibility > Off. When Accessibility Mode is turned off . These regulations are enacting regulations to improve access to products and services for persons with disabilities. Standards The US Access Board created...
Setup Instructions
Page 1
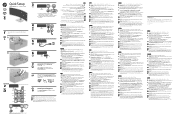
...;t, telefonszámát és postacímét. Quick Setup Maximum Resolution: 5120 × 1440 @ 165 Hz (DQHD) 1 * * If your user guide, drivers, and software. A B 2 1 C 2 USB Type-C® DisplayPort™ USB Type-C HDMI® USB Type-C USB Type-C USB Type-C OR DisplayPort USB Type-A OR HDMI USB Type-A USB Type-C 3 USB Type-C ‡ § USB (4) ‡ The USB hub is enabled only if the monitor is either a registered trademark or trademark of...
...;t, telefonszámát és postacímét. Quick Setup Maximum Resolution: 5120 × 1440 @ 165 Hz (DQHD) 1 * * If your user guide, drivers, and software. A B 2 1 C 2 USB Type-C® DisplayPort™ USB Type-C HDMI® USB Type-C USB Type-C USB Type-C OR DisplayPort USB Type-A OR HDMI USB Type-A USB Type-C 3 USB Type-C ‡ § USB (4) ‡ The USB hub is enabled only if the monitor is either a registered trademark or trademark of...


