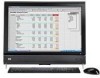
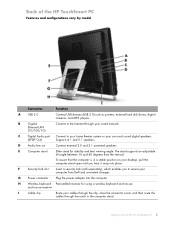
Service Reference Guide: HP dx9000 TouchSmart Business PC
Page 5
... right side ...2 Left-side components ...4 Rear components ...5 Activity LED indicator lights ...6 3 Removal and Replacement Procedures Opening the HP TouchSmart PC ...7 Adding Memory ...11 Before you begin ...11 Removing a memory module 11 Installing a memory module 13 Stand assembly ...16 Back cover ...16 Optical drive ...18 Manually removing an optical disc 18 Removing and installing...
Service Reference Guide: HP dx9000 TouchSmart Business PC
Page 11
...network. To assure that the computer is in the computer stand. Out) Supports 4.1 and 5.1 speakers. Wireless keyboard and mouse receiver Preinstalled receiver for stability and best viewing angle. The stand supports an adjustable tilt angle between 10 and 40 degrees from... the clip, close the connector cover, and then route the cables through your desktop, pull the computer stand open until you to secure your surround sound digital speakers. Rear components 5 Computer stand Slide stand for using a wireless keyboard and mouse. Rear components Item A B C D E F G H ...
Service Reference Guide: HP dx9000 TouchSmart Business PC
Page 15
Using the notch on the wireless keyboard and mouse receiver, pull the receiver out of the computer. Apply additional pressure to lift the computer stand as far as it will go to an upright position, about 90 degrees (B) from the back of and away from the computer, and then move the latch to the left until it is in the locked position (C). 9. Opening the HP TouchSmart PC 9 8.
Service Reference Guide: HP dx9000 TouchSmart Business PC
Page 22
Pull the stand up to a 90 degree position and push left on the bottom edge of the PC. Lift the stand off of the system. 2. Detach the four screws securing the stand to lock it in place. 2. Remove the wireless keyboard and mouse receiver from its USB slot on its latch to the computer. 4. To install the stand, reverse the removal procedures. Back cover 1. Remove the memory cover. 3. Remove the I/O cover and the I/O cable guide. 16 Chapter 3 Removal and Replacement Procedures Stand assembly 1.
Service Reference Guide: HP dx9000 TouchSmart Business PC
Page 23
Remove the nine screws that secure the back cover to the computer, as follows: a. 2 screws are located near the optical disc drive Back cover 17 Remove the optical disc drive cover panel. 6. 3. Remove the memory door and the stand. 5. To remove it, first squeeze the tabs at its sides and then pull the guide off its mounting post. 4. Remove the I/O cable guide.
Service Reference Guide: HP dx9000 TouchSmart Business PC
Page 26
... on the hard disk drive to prepare the HP TouchSmart PC. After replacing the hard disk drive, you need to run System Recovery using recovery discs to cool before touching them. 2. The hard disk drive ... can replace or upgrade the hard disk drive. CAUTION: Before removing the hard disk drive, back up any personal files on page 7. Remove the computer stand by removing the four screws that secure it to do so may result in data loss. Complete the procedures to an external storage device, such...
Service Reference Guide: HP dx9000 TouchSmart Business PC
Page 37
If you removed it, replace the computer stand. Closing the HP TouchSmart PC 31 Align the four screw holes of the stand over the four holes on the back of the computer, and then replace the four screws that secure the stand to the computer. Closing the HP TouchSmart PC CAUTION: To avoid injury and equipment damage, always complete the following steps in order after closing the HP TouchSmart PC. 1.
Service Reference Guide: HP dx9000 TouchSmart Business PC
Page 38
Push in the middle of the bottom edge to make sure the entire cover is pushed all the way down on both sides of the bottom edge of the computer stand and the screw hole and slide toward the stand and into place (B). Replace the memory cover. Replace the screw that secures the memory cover to snap it into place (A). 2. Align the memory cover over the two legs of the memory cover to the computer. 32 Chapter 3 Removal and Replacement Procedures Push down . 3.
Service Reference Guide: HP dx9000 TouchSmart Business PC
Page 39
Push the computer stand back slightly beyond the locked position (A), holding it with one hand so it does not snap back when the lock is released, and then release the lock on the computer stand (B) with the other hand. 5. Closing the HP TouchSmart PC 33 4. Replace the keyboard and mouse receiver.
Service Reference Guide: HP dx9000 TouchSmart Business PC
Page 40
Place the computer upright on a flat surface with the stand in a safe and open position. 7. Attach the power adapter to the back of electrical shock, fire, or equipment damage, do not plug telecommunications or telephone cables into the network interface card (NIC) (labeled as LAN). 34 Chapter 3 Removal and Replacement Procedures To reduce the risk of the computer and then reconnect the power cord to the power source. WARNING! 6.
Service Reference Guide: HP dx9000 TouchSmart Business PC
Page 51
... discs choosing 40 creating 40 recovery options 41 removal and replacement procedures 7 back cover 16 closing 31 hard drive 20 memory, adding 11 opening the TouchSmart PC 7 optical disc 18 stand 16 removing hard drive 20 optical disc 18 removing memory 11 Index 45
Service Reference Guide: HP dx9000 TouchSmart Business PC
Page 52
repairing software problems 37 restoring the system 38 right-side components 2 S security lock slot 5 SODIMM 1 software problems 37 software reinstallation 39 spare parts 1 SPDIF 5 speakers 3 stand 5 stand assembly 16 system recovery 40 system recovery options 41 T TouchSmart button 3 U updating drivers 37 USB 2.0 4, 5 USB receiver, wireless 1 V volume 3 W webcam 2 webcam light 6 whole unit replacement 1 wireless keyboard and mouse 3, 5 wireless keyboard and mouse light 6 wireless LAN 3 wireless USB receiver 1 46 Index
Getting Started: HP dx9000 TouchSmart Business PC
Page 3
... Finding HP TouchSmart PC Information vi Getting to Know the HP TouchSmart PC 1 Features of the HP TouchSmart PC 1 Front and right side of the HP TouchSmart PC 2 Left side of the HP TouchSmart PC 4 Removing the Connector Cover 4 Back of the HP TouchSmart PC 5 Activity LED indicator lights...6 Connecting the power source ...7 Cable Management...7 Adjust the Angle of the Computer Stand 9 Using...
Getting Started: HP dx9000 TouchSmart Business PC
Page 11
... 5 D Audio line out Connect external 2.0 and 2.1 powered speakers. To assure that the computer is in the computer stand. H Wireless keyboard Preinstalled receiver for stability and best viewing angle. Back of the HP TouchSmart PC Features and configurations vary by model Connector Function A USB 2.0 Connect USB devices (USB 2.0) such as printers, external hard disk...
Getting Started: HP dx9000 TouchSmart Business PC
Page 13
...management feature that is located behind the back connector cover. Route the power cord through a surge protector/uninterruptible power supply (UPS). Getting to Know the HP TouchSmart PC 7 Connecting the power source Plug the power cord into the AC adapter (brick), and the power adapter cord into an AC power source through... the notch in the computer stand, and then plug the power cord into the back of the cover, and pull gently. To use the cable routing clip feature: 1 To remove ...
Getting Started: HP dx9000 TouchSmart Business PC
Page 14
2 Route your cables through the notch (B) in the computer stand. Then, route the cables through the cable routing clip (A), and out of the back of the cover with the slots on the computer, and then pressing it until it snaps into place. A 3 Replace the connector cover by aligning the hooks on the right edge of the computer. B 8 Getting Started
Getting Started: HP dx9000 TouchSmart Business PC
Page 15
...to do is remove the battery tabs on your desktop, pull the computer stand open until it back to change the angle of HP TouchSmart PC, hold each side of the computer, and tilt it snaps into...the computer. Using the Wireless Keyboard or Mouse Your wireless keyboard and mouse are easy to Know the HP TouchSmart PC 9 All you want to an angle of between 10 and 40 degrees from the vertical. 10... least 10 degrees from the vertical; Adjust the Angle of the Computer Stand The HP TouchSmart PC is shipped with the computer stand collapsed against the back of the mouse is in the On position (the...
Getting Started: HP dx9000 TouchSmart Business PC
Page 20
b For each wired computer by model 6 Add other end of the cable to your HP TouchSmart PC. Then, turn on the router. For clean cable management, route the cable through the notch in the back stand (not shown), then close the back connector cover. Reconnect power to the modem, and wait until the modem... then connect the other computers or devices to your wired network: a Disconnect power from the broadband modem and the router, and then shut down your HP TouchSmart PC and the computers you want to add to any Web site. 14 Getting Started The Ethernet port on the...
Getting Started: HP dx9000 TouchSmart Business PC
Page 26
...other stationary object) and the other damage. 2 Lift the computer stand as far as it is a key lock device that require a parallel printer connector. A security lock is in the unlocked position. NOTE: The HP TouchSmart PC does not support printers that has a wire cable attached. ...Secure the security lock with one end of the HP TouchSmart PC, or you can connect a printer by following the lock manufacturer's instructions. 4 Move the stand slightly beyond 90 degrees ...
Getting Started: HP dx9000 TouchSmart Business PC
Page 61
... cable router clip 5 calendar using HP TouchSmart Calendar 42 camera using the webcam 40 carpal tunnel syndrome 22 CD playing 34 using the CD/DVD drive 16 cleaning touch screen 21 computer recycling old hardware 22 turning on 11 computer stand 5 adjusting the angle 9 CyberLink ...LabelPrint, features 53 Power2Go, features 53 PowerDirector, features 53 YouCam, features 53 D digital audio connector 5 digital camera, using HP TouchSmart Photo 30 digital video camera, using HP TouchSmart Photo 30 DVD drive, using 16 DVD...