Modem and Local Area Network - Windows Vista and Windows XP
Page 11
... enable modem use in other countries. The modem may not function properly if the correct country selection is displayed.) 9. Select Start > Control Panel > Hardware and Sound > Phone and Modem Options. 2. Then click the Dialing Rules tab. 3. Click OK to save your preference from the Country/region drop-down list. (If you...
... enable modem use in other countries. The modem may not function properly if the correct country selection is displayed.) 9. Select Start > Control Panel > Hardware and Sound > Phone and Modem Options. 2. Then click the Dialing Rules tab. 3. Click OK to save your preference from the Country/region drop-down list. (If you...
Modem and Local Area Network - Windows Vista and Windows XP
Page 12
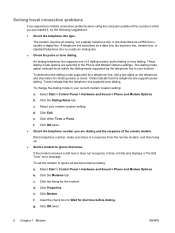
...9679; Set the modem to ignore all dial tones before dialing. 7. Then click the Modems tab. 3. Select Start > Control Panel > Hardware and Sound > Phone and Modem Options. 2. Click Modem. 6. Clear the check box for Wait for pulse or tone dialing. Solving travel connection problems If ...one of the remote modem. Clicks indicate that the telephone line supports tone dialing. Tones indicate that the telephone line supports pulse dialing. Click Edit. 5. If the modem receives a dial tone it does not recognize, it , try the following suggestions. ● Check the telephone line ...
...9679; Set the modem to ignore all dial tones before dialing. 7. Then click the Modems tab. 3. Select Start > Control Panel > Hardware and Sound > Phone and Modem Options. 2. Click Modem. 6. Clear the check box for Wait for pulse or tone dialing. Solving travel connection problems If ...one of the remote modem. Clicks indicate that the telephone line supports tone dialing. Tones indicate that the telephone line supports pulse dialing. Click Edit. 5. If the modem receives a dial tone it does not recognize, it , try the following suggestions. ● Check the telephone line ...
Modem and Local Area Network - Windows Vista
Page 9
... setting available to the modem is a location setting for any time. As you are using , click Tone or Pulse. 7. Select Start > Control Panel > Hardware and Sound > Phone and Modem Options. 2. CAUTION To prevent losing your home country settings, do not delete your home country configuration, add a new configuration for the modem...
... setting available to the modem is a location setting for any time. As you are using , click Tone or Pulse. 7. Select Start > Control Panel > Hardware and Sound > Phone and Modem Options. 2. CAUTION To prevent losing your home country settings, do not delete your home country configuration, add a new configuration for the modem...
Modem and Local Area Network - Windows Vista
Page 10
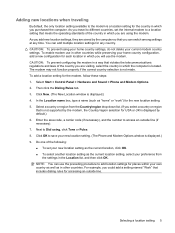
...These dialing mode options are dialing and the response of the remote modem. Select Start > Control Panel > Hardware and Sound > Phone and Modem Options. Click Edit. Click either Tone or Pulse. f. d. e. g. Solving travel connection problems If you experience modem connection problems when using...box for Wait for pulse or tone dialing. b. d. To set the modem to ignore dial tones. Select Start > Control Panel > Hardware and Sound > Phone and Modem Options. Click Properties. Click OK twice. 6 Chapter 1 Modem ENWW c. Click the listing for clicks (pulses) or tones....
...These dialing mode options are dialing and the response of the remote modem. Select Start > Control Panel > Hardware and Sound > Phone and Modem Options. Click Edit. Click either Tone or Pulse. f. d. e. g. Solving travel connection problems If you experience modem connection problems when using...box for Wait for pulse or tone dialing. b. d. To set the modem to ignore dial tones. Select Start > Control Panel > Hardware and Sound > Phone and Modem Options. Click Properties. Click OK twice. 6 Chapter 1 Modem ENWW c. Click the listing for clicks (pulses) or tones....
Modem and Local Area Network - Windows Vista
Page 11
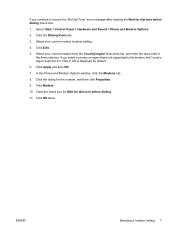
Click Edit. 5. Click the Dialing Rules tab. 3. Select your current modem location setting. 4. Clear the check box for Wait for dial tone before dialing check box: 1. In ... that is not supported by the modem, the Country/ region selection for USA or UK is displayed by default. 6. Select Start > Control Panel > Hardware and Sound > Phone and Modem Options. 2. Select your current location from the Country/region drop-down list, and enter the area code in the Area code box...
Click Edit. 5. Click the Dialing Rules tab. 3. Select your current modem location setting. 4. Clear the check box for Wait for dial tone before dialing check box: 1. In ... that is not supported by the modem, the Country/ region selection for USA or UK is displayed by default. 6. Select Start > Control Panel > Hardware and Sound > Phone and Modem Options. 2. Select your current location from the Country/region drop-down list, and enter the area code in the Area code box...
Setup Utility - Windows Vista
Page 10
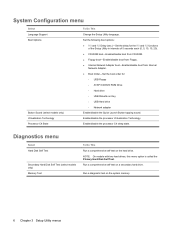
System Configuration menu Select Language Support Boot Options Button Sound (select models only) Virtualization Technology Processor C4 State To Do This Change the Setup Utility language. Set the following boot options: ● f10 and f12 .../disable the processor C4 sleep state. Run a diagnostic test on Key ◦ USB Hard drive ◦ Network adapter Enable/disable the Quick Launch Button tapping sound. Diagnostics menu Select Hard Disk Self Test Secondary Hard Disk Self Test (select models only) Memory Test To Do This Run a comprehensive self-test on...
System Configuration menu Select Language Support Boot Options Button Sound (select models only) Virtualization Technology Processor C4 State To Do This Change the Setup Utility language. Set the following boot options: ● f10 and f12 .../disable the processor C4 sleep state. Run a diagnostic test on Key ◦ USB Hard drive ◦ Network adapter Enable/disable the Quick Launch Button tapping sound. Diagnostics menu Select Hard Disk Self Test Secondary Hard Disk Self Test (select models only) Memory Test To Do This Run a comprehensive self-test on...

Setup Utility - Windows Vista
Page 11
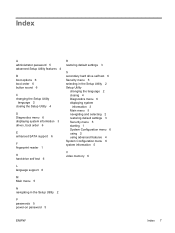
Index A administrator password 5 advanced Setup Utility features 4 B boot options 6 boot order 6 button sound 6 C changing the Setup Utility language 2 closing the Setup Utility 4 D Diagnostics menu 6 displaying system information 3 drives, boot order 6 F fingerprint reader 1 S secondary hard drive self test 6 Security ...
Index A administrator password 5 advanced Setup Utility features 4 B boot options 6 boot order 6 button sound 6 C changing the Setup Utility language 2 closing the Setup Utility 4 D Diagnostics menu 6 displaying system information 3 drives, boot order 6 F fingerprint reader 1 S secondary hard drive self test 6 Security ...

Setup Utility - Windows Vista and XP
Page 10
System Configuration menu Select Language Support Enhanced SATA support (select models only) Boot Options Button Sound (select models only) Video memory up to (select models only) To Do This Change the Setup Utility language. Diagnostics menu Select Hard Disk Self Test .../DVD ROM Drive ● Hard drive ● USB Diskette on Key ● USB Hard drive ● Network adapter Enable/disable the Quick Launch Button tapping sound. Run a comprehensive self-test on the hard drive. Select the amount of 5 seconds each (0. 5, 10, 15, 20). ● CD-ROM boot―Enable/disable boot...
System Configuration menu Select Language Support Enhanced SATA support (select models only) Boot Options Button Sound (select models only) Video memory up to (select models only) To Do This Change the Setup Utility language. Diagnostics menu Select Hard Disk Self Test .../DVD ROM Drive ● Hard drive ● USB Diskette on Key ● USB Hard drive ● Network adapter Enable/disable the Quick Launch Button tapping sound. Run a comprehensive self-test on the hard drive. Select the amount of 5 seconds each (0. 5, 10, 15, 20). ● CD-ROM boot―Enable/disable boot...
Setup Utility - Windows Vista and XP
Page 11
Index A administrator password 5 advanced Setup Utility features 4 B boot options 6 boot order 6 button sound 6 C changing the Setup Utility language 2 closing the Setup Utility 4 D Diagnostics menu 6 displaying system information 3 drives, boot order 6 E enhanced SATA support 6 F fingerprint reader 1 H hard drive self ...
Index A administrator password 5 advanced Setup Utility features 4 B boot options 6 boot order 6 button sound 6 C changing the Setup Utility language 2 closing the Setup Utility 4 D Diagnostics menu 6 displaying system information 3 drives, boot order 6 E enhanced SATA support 6 F fingerprint reader 1 H hard drive self ...
External Devices - Windows Vista
Page 8
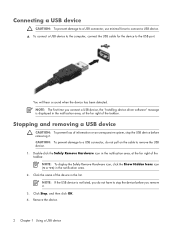
... CAUTION: To prevent loss of the taskbar. NOTE: To display the Safely Remove Hardware icon, click the Show Hidden Icons icon (< or You will hear a sound when the device has been detected. Connecting a USB device CAUTION: To prevent damage to a USB connector, use minimal force to connect a USB device. ▲ To...
... CAUTION: To prevent loss of the taskbar. NOTE: To display the Safely Remove Hardware icon, click the Show Hidden Icons icon (< or You will hear a sound when the device has been detected. Connecting a USB device CAUTION: To prevent damage to a USB connector, use minimal force to connect a USB device. ▲ To...

External Devices - Windows Vista
Page 10
... icon in the notification area, at the far right of information or an unresponsive system, stop the 1394 device before removing it. You will hear a sound when the device has been detected. Connecting a 1394 device CAUTION: To prevent damage to a 1394 port connector, use minimal force to connect a 1394 device. ▲...
... icon in the notification area, at the far right of information or an unresponsive system, stop the 1394 device before removing it. You will hear a sound when the device has been detected. Connecting a 1394 device CAUTION: To prevent damage to a 1394 port connector, use minimal force to connect a 1394 device. ▲...
External Media Cards - Windows Vista
Page 8
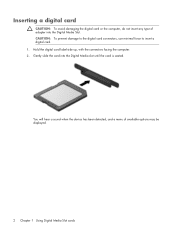
CAUTION: To prevent damage to the digital card connectors, use minimal force to insert a digital card. 1. Gently slide the card into the Digital Media Slot. You will hear a sound when the device has been detected, and a menu of adapter into the Digital Media slot until the card is seated. Inserting a digital card CAUTION: To avoid damaging the digital card or the computer, do not insert any type of available options may be displayed. 2 Chapter 1 Using Digital Media Slot cards Hold the digital card label-side up, with the connectors facing the computer. 2.
CAUTION: To prevent damage to the digital card connectors, use minimal force to insert a digital card. 1. Gently slide the card into the Digital Media Slot. You will hear a sound when the device has been detected, and a menu of adapter into the Digital Media slot until the card is seated. Inserting a digital card CAUTION: To avoid damaging the digital card or the computer, do not insert any type of available options may be displayed. 2 Chapter 1 Using Digital Media Slot cards Hold the digital card label-side up, with the connectors facing the computer. 2.

External Media Cards - Windows Vista
Page 11
... inserting an ExpressCard. Insert the card into an ExpressCard slot. Hold the card label-side up, with the connectors facing the computer. 2. You will hear a sound when the device has been detected, and a menu of available options may contain a protective insert. The ExpressCard slot may be displayed. Inserting an ExpressCard 5 Press...
... inserting an ExpressCard. Insert the card into an ExpressCard slot. Hold the card label-side up, with the connectors facing the computer. 2. You will hear a sound when the device has been detected, and a menu of available options may contain a protective insert. The ExpressCard slot may be displayed. Inserting an ExpressCard 5 Press...

Notebook Tour - Windows Vista
Page 8
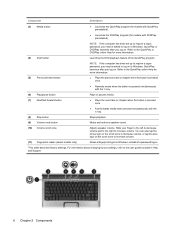
To view and change pointing device preferences, select Start > Control Panel > Hardware and Sound > Mouse. 2 Chapter 2 Components Top components TouchPad Component Description (1) TouchPad light ● Blue: TouchPad is enabled. ● Amber: TouchPad is disabled. (2) TouchPad* Moves the pointer and ...
To view and change pointing device preferences, select Start > Control Panel > Hardware and Sound > Mouse. 2 Chapter 2 Components Top components TouchPad Component Description (1) TouchPad light ● Blue: TouchPad is enabled. ● Amber: TouchPad is disabled. (2) TouchPad* Moves the pointer and ...
Notebook Tour - Windows Vista
Page 9
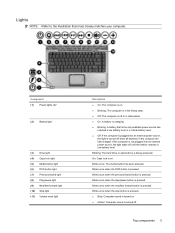
Blinks once when the play/pause button is pressed. On: Caps lock is on . ● Amber: Computer sound is turned off when all batteries in Hibernation. ● On: A battery is charging. ● Blinking: A battery that most closely matches your computer. Top components 3 ... button is being accessed. Blinking: The hard drive or optical drive is pressed. Blinks once when the stop button is pressed. ● Blue: Computer sound is off or in the computer are fully charged. If the computer is not plugged into an external power source, the light is pressed. Blinks...
Blinks once when the play/pause button is pressed. On: Caps lock is on . ● Amber: Computer sound is turned off when all batteries in Hibernation. ● On: A battery is charging. ● Blinking: A battery that most closely matches your computer. Top components 3 ... button is being accessed. Blinking: The hard drive or optical drive is pressed. Blinks once when the stop button is pressed. ● Blue: Computer sound is off or in the computer are fully charged. If the computer is not plugged into an external power source, the light is pressed. Blinks...
Notebook Tour - Windows Vista
Page 10
... computer is open or closed. On: Caps lock is being accessed. Blinks once: The media button has been pressed. ● Blue: Computer sound is turned on. ● Amber: Computer sound is turned off. The power light on the front of the computer is visible whether the computer is open . Component Description (12...
... computer is open or closed. On: Caps lock is being accessed. Blinks once: The media button has been pressed. ● Blue: Computer sound is turned on. ● Amber: Computer sound is turned off. The power light on the front of the computer is visible whether the computer is open . Component Description (12...

Notebook Tour - Windows Vista
Page 11
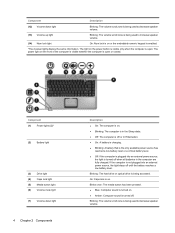
... speaker volume. (9) Num lock light On: Num lock is on the front of the computer is visible whether the computer is open or closed. Produce sound. Component Description (8) Volume up light Blinking: The volume scroll zone is being used to exit Hibernation. Top components 5 The light on the power button is...
... speaker volume. (9) Num lock light On: Num lock is on the front of the computer is visible whether the computer is open or closed. Produce sound. Component Description (8) Volume up light Blinking: The volume scroll zone is being used to exit Hibernation. Top components 5 The light on the power button is...
Notebook Tour - Windows Vista
Page 12
... with QuickPlay preinstalled). ● Launches the DVDPlay program (for models with the fn key. (8) Stop button Stops playback. (9) Volume mute button Mutes and restores speaker sound. (10) Volume scroll zone Adjusts speaker volume. NOTE: If the computer has been set up to require a logon password, you may be asked to log...
... with QuickPlay preinstalled). ● Launches the DVDPlay program (for models with the fn key. (8) Stop button Stops playback. (9) Volume mute button Mutes and restores speaker sound. (10) Volume scroll zone Adjusts speaker volume. NOTE: If the computer has been set up to require a logon password, you may be asked to log...
Notebook Tour - Windows Vista
Page 13
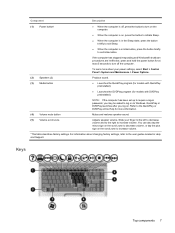
...Slide your power settings, select Start > Control Panel > System and Maintenance > Power Options. (2) Speakers (2) (3) Media button Produce sound. ● Launches the QuickPlay program (for models with DVDPlay preinstalled). Keys Top components 7 To learn more about changing factory settings... with QuickPlay preinstalled). ● Launches the DVDPlay program (for more information. (4) Volume mute button Mutes and restores speaker sound. (5) Volume scroll zone Adjusts speaker volume. Component Description (1) Power button* ● When the computer is off the ...
...Slide your power settings, select Start > Control Panel > System and Maintenance > Power Options. (2) Speakers (2) (3) Media button Produce sound. ● Launches the QuickPlay program (for models with DVDPlay preinstalled). Keys Top components 7 To learn more about changing factory settings... with QuickPlay preinstalled). ● Launches the DVDPlay program (for more information. (4) Volume mute button Mutes and restores speaker sound. (5) Volume scroll zone Adjusts speaker volume. Component Description (1) Power button* ● When the computer is off the ...
Notebook Tour - Windows Vista
Page 15
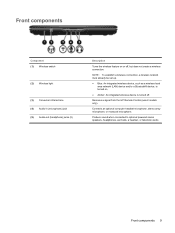
... as a wireless local area network (LAN) device and/or a Bluetooth® device, is turned on or off . Receives a signal from the HP Remote Control (select models only). Front components 9 Produce sound when connected to optional powered stereo speakers, headphones, ear buds, a headset, or television audio. Connects an optional computer headset microphone, stereo...
... as a wireless local area network (LAN) device and/or a Bluetooth® device, is turned on or off . Receives a signal from the HP Remote Control (select models only). Front components 9 Produce sound when connected to optional powered stereo speakers, headphones, ear buds, a headset, or television audio. Connects an optional computer headset microphone, stereo...

