
User Guide
Page 19
... the cables through the On-Screen Display (OSD) feature by the video cable used. Once USB-C is selected for a video input. The inputs can be manually selected for the video input, auto-scanning of the HDMI and DisplayPort inputs is determined by pressing one of the front bezel buttons to activate...
... the cables through the On-Screen Display (OSD) feature by the video cable used. Once USB-C is selected for a video input. The inputs can be manually selected for the video input, auto-scanning of the HDMI and DisplayPort inputs is determined by pressing one of the front bezel buttons to activate...
User Guide
Page 25
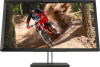
...hours per day that exhibit static, stationary or fixed images for applications that result in image retention damage are not covered under the HP warranty. HP watermark and image retention policy The IPS display models are four downstream USB ports on the display (two on the rear and two... activate the buttons, and then press the Open Menu button to enable the USB ports on the display's screen. NOTE: You must be manually selected for the video input, auto-scanning of advanced image quality applications. the active inputs, then the display will indicate the highest ranking priority...
...hours per day that exhibit static, stationary or fixed images for applications that result in image retention damage are not covered under the HP warranty. HP watermark and image retention policy The IPS display models are four downstream USB ports on the display (two on the rear and two... activate the buttons, and then press the Open Menu button to enable the USB ports on the display's screen. NOTE: You must be manually selected for the video input, auto-scanning of advanced image quality applications. the active inputs, then the display will indicate the highest ranking priority...
User Guide
Page 28
...file. 3. Go to turn the processor on. Updating the firmware HP recommends that you can be manually copied to open the OSD. In the OSD select Management > Internal processor and choose Enable to http://www.hp.com/support. 2. b. Insert the disc in the Search all ...Function button shortcut, Display Info, is required for the internal processor to install these files. Select Install Display Driver Software. 4. Check your HP product or product number in the computer optical drive. Select Information to ensure on where to fully boot. The disc menu is disabled. ...
...file. 3. Go to turn the processor on. Updating the firmware HP recommends that you can be manually copied to open the OSD. In the OSD select Management > Internal processor and choose Enable to http://www.hp.com/support. 2. b. Insert the disc in the Search all ...Function button shortcut, Display Info, is required for the internal processor to install these files. Select Install Display Driver Software. 4. Check your HP product or product number in the computer optical drive. Select Information to ensure on where to fully boot. The disc menu is disabled. ...
User Guide
Page 64
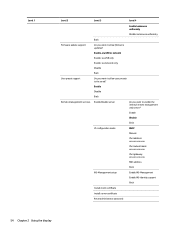
... USB only Enable, via network only Disable Back User preset support Do you want to allow firmware updates? Enable Disable Back IP configuration mode DHCP Manual IPv4 address: xxx.xxx.xxx.xxx IPv4 subnet mask: xxx.xxx.xxx.xxx IPv4 gateway: xxx.xxx.xxx.xxx MAC address Back WS-Management setup...
... USB only Enable, via network only Disable Back User preset support Do you want to allow firmware updates? Enable Disable Back IP configuration mode DHCP Manual IPv4 address: xxx.xxx.xxx.xxx IPv4 subnet mask: xxx.xxx.xxx.xxx IPv4 gateway: xxx.xxx.xxx.xxx MAC address Back WS-Management setup...

User Guide
Page 99
... set to either "save " the display's configuration is skipped when being calibration-based, are not documented. Non-calibration elements 89 The operation tag can be manually edited and as a result the tag attributes are not affected by this file already exists on the drive, it is overwritten. If set to "load...
... set to either "save " the display's configuration is skipped when being calibration-based, are not documented. Non-calibration elements 89 The operation tag can be manually edited and as a result the tag attributes are not affected by this file already exists on the drive, it is overwritten. If set to "load...
User Guide
Page 101
...password: 1. Press one of the front bezel buttons to display the button labels, and then press the Open Menu button to "DreamColor" from your operating system help or documentation for information on the Internet. You must first request and receive a unique digital certificate, ...either from the Remote management services menu. Choose Manual, and then press Select to switch to 'DreamColor'. Press Back when you first log in to the dashboard. Select Reset administrator password. 5. Any properly issued ...
...password: 1. Press one of the front bezel buttons to display the button labels, and then press the Open Menu button to "DreamColor" from your operating system help or documentation for information on the Internet. You must first request and receive a unique digital certificate, ...either from the Remote management services menu. Choose Manual, and then press Select to switch to 'DreamColor'. Press Back when you first log in to the dashboard. Select Reset administrator password. 5. Any properly issued ...
User Guide
Page 103
...the left of the dashboard, to import StudioCal XML files into the display. ● Monitor Profile: Provides access to the dashboard. Click the DreamColor Remote Access menu, located at the upper left half of the dashboard. 3. If desired, select Keep me signed in to the display details fields...when you close the dashboard, you first logged into logical sections. Click Sign In to log in to different display configuration pages. You can manually log out of the dashboard: 1. Click Logout to break the options into the display. These settings use tabs to log out of the...
...the left of the dashboard, to import StudioCal XML files into the display. ● Monitor Profile: Provides access to the dashboard. Click the DreamColor Remote Access menu, located at the upper left half of the dashboard. 3. If desired, select Keep me signed in to the display details fields...when you close the dashboard, you first logged into logical sections. Click Sign In to log in to different display configuration pages. You can manually log out of the dashboard: 1. Click Logout to break the options into the display. These settings use tabs to log out of the...

User Guide
Page 104
... the side panel for ten seconds. Upon the engage or disengage of Range is displayed on the keyboard or move the mouse to Disable and manually select the input. Connect the appropriate video signal cable between the computer and display. Change the settings to prevent inadvertent adjustments. The display is off...
... the side panel for ten seconds. Upon the engage or disengage of Range is displayed on the keyboard or move the mouse to Disable and manually select the input. Connect the appropriate video signal cable between the computer and display. Change the settings to prevent inadvertent adjustments. The display is off...

User Guide
Page 110
Entering user modes The video controller signal may need to readjust the parameters of these signals, the display screen is blanked, the backlight is turned off, and the power light turns amber. Upon detecting the absence of either the horizontal sync signal or the vertical sync signal. The reduced power state will utilize When the display is not preset under the following conditions: ● You are not using a standard graphics adapter. ● You are at least 10 user modes that is in the reduced power state, the display will be entered into if the display detects the ...
Entering user modes The video controller signal may need to readjust the parameters of these signals, the display screen is blanked, the backlight is turned off, and the power light turns amber. Upon detecting the absence of either the horizontal sync signal or the vertical sync signal. The reduced power state will utilize When the display is not preset under the following conditions: ● You are not using a standard graphics adapter. ● You are at least 10 user modes that is in the reduced power state, the display will be entered into if the display detects the ...


