Dc7800 Power Supply Replacement - HP Compaq Business Desktop
Dc7800 Power Supply Replacement
Related Manual Pages


Similar Questions

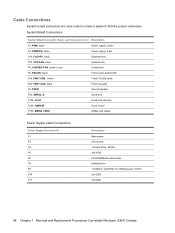
Hp E Pc-42 Power Supply Pinout
what is the pin-out on the power supply of the HP E PC-42
what is the pin-out on the power supply of the HP E PC-42
(Posted by 1Dangerous1T00 9 years ago)

Hp Dc7800 Usdt What Type Of Power Supply
(Posted by DiLroz 9 years ago)


Hp Dc7800 Does Not Power On Flashes Red Light 4 Times
(Posted by krishpd 10 years ago)
Power Supply?
our power was shut of for a hour or two when it came back on our hp s3300f would not turn on. There...
our power was shut of for a hour or two when it came back on our hp s3300f would not turn on. There...
(Posted by scottinnh88 11 years ago)