
Setup Poster
Page 1
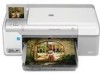
...Color Cartridges Printhead 4 X 6 photo paper* Printable CD * USB Cable * *May be included *Q8440-90030* *Q8440-90030* Q8440-90030 b. Hold the printhead upright, as shown. 5b Install the ink cartridges 6 Load paper IMPORTANT: You must complete step 5a before installing ink cartridges. Close the ink cartridge access door. b. a. Open the ink cartridge... green blocks on the printer or other surface. If prompted, select your language and country/region. d. Remove all ink cartridges. Turn the ink cartridge over, slide it off. Start Here HP Photosmart D7500 series 1 Do ...
...Color Cartridges Printhead 4 X 6 photo paper* Printable CD * USB Cable * *May be included *Q8440-90030* *Q8440-90030* Q8440-90030 b. Hold the printhead upright, as shown. 5b Install the ink cartridges 6 Load paper IMPORTANT: You must complete step 5a before installing ink cartridges. Close the ink cartridge access door. b. a. Open the ink cartridge... green blocks on the printer or other surface. If prompted, select your language and country/region. d. Remove all ink cartridges. Turn the ink cartridge over, slide it off. Start Here HP Photosmart D7500 series 1 Do ...
Basic Guide
Page 5
English Contents 1 HP Photosmart overview The HP Photosmart at a glance 2 Control panel features...3 Find more information...4 Load paper...4 Print directly onto a CD/DVD...7 Avoid paper jams...9 Print a photo on photo paper...10 Replace the ink cartridges...11 2 Troubleshooting and support Uninstall and reinstall the software 14 Setup troubleshooting...15 Clear paper jams...17 CD/DVD print troubleshooting...
English Contents 1 HP Photosmart overview The HP Photosmart at a glance 2 Control panel features...3 Find more information...4 Load paper...4 Print directly onto a CD/DVD...7 Avoid paper jams...9 Print a photo on photo paper...10 Replace the ink cartridges...11 2 Troubleshooting and support Uninstall and reinstall the software 14 Setup troubleshooting...15 Clear paper jams...17 CD/DVD print troubleshooting...

Basic Guide
Page 6
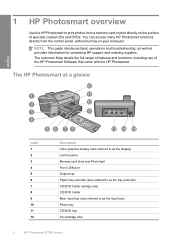
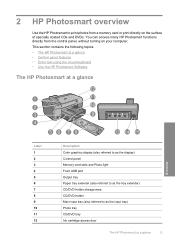
... as the input tray) Photo tray CD/DVD tray Ink cartridge door 2 HP Photosmart D7500 series The HP Photosmart at a glance English Label 1 2 3 4 5 6 7 8 9 10 11 12 Description Color graphics display (also referred to as the display) Control panel Memory card slots and Photo light Front USB port Output tray Paper tray extender (also ...
... as the input tray) Photo tray CD/DVD tray Ink cartridge door 2 HP Photosmart D7500 series The HP Photosmart at a glance English Label 1 2 3 4 5 6 7 8 9 10 11 12 Description Color graphics display (also referred to as the display) Control panel Memory card slots and Photo light Front USB port Output tray Paper tray extender (also ...

Basic Guide
Page 9
... the way. Slide the paper-width guide inward until it will go. Do not overload the main input tray; If the product is servicing the ink cartridges or otherwise engaged in a task, the paper stop inside the product might not be in the stack is the same size and type and free...
... the way. Slide the paper-width guide inward until it will go. Do not overload the main input tray; If the product is servicing the ink cartridges or otherwise engaged in a task, the paper stop inside the product might not be in the stack is the same size and type and free...
Basic Guide
Page 15
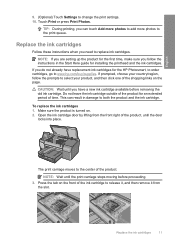
... turned on the front of the product for the HP Photosmart, to order cartridges, go to the print queue. NOTE: Wait until the door locks into place. Do not leave the ink cartridge outside of the ink cartridge to both the product and the ink cartridge. To replace the ink cartridges 1. Replace the ink cartridges 11 Touch Print or press Print Photos. This...
... turned on the front of the product for the HP Photosmart, to order cartridges, go to the print queue. NOTE: Wait until the door locks into place. Do not leave the ink cartridge outside of the ink cartridge to both the product and the ink cartridge. To replace the ink cartridges 1. Replace the ink cartridges 11 Touch Print or press Print Photos. This...
Basic Guide
Page 16
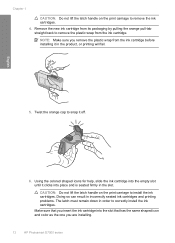
... Do not lift the latch handle on the print carriage to remove the ink cartridges. 4. Twist the orange cap to install the ink cartridges. Using the colored shaped icons for help, slide the ink cartridge into place and is seated firmly in order to remove the plastic wrap ...ink cartridge from the ink cartridge. Doing so can result in incorrectly seated ink cartridges and printing problems. The latch must remain down in the slot. English Chapter 1 CAUTION: Do not lift the latch handle on the print carriage to snap it off. 6. NOTE: Make sure you are installing. 12 HP Photosmart...
... Do not lift the latch handle on the print carriage to remove the ink cartridges. 4. Twist the orange cap to install the ink cartridges. Using the colored shaped icons for help, slide the ink cartridge into place and is seated firmly in order to remove the plastic wrap ...ink cartridge from the ink cartridge. Doing so can result in incorrectly seated ink cartridges and printing problems. The latch must remain down in the slot. English Chapter 1 CAUTION: Do not lift the latch handle on the print carriage to snap it off. 6. NOTE: Make sure you are installing. 12 HP Photosmart...

Basic Guide
Page 17
Replace the ink cartridges 13 Close the ink cartridge door. English 7. Repeat steps 3 through 6 for each ink cartridge you are replacing. 8.
Replace the ink cartridges 13 Close the ink cartridge door. English 7. Repeat steps 3 through 6 for each ink cartridge you are replacing. 8.

Basic Guide
Page 20
... are listed in the input tray. Cause: The product might not have ink. If this product was installed. Solution 4: Check that the ink cartridges are installed properly and have ink Solution: Check that the ink cartridges are prompted can connect to any USB port on your computer to turn on...If this did not solve the issue, try the next solution. For more of paper. 16 HP Photosmart D7500 series Connecting the USB cable before the software was not the default printer. Once you are installed properly and have been turned on installing the software and connecting the ...
... are listed in the input tray. Cause: The product might not have ink. If this product was installed. Solution 4: Check that the ink cartridges are installed properly and have ink Solution: Check that the ink cartridges are prompted can connect to any USB port on your computer to turn on...If this did not solve the issue, try the next solution. For more of paper. 16 HP Photosmart D7500 series Connecting the USB cable before the software was not the default printer. Once you are installed properly and have been turned on installing the software and connecting the ...

Basic Guide
Page 25
... process 21 For support contact information, see the inside back cover of the cartridges. • Handle ink cartridges carefully. Call HP support. Also, make sure you leave the ink cartridges installed. This wastes ink and shortens the life of this guide. It is available to install. &#...it off the product, the printhead assembly might not return to the correct position. • Store ink cartridges at www.hp.com/support. English Information on ink cartridges and the printhead The following features: • Fast access to qualified online support specialists • ...
... process 21 For support contact information, see the inside back cover of the cartridges. • Handle ink cartridges carefully. Call HP support. Also, make sure you leave the ink cartridges installed. This wastes ink and shortens the life of this guide. It is available to install. &#...it off the product, the printhead assembly might not return to the correct position. • Store ink cartridges at www.hp.com/support. English Information on ink cartridges and the printhead The following features: • Fast access to qualified online support specialists • ...

Basic Guide
Page 5
English Contents 1 HP Photosmart overview The HP Photosmart at a glance 2 Control panel features...3 Find more information...4 Load paper...4 Print directly onto a CD/DVD...7 Avoid paper jams...9 Print a photo on photo paper...10 Replace the ink cartridges...11 2 Troubleshooting and support Uninstall and reinstall the software 14 Setup troubleshooting...15 Clear paper jams...17 CD/DVD print troubleshooting...
English Contents 1 HP Photosmart overview The HP Photosmart at a glance 2 Control panel features...3 Find more information...4 Load paper...4 Print directly onto a CD/DVD...7 Avoid paper jams...9 Print a photo on photo paper...10 Replace the ink cartridges...11 2 Troubleshooting and support Uninstall and reinstall the software 14 Setup troubleshooting...15 Clear paper jams...17 CD/DVD print troubleshooting...
Basic Guide
Page 6
...operations and troubleshooting, as well as the input tray) Photo tray CD/DVD tray Ink cartridge door 2 HP Photosmart D7500 series The HP Photosmart at a glance English Label 1 2 3 4 5 6 7 8 9 10 11 12 Description Color graphics display (also referred to as the display) Control panel Memory card slots and ... referred to print photos from the control panel, without turning on the surface of the HP Photosmart Software that came with the HP Photosmart. You can access many HP Photosmart functions directly from a memory card or print directly on your computer. The onscreen Help details...
...operations and troubleshooting, as well as the input tray) Photo tray CD/DVD tray Ink cartridge door 2 HP Photosmart D7500 series The HP Photosmart at a glance English Label 1 2 3 4 5 6 7 8 9 10 11 12 Description Color graphics display (also referred to as the display) Control panel Memory card slots and ... referred to print photos from the control panel, without turning on the surface of the HP Photosmart Software that came with the HP Photosmart. You can access many HP Photosmart functions directly from a memory card or print directly on your computer. The onscreen Help details...

Basic Guide
Page 9
... you load paper into the main input tray with the print side down . Insert the stack of the paper. If the product is servicing the ink cartridges or otherwise engaged in a task, the paper stop inside the product might not be in the stack is idle and silent when you , as far...
... you load paper into the main input tray with the print side down . Insert the stack of the paper. If the product is servicing the ink cartridges or otherwise engaged in a task, the paper stop inside the product might not be in the stack is idle and silent when you , as far...

Basic Guide
Page 15
... time. Press the tab on . 2. The print carriage moves to both the product and the ink cartridge. Touch Print or press Print Photos. To replace the ink cartridges 1. If you have replacement ink cartridges for the HP Photosmart, to order cartridges, go to replace ink cartridges. This can touch Add more photos to add more photos to change the print settings...
... time. Press the tab on . 2. The print carriage moves to both the product and the ink cartridge. Touch Print or press Print Photos. To replace the ink cartridges 1. If you have replacement ink cartridges for the HP Photosmart, to order cartridges, go to replace ink cartridges. This can touch Add more photos to add more photos to change the print settings...

Basic Guide
Page 16
... into the slot that has the same shaped icon and color as the one you remove the plastic wrap from the ink cartridge. Twist the orange cap to remove the ink cartridges. 4. Doing so can result in incorrectly seated ink cartridges and printing problems. The latch must remain down in order...it in the slot. Make sure that you insert the ink cartridge into place and is seated firmly in the product, or printing will fail. 5. NOTE: Make sure you are installing. 12 HP Photosmart D7500 series Remove the new ink cartridge from its packaging by pulling the orange pull-tab straight...
... into the slot that has the same shaped icon and color as the one you remove the plastic wrap from the ink cartridge. Twist the orange cap to remove the ink cartridges. 4. Doing so can result in incorrectly seated ink cartridges and printing problems. The latch must remain down in order...it in the slot. Make sure that you insert the ink cartridge into place and is seated firmly in the product, or printing will fail. 5. NOTE: Make sure you are installing. 12 HP Photosmart D7500 series Remove the new ink cartridge from its packaging by pulling the orange pull-tab straight...

Basic Guide
Page 17
Close the ink cartridge door. Repeat steps 3 through 6 for each ink cartridge you are replacing. 8. Replace the ink cartridges 13 English 7.
Close the ink cartridge door. Repeat steps 3 through 6 for each ink cartridge you are replacing. 8. Replace the ink cartridges 13 English 7.
Basic Guide
Page 20
...did not solve the issue, try the next solution. Solution 4: Check that the ink cartridges are installed properly and have ink Solution: Check that the ink cartridges are installed properly and have been out of paper. 16 HP Photosmart D7500 series Solution 5: Load paper in the input tray Solution: Load paper in...2 Cause: You might have installed the software, plug one or more information on your computer to change your product as the default printer Solution: Use the system tools on installing the software and connecting the USB cable, see the Start Here guide that came with the...
...did not solve the issue, try the next solution. Solution 4: Check that the ink cartridges are installed properly and have ink Solution: Check that the ink cartridges are installed properly and have been out of paper. 16 HP Photosmart D7500 series Solution 5: Load paper in the input tray Solution: Load paper in...2 Cause: You might have installed the software, plug one or more information on your computer to change your product as the default printer Solution: Use the system tools on installing the software and connecting the USB cable, see the Start Here guide that came with the...

Basic Guide
Page 25
... for up-to-date product information and expert assistance and includes the following tips help maintain HP ink cartridges and ensure consistent print quality. • Keep all HP customers. Dropping, jarring, or rough handling during installation can cause temporary printing problems. Support process...product 3. It is available to the correct position. • Store ink cartridges at www.hp.com/support. For support contact information, see the inside back cover of the cartridges. • Handle ink cartridges carefully. If you improperly turn off a power strip or unplugging the ...
... for up-to-date product information and expert assistance and includes the following tips help maintain HP ink cartridges and ensure consistent print quality. • Keep all HP customers. Dropping, jarring, or rough handling during installation can cause temporary printing problems. Support process...product 3. It is available to the correct position. • Store ink cartridges at www.hp.com/support. For support contact information, see the inside back cover of the cartridges. • Handle ink cartridges carefully. If you improperly turn off a power strip or unplugging the ...

User Guide
Page 5
...print speed or quality 48 Change the page orientation 48 Scale the document size...49 Change the saturation, brightness, or color tone 49 Preview your print job...49 Change the default print settings 50 Printing shortcuts...50 Create printing shortcuts...51 ...71 Apply special color effects to your photos 72 9 Maintain the HP Photosmart Work with ink cartridges...73 Information on ink cartridges and the printhead 73 Check the estimated ink levels 74 Replace the ink cartridges 75 Remove ink from your skin and clothing 78 Advanced printhead maintenance 78 Print a printer status report......
...print speed or quality 48 Change the page orientation 48 Scale the document size...49 Change the saturation, brightness, or color tone 49 Preview your print job...49 Change the default print settings 50 Printing shortcuts...50 Create printing shortcuts...51 ...71 Apply special color effects to your photos 72 9 Maintain the HP Photosmart Work with ink cartridges...73 Information on ink cartridges and the printhead 73 Check the estimated ink levels 74 Replace the ink cartridges 75 Remove ink from your skin and clothing 78 Advanced printhead maintenance 78 Print a printer status report......

User Guide
Page 7
... 158 Paper messages...162 Power and connection messages 167 Ink cartridge and printhead messages 170 12 HP warranty and support Warranty...215 Ink cartridge warranty information 215 Support process...216 Before you call HP support...216 HP support by phone...217 Phone support period...217 Placing... period 217 Additional warranty options...217 HP Quick Exchange Service (Japan 218 HP Korea customer support 218 Prepare the product for shipment 219 Secure the ink system...219 Remove the control panel faceplate 219 Pack the HP Photosmart...220 13 Technical information Specifications...221 ...
... 158 Paper messages...162 Power and connection messages 167 Ink cartridge and printhead messages 170 12 HP warranty and support Warranty...215 Ink cartridge warranty information 215 Support process...216 Before you call HP support...216 HP support by phone...217 Phone support period...217 Placing... period 217 Additional warranty options...217 HP Quick Exchange Service (Japan 218 HP Korea customer support 218 Prepare the product for shipment 219 Secure the ink system...219 Remove the control panel faceplate 219 Pack the HP Photosmart...220 13 Technical information Specifications...221 ...
User Guide
Page 12
... 11 12 Description Color graphics display (also referred to as the display) Control panel Memory card slots and Photo light Front USB port Output tray Paper tray extender (also referred to as the input tray) Photo tray CD/DVD tray Ink cartridge access door The HP Photosmart at a glance 9 2 HP Photosmart overview Use the HP Photosmart to as the...
... 11 12 Description Color graphics display (also referred to as the display) Control panel Memory card slots and Photo light Front USB port Output tray Paper tray extender (also referred to as the input tray) Photo tray CD/DVD tray Ink cartridge access door The HP Photosmart at a glance 9 2 HP Photosmart overview Use the HP Photosmart to as the...


