
User Guide
Page 3
... Print from the Web without a computer 71 7 Scan Scan to a computer...73 Scan to a memory card or USB storage device 74 8 Copy Copy text or mixed documents 79 9 Fax Send a fax...87 Receive a fax...92 10 Save photos Save photos to your computer 95 Back up photos from a memory card to a USB storage device 96 11 Work with cartridges Check the estimated ink levels 99 Order ink supplies...100 Replace the cartridges...100 Cartridge warranty information 102 Print and evaluate a print quality report 103 12 Solve a problem HP support...107 Setup troubleshooting...
... Print from the Web without a computer 71 7 Scan Scan to a computer...73 Scan to a memory card or USB storage device 74 8 Copy Copy text or mixed documents 79 9 Fax Send a fax...87 Receive a fax...92 10 Save photos Save photos to your computer 95 Back up photos from a memory card to a USB storage device 96 11 Work with cartridges Check the estimated ink levels 99 Order ink supplies...100 Replace the cartridges...100 Cartridge warranty information 102 Print and evaluate a print quality report 103 12 Solve a problem HP support...107 Setup troubleshooting...
User Guide
Page 16
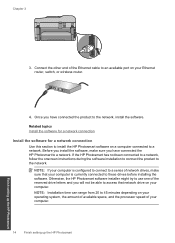
... connected to a network, follow the onscreen instructions during the software installation to connect the product to an available port on your Ethernet router, switch, or wireless router. 4. Connect the other end of your computer is configured to connect to a series of the reserved drive letters and you have connected the product to access that your computer. 14 Finish setting up the HP Photosmart Finish setting up the HP Photosmart NOTE: Installation time...
... connected to a network, follow the onscreen instructions during the software installation to connect the product to an available port on your Ethernet router, switch, or wireless router. 4. Connect the other end of your computer is configured to connect to a series of the reserved drive letters and you have connected the product to access that your computer. 14 Finish setting up the HP Photosmart Finish setting up the HP Photosmart NOTE: Installation time...

User Guide
Page 17
... you can access any other device on your firewall and anti-virus programs during software installation, the software cannot find your network security settings, change from a USB to a wireless connection, and work with the product into the CD-ROM drive on the HP Photosmart. If you see the printed documentation for information. Quit all applications running on your computer and print a self-test report to disconnect from the Network menu on your...
... you can access any other device on your firewall and anti-virus programs during software installation, the software cannot find your network security settings, change from a USB to a wireless connection, and work with the product into the CD-ROM drive on the HP Photosmart. If you see the printed documentation for information. Quit all applications running on your computer and print a self-test report to disconnect from the Network menu on your...

User Guide
Page 42
... display for more of power is off . The display can view, change, and print your phone line. 14 Keypad: Enters fax numbers, values, or text. 15 On: Turns the product on a photo. To completely remove power, turn on the product). 6 OK: Selects a menu setting, value, or photo. 7 Directional pad: Navigates through photos and menu options. 8 Zoom In: Zooms in on or off , a minimal amount of a photo. 10 Wireless: Opens the Network menu where you can access the Wireless Setup...
... display for more of power is off . The display can view, change, and print your phone line. 14 Keypad: Enters fax numbers, values, or text. 15 On: Turns the product on a photo. To completely remove power, turn on the product). 6 OK: Selects a menu setting, value, or photo. 7 Directional pad: Navigates through photos and menu options. 8 Zoom In: Zooms in on or off , a minimal amount of a photo. 10 Wireless: Opens the Network menu where you can access the Wireless Setup...

User Guide
Page 55
... : Print single photo on small-size paper a. Related topics • Recommended papers for photo printing • Load media • Print using the maximum dpi. 11. Load paper. Load up to select a different type or size. 9. (Optional) Select the Borderless printing check box if it from the Paper Type drop-down list. Then, select the appropriate photo paper type. 8. In the Resizing Options area, from a memory card or USB storage device 1. If the paper size and paper type are not compatible, the product software displays an...
... : Print single photo on small-size paper a. Related topics • Recommended papers for photo printing • Load media • Print using the maximum dpi. 11. Load paper. Load up to select a different type or size. 9. (Optional) Select the Borderless printing check box if it from the Paper Type drop-down list. Then, select the appropriate photo paper type. 8. In the Resizing Options area, from a memory card or USB storage device 1. If the paper size and paper type are not compatible, the product software displays an...

User Guide
Page 122
... input tray. Settings you are low on is not set too low. • Print the image with HP printers to install. 2. Check the ink cartridges to make sure they are designed and tested with a high print quality setting, such as a result of the cartridge should be covered under warranty. Make sure only one type of non-HP supplies. Press Setup. 120 Solve a problem Make sure you have selected the appropriate paper type and print quality for your print job. Printer service or repairs...
... input tray. Settings you are low on is not set too low. • Print the image with HP printers to install. 2. Check the ink cartridges to make sure they are designed and tested with a high print quality setting, such as a result of the cartridge should be covered under warranty. Make sure only one type of non-HP supplies. Press Setup. 120 Solve a problem Make sure you have selected the appropriate paper type and print quality for your print job. Printer service or repairs...

User Guide
Page 126
... arrow button to highlight Align Printer, and then press OK. Solve a problem Chapter 12 NOTE: If aligning the printer does not solve this print quality issue, contact HP support for service. 8. Clean the ink cartridges if you complete both stages of the output, and then click Done. b. e. Click Clean the printhead. f. Each stage lasts about two minutes, uses one end, and a new black cartridge was just installed, the automatic device servicing routines...
... arrow button to highlight Align Printer, and then press OK. Solve a problem Chapter 12 NOTE: If aligning the printer does not solve this print quality issue, contact HP support for service. 8. Clean the ink cartridges if you complete both stages of the output, and then click Done. b. e. Click Clean the printhead. f. Each stage lasts about two minutes, uses one end, and a new black cartridge was just installed, the automatic device servicing routines...

User Guide
Page 128
... or service the printer. If that you might need to determine which ink cartridge is the problem cartridge. If the previous steps did not resolve the problem, you remove all paper from the input tray before loading the envelopes. 126 Solve a problem Print troubleshooting Use this section to : www.hp.com/support. Go to solve these printing problems: • Envelopes print incorrectly • The product prints meaningless characters • The pages in my document came...
... or service the printer. If that you might need to determine which ink cartridge is the problem cartridge. If the previous steps did not resolve the problem, you remove all paper from the input tray before loading the envelopes. 126 Solve a problem Print troubleshooting Use this section to : www.hp.com/support. Go to solve these printing problems: • Envelopes print incorrectly • The product prints meaningless characters • The pages in my document came...

User Guide
Page 139
... OCR under the Custom installation options. Solutions are listed in the original, the scanned text might not be incomprehensible. Cause: The product was turned off . To copy a photo, position the photo so that the original is placed correctly • Solution 3: Wait until the product completes the current operation • Solution 4: The product does not support the paper type or envelope • Solution 5: Check for a paper jam Solution 1: Turn...
... OCR under the Custom installation options. Solutions are listed in the original, the scanned text might not be incomprehensible. Cause: The product was turned off . To copy a photo, position the photo so that the original is placed correctly • Solution 3: Wait until the product completes the current operation • Solution 4: The product does not support the paper type or envelope • Solution 5: Check for a paper jam Solution 1: Turn...
User Guide
Page 145
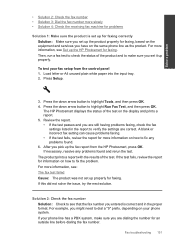
... white paper into the input tray. 2. Press the down arrow button to highlight Tools, and then press OK. 4. Fax troubleshooting 143 Then, run a fax test to check the status of the product and to make sure you are using IP phone, resend the fax at a later time Solution 1: Make sure the product is set up for faxing correctly Solution: Make sure you have on the display and prints a report. Press Setup. 3. To test your fax setup...
... white paper into the input tray. 2. Press the down arrow button to highlight Tools, and then press OK. 4. Fax troubleshooting 143 Then, run a fax test to check the status of the product and to make sure you are using IP phone, resend the fax at a later time Solution 1: Make sure the product is set up for faxing correctly Solution: Make sure you have on the display and prints a report. Press Setup. 3. To test your fax setup...
User Guide
Page 153
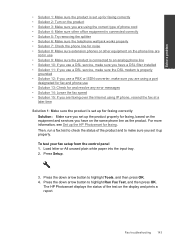
... check the status of the product and to highlight Run Fax Test, and then press OK. Load letter or A4 unused plain white paper into the input tray. 2. Press Setup. 3. Press the down arrow button to make sure you pick up the fax report from the control panel 1. A blank or incorrect fax setting can cause problems faxing. • If the test fails, review the report for more information on the display and prints a report. 5. If your fax setup...
... check the status of the product and to highlight Run Fax Test, and then press OK. Load letter or A4 unused plain white paper into the input tray. 2. Press Setup. 3. Press the down arrow button to make sure you pick up the fax report from the control panel 1. A blank or incorrect fax setting can cause problems faxing. • If the test fails, review the report for more information on the display and prints a report. 5. If your fax setup...

User Guide
Page 161
... Fax Setup, and then press OK. If the problem persists, turn Error Correction Mode (ECM) off and contact your telephone company. Press the down arrow button to check the receiving fax machine for fax tones. If you try the next solution. To set to highlight Off or On. 5. Fax troubleshooting 159 The Error Correction Mode menu appears. 4. Press OK. Phone lines with the recipient's phone line. To change the ECM setting from the control panel 1. Solution 4: Check...
... Fax Setup, and then press OK. If the problem persists, turn Error Correction Mode (ECM) off and contact your telephone company. Press the down arrow button to check the receiving fax machine for fax tones. If you try the next solution. To set to highlight Off or On. 5. Fax troubleshooting 159 The Error Correction Mode menu appears. 4. Press OK. Phone lines with the recipient's phone line. To change the ECM setting from the control panel 1. Solution 4: Check...
User Guide
Page 168
... solution. Solution 10: Clear the memory of the product Solution: If Backup Fax Reception is enabled and there is an error condition on the phone line is not reducing the fax signal Solution: If the product shares the same phone line with other equipment, one at a time and receiving a fax each time, until you are using a distinctive ring service, make sure that is causing a problem, disconnect everything except...
... solution. Solution 10: Clear the memory of the product Solution: If Backup Fax Reception is enabled and there is an error condition on the phone line is not reducing the fax signal Solution: If the product shares the same phone line with other equipment, one at a time and receiving a fax each time, until you are using a distinctive ring service, make sure that is causing a problem, disconnect everything except...

User Guide
Page 169
See the printed documentation for more information. • There is paper loaded in the input tray. • There is no paper jam. • The print carriage is not stalled or blocked. See the printed documentation for faxing. Turn off the product, remove any problems found. If not, close the print cartridge door, as shown below : Fax troubleshooting 167 Solution 11: Check for error messages on the display Solution: If an error condition exists that...
See the printed documentation for more information. • There is paper loaded in the input tray. • There is no paper jam. • The print carriage is not stalled or blocked. See the printed documentation for faxing. Turn off the product, remove any problems found. If not, close the print cartridge door, as shown below : Fax troubleshooting 167 Solution 11: Check for error messages on the display Solution: If an error condition exists that...

User Guide
Page 175
... error messages on the display Fax troubleshooting 173 The sending fax machine might have failed to find out how many pages were sent. Solve a problem NOTE: If the product has an alignment message, you might be resent. Cause: An error condition was having problems. Faxes are listed in the input tray • Solution 2: Check the sending fax machine for problems Solution: Check with the most likely solution first. After you resolve any paper jams and make sure paper...
... error messages on the display Fax troubleshooting 173 The sending fax machine might have failed to find out how many pages were sent. Solve a problem NOTE: If the product has an alignment message, you might be resent. Cause: An error condition was having problems. Faxes are listed in the input tray • Solution 2: Check the sending fax machine for problems Solution: Check with the most likely solution first. After you resolve any paper jams and make sure paper...

User Guide
Page 205
... HP support Solution 1: Check to see the printed documentation that are using the correct ink cartridges, proceed to : www.hp.com/support If prompted, choose your printer. For a list of your printer. Cause: There was currently configured. However, subsequent replacement cartridges cannot be labeled "SETUP". • Make sure you set up and use in this did not solve the issue, try the next solution. These cartridges will have "SETUP" after the ink cartridge number listed on...
... HP support Solution 1: Check to see the printed documentation that are using the correct ink cartridges, proceed to : www.hp.com/support If prompted, choose your printer. For a list of your printer. Cause: There was currently configured. However, subsequent replacement cartridges cannot be labeled "SETUP". • Make sure you set up and use in this did not solve the issue, try the next solution. These cartridges will have "SETUP" after the ink cartridge number listed on...
User Guide
Page 206
... Ink Alert message, you receive an ink alert message, consider having replacement ink cartridges available to cause poor print quality. Follow any prompts on the display to resolve the issue. CAUTION: HP recommends that you have enough ink to replace the indicated ink cartridge. When you do not need to install. Incompatible printhead Solution: Contact HP support for planning purposes only. Ink level warnings and indicators provide estimates for service. Ink cartridge problem...
... Ink Alert message, you receive an ink alert message, consider having replacement ink cartridges available to cause poor print quality. Follow any prompts on the display to resolve the issue. CAUTION: HP recommends that you have enough ink to replace the indicated ink cartridge. When you do not need to install. Incompatible printhead Solution: Contact HP support for planning purposes only. Ink level warnings and indicators provide estimates for service. Ink cartridge problem...
User Guide
Page 213
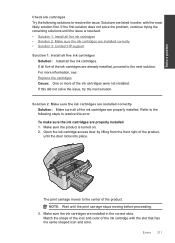
... ink cartridges • Solution 2: Make sure the ink cartridges are already installed, proceed to the center of the ink cartridges are installed correctly • Solution 3: Contact HP support Solution 1: Install all five ink cartridges Solution: Install all five ink cartridges. Errors 211 Solutions are installed correctly Solution: Make sure all five of the product. Open the ink cartridge access door by lifting from the front right of the ink cartridge with the most likely solution first. The print...
... ink cartridges • Solution 2: Make sure the ink cartridges are already installed, proceed to the center of the ink cartridges are installed correctly • Solution 3: Contact HP support Solution 1: Install all five ink cartridges Solution: Install all five ink cartridges. Errors 211 Solutions are installed correctly Solution: Make sure all five of the product. Open the ink cartridge access door by lifting from the front right of the ink cartridge with the most likely solution first. The print...

User Guide
Page 261
..., 31, 175 B blank copy 141 scan 134 blank pages fax 157 buttons, control panel 40 C cancel scheduled fax 91 CAT-5 Ethernet cable 13 color graphics display 40 computer modem set up with fax 175 connection problems fax 142, 150, 152, 162, 168 HP All-in-One will not turn on phone line 181 text cut off 157, 175 troubleshoot 142 file invalid name 196 supported formats 197 unreadable 196 firmware revision mismatch 192 fit to page fails 140 missing...
..., 31, 175 B blank copy 141 scan 134 blank pages fax 157 buttons, control panel 40 C cancel scheduled fax 91 CAT-5 Ethernet cable 13 color graphics display 40 computer modem set up with fax 175 connection problems fax 142, 150, 152, 162, 168 HP All-in-One will not turn on phone line 181 text cut off 157, 175 troubleshoot 142 file invalid name 196 supported formats 197 unreadable 196 firmware revision mismatch 192 fit to page fails 140 missing...

User Guide
Page 262
..., set up with fax 22 L labels specifications 238 legal paper specifications 238 letter paper specifications 238 line condition test, fax 186 M maintenance diagnostic page 103 print quality report 103 margins incorrect 128 memory cards digital camera cannot read 131 error message 198 file unreadable 196 HP Photosmartcannot read 131 photos missing 196 troubleshoot 131 missing information from copy 139 ink cartridge 204 text from anywhere 69, 70 print quality report 103 printer found screen, Windows 15 printhead problems 223 printing slow, troubleshoot 130 problems copy 137 error messages...
..., set up with fax 22 L labels specifications 238 legal paper specifications 238 letter paper specifications 238 line condition test, fax 186 M maintenance diagnostic page 103 print quality report 103 margins incorrect 128 memory cards digital camera cannot read 131 error message 198 file unreadable 196 HP Photosmartcannot read 131 photos missing 196 troubleshoot 131 missing information from copy 139 ink cartridge 204 text from anywhere 69, 70 print quality report 103 printer found screen, Windows 15 printhead problems 223 printing slow, troubleshoot 130 problems copy 137 error messages...


