
HP LaserJet 3015 All-in-One - User Guide
Page 92
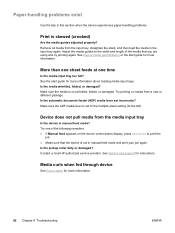
...ADF media lever is not in manual feed mode and print your job again. Contact a local HP authorized service provider. Remove all media from the input tray, straighten the stack, and then load ... the device is set incorrectly? Is the media wrinkled, folded, or damaged? Is the pickup roller dirty or damaged? See Service and support for more information. 82 Chapter 8 Troubleshooting ENWW Try printing...the job. ● Make sure that you are using and try printing again. Device does not pull media from a new or different package. Adjust the media guides to the left). Make sure the ...
...ADF media lever is not in manual feed mode and print your job again. Contact a local HP authorized service provider. Remove all media from the input tray, straighten the stack, and then load ... the device is set incorrectly? Is the media wrinkled, folded, or damaged? Is the pickup roller dirty or damaged? See Service and support for more information. 82 Chapter 8 Troubleshooting ENWW Try printing...the job. ● Make sure that you are using and try printing again. Device does not pull media from a new or different package. Adjust the media guides to the left). Make sure the ...
HP LaserJet 3015 All-in-One - User Guide
Page 96
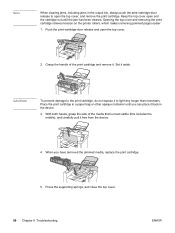
...have removed the jammed media, replace the print cartridge. 5. Grasp the handle of the media that is most visible (this includes the middle), and carefully pull it . Press the supporting springs, and close the top cover. 86 Chapter 8 Troubleshooting ENWW Note When clearing jams, including jams in the output bin,...has been cleared. Set it to open the top cover. 2. Opening the top cover and removing the print cartridge relieves tension on the printer rollers, which makes removing jammed pages easier. 1. CAUTION To prevent damage to the print cartridge, do not expose it aside.
...have removed the jammed media, replace the print cartridge. 5. Grasp the handle of the media that is most visible (this includes the middle), and carefully pull it . Press the supporting springs, and close the top cover. 86 Chapter 8 Troubleshooting ENWW Note When clearing jams, including jams in the output bin,...has been cleared. Set it to open the top cover. 2. Opening the top cover and removing the print cartridge relieves tension on the printer rollers, which makes removing jammed pages easier. 1. CAUTION To prevent damage to the print cartridge, do not expose it aside.
Service Manual
Page 76
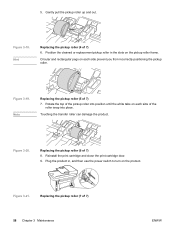
... into position until the white tabs on each side of the pickup roller into place. Figure 3-20. Figure 3-19. Reinstall the print cartridge and close the print-cartridge door. 9. Touching the transfer roller can damage the product. Gently pull the pickup roller up and out. Plug the product in the slots on the product...
... into position until the white tabs on each side of the pickup roller into place. Figure 3-20. Figure 3-19. Reinstall the print cartridge and close the print-cartridge door. 9. Touching the transfer roller can damage the product. Gently pull the pickup roller up and out. Plug the product in the slots on the product...

Service Manual
Page 148
Pull the left until the right-side hinge clears the hole in the frame assembly. Remove the following assemblies. ● Scanner assembly. Figure 5-45. Remove the .... Remove the top-cover assembly (2 of the slot in the frame assembly, and slide the top cover to the left -end hinge out of 2) Pickup roller 1. Remove the top-cover assembly (1 of 2) 3. Figure 5-46. Rotate the top-cover assembly (callout 1) away from the frame assembly (callout 2).
Pull the left until the right-side hinge clears the hole in the frame assembly. Remove the following assemblies. ● Scanner assembly. Figure 5-45. Remove the .... Remove the top-cover assembly (2 of the slot in the frame assembly, and slide the top cover to the left -end hinge out of 2) Pickup roller 1. Remove the top-cover assembly (1 of 2) 3. Figure 5-46. Rotate the top-cover assembly (callout 1) away from the frame assembly (callout 2).
Service Manual
Page 149
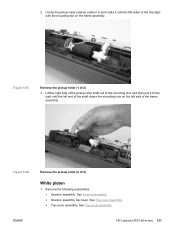
...pull it until the left end of the shaft clears the mounting hole on the left side of the clip align with the mounting slot on the frame assembly. Remove the pickup roller (1 of 2) White platen 1. See Scanner assembly ● Scanner assembly top cover. See Top-cover assembly ENWW HP LaserJet 3015... all-in-one 131 2. Unclip the pickup-roller retainer (callout 1) and rotate it to the ...
...pull it until the left end of the shaft clears the mounting hole on the left side of the clip align with the mounting slot on the frame assembly. Remove the pickup roller (1 of 2) White platen 1. See Scanner assembly ● Scanner assembly top cover. See Top-cover assembly ENWW HP LaserJet 3015... all-in-one 131 2. Unclip the pickup-roller retainer (callout 1) and rotate it to the ...
Service Manual
Page 175
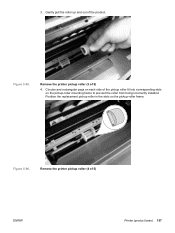
Gently pull the roller up and out of the pickup roller fit into corresponding slots on the pickup-roller mounting frame to prevent the roller from being incorrectly installed. Circular and rectangular pegs on the pickup-roller frame. Remove the printer pickup roller (3 of 5) ENWW Printer (product base) 157 3. Remove the printer pickup roller (4 of 5) 4. Figure 5-96. Position the replacement pickup roller in the slots on each side of the product. Figure 5-95.
Gently pull the roller up and out of the pickup roller fit into corresponding slots on the pickup-roller mounting frame to prevent the roller from being incorrectly installed. Circular and rectangular pegs on the pickup-roller frame. Remove the printer pickup roller (3 of 5) ENWW Printer (product base) 157 3. Remove the printer pickup roller (4 of 5) 4. Figure 5-96. Position the replacement pickup roller in the slots on each side of the product. Figure 5-95.

Service Manual
Page 177
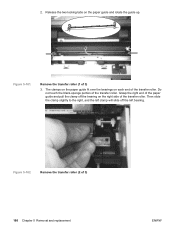
... cause print-quality problems. Be very careful not to the center of the transfer roller. Remove the media input tray (2 of the transfer roller. Remove the media input tray (3 of 3) CAUTION Transfer roller Do not touch the black-sponge portion of 3) 3. Slide the adjustable media guides (callout 1) to... break the paper guide that is not a FRU, the entire printer will have to release the media input tray, and then pull it out and away from the...
... cause print-quality problems. Be very careful not to the center of the transfer roller. Remove the media input tray (2 of the transfer roller. Remove the media input tray (3 of 3) CAUTION Transfer roller Do not touch the black-sponge portion of 3) 3. Slide the adjustable media guides (callout 1) to... break the paper guide that is not a FRU, the entire printer will have to release the media input tray, and then pull it out and away from the...
Service Manual
Page 178
... the right end of the paper guide and pull the clamp off the left bearing. Release the two locking tabs on each end of 3) 160 Chapter 5 Removal and replacement ENWW Remove the transfer roller (2 of the transfer roller. Figure 5-101. Figure 5-102. Then slide the clamp slightly to the right, and the left... paper guide fit over the bearings on the paper guide and rotate the guide up. 2. Do not touch the black-sponge portion of the transfer roller.
... the right end of the paper guide and pull the clamp off the left bearing. Release the two locking tabs on each end of 3) 160 Chapter 5 Removal and replacement ENWW Remove the transfer roller (2 of the transfer roller. Figure 5-101. Figure 5-102. Then slide the clamp slightly to the right, and the left... paper guide fit over the bearings on the paper guide and rotate the guide up. 2. Do not touch the black-sponge portion of the transfer roller.


